Issues of the hull:
- The turret is sitting on the bullet protection ring (the ring is wrong placed).
You need to cut the ring of and make a new one.
- Fuel tanks are wrong shaped and need a reshape
- The dynamic protection on the plate on the hull front are mismatched and wrong placed (the middle part)
- Zvezda represents a welded turret T-90 from 2004+ which have a reinforcement plate on drivers roof, this reinforcemt is missing. All the stuff on the roofplate need to be removed and newly done after adding the reinforcemt.
- The engine deck plate is wrong shaped, its not flat on the real tank, it's lifted a bit.
- There are also some little issues here and there,some detail simplifications
Turret:
- The gun is wrong.Zvezda gives the 2A46M gun (similar to the T-72). That's ok for first T-90 built in 90ies, but not for the weldet turret. Here we need a newer 2A46M-5, those have the front heatprotection cover shorten (due to the slack control system mounted on the gun head)
- Utility boxoes seem to be a little to high placed
A loooooot has to be done to make it look correct, anyway its a good kit for Zvezda and all problems can be solved.
Яusso-Soviэt Forum
Russian or Soviet vehicles/armor modeling forum.
Russian or Soviet vehicles/armor modeling forum.
Hosted by Darren Baker, Jacques Duquette
REVIEW
Zvezda Russian T-90 MBT
ejasonk

Joined: October 14, 2007
KitMaker: 314 posts
Armorama: 226 posts

Posted: Monday, January 16, 2012 - 01:31 AM UTC
clay_cliff

Joined: April 07, 2008
KitMaker: 375 posts
Armorama: 371 posts

Posted: Monday, January 16, 2012 - 04:50 AM UTC
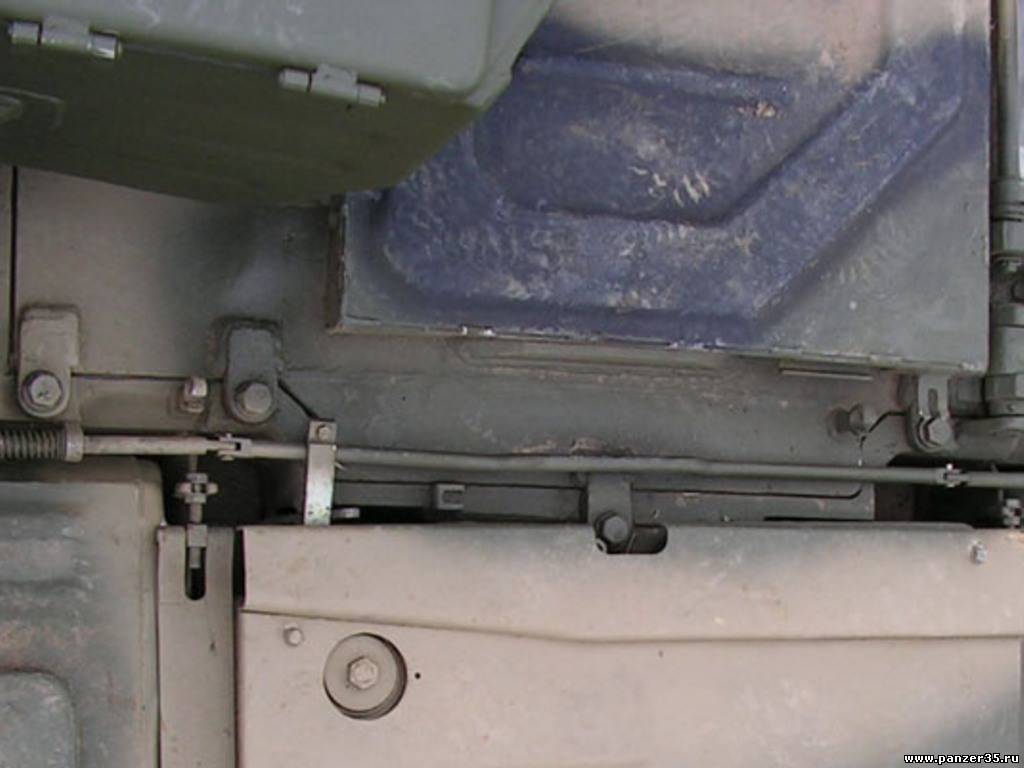
As I noted on the Zvezda's T-90 WIP on this forum, They (Zvezda) missed this detail:



lukiftian

Joined: March 12, 2010
KitMaker: 791 posts
Armorama: 592 posts

Posted: Monday, January 16, 2012 - 04:56 AM UTC
Zvezda has been doing progressively better kits for a long time, and it should be remembered that even their late 90s kits were a step forward from what came before. Where Zvezda has shone lately is in their ship and aircraft kits, and where they have always been strong is in their superb figure sets. That this kit surpasses those standards is not a surprise.
Campeador

Joined: September 25, 2007
KitMaker: 28 posts
Armorama: 27 posts

Posted: Monday, January 16, 2012 - 06:18 AM UTC
Those issues with the missing/wrong details are not a big deal IMHO. Same with the fuel tanks, they are optional.
The most noticable error with this kit are the oversized side skirts. They are the reason for the hull height problem. When you compare the model with the real thing, you will notice that the hull profile is somewhat off. It would be appreciated if someone could compare Zvezda's side skirts with the Tamiya T-72 model.

Besides the issues I think it's still a great kit and a big step forward for Zvezda.
The most noticable error with this kit are the oversized side skirts. They are the reason for the hull height problem. When you compare the model with the real thing, you will notice that the hull profile is somewhat off. It would be appreciated if someone could compare Zvezda's side skirts with the Tamiya T-72 model.

Besides the issues I think it's still a great kit and a big step forward for Zvezda.

afv_rob

Joined: October 09, 2005
KitMaker: 2,556 posts
Armorama: 2,199 posts

Posted: Monday, January 16, 2012 - 06:56 AM UTC
Quoted Text
Issues of the hull:
- The turret is sitting on the bullet protection ring (the ring is wrong placed).
You need to cut the ring of and make a new one.
- Fuel tanks are wrong shaped and need a reshape
- The dynamic protection on the plate on the hull front are mismatched and wrong placed (the middle part)
- Zvezda represents a welded turret T-90 from 2004+ which have a reinforcement plate on drivers roof, this reinforcemt is missing. All the stuff on the roofplate need to be removed and newly done after adding the reinforcemt.
- The engine deck plate is wrong shaped, its not flat on the real tank, it's lifted a bit.
- There are also some little issues here and there,some detail simplifications
Turret:
- The gun is wrong.Zvezda gives the 2A46M gun (similar to the T-72). That's ok for first T-90 built in 90ies, but not for the weldet turret. Here we need a newer 2A46M-5, those have the front heatprotection cover shorten (due to the slack control system mounted on the gun head)
- Utility boxoes seem to be a little to high placed
A loooooot has to be done to make it look correct, anyway its a good kit for Zvezda and all problems can be solved.
I was going to write a similar list but didn't have time in the end.
There is another issue and that is the fuel tanks seem to sit too high. On the real T-90 the fuel tanks should be in line with the top edge of the glacis plate. On Zvezda's model however the fuel tanks are way higher. I don't know if this means they moulded the angle of the front glacis wrong or the fuel tanks are too high. Of course one could sand down the fuel tanks but that would mean they then sit too low compared to the rear deck.

afv_rob

Joined: October 09, 2005
KitMaker: 2,556 posts
Armorama: 2,199 posts

Posted: Monday, January 16, 2012 - 06:58 AM UTC
Quoted Text
As I noted on the Zvezda's T-90 WIP on this forum, They (Zvezda) missed this detail:

Yes I agree. In my opinion its best to totally remove the entire exhaust section and build the hull extension with plastic card.
Removed by original poster on 01/16/12 - 22:48:15 (GMT).
Tito73

Joined: January 08, 2012
KitMaker: 6 posts
Armorama: 5 posts

Posted: Monday, January 16, 2012 - 04:23 PM UTC
Acabo de recibir el kit, e inmediatamente quedé impresionado por el nivel de detalle en las piezas y la calidad del plástico, fuera de la fortaleza de la caja y embalaje--QUÉ TAL MEJORA!!. Fuera que tenga algunos pequeños errores (los cuales los puedo encontrar fácilmente en los kits de Tamiya--por algo ya existen paquetes "aftermarkets" para solucionárselos a ellos también), me parece un muy buen exponente de lo que la industria del hobby puede ofrecer dentro de una positiva relación costo-precio. O sea, eso es trasladar valor para el consumidor.
Felicitaciones Zvezda...y a tí Karl por la excelente revisión.
Felicitaciones Zvezda...y a tí Karl por la excelente revisión.
clay_cliff

Joined: April 07, 2008
KitMaker: 375 posts
Armorama: 371 posts

Posted: Monday, January 16, 2012 - 05:50 PM UTC
No voy a negar que se ve bien y agradezco el esfuerzo de quienes lo hicieron, pero dada la larga espera, creo que merecíamos algo "mejor".

Spiderfrommars

Joined: July 13, 2010
KitMaker: 3,845 posts
Armorama: 3,543 posts

Posted: Monday, January 16, 2012 - 07:15 PM UTC
Quoted Text
No voy a negar que se ve bien y agradezco el esfuerzo de quienes lo hicieron, pero dada la larga espera, creo que merecíamos algo "mejor".
Well, "siempre se puede ir mas"

Do you remember how wrong in dimensions and shapes was their T-72? And what about their almost totally invented T-80?
Yes,the kit would have been better, because ALL the latest releases in my opinion could be better than actually they are.
We used to have few pics of our subjects, nowadays we have plenty of them. That it means we are far more demanding than in the past (maybe too much). The difference is that now we are discussing about the rendition of some details, some years ago we talked about how big were the dimensional mistakes and how incorrect were the shapes.
So probably this isn't the "definitive" T-90 yet, but indubitably is an HUGE step forward
Cheers
Posted: Monday, January 16, 2012 - 11:47 PM UTC
Quoted Text
Acabo de recibir el kit, e inmediatamente quedé impresionado por el nivel de detalle en las piezas y la calidad del plástico, fuera de la fortaleza de la caja y embalaje--QUÉ TAL MEJORA!!. Fuera que tenga algunos pequeños errores (los cuales los puedo encontrar fácilmente en los kits de Tamiya--por algo ya existen paquetes "aftermarkets" para solucionárselos a ellos también), me parece un muy buen exponente de lo que la industria del hobby puede ofrecer dentro de una positiva relación costo-precio. O sea, eso es trasladar valor para el consumidor.
Felicitaciones Zvezda...y a tí Karl por la excelente revisión.
Muchas gracias Ernesto
 !
!clay_cliff

Joined: April 07, 2008
KitMaker: 375 posts
Armorama: 371 posts

Posted: Tuesday, January 17, 2012 - 03:27 PM UTC
Sorry, my bad, I forgot to thank the review. What about a comparison to Tamiya's T-72? It's a T-72A, the comparison will be the dimensions only... Now that I mention it, There's not even a T-72 comparison, I know that the old DML T-72 series are almost fictitious, but some modellers may want to see the differences as DML kits are now available under the Zvezda label, some new modelers may think they are as good as they new release (T-90), it won't be a nice surprise to see they are not. Best regards.
José.
José.

bison126

Joined: June 10, 2004
KitMaker: 5,329 posts
Armorama: 5,204 posts

Posted: Thursday, January 19, 2012 - 04:29 AM UTC
Quoted Text
A loooooot has to be done to make it look correct
Sorry but I disagree. OK you will have to do some extra work to get a perfectly accurate T-90 but to me it's already looking good.
Don't forget the previous offerings, none were perfect either.
I think we're getting spoilt and I second Mauro's words, today we are bashing a kit because of soft detail rendition or misplaced bolts whereas years ago the point was wrong shapes or totally off dimensioned models.
I for one am happy to see this one eventually on the shelves. I'll buy and build one and that will save a lot of euros that the Miniarm AM sets would have cost me.
Be sure I'll be pleased to look at your builds so I can improve mine when time comes.
A great thank you to Karl for this blog review.
Olivier
SEDimmick

Joined: March 15, 2002
KitMaker: 1,745 posts
Armorama: 1,483 posts

Posted: Thursday, January 19, 2012 - 05:01 AM UTC
Quoted Text
Quoted Text
A loooooot has to be done to make it look correct
Sorry but I disagree. OK you will have to do some extra work to get a perfectly accurate T-90 but to me it's already looking good.
Don't forget the previous offerings, none were perfect either.
Has there ever been a "Perfect" kit anyways? (my vote is for the Tamiya P-47D, but its even missing stuff on it)...I also agree that far too many people slag off on kit releases, especially from certain manufactures.
Seems like Tamiya gets a hall pass whenever a new kit comes out and Trumpeter,HobbyBoss, and Great Wall get the worst of it, with people calling out that they only thing they do is copy other manufactures stuff. I know those brands have copied stuff years ago, but for the most part they've done their own research (which may or may not be that good)
How is that any different then say DML spending $$$ on a scratchbuilt Scud missile launcher that a pretty well known modeler did 20+ years ago?
Posted: Friday, January 20, 2012 - 04:37 AM UTC
I have to agree with Scott and Olivier here. There is only one or two parts on the kit that, accuracy wise, I have been dissapointed with and I reckon they will be sorted with some aftermarket etch.
Anyway, I have been making good progress and as I said earlier I would update with some pics every so often. I suggest checking out Christian's build for more detail on each step:
Christian's Build
I have, momentarily, skipped ahead of Christian to the tracks. The construction and fitting of which are novel and I certainly haven't seen anything like it before.
Here are the stages the instructions have you go in:
Stage 21 (No picture): Fit the return rollers.
Stage 23 (Picture below): Fit the upper and lower hulls:
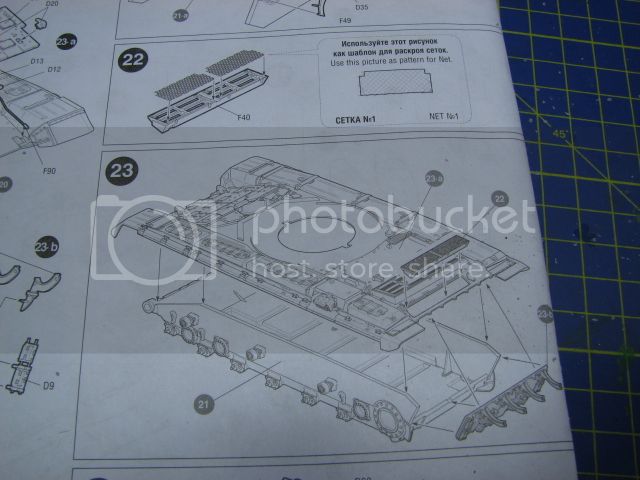
Stage 24 (No picture): Fit all running gear except wheels.
Stage 25 (Picture below): Fit half wheels (wheels are two parts, stage 25 has you install one half on each suspension arm) and half sprocket.
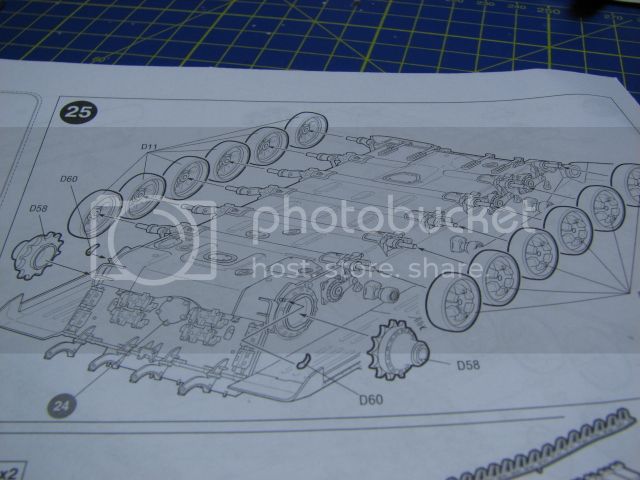
Stage 26 (No Picture): Fit teeth to upper track runs.
Stage 27 (Picture Below): Fit half idler, make rest of the track runs in sub-assemblies before fitting them.
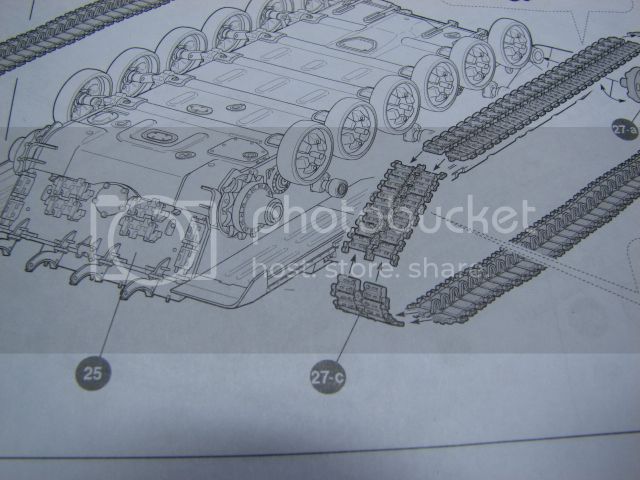
If you have the kit you'll know the stages I have outlined. I've decided not to follow the instructions. The main reason for this is that with the upper hull attached you have reduced access to the running gear and as far as I can see it would be fiddly at best to fit the upper length of track, never mind trying to fit the other pieces of track to halves of the running gear (the other halves of the wheels, idlers and sprockets are attached in Stage 29).
If you follow the instructions you will also end up having to paint the running gear and tracks in-situ which will be quite fiddly. I don't like doing that, I prefer to paint the tracks and running gear seperately.
Don't get me wrong, following the instructions will be fine, I'm just suggesting and showing another way if people are interested.
So, here's what I'm doing. I stopped following the instructions at stage 23, I did not mate the upper and lower hulls. I also went ahead and completed the running gear assembly including wheels. I attached the sprockets and idlers to help get the track construction correct:
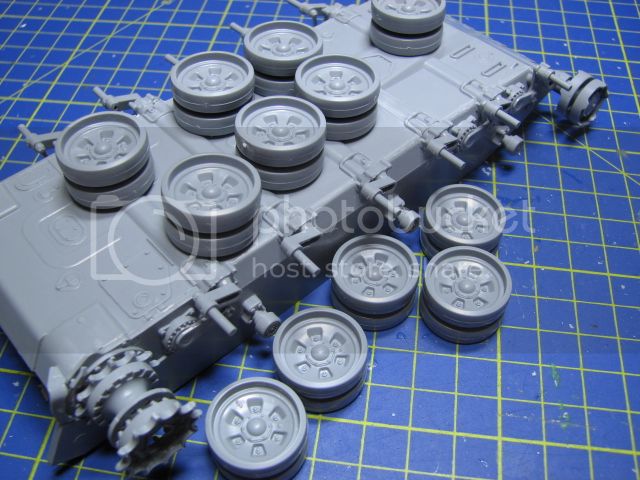
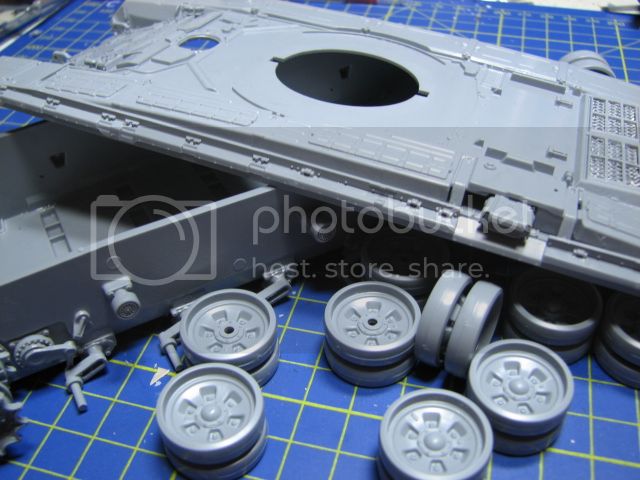
Track construction is very easy, they runs build up nicely with the teeth. The long upper runs are shaped to conform to the return rollers:
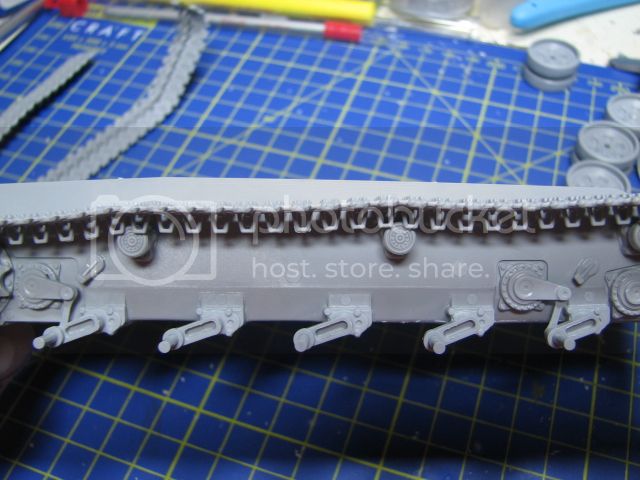
This gives you the exactly place the other track bits should be attached and you can then glue them together- just be careful not to glue them to the running gear just yet- I had to un-stick a part after doing exactly that!
You end up with this:
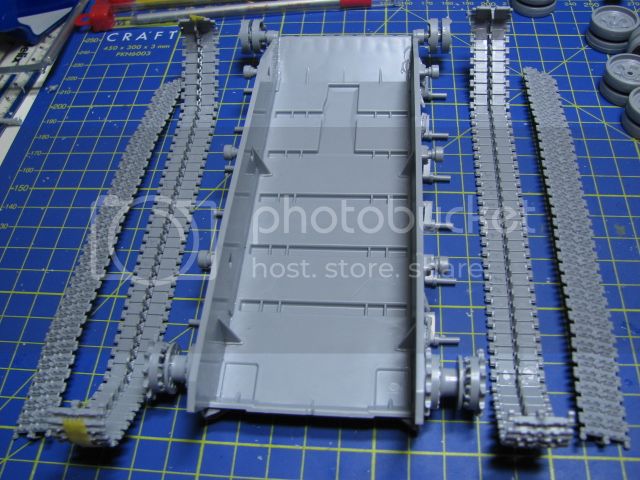
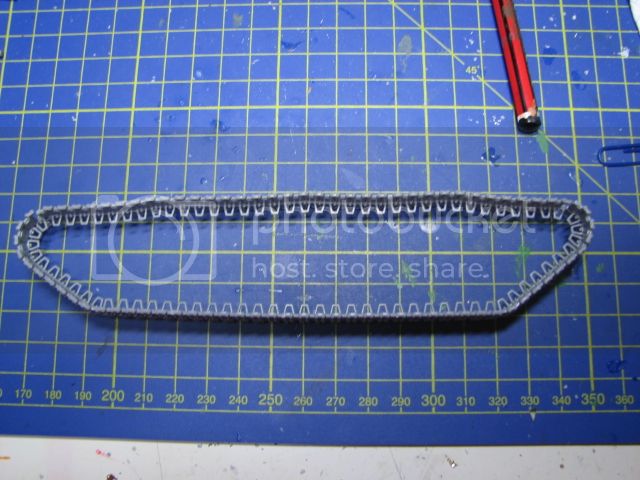
There is enough pliability in the tracks that with a bit of tape they sit down perfectly so I now have four pieces of track which I can paint seperately. The attachment areas for the lower and upper runs will also be fairly well hidden by the upper hull and sideskirts.
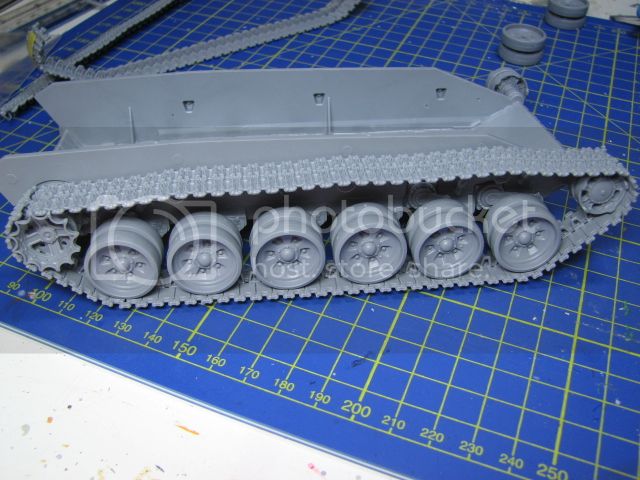
So now I'm going to mask off the lower hull so I can paint the hull sides and then attach the painted wheels and tracks before continuing with the rest of the build.
I'll post some more progress as I go.
Thanks for reading.
-Karl187-
Anyway, I have been making good progress and as I said earlier I would update with some pics every so often. I suggest checking out Christian's build for more detail on each step:
Christian's Build
I have, momentarily, skipped ahead of Christian to the tracks. The construction and fitting of which are novel and I certainly haven't seen anything like it before.
Here are the stages the instructions have you go in:
Stage 21 (No picture): Fit the return rollers.
Stage 23 (Picture below): Fit the upper and lower hulls:

Stage 24 (No picture): Fit all running gear except wheels.
Stage 25 (Picture below): Fit half wheels (wheels are two parts, stage 25 has you install one half on each suspension arm) and half sprocket.

Stage 26 (No Picture): Fit teeth to upper track runs.
Stage 27 (Picture Below): Fit half idler, make rest of the track runs in sub-assemblies before fitting them.

If you have the kit you'll know the stages I have outlined. I've decided not to follow the instructions. The main reason for this is that with the upper hull attached you have reduced access to the running gear and as far as I can see it would be fiddly at best to fit the upper length of track, never mind trying to fit the other pieces of track to halves of the running gear (the other halves of the wheels, idlers and sprockets are attached in Stage 29).
If you follow the instructions you will also end up having to paint the running gear and tracks in-situ which will be quite fiddly. I don't like doing that, I prefer to paint the tracks and running gear seperately.
Don't get me wrong, following the instructions will be fine, I'm just suggesting and showing another way if people are interested.
So, here's what I'm doing. I stopped following the instructions at stage 23, I did not mate the upper and lower hulls. I also went ahead and completed the running gear assembly including wheels. I attached the sprockets and idlers to help get the track construction correct:


Track construction is very easy, they runs build up nicely with the teeth. The long upper runs are shaped to conform to the return rollers:

This gives you the exactly place the other track bits should be attached and you can then glue them together- just be careful not to glue them to the running gear just yet- I had to un-stick a part after doing exactly that!
You end up with this:


There is enough pliability in the tracks that with a bit of tape they sit down perfectly so I now have four pieces of track which I can paint seperately. The attachment areas for the lower and upper runs will also be fairly well hidden by the upper hull and sideskirts.

So now I'm going to mask off the lower hull so I can paint the hull sides and then attach the painted wheels and tracks before continuing with the rest of the build.
I'll post some more progress as I go.
Thanks for reading.
-Karl187-
hugohuertas

Joined: January 26, 2007
KitMaker: 1,024 posts
Armorama: 1,013 posts

Posted: Friday, January 20, 2012 - 09:57 AM UTC
A question for all T-90 experts here
From your pics I feel that the track guide horns are quite "tall", am I wrong about this?
Is this really accurate?
Thanks, and great build!!!
From your pics I feel that the track guide horns are quite "tall", am I wrong about this?
Is this really accurate?
Thanks, and great build!!!
Spades

Joined: February 08, 2003
KitMaker: 776 posts
Armorama: 477 posts

Posted: Friday, January 20, 2012 - 11:14 AM UTC
Quoted Text
Issues of the hull:
- The turret is sitting on the bullet protection ring (the ring is wrong placed).
You need to cut the ring of and make a new one.
- Fuel tanks are wrong shaped and need a reshape
- The dynamic protection on the plate on the hull front are mismatched and wrong placed (the middle part)
- Zvezda represents a welded turret T-90 from 2004+ which have a reinforcement plate on drivers roof, this reinforcemt is missing. All the stuff on the roofplate need to be removed and newly done after adding the reinforcemt.
- The engine deck plate is wrong shaped, its not flat on the real tank, it's lifted a bit.
- There are also some little issues here and there,some detail simplifications
Turret:
- The gun is wrong.Zvezda gives the 2A46M gun (similar to the T-72). That's ok for first T-90 built in 90ies, but not for the weldet turret. Here we need a newer 2A46M-5, those have the front heatprotection cover shorten (due to the slack control system mounted on the gun head)
- Utility boxoes seem to be a little to high placed
A loooooot has to be done to make it look correct, anyway its a good kit for Zvezda and all problems can be solved.
ARENT WE ALL INTO THIS FOR THE ENJOYMENT ? I understand people want realism. But at some point, this takes the fun out of it.

Warsawpact

Joined: September 25, 2006
KitMaker: 321 posts
Armorama: 273 posts

Posted: Friday, January 20, 2012 - 11:26 AM UTC
Great solid progress Karl! Thanks for sharing whit us on your build.
Good tips about the tracks Karl. Perfect for me as i have yet to start whit the tracks and i was just about to fit the upper chassie to the lower part. Didn't notice that the top chassie would affect the track "installation".
Looking forward to your next update
Good tips about the tracks Karl. Perfect for me as i have yet to start whit the tracks and i was just about to fit the upper chassie to the lower part. Didn't notice that the top chassie would affect the track "installation".
Looking forward to your next update


Spiderfrommars

Joined: July 13, 2010
KitMaker: 3,845 posts
Armorama: 3,543 posts

Posted: Friday, January 20, 2012 - 12:18 PM UTC
Christian and karl
Your build logs are incredibly useful. I'll follow your steps for sure!
Your build logs are incredibly useful. I'll follow your steps for sure!

afv_rob

Joined: October 09, 2005
KitMaker: 2,556 posts
Armorama: 2,199 posts

Posted: Saturday, January 21, 2012 - 12:13 AM UTC
Quoted Text
ARENT WE ALL INTO THIS FOR THE ENJOYMENT ? I understand people want realism. But at some point, this takes the fun out of it.
Well you have to understand some of us find enjoyment in making as accurate a model as possible.
I'll never criticise those who wish to have fun building the kit out of the box, indeed I'm currently doing exactly that with the Zvezda kit. But I personally see now harm in pointing out errors and problems for those who are interested. From my point of view theres certainly things wrong with the kit, but I've always tried to give a balanced argument, indeed I think this is a great leap forward and still presents the best model on the market of a modern Russian MBT.

afv_rob

Joined: October 09, 2005
KitMaker: 2,556 posts
Armorama: 2,199 posts

Posted: Saturday, January 21, 2012 - 12:15 AM UTC
Excellent work as well Karl. The kit tracks are stunningly good, I think i'll even go so far to say the best tracks I've encountered in any kit.
Posted: Saturday, January 21, 2012 - 12:34 AM UTC
Quoted Text
Excellent work as well Karl. The kit tracks are stunningly good, I think i'll even go so far to say the best tracks I've encountered in any kit.
Thanks Rob, I agree with you about the tracks- they are very good and easy to use aswell. There are what appear to be ejector pin marks on the inside of some, but strangely, they appear to have been filled and only require a bit of sanding, hence virtually no clean up prior to assembling the tracks. Plus they are quite flexible so its a doddle to get them to sit correctly with a bit of liquid poly and tape.
Posted: Sunday, January 22, 2012 - 04:23 AM UTC
Over on Christian's thread we've been talking about colors for the T-90. I'm going for the tri-tonal scheme. There are a few different hues of green that could be used for this, and indeed there are a couple of different hues of the tan color aswell. However, I wanted my scheme to be as close to this as possible:


The paints I thought would suit this scheme were Tamiya Deck Tan, NATO Black and Olive Green. The green I wasn't sure about though. Tamiya Khaki Drab looked to be a good match too, but I thought it might be just a bit too brown.
However, it wasn't until I actually sprayed the colors that I began to have doubts about Olive Green. I sprayed the entire lower hull and wheels with it, but it looked too bright compared to the pictures.
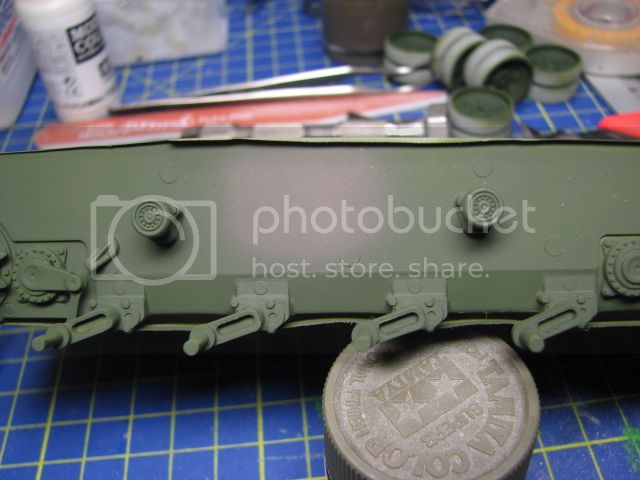
Even spraying some Khaki Drab on didn't totally convince me. It wasn't until I had the tan and the greens side by side that it became apparent Khaki Drab was the better match:
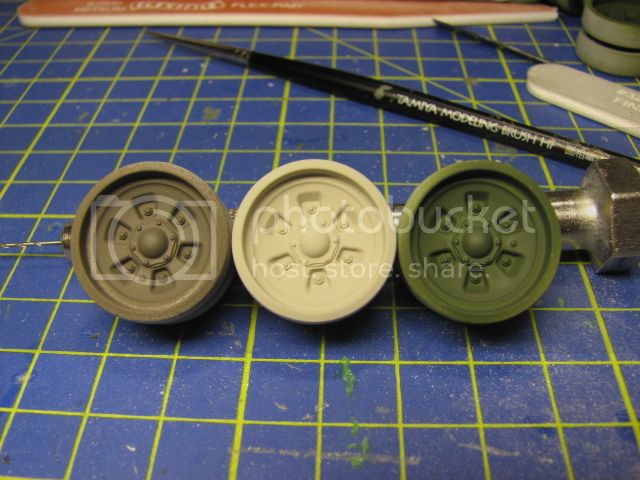
So, now thats sorted I can get the hull re-painted Khaki Drab and sort the wheels. I'll have pictures when I get some more painting done.
In addition to painting I also wired up the Shtora devices using some lead wire:
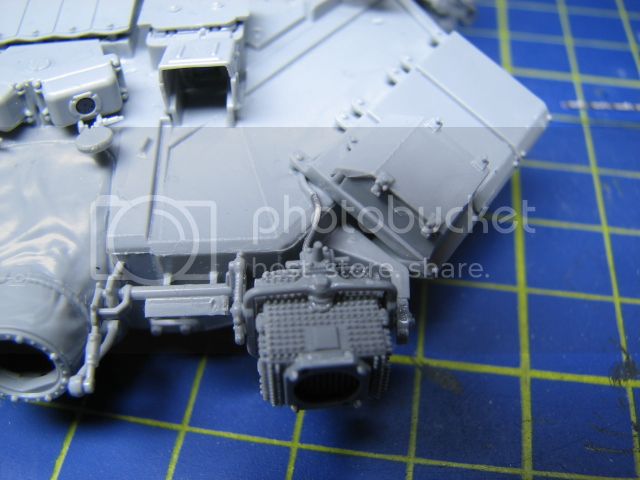
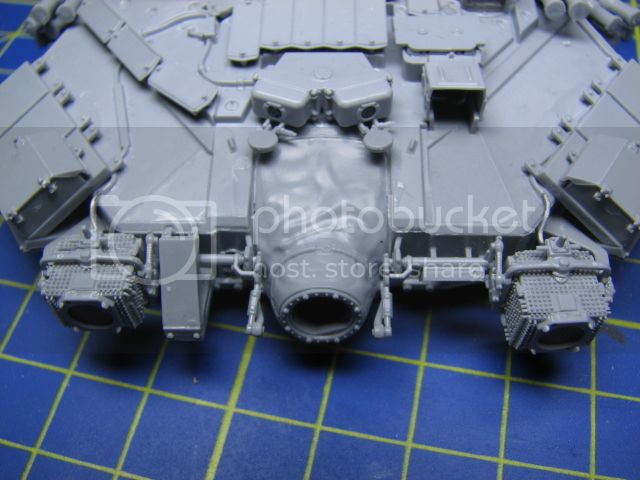
Thanks for reading.
-Karl187-


The paints I thought would suit this scheme were Tamiya Deck Tan, NATO Black and Olive Green. The green I wasn't sure about though. Tamiya Khaki Drab looked to be a good match too, but I thought it might be just a bit too brown.
However, it wasn't until I actually sprayed the colors that I began to have doubts about Olive Green. I sprayed the entire lower hull and wheels with it, but it looked too bright compared to the pictures.

Even spraying some Khaki Drab on didn't totally convince me. It wasn't until I had the tan and the greens side by side that it became apparent Khaki Drab was the better match:

So, now thats sorted I can get the hull re-painted Khaki Drab and sort the wheels. I'll have pictures when I get some more painting done.
In addition to painting I also wired up the Shtora devices using some lead wire:


Thanks for reading.
-Karl187-
barron

Joined: December 01, 2001
KitMaker: 666 posts
Armorama: 598 posts

Posted: Sunday, January 22, 2012 - 04:37 AM UTC
This looks like a great kit. I have been enjoying your build Karl and thank you for it. I used to build for shows and to compete and I got so burnt out I had to leave modeling all together for a while. I am slowly getting back into it now and am amazed of the kit selection that we have now. Kits are 10 times better now than they were when I got out of it in 1996. 


jointhepit

Joined: May 14, 2006
KitMaker: 3,829 posts
Armorama: 881 posts

Posted: Sunday, January 22, 2012 - 05:27 AM UTC
just got mine (in fact 2 of them), looked in the box, and Zvesda has improved a lot, seems there are some little thing to fiddle with, and will be looking out for the "experts" builds to get the second one "right", in the mean time I'll have fun building the OTTB version :-)
greetz
greetz

 |


