Яusso-Soviэt Forum
Russian or Soviet vehicles/armor modeling forum.
REVIEW
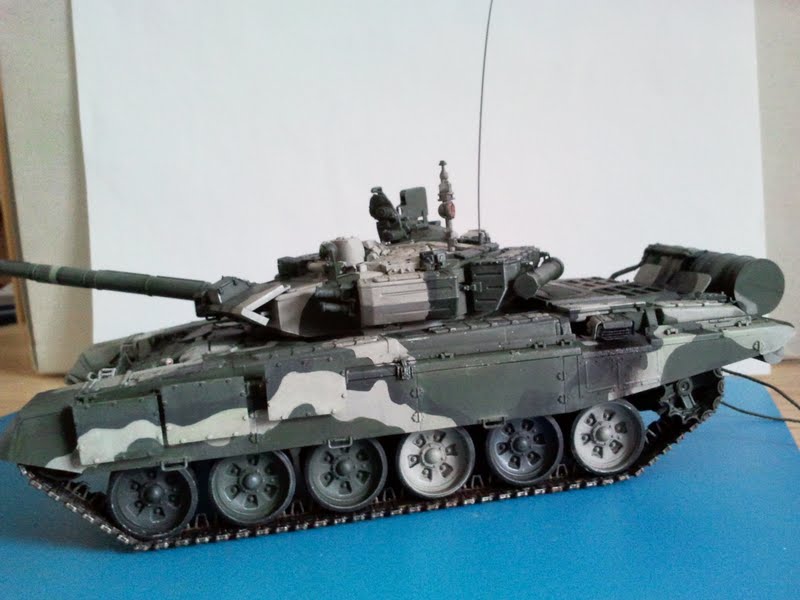
Zvezda Russian T-90 MBT
Spiderfrommars
Visit this Community
Milano, Italy
Joined: July 13, 2010
KitMaker: 3,845 posts
Armorama: 3,543 posts
Posted: Thursday, February 23, 2012 - 06:34 AM UTC

Quoted Text


Mauro- She is a handsome beast isn't she? !


Yes. It isn't as SEXY as a T-55 but it looks attractive indeed

Anyway, as usual you're doing an incredibly good paint job
I really like it and i think that it'll get many inspirations from you when I tackle my "Vladimir"

meaty_hellhound
Visit this Community
Alberta, Canada
Joined: July 23, 2010
KitMaker: 786 posts
Armorama: 753 posts
Posted: Thursday, February 23, 2012 - 01:36 PM UTC
great work on the project and sorry to hear that your wonderful thread is too popular for photobucket LOL. it will reset at the beginning of each month so everyone checking this out can get up to date in a few days time.

i like how you have a hard edge camo as i have yet to see any T-90s with anything other than a hard edge or a really tight feathered edge. i have seen some others working on their models and one guy had a really soft feathered camo that just looked off, like it was a WW2 panzer.

i got my kit this week... happy as a kid on christmas morning. all the sprues look well cast and no anomalies in the box. keep up the great job Karl. cheers, bd.
Karl187
#284
Visit this Community
Northern Ireland, United Kingdom
Joined: October 04, 2006
KitMaker: 3,094 posts
Armorama: 2,942 posts
Posted: Thursday, February 23, 2012 - 11:07 PM UTC
Mark- Thanks bud but don't worry if you did freehand it, as long as you are happy with it thats all that matters!

Mauro- glad I could give you some inspiration! I have to get a T-55 done at some point. I'm thinking Tamiya's new Enigma might be a good build, I haven't done a big T model in a while now.

Bruce- Yes the hard edge seemed the way to go as I could only find one example in a green/tan two-tone that looked soft edged. All the tan/khaki/black schemes are very tight edged. Cheers mate!

Karl187
#284
Visit this Community
Northern Ireland, United Kingdom
Joined: October 04, 2006
KitMaker: 3,094 posts
Armorama: 2,942 posts
Posted: Saturday, February 25, 2012 - 06:07 AM UTC
Some more work on the figures:


This is still early days for these figures but the main base colors have been blocked in. Paints are Vallejo unless noted otherwise-

Gunner Figure:
Cap- Black Grey
Cap Fur Lining- London Grey
Face & Hands- Andrea Flesh Base
Jumper- Andrea Russian Khaki
Jacket & Trousers- Khaki
Jacket Fur Lining- London Grey
Belt- Andrea Dark Brown Leather
Belt Buckle- Mr. Metal Color Brass
Boots- Black Grey

The jacket and trousers of this figure will be finished in Russian Flora camouflage.

Commander/Officer Figure:
Cap- Black Grey
Cap Fur Lining- Slate Grey
Face- Andrea Flesh Base
Hair- German Camouflage Black Brown
Winter Jacket- Old Wood
Winter Jacket Fur- Slate Grey
Standard Jacket & Trousers- Khaki
Jumper- Russian Khaki
Boots- Black Grey

The Officer figure will have Flora camouflage jacket and trousers but his overcoat will be in Tan, a color used in Afghanistan and the First Chechen War, the jacket will be older than the Flora uniform and so the khaki tone is altered slightly to Old Wood instead of Khaki and the fur collar to Slate Grey instead of London Grey.

Both figures will also have an AKS-74U close by- I'm rigging slings up for those now.

I'm wondering would anyone be interested in a feature article on the website about painting modern Russian tank-crew and/or modern Russian soldiers?

I also have been working on the base, the sign and the overhead power cables and I'll be posting some progress on those soon. The T-90 itself is getting a break to dry before weathering continues.

Thanks for reading.

-KARL187-


Karl187
#284
Visit this Community
Northern Ireland, United Kingdom
Joined: October 04, 2006
KitMaker: 3,094 posts
Armorama: 2,942 posts
Posted: Friday, March 02, 2012 - 04:47 AM UTC
So guys, my apologies for not having an update until now. I had to get the tank ready quickly to go into Scale Military Modeller International. This presented a problem for me because the article required the tank on its own, not in a dio. Hence my weathering is going to be a little weird but I'll explain on the way.

I added streaking and grime using AK Streaking Grime and Kursk Earth:


It was just after finishing this particular stage that I got word to prepare the tank for an article on its own. I had originally wanted to experiment with a finish that didn't really very much on pigments because I'm kind of bored with them at the moment and wanted to try something a bit different. But the finish I wanted to try would tie it into a dio so in order to compose the magazine shots I simply used pigments, four colors to be precise and put on in the usual way. I used a few references to find out where the most dirt would accumulate and (unsurprisingly) it was the sides, front, rear and the front top of the turret, presumably where the crew would be walking about. So here we are:


This finish is not final. Nearly all of the pigments will now be stripped off because, as I said, I'm a bit bored with them at the minute and want to try something different. I'll explain it all when I get the pigments stripped and get stuck in...again!

Bits and pieces of the dio are coming together aswell including the Telegraph pole which had a triple dose of the hairspray technique!

Thanks for reading.

-KARL187-

tonyrocky
Visit this Community
Bayern, Germany
Joined: March 03, 2012
KitMaker: 4 posts
Armorama: 3 posts
Posted: Friday, March 02, 2012 - 11:10 PM UTC
Hey Karl!
Really like your T-90. Looking forward to see more from it :-) I read your Topic from the beginning and i desided to get my hands on this kit. Here some Pictures from my T-90 im working on.
Still lot of work to do here, but i hope you like it!
Karl187
#284
Visit this Community
Northern Ireland, United Kingdom
Joined: October 04, 2006
KitMaker: 3,094 posts
Armorama: 2,942 posts
Posted: Friday, March 02, 2012 - 11:20 PM UTC
Tony, thanks a lot and thanks for posting your pictures. Your paint scheme is awesome, truly nice work on it. Keep posting your progress on it and good luck with it !
Wittmann98_VN
Visit this Community
Hanoi, Vietnam
Joined: November 06, 2011
KitMaker: 53 posts
Armorama: 52 posts
Posted: Saturday, March 03, 2012 - 06:31 PM UTC
Hello, I like your T-90 very much. What a great work!!
I think the top of the tank is a little bit dirty (too much compare to the sides).
But it's still wonderful! Good job Karl.
flugwuzzi
Visit this Community
Lower Austria, Austria
Joined: November 02, 2007
KitMaker: 633 posts
Armorama: 599 posts
Posted: Saturday, March 03, 2012 - 08:54 PM UTC
Karl, your T-90 build is excellent and its always a pleasure to follow your updates.
Your weathering is great an makes the tank look like the real thing!

Thanks for sharing your knowledge and pictures with us.

cheers
Walter
Karl187
#284
Visit this Community
Northern Ireland, United Kingdom
Joined: October 04, 2006
KitMaker: 3,094 posts
Armorama: 2,942 posts
Posted: Sunday, March 04, 2012 - 05:53 AM UTC
Mai- I'm glad you like the build. I agree with you about the pigments on the turret being a bit too heavy- I have stripped much of the pigments off now- tell me what you think .

Walter- Good to hear from you mate. I appreciate your comments- I have stripped some of the weathering off now- hope you still like it !

So, as I said above, I have stripped the pigments off. However, I haven't stripped them off fully. I've done something I like to call 'pigment grinding'.

I kind of stumbled across this effect while working on a Panzer IV- I had applied rust pigments much too heavily on certain areas and I wanted to get them off. I got some thinner and a brush and began to scrub at them but I noticed if I didn't scrub too hard some of the pigments stayed on the model and gave a very pleasing effect:


Basically what happend is some of the pigments (about 75% I'd say) was removed (a cotton bud is useful to take off the excess) but some was left on- not entirely removing the pigment effect but toning it down somewhat.

Unfortunately the Panzer IV is now in several pieces in the box of shame after a later mis-hap!

However, I thought I would try this effect on the T-90 to see if it could produce a more subtle dusty effect.

Here's the result on one particular area:

Before Pigment Grinding:


After Pigment Grinding:


As you can see the dusty effect created by thge pigments is still very much there but it is toned down when compared to the previous picture. This was repeated on the rest of the model. As long as you leave a decent amount of time for prior enamel or oil based weathering to dry the thinner used to grind the pigments shouldn't affec these stages all that much- and you can always re-apply if it does! I also removed the oil/fuel staining at this point- I will be re-applying this later.


So right now I'm leaving the model to dry for a day or two while I do a bit of work on the base. As for the tank itself I plan to use some AK products and plaster to add a bit of mud here and there.

Thanks for reading and taking the time to have a look.

-KARL187-


Spiderfrommars
Visit this Community
Milano, Italy
Joined: July 13, 2010
KitMaker: 3,845 posts
Armorama: 3,543 posts
Posted: Sunday, March 04, 2012 - 07:00 AM UTC
Great job Karl

Thanks for sharing the tip about the pigments
Brobru
Visit this Community
Warszawa, Poland
Joined: October 10, 2011
KitMaker: 95 posts
Armorama: 86 posts
Posted: Sunday, March 04, 2012 - 08:58 AM UTC
Weathering starts to look simply outstanding! Great job and nice effect with this Pigmetn Grinding!
BBD468
Visit this Community
Texas, United States
Joined: March 08, 2010
KitMaker: 2,465 posts
Armorama: 2,383 posts
Posted: Sunday, March 04, 2012 - 04:50 PM UTC
Hi Karl,

It just gets better and better. i think its looks fantastic! Just one question if i may, you have a cat of a dog? both maybe?

Gary
Wittmann98_VN
Visit this Community
Hanoi, Vietnam
Joined: November 06, 2011
KitMaker: 53 posts
Armorama: 52 posts
Posted: Sunday, March 04, 2012 - 07:51 PM UTC
Great job Karl! The tank looks much better now!!!
I think this is really good, carry on, you've done very well so far.
Karl187
#284
Visit this Community
Northern Ireland, United Kingdom
Joined: October 04, 2006
KitMaker: 3,094 posts
Armorama: 2,942 posts
Posted: Sunday, March 04, 2012 - 11:14 PM UTC
Mauro- I hope my wee effect proves useful in some degree! Cheers mate.

Jaroslaw- Thanks for stopping by, much appreciated.

Mai- Very kind of you, I really appreciate it.

Gary- Thanks so much my friend...and yes I have a dog - how did you know?
dylans
Visit this Community
British Columbia, Canada
Joined: March 05, 2009
KitMaker: 394 posts
Armorama: 380 posts
Posted: Monday, March 05, 2012 - 06:10 AM UTC
wow Karl thats fantastic.
the pigment treatment really turned out great
tonyrocky
Visit this Community
Bayern, Germany
Joined: March 03, 2012
KitMaker: 4 posts
Armorama: 3 posts
Posted: Thursday, March 08, 2012 - 09:47 PM UTC
Hey Karl
I also did a little Progress on my T-90. Added the last parts and did a little Point wash on the wheels and some Details. So far i think my Tank is almost done. I dont think that i will add pigment on it. Not right now because i have no experience with pigments so far (almost no experience with modeling at all, this is my second model i build :-) and i wanted to create an almost new T-90 like you can see on the reference Picture i added below. So far i hope you will post more Progress of your tank!!!

this was the Picture i used as Reference for my Tank

well its not perfect but i think it looks alike :-) edit: i think i need to fix one of those wheels!

well in real the model looks much more green than displayed on those pictures. I have only a smartphone with a bad camera :-S

I don´t know if i did something wrong with my model. But it seems that the original silhouette of the T-90 is not that high as the Zvezda model looks. Espacialy the sideskirts are bigger than the original. But at all this is a great model to build.
BBD468
Visit this Community
Texas, United States
Joined: March 08, 2010
KitMaker: 2,465 posts
Armorama: 2,383 posts
Posted: Friday, March 09, 2012 - 01:37 AM UTC

Quoted Text

Gary- Thanks so much my friend...and yes I have a dog - how did you know?


Hi Karl,

well, in a couple of pics it looks as if your tank had just driven through some kind of tall grass or its pet hair. so i guessed pet hair.

Gary
markchis
Visit this Community
Kuwait / لعربية
Joined: February 09, 2009
KitMaker: 467 posts
Armorama: 392 posts
Posted: Friday, March 09, 2012 - 04:20 AM UTC
awesome work from both you guys !! well done Karl and Tony.

Karl - very much liked the BTR also

cheers
Mark
Karl187
#284
Visit this Community
Northern Ireland, United Kingdom
Joined: October 04, 2006
KitMaker: 3,094 posts
Armorama: 2,942 posts
Posted: Friday, March 09, 2012 - 04:36 AM UTC
Dylan- Glad you liked the pigment treatment, thanks for taking the time to have a look.

Tony- I think the parade look is awesome, you've done a superb job on it. The last AFV I finished I also did it in a Parade scheme, all nice and clean- I plan to wait for some aftermarket sets for the T-90 and finish it in the all-green Guards Parade scheme.

Gary- The dog is getting her summer coat I think, hence hairs are a hazard at this point ! I'm just glad I have a static brush!

Mark- Thanks for checking in mate, glad you like the build and the BTR!!

I haven't actually done anything to the tank since last time. I'm working on getting the base bits and pieces sorted, plus the bust I'm working on is entering the time-consuming shadows and highlights stage- as are the two figures for the dio.
edklingon
Visit this Community
Rio de Janeiro, Brazil
Joined: October 11, 2010
KitMaker: 194 posts
Armorama: 173 posts
Posted: Friday, March 09, 2012 - 06:11 AM UTC

Quoted Text

Hey Karl
this was the Picture i used as Reference for my Tank

well its not perfect but i think it looks alike :-) edit: i think i need to fix one of those wheels!


I loved the painted log on the back, will do the same with my T-90!
Karl187
#284
Visit this Community
Northern Ireland, United Kingdom
Joined: October 04, 2006
KitMaker: 3,094 posts
Armorama: 2,942 posts
Posted: Sunday, March 11, 2012 - 05:48 AM UTC
Good news! Photobucket have sorted out the problem with my photos so if you want to see some of the early build stages then the photos are working now.


The road-sign was a colloborative effort in terms of the words and color design- thanks to Mauro, Jaroslaw and Luty for the translation. The sign reads 'STOP STOP RESTRICTED AREA -СТОЙ СТОЙ ЗАПРЕТНАЯ ЗОНА.

Backing for the sign is plastic-card and the sign was printed on matte photo paper:


The telegraph/powerline pole I wanted to depict was an old one, out of use. This is the sort of effect I was after:


After a primer the pole received a coat of a mix of sandy, light brown and mid-yellow Model Air paints:


AK Chipping Fluid was then airbrushed on before a dark red color was painted on. It was then chipped and scratched.


Finally another pass of AK Chipping Fluid was completed before a mix of sandy and olive drab paint was airbrushed on and then chipped, only a bit lighter than previously.


The junction box was in for the same treatment and was base-coated in a dark brown.


Chipping fluid was brushed on followed by a light grey color which was then heavily chipped.


Details were picked out before the pole was sealed with Future. I have commenced a Dark Wash and plan to do a good deal more weathering on it.


Figures:

After the base coating the faces were started on. The Gunner I wanted to depict as a young man with fairly pale skin, mostly due to the cold air. I've been practicing alla-prima (wet on wet) acrylic painting on busts and I've done a 1/35 figure with it in the past. I'm still not entirely happy with the results- the painting area on a 1/35 figure is so small and tricky when trying to blend effectively. However, I prefer it to the traditional way and I plan to practice it more and more.


The Flora camouflage was painted on, the green first, using Panzer Aces Camouflage Medium Green and then Andrea Dark Brown Leather:


The Officer figure I wanted to depict as an older soldier, a veteran. First off I wanted his over-coat to be an old Tan issue item, with the Flora camouflage underneath. The face was painted using alla-prima and he was given a much more 'grizzled' look with stubble. The eyes were very well defined on this Hornet head so a 1/100 Artjetje brush was used to paint in the whites and then the eyes themselves- I rarely pick out the white parts on a figure this size but when the eye sockets are so well defined I like to do it, although a 1/100 brush is hard to get used to- it is so small it barely holds any paint!


I'm now in the process of highlighting and shading the uniforms.

Thanks for reading.

-Karl187-


BBD468
Visit this Community
Texas, United States
Joined: March 08, 2010
KitMaker: 2,465 posts
Armorama: 2,383 posts
Posted: Sunday, March 11, 2012 - 06:06 AM UTC
Hi Karl,

Excellent work! im taking notes on your power pole finishing prosses. that will come in handy. looks like the real deal. The figure is coming along nicely as well.

Gary
Karl187
#284
Visit this Community
Northern Ireland, United Kingdom
Joined: October 04, 2006
KitMaker: 3,094 posts
Armorama: 2,942 posts
Posted: Tuesday, March 13, 2012 - 05:04 AM UTC
Gary- thanks a lot mate. The power line pole was actually good fun, I like the chipping effect and I use it quite a bit on accessories and figures- haven't got around to doing it on an actual AFV yet !

I just wanted to add a little bit about doing Russian Flora camouflage. I really like this particular pattern because over the years of it has been used it has appeared in several different tones of color and there have also been a few variations in pattern- but its the color tone I want to talk about.

Take a look at these two swatches on the bottom of each of these pages from kamouflage.net:

http://www.kamouflage.net/camouflage/00017.php

http://www.kamouflage.net/camouflage/00219.php


Both are Flora camouflage but there is slight differences to both- mostly in terms of the color tones. You sometimes see pictures of soldiers wearing the Flora camo and there are different tones between a few of the soldiers- bearing in mind dirt and grime also have an impact.

I like to start painting the Flora camo with a light base color, usually Vallejo Khaki or Old Wood and then adding the green and red- there's also some leeway as to what red and greens you can use.

This is the result, which I've posted somewhere in the thread previously:


As you can see this is just too light. But I find it a good starting point. Then I like to do what I call a 'color shift' which is basically an acrylic filter applied multiple times (four in the case of the following figure). I used German Cam. Black Brown very heavily diluted with water and slow drying medium, applied with a water brush (a brush with water in the handle that constantly moistens the brush and can be squeezed to introduce more water). At first the effect should not really be noticeable but over several applications the effects are obvious:


You could also use an Olive Drab for the color shift. You can also add some shadows to the figure by applying even more of the color shift mix to the deep folds and crevices.

I hope some of you find this useful, or interesting at the least !


Thanks for reading.

-Karl187-
lespauljames
Visit this Community
England - South West, United Kingdom
Joined: January 06, 2007
KitMaker: 3,661 posts
Armorama: 2,764 posts
Posted: Wednesday, March 14, 2012 - 02:27 AM UTC
Looks like a realy innovative way to shade a multitonal uniform.
How long does your ratio fo slow dry to paint take to dry.?
nice brushwork, look slike i need to brush up a little