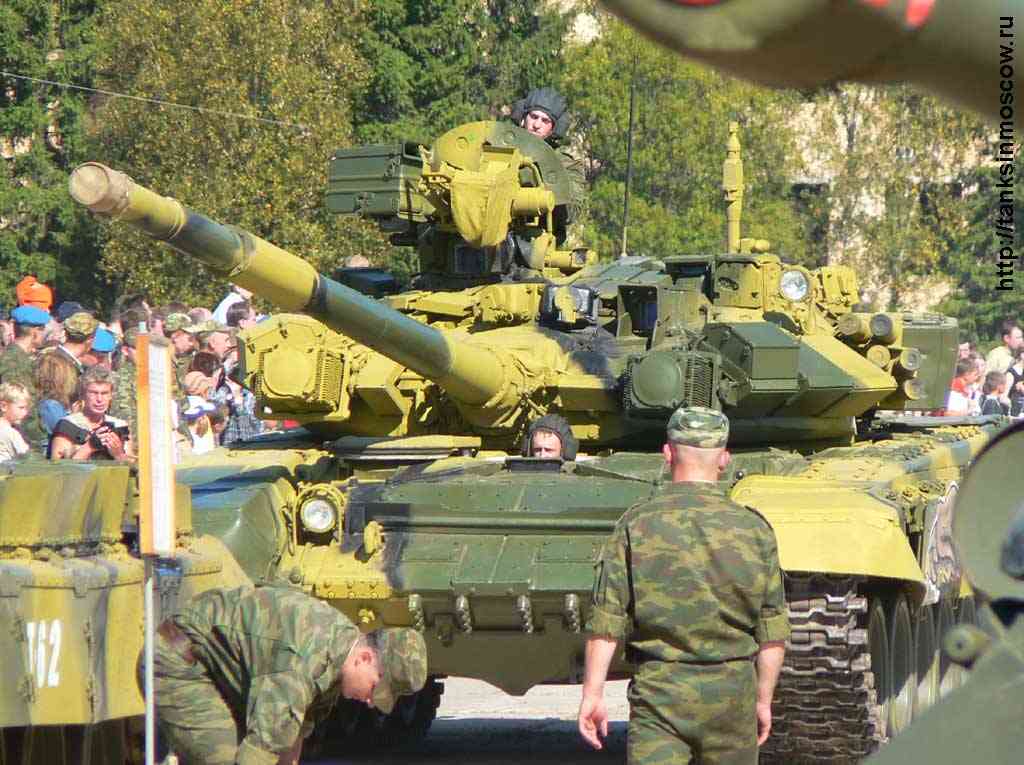
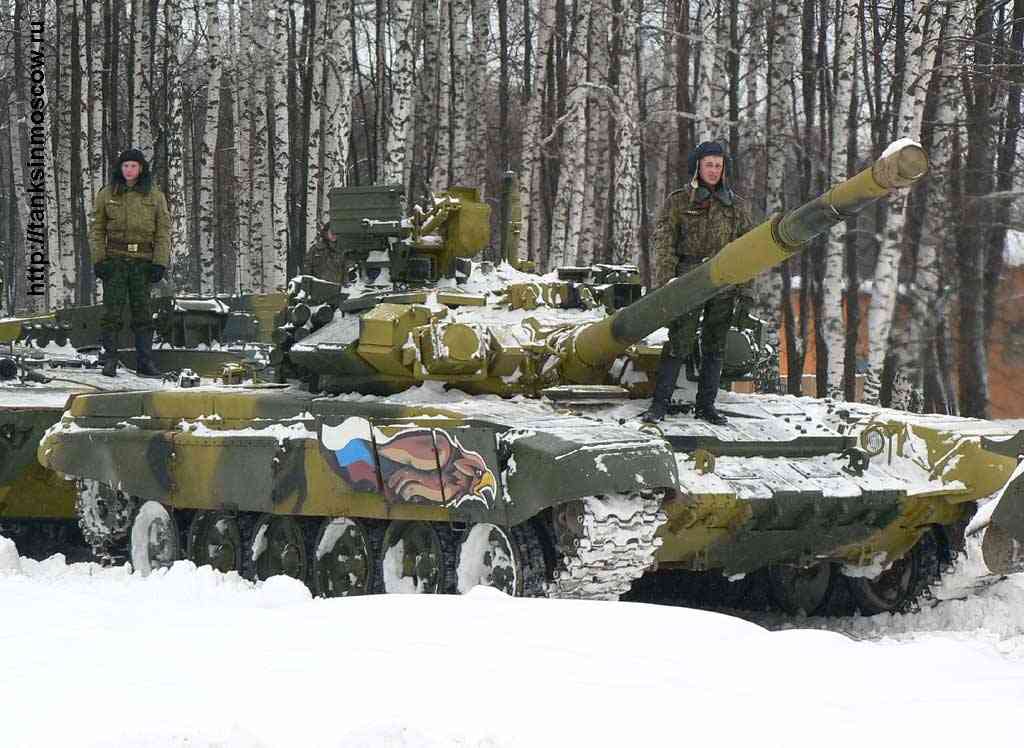
...yesterday at my local hobby shop I was about to buy a bottle of tamiya khaky drab but eventually I didn't
Anyway, thanks a lot karl, I think I'll use on mine
Cheers
Яusso-Soviэt Forum
Russian or Soviet vehicles/armor modeling forum.
Hosted by Darren Baker, Jacques Duquette
REVIEW
Zvezda Russian T-90 MBTSpiderfrommars
Milano, Italy
Joined: July 13, 2010
KitMaker: 3,845 posts
Armorama: 3,543 posts
Joined: July 13, 2010
KitMaker: 3,845 posts
Armorama: 3,543 posts
Posted: Sunday, January 22, 2012 - 06:16 AM UTC
Posted: Wednesday, January 25, 2012 - 06:22 AM UTC
Some more progress:
Tracks:
The tracks on this kit are damn good, they are easy to assemble, flex well enough to fit and have some nice detail. Having good detail makes painting them easy. First they got a coat of Tamiya Primer. If you look at a clean T-90 you will notice the tracks look black, with some of the metal showing through. I think the black may be some sort of protective coating. Anyway, I started with black:
Then came a light dusting of an earthy color through the airbrush:
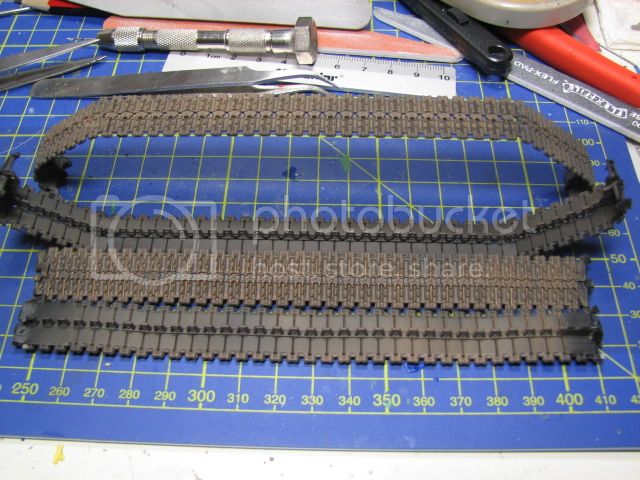
Then it was time to bring out the steel areas with some drybrushing and I also painted the inner track pads a dark rubber color:
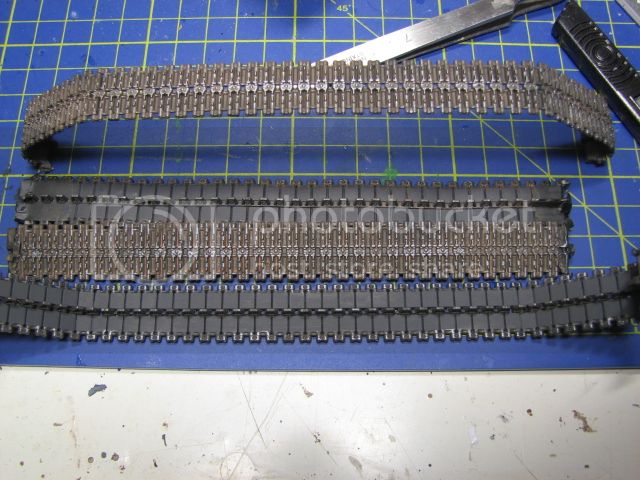
The tracks aren't finished yet, I still need to give them an acrylic wash or two with more earthy, muddy colors. Then I'll fit them, towards the end of the build they will be touched up again with pigments etc.
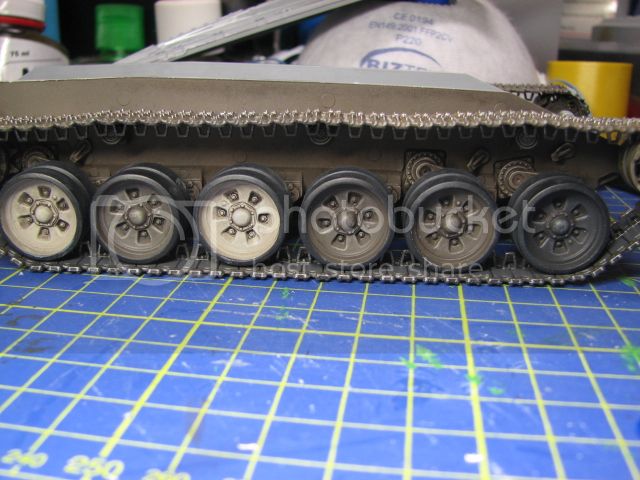
The Wheels:
There should be a raised lip around the sidewall of the wheels denoting the end of the steel rim and the start of the rubber. The kit wheels don't have the lip. If you have a compass cutter and some thin plastic sheet you might be able to make them, or perhaps an aftermarket set will come with etched ones? In any case this is, for me, an OOB build (like a few people here I plan another once the aftermarket gets going) so I left the wheels as is. It makes painting the rubber easy:
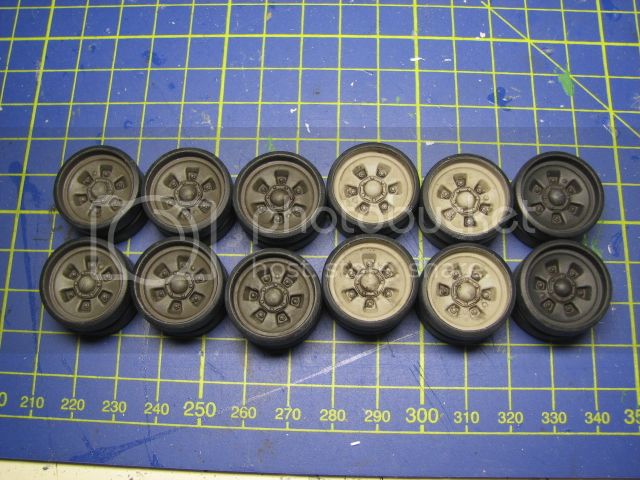
Once the inside faces were painted (6 Khaki Drab, 4 Deck Tan and 2 NATO Black to correspond with the camo scheme I'm planning on doing- some T-90s have the wheels all one color, either tan or khaki drab, and some have four black wheels, four khaki drab and four deck tan) I stuffed the hubs with silly putty to mask them and then sprayed black for the rubber areas:
I then gave each wheel some drybrushing with dark rubber for the rubber areas and lighter colors of the base colors:
The wheels will be getting an enamel wash before being fitted. Later they will be weathered with pigments etc.
The Hull:
Hull sides were painted one color- khaki drab:
Then a light dusting with an earthy color:
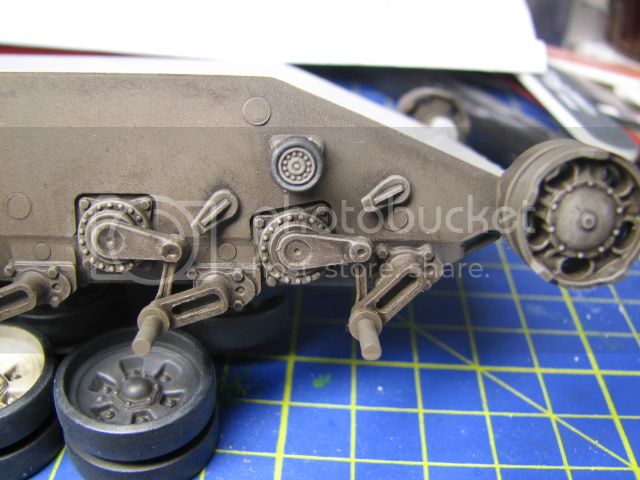
The rubber was painted on the return rollers and then I did some drybrushing around various parts:
I also plan to give the hull sides a pin wash before I fit the wheels and tracks.
Thanks for reading.
-Karl187-
Tracks:
The tracks on this kit are damn good, they are easy to assemble, flex well enough to fit and have some nice detail. Having good detail makes painting them easy. First they got a coat of Tamiya Primer. If you look at a clean T-90 you will notice the tracks look black, with some of the metal showing through. I think the black may be some sort of protective coating. Anyway, I started with black:
Then came a light dusting of an earthy color through the airbrush:
Then it was time to bring out the steel areas with some drybrushing and I also painted the inner track pads a dark rubber color:
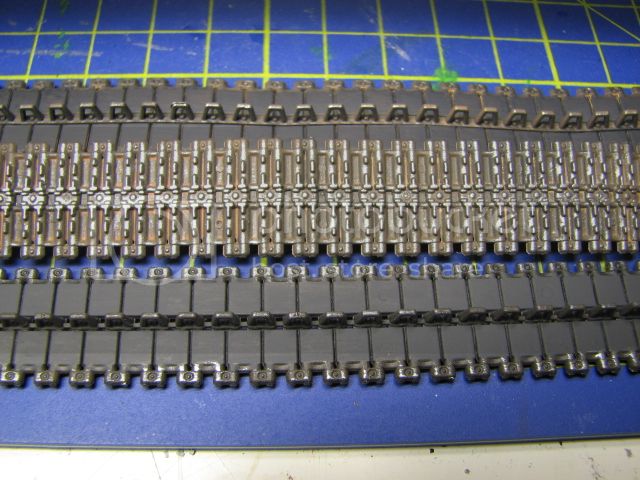
The tracks aren't finished yet, I still need to give them an acrylic wash or two with more earthy, muddy colors. Then I'll fit them, towards the end of the build they will be touched up again with pigments etc.
The Wheels:
There should be a raised lip around the sidewall of the wheels denoting the end of the steel rim and the start of the rubber. The kit wheels don't have the lip. If you have a compass cutter and some thin plastic sheet you might be able to make them, or perhaps an aftermarket set will come with etched ones? In any case this is, for me, an OOB build (like a few people here I plan another once the aftermarket gets going) so I left the wheels as is. It makes painting the rubber easy:
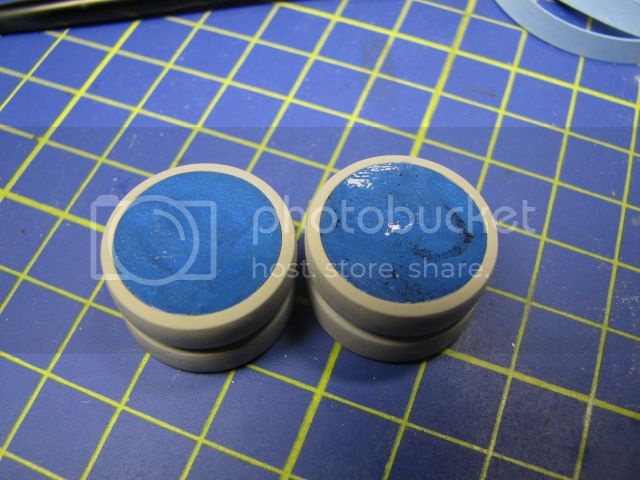
Once the inside faces were painted (6 Khaki Drab, 4 Deck Tan and 2 NATO Black to correspond with the camo scheme I'm planning on doing- some T-90s have the wheels all one color, either tan or khaki drab, and some have four black wheels, four khaki drab and four deck tan) I stuffed the hubs with silly putty to mask them and then sprayed black for the rubber areas:
I then gave each wheel some drybrushing with dark rubber for the rubber areas and lighter colors of the base colors:
The wheels will be getting an enamel wash before being fitted. Later they will be weathered with pigments etc.
The Hull:
Hull sides were painted one color- khaki drab:
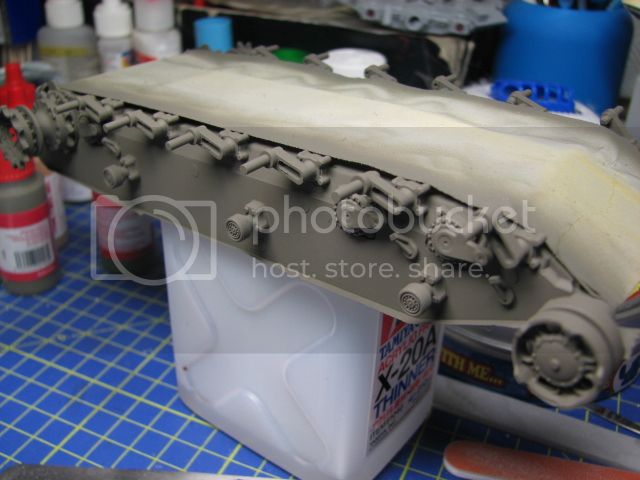
Then a light dusting with an earthy color:
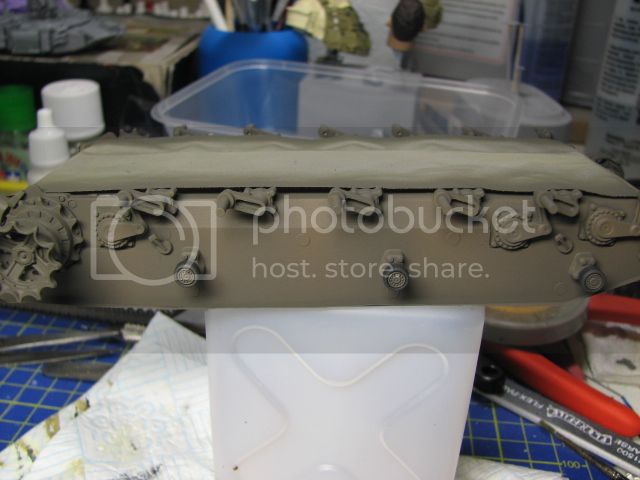
The rubber was painted on the return rollers and then I did some drybrushing around various parts:
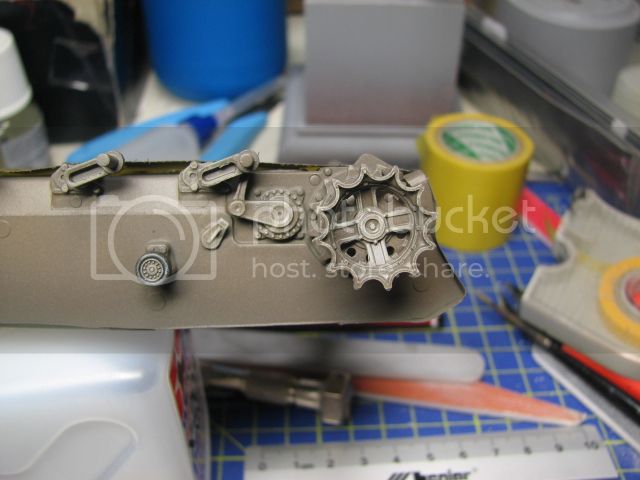
I also plan to give the hull sides a pin wash before I fit the wheels and tracks.
Thanks for reading.
-Karl187-
clay_cliff
Lima, Peru
Joined: April 07, 2008
KitMaker: 375 posts
Armorama: 371 posts
Joined: April 07, 2008
KitMaker: 375 posts
Armorama: 371 posts
Posted: Wednesday, January 25, 2012 - 10:40 AM UTC
Very good looking. I don't know about the T-90, but T-72's return rollers are all-steel, no rubber band. Best regards.
José.
José.
Spiderfrommars
Milano, Italy
Joined: July 13, 2010
KitMaker: 3,845 posts
Armorama: 3,543 posts
Joined: July 13, 2010
KitMaker: 3,845 posts
Armorama: 3,543 posts
Posted: Wednesday, January 25, 2012 - 11:15 AM UTC
Quoted Text
Very good looking. I don't know about the T-90, but T-72's return rollers are all-steel, no rubber band. Best regards.
José.
Yes, also T-90 has metal rollers
Anyway, great job so far Karl
I have a question for you
Why are you painting upper and lower hull separately?
There would be perhaps any problem essembling them before?
Posted: Wednesday, January 25, 2012 - 11:59 PM UTC
Thanks for the comments guys.
I wouldn't worry too much about the return rollers, they won't be visible with the sideskirts on!
Mauro- I'm not assembling the lower and upper hulls seperately. I probably didn't explain this very well!! I'm painting the lower hull sides, running gear and tracks before putting them in place and then mating the upper and lower hulls. The kit has you mate the lower and upper hulls and then do the running gear and tracks- this, in my view, would make assembly of the tracks difficult as the upper hull impedes access around the upper track run. Plus if you follow the instructions you will end up painting the tracks on the tank, which I never like doing.
Once I finish the running gear and tracks I will mate the lower and upper hulls and continue the build as normal. Once the build is finished and it comes time to paint it I will simply mask off the running gear, which is fairly simple to do on a tank with sideskirts.
It will all become clear soon, I promise !
Warsawpact
Västra Götaland, Sweden
Joined: September 25, 2006
KitMaker: 321 posts
Armorama: 273 posts
Joined: September 25, 2006
KitMaker: 321 posts
Armorama: 273 posts
Posted: Thursday, January 26, 2012 - 03:22 AM UTC
This is great Karl!
Loving your progress on the T-90, especially the discussion about the paint.
I'll keep on following your progress whit interest.
Loving your progress on the T-90, especially the discussion about the paint.
I'll keep on following your progress whit interest.
billwinkes
Alabama, United States
Joined: March 20, 2009
KitMaker: 33 posts
Armorama: 28 posts
Joined: March 20, 2009
KitMaker: 33 posts
Armorama: 28 posts
Posted: Thursday, January 26, 2012 - 05:58 AM UTC
Let me join the chorus of praise for your OOTB build. It has served as an inspiration to buy and build one, too. It looks like a good enough kit to help me resit the temptation to invest in a lot of AM stuff and actually finish the T-90.
Thanks agin for a most informative article,
Bill Winkes
Thanks agin for a most informative article,
Bill Winkes
Spiderfrommars
Milano, Italy
Joined: July 13, 2010
KitMaker: 3,845 posts
Armorama: 3,543 posts
Joined: July 13, 2010
KitMaker: 3,845 posts
Armorama: 3,543 posts
Posted: Thursday, January 26, 2012 - 07:02 PM UTC
Yes, I've understood what do you mean Karl, I think I'll follow your method when (...when?) I make mine T-90
Cheers and thanks a lot
Posted: Friday, January 27, 2012 - 01:09 AM UTC
Christian- thanks for following, I'm watching yours aswell...who's gonna finish building first eh? !
William- thanks for the kind words mate, glad I could give you some inspiration!
Mauro- no problem, I'm happy you like the method!
I now have the wheels and tracks attached and I'll get some pictures up later.
William- thanks for the kind words mate, glad I could give you some inspiration!
Mauro- no problem, I'm happy you like the method!
I now have the wheels and tracks attached and I'll get some pictures up later.
Posted: Friday, January 27, 2012 - 05:48 AM UTC
So, as I said, the tracks are on!
Prior to this I gave the wheels a coat of Future before applying a dark wash. The hull sides were also treated this way. A coat of matt then sealed everything.
The tracks were given a coat of Future but I decided to leave them alone for now, they will be weathered with the rest of the tank later in the build.
I had purposely masked off the contact areas on the tracks, i.e. the areas were the track lengths would meet. This would allow the glue (superglue is what I used) to cure better. Depending on the kit link and length tracks can be a bit fiddly and at times, brittle at the glue joins. I was dreading that the glue joins would tear as I coaxed the tracks around the idlers and sprockets.
Then I was also dreading pulling each side in a bit to meet up with the upper run of track. But on both sides the tracks held firm and at the same time proved very flexible allowing me to get everything glued down with a minimum of fuss.
Also the wheel colors weren't put on at random, they will correspond with the color scheme once I start painting.
In the mean-time I've just mated the hulls and am waiting for the glue to cure. The fit was excellent, with only one area looking like it might need some filler. Just remember to mask off the areas where the lower hull mates with the upper one before you begin painting it!
Thanks for reading.
-Karl187-
afv_rob
England - East Anglia, United Kingdom
Joined: October 09, 2005
KitMaker: 2,556 posts
Armorama: 2,199 posts
Joined: October 09, 2005
KitMaker: 2,556 posts
Armorama: 2,199 posts
Posted: Friday, January 27, 2012 - 06:04 AM UTC
Looking good Karl! You seem to have matched the colours perfectly, I must remember this when painting mine, unless I just go with the easy parade monotone green
Started working on my kit, might try and get some pics posted up later. So far its going together nicely.
Spiderfrommars
Milano, Italy
Joined: July 13, 2010
KitMaker: 3,845 posts
Armorama: 3,543 posts
Joined: July 13, 2010
KitMaker: 3,845 posts
Armorama: 3,543 posts
Posted: Friday, January 27, 2012 - 08:05 AM UTC
Quoted Text
Looking good Karl! You seem to have matched the colours perfectly, I must remember this when painting mine, unless I just go with the easy parade monotone green
Yes, I agree, colors look matched perfectly. Only black could be in my humble opinion a little bit more graysh,
However I think I'll use your color list also for other Russian vehicles with 3 tones camo scheme (...such as the BMD-1 )
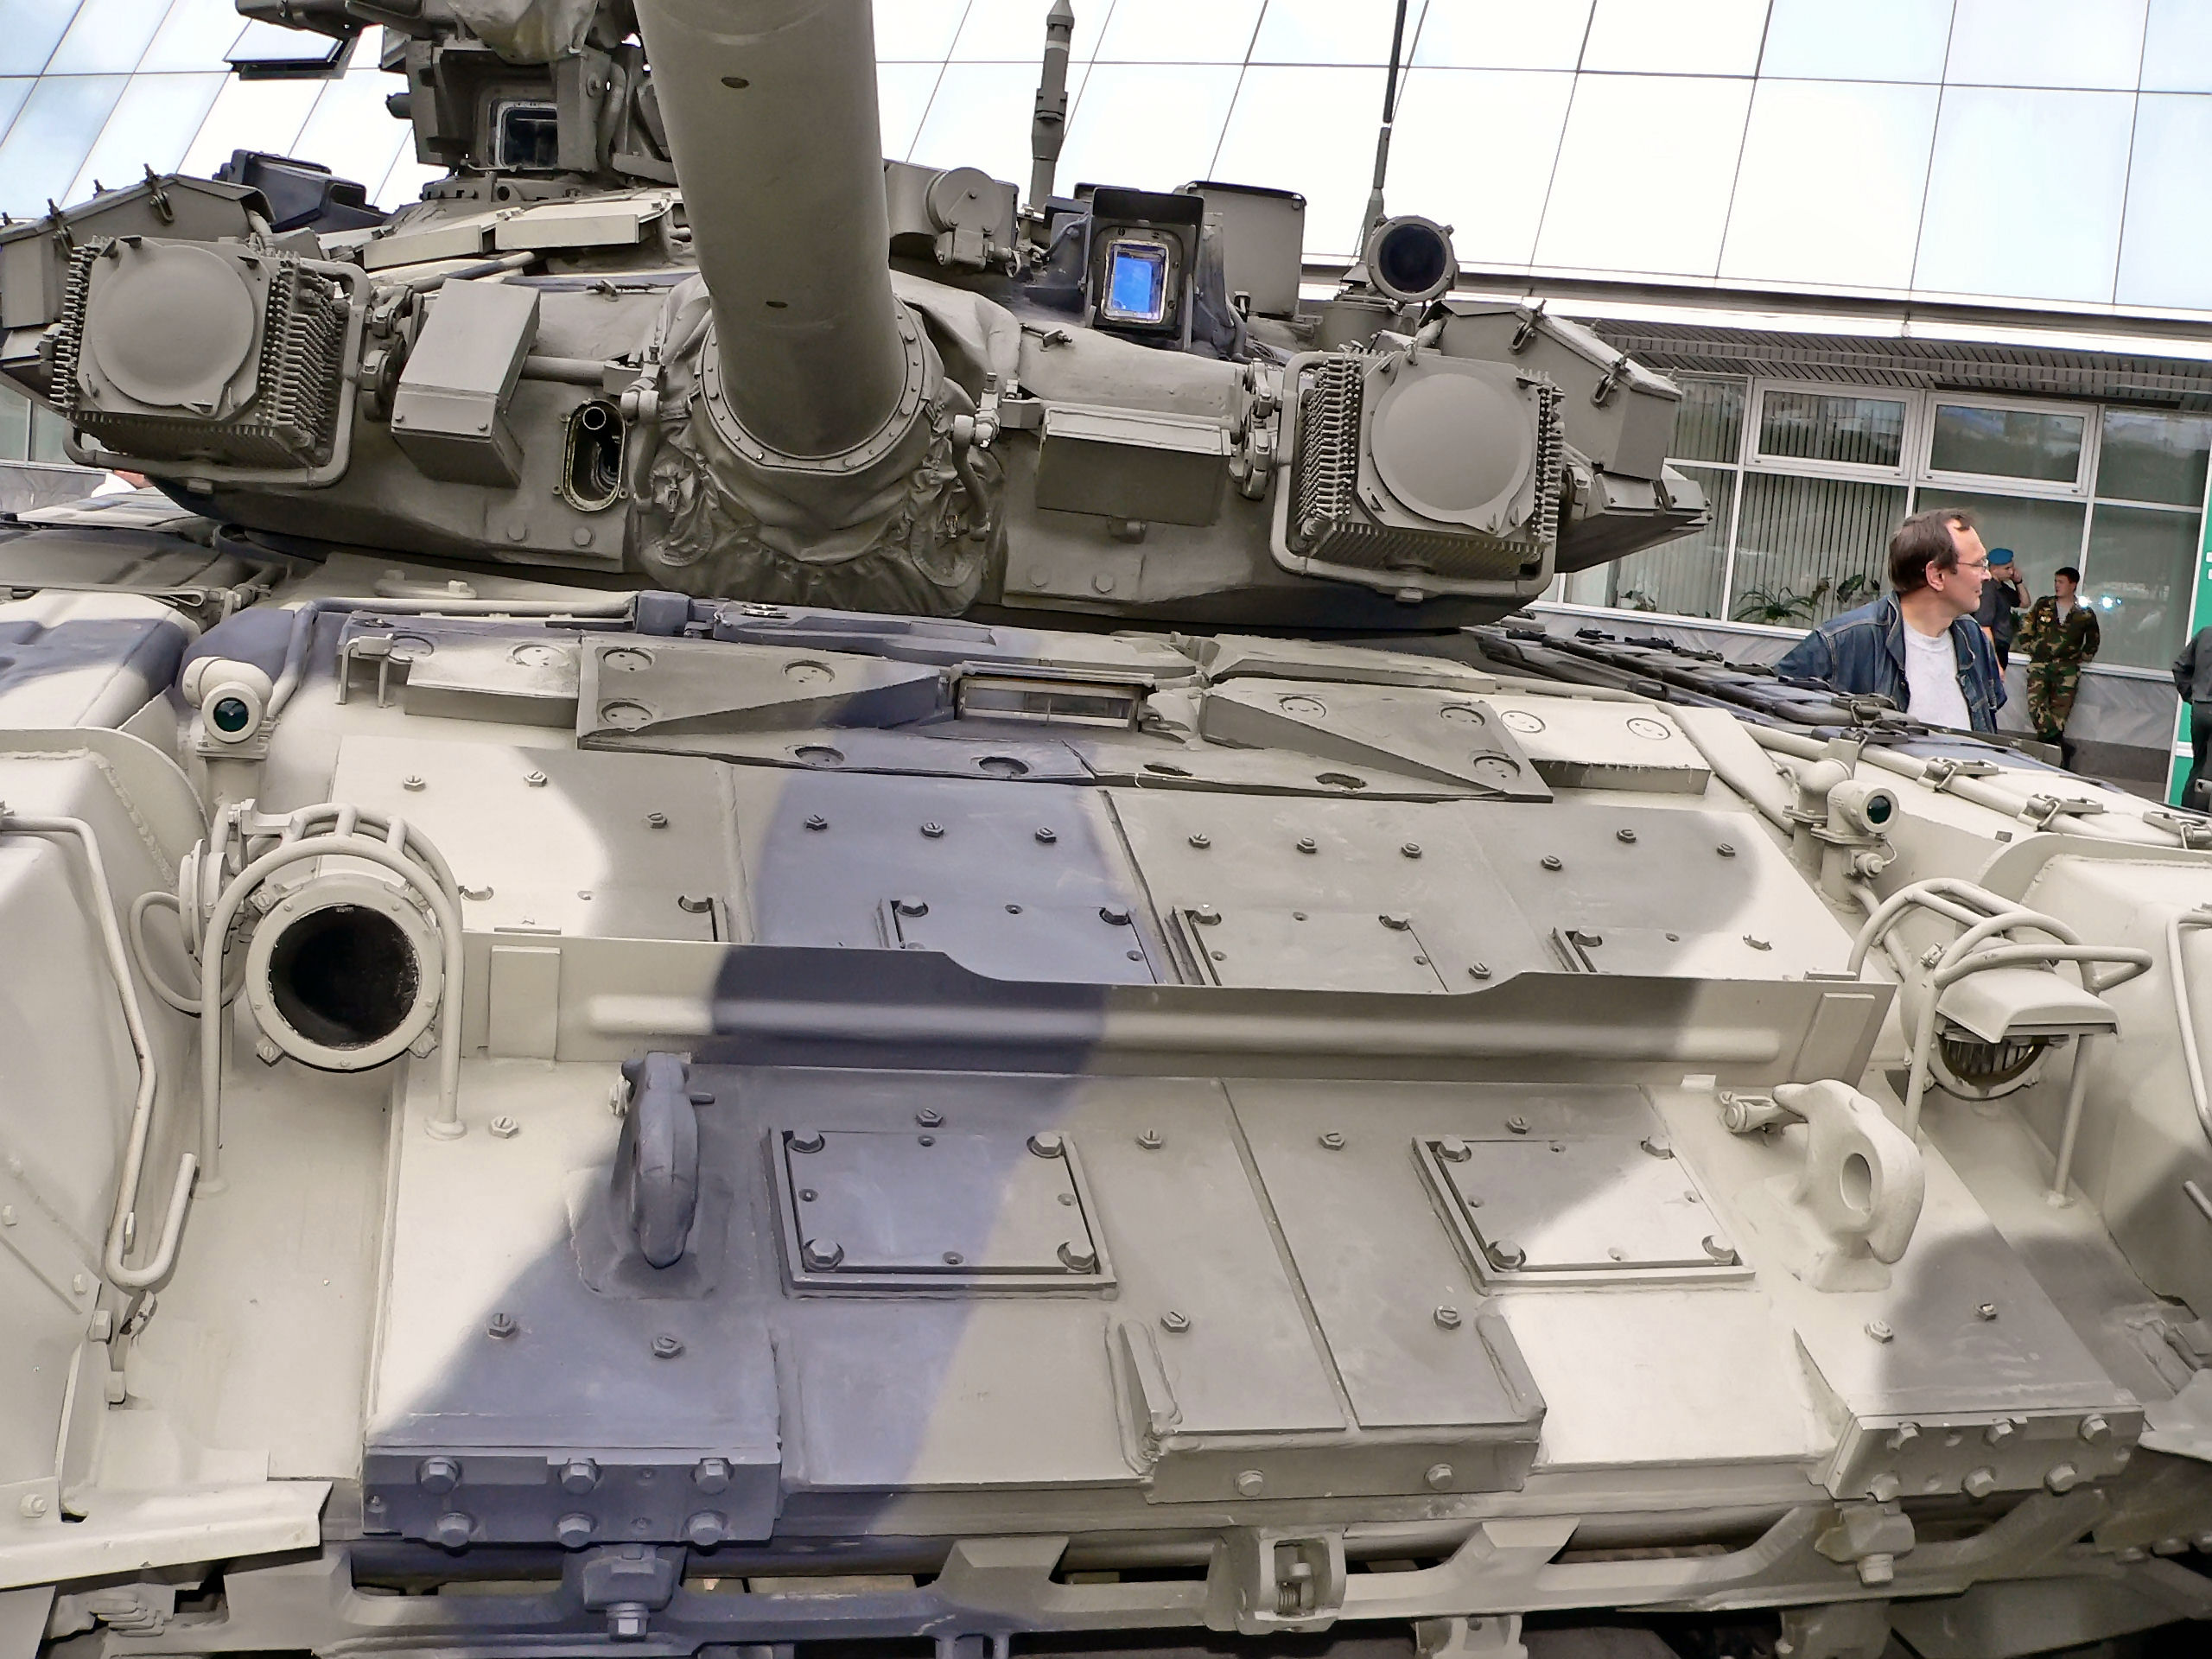
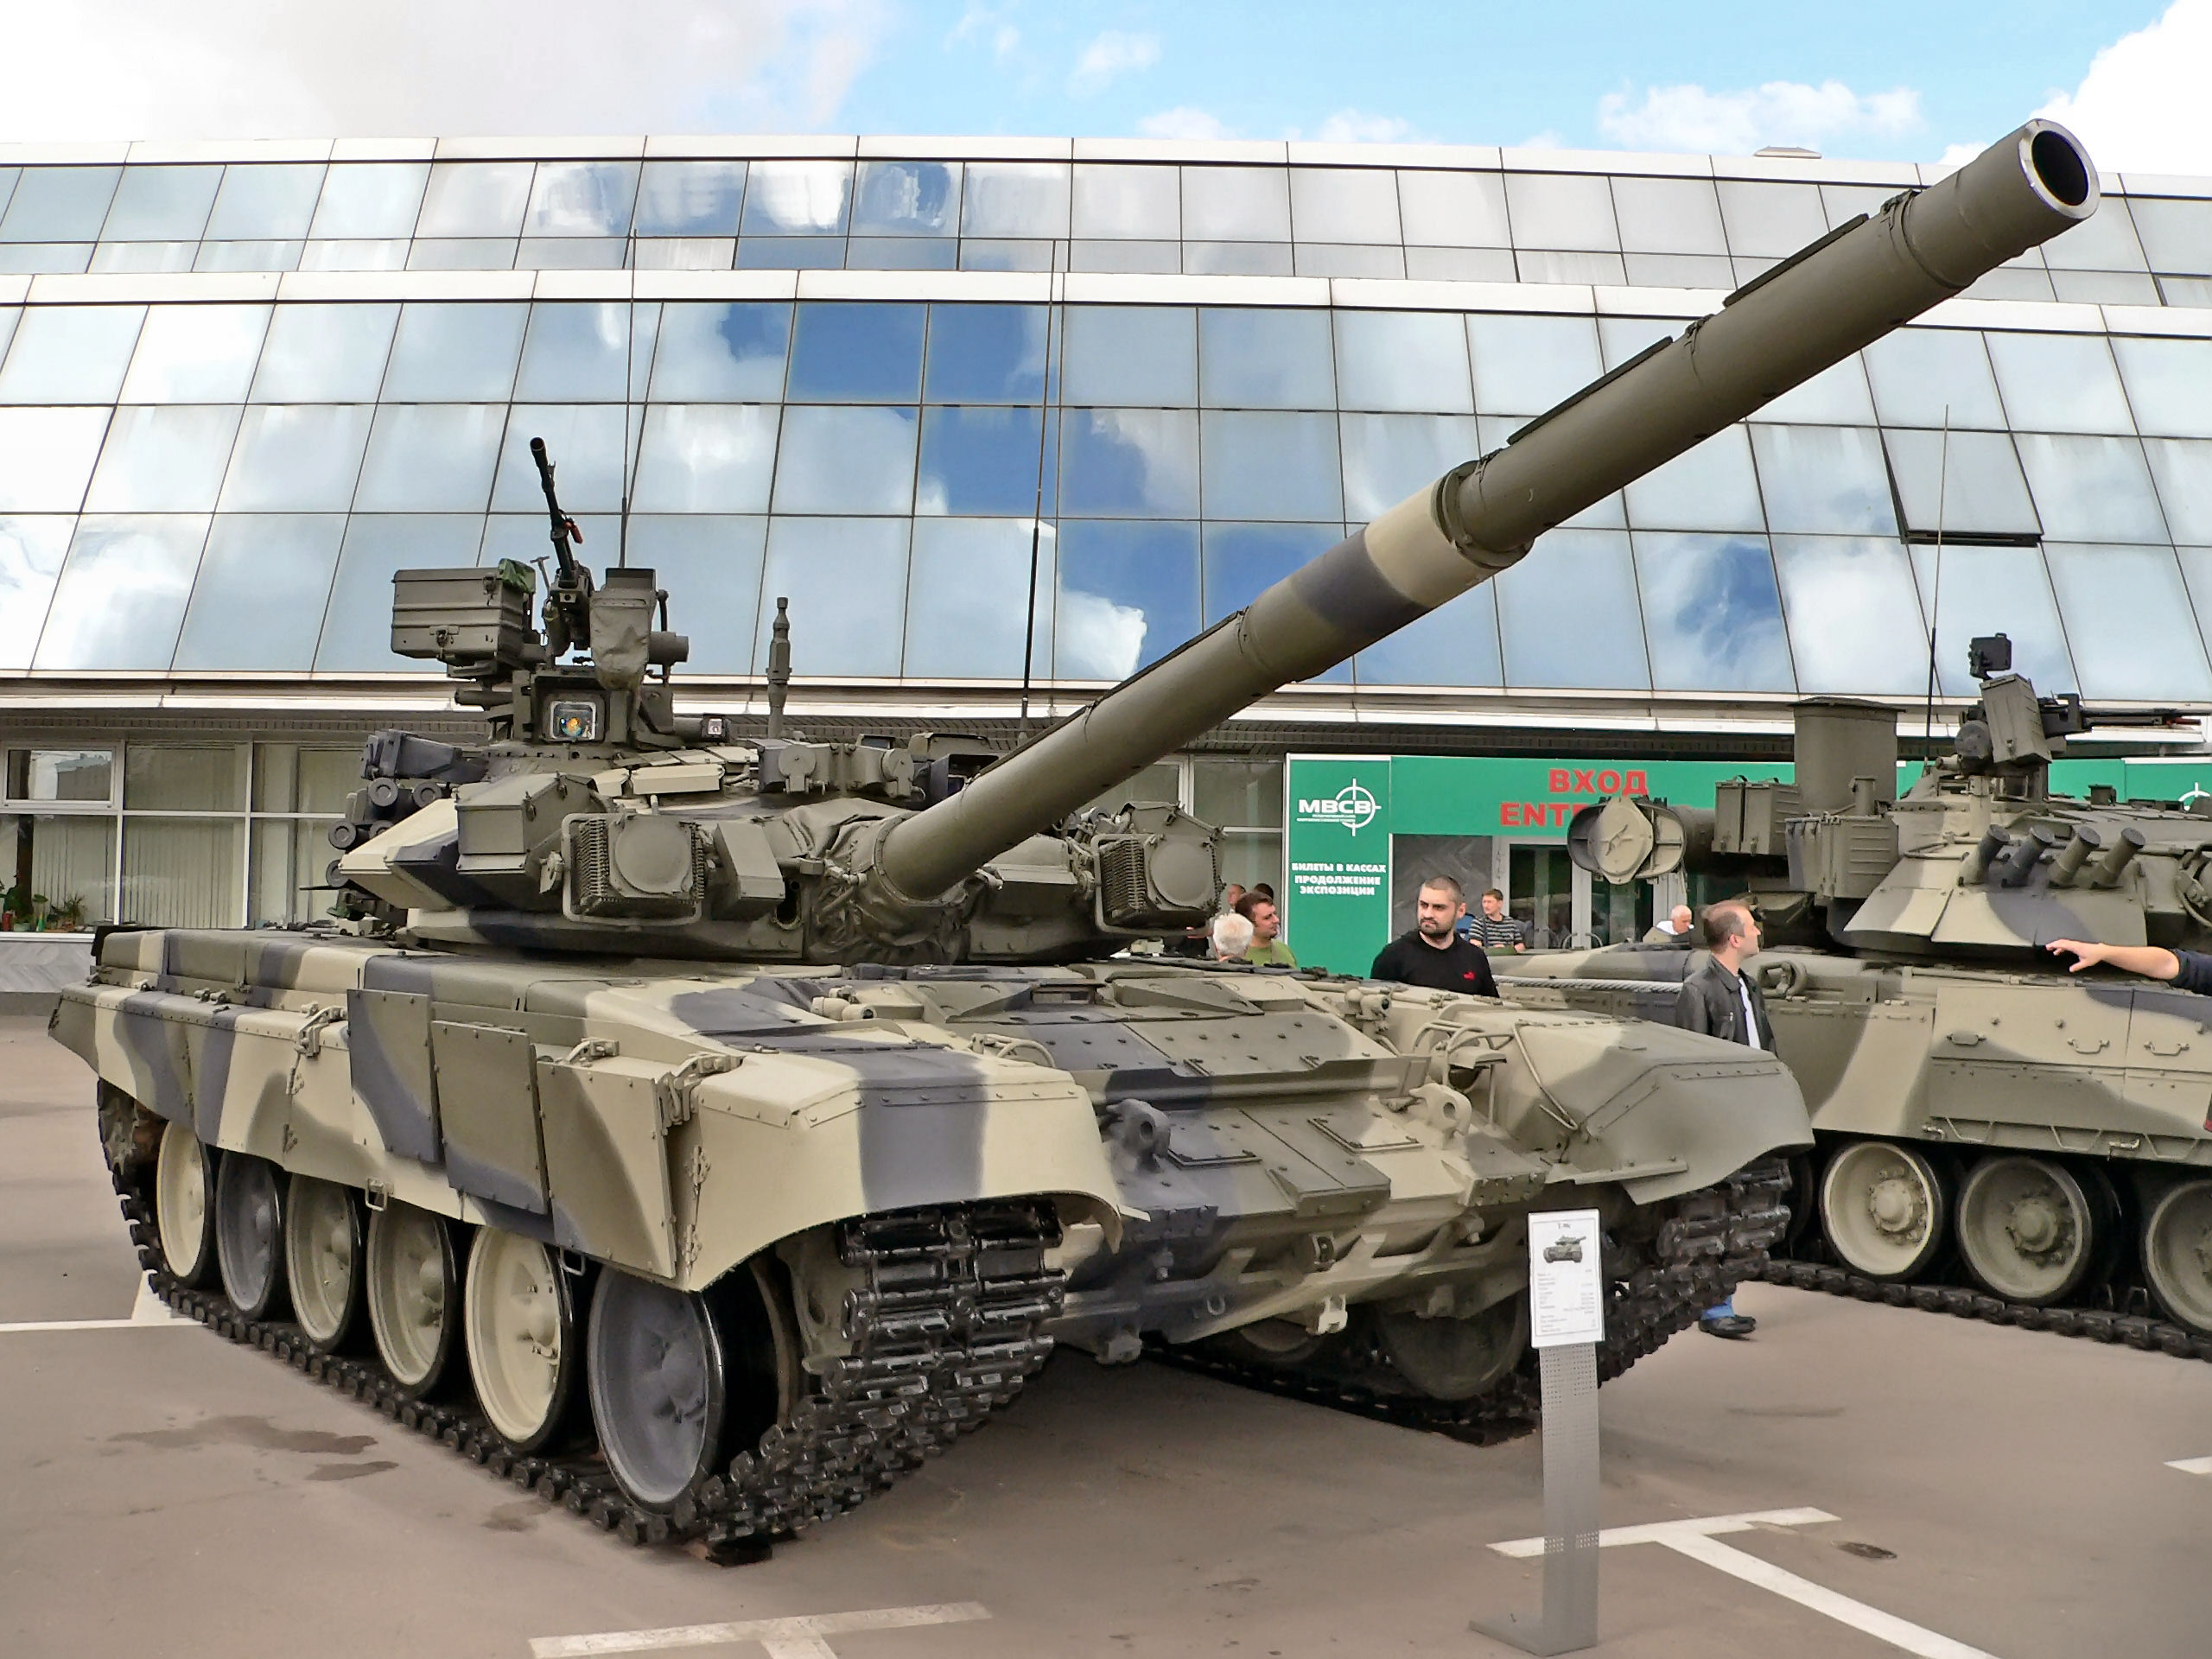
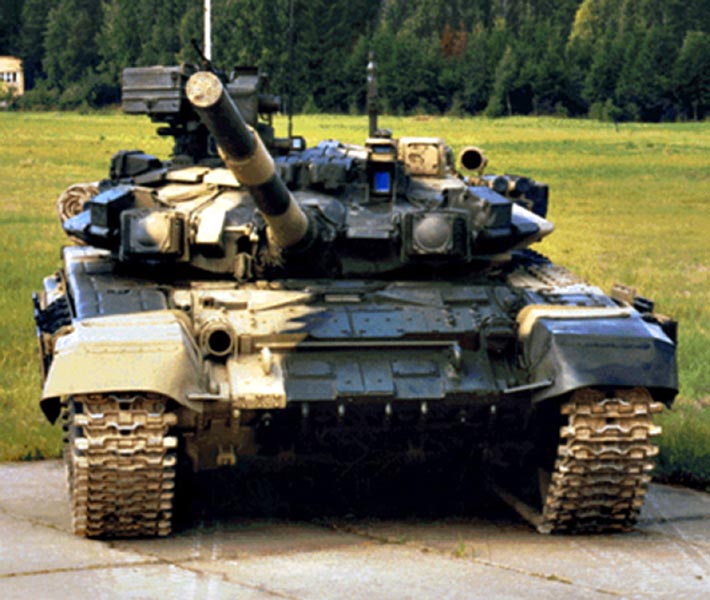
Anyway, looking at the Primeportal and Dismodels Walkarounds it seems to me that there are two "3 tones camo schemes".
The first with black spots more diffused and wheels painted with different tones:
The second with black spots less diffused and wheels painted green
Zvezda instruction sheet seems to depict the second one
cheers
jointhepit
Oost-Vlaanderen, Belgium
Joined: May 14, 2006
KitMaker: 3,829 posts
Armorama: 881 posts
Joined: May 14, 2006
KitMaker: 3,829 posts
Armorama: 881 posts
Posted: Friday, January 27, 2012 - 08:41 AM UTC
wow impressive build log here, thanks for the info, will be very usefull once i start mine
todorovicandreas
Austria
Joined: May 01, 2007
KitMaker: 608 posts
Armorama: 593 posts
Joined: May 01, 2007
KitMaker: 608 posts
Armorama: 593 posts
Posted: Friday, January 27, 2012 - 08:54 AM UTC
Hi there,
there is also a 3-tone camo for T-90´s of grey-green-black. Currently used in Abkhazia.
Very nice work so far on your model! I should get some paint on mine too :-)
All the best,
Andreas
there is also a 3-tone camo for T-90´s of grey-green-black. Currently used in Abkhazia.
Very nice work so far on your model! I should get some paint on mine too :-)
All the best,
Andreas
Spiderfrommars
Milano, Italy
Joined: July 13, 2010
KitMaker: 3,845 posts
Armorama: 3,543 posts
Joined: July 13, 2010
KitMaker: 3,845 posts
Armorama: 3,543 posts
Posted: Friday, January 27, 2012 - 09:23 AM UTC
Quoted Text
Hi there,
there is also a 3-tone camo for T-90´s of grey-green-black. Currently used in Abkhazia.
Very nice work so far on your model! I should get some paint on mine too :-)
All the best,
Andreas
It would be the same scheme used for exemple in Ossetian strikes
Andreas, do you have any reference pic of it?
Anyway, looking here
http://army.lv/ru/t-90/foto/631/12#info,
we can see that 3 tone camo schemes actually are a lot indeed
PS: Guys, can you notice anything "strange" on these exemplars?
Warsawpact
Västra Götaland, Sweden
Joined: September 25, 2006
KitMaker: 321 posts
Armorama: 273 posts
Joined: September 25, 2006
KitMaker: 321 posts
Armorama: 273 posts
Posted: Friday, January 27, 2012 - 10:43 AM UTC
The guys at the russian war department must have a special realation to mustard.
......it's like the same as ketchup is for the americans.
Warsawpact
Västra Götaland, Sweden
Joined: September 25, 2006
KitMaker: 321 posts
Armorama: 273 posts
Joined: September 25, 2006
KitMaker: 321 posts
Armorama: 273 posts
Posted: Friday, January 27, 2012 - 10:49 AM UTC
This might be a usefull link for you Karl (and to everyone else aswell)
http://www.armyrecognition.com/forum/viewtopic.php?p=7488&sid=3268fe794bafb4196c2df916a2297759
Many great photos and it also includes video at the bottom of the page.
http://www.armyrecognition.com/forum/viewtopic.php?p=7488&sid=3268fe794bafb4196c2df916a2297759
Many great photos and it also includes video at the bottom of the page.
Spiderfrommars
Milano, Italy
Joined: July 13, 2010
KitMaker: 3,845 posts
Armorama: 3,543 posts
Joined: July 13, 2010
KitMaker: 3,845 posts
Armorama: 3,543 posts
Posted: Friday, January 27, 2012 - 10:50 AM UTC
anything else about the pics?
dlesko
Alabama, United States
Joined: January 08, 2003
KitMaker: 124 posts
Armorama: 106 posts
Joined: January 08, 2003
KitMaker: 124 posts
Armorama: 106 posts
Posted: Friday, January 27, 2012 - 10:52 AM UTC
Anyone aware of any PE sets in the works?
todorovicandreas
Austria
Joined: May 01, 2007
KitMaker: 608 posts
Armorama: 593 posts
Joined: May 01, 2007
KitMaker: 608 posts
Armorama: 593 posts
Posted: Friday, January 27, 2012 - 12:25 PM UTC
Hey Mauro,
here are two pics of what I mean, seems pretty close to the camo you refer on the BMD. Though not the whole tanks is visible. I like this pic too, because it shows a T-90 in "action" WITH the extra fuel drums.
Andreas
here are two pics of what I mean, seems pretty close to the camo you refer on the BMD. Though not the whole tanks is visible. I like this pic too, because it shows a T-90 in "action" WITH the extra fuel drums.
Andreas
RichardM
Quebec, Canada
Joined: August 13, 2006
KitMaker: 383 posts
Armorama: 358 posts
Joined: August 13, 2006
KitMaker: 383 posts
Armorama: 358 posts
Posted: Friday, January 27, 2012 - 12:36 PM UTC
Quoted Text
anything else about the pics?
The tracks (single pin, T-72?)
Very nice build btw. Still waiting for mine but should have it in a day or two now.
Spiderfrommars
Milano, Italy
Joined: July 13, 2010
KitMaker: 3,845 posts
Armorama: 3,543 posts
Joined: July 13, 2010
KitMaker: 3,845 posts
Armorama: 3,543 posts
Posted: Friday, January 27, 2012 - 07:22 PM UTC
Quoted Text
Hey Mauro,
here are two pics of what I mean, seems pretty close to the camo you refer on the BMD. Though not the whole tanks is visible. I like this pic too, because it shows a T-90 in "action" WITH the extra fuel drums.
Andreas
Thanks for the pics, especially for the second one. I was looking for a pic of the stuff used to fill the extra fuel tanks. Yes, camo could be the same. I think you can replicate it replacing deck tan color with light gray
Quoted Text
The tracks (single pin, T-72?)
Yes, that's it. Early T-90 had T-72 tracks
Actually it isn't so strange. All in all T-90 is the latest version of T-72 tank
Cheers
Posted: Saturday, January 28, 2012 - 12:03 AM UTC
Hey guys, thanks for the comments and the pictures and links. Some of those other tri-tonal schemes are interesting, especially the grey-green-black one. Although the yellowish one is also tempting! Perhaps on a second build !
Its interesting to see the T-72 links on the early versions though, that gives some leeway as to what aftermarket tracks you could use I suppose.
bison126
Correze, France
Joined: June 10, 2004
KitMaker: 5,329 posts
Armorama: 5,204 posts
Joined: June 10, 2004
KitMaker: 5,329 posts
Armorama: 5,204 posts
Posted: Saturday, January 28, 2012 - 02:24 AM UTC
Mauro,
where did you get the pics with the Tanksinmoscow url? I had this url in my favorites but it looks like nowadays it's become a simple Blog not related to armor at all.
Olivier
where did you get the pics with the Tanksinmoscow url? I had this url in my favorites but it looks like nowadays it's become a simple Blog not related to armor at all.
Olivier
Spiderfrommars
Milano, Italy
Joined: July 13, 2010
KitMaker: 3,845 posts
Armorama: 3,543 posts
Joined: July 13, 2010
KitMaker: 3,845 posts
Armorama: 3,543 posts
Posted: Saturday, January 28, 2012 - 04:40 AM UTC
Quoted Text
Mauro,
where did you get the pics with the Tanksinmoscow url? I had this url in my favorites but it looks like nowadays it's become a simple Blog not related to armor at all.
Olivier
I got them here
http://army.lv/ru/oruzhie/Vse-vidi-oruzhiya/Suhoputnie-voyska/Tanki/631
http://army.lv/ru/t-90/foto/631/12#info
I'm almost sure that you've already known this very interesting site Olivier
Yes karl, it would be interesting to make a series of T-90 with different camo schemes.
Anyway, as far as I know the exemplar with the eagle painted on the side is the first T-90 prototype