Яusso-Soviэt Forum
Russian or Soviet vehicles/armor modeling forum.
REVIEW
Zvezda Russian T-90 MBT
Spiderfrommars
Visit this Community
Milano, Italy
Joined: July 13, 2010
KitMaker: 3,845 posts
Armorama: 3,543 posts
Posted: Saturday, February 04, 2012 - 02:54 AM UTC

Quoted Text

Nice find!
This one reads:
"Forbidden zone no entry"
(the last two words are literally "passage closed" but it's kind of awkward sounding in english I think)


The pic was taken in Gayok a former military town with a big aviation base.

Well i think that now Karl has some good references to use for his diorama

cheers
Karl187
#284
Visit this Community
Northern Ireland, United Kingdom
Joined: October 04, 2006
KitMaker: 3,094 posts
Armorama: 2,942 posts
Posted: Saturday, February 04, 2012 - 04:26 AM UTC
Mauro, Jaroslaw- thanks for all those references and the translations, I have plenty to choose from now! Also thanks for the comments on the build Jaroslaw, much appreciated.

Hey Christian, I must say I'm enjoying this tandem build aswell, I think its fantastic- to see someone else doing the same model, to watch their progress, their techniques and interpretation is very interesting- I think I will have to do more tandem builds!

As for a diorama, I did mention it a while ago. I started thinking of it a while ago too. Originally I thought, with the base I plan to use, I had enough room for a wall and a large gate from Mini-Art but its too big for the base. Then, looking at various reference pics, I came up with another layout- it will be a dirt road, with some rough grass/stoney grass etc on the side- there will also be a sign post, as I've already mentioned, and a broken overhead power line, which is from Verlinden and is already built minus the wires. There's also two figures to go in too, both from TANK, one an Officer standing beside the tank, the other the Gunner in his hatch.

So here's some more progress shots:


As I said earlier there were a few bits to be filled and sanded. Mr. Dissolved Putty was used along with Vallejo Putty. If you are going to use Mr. Hobby products like Dissolved Putty or Mr. Surfacer I recommend having a bottle of their thinners handy, otherwise you could ruin brushes! Mr. Color Thinner is also the strongest thinner I've ever used and will cut through any paint like a dream- I use it for deep-cleaning my airbrushes and for restoring paint pallettes to 'almost new' status- you can also use it to strip paint, it is good stuff.

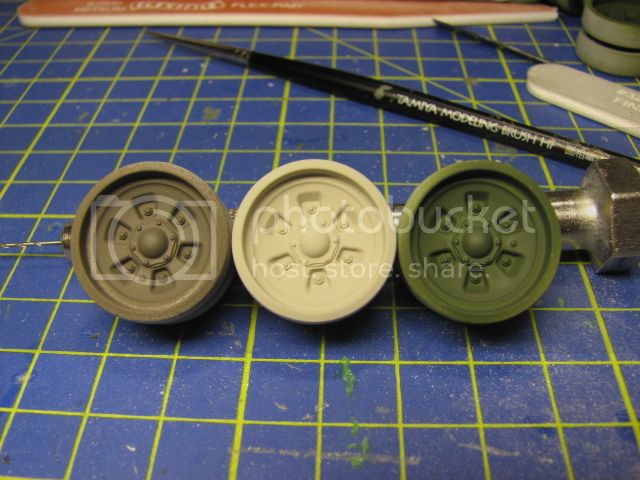
Anyway, on with the painting- Tamiya Primer first:


Then Khaki Drab all over:


This where I am at now, which is just outlining the areas for the Tan color:


So now I have to finish outlining, on the rear and front of the hull underside, and fill the tan parts in before doing the NATO Black.

Thanks for reading and commenting guys, it means a lot!

-KARL187-
Spiderfrommars
Visit this Community
Milano, Italy
Joined: July 13, 2010
KitMaker: 3,845 posts
Armorama: 3,543 posts
Posted: Saturday, February 04, 2012 - 05:01 AM UTC
It looks great so far Karl!

I thought you would've used the tan as base color (I'm going to do this way)

anyway, I've bought a lot of xf-51 bottles, now I think they are perfect to reproduce the Russian green

Thanks for the tip

Cheers
SDavies
Visit this Community
England - South East, United Kingdom
Joined: January 09, 2010
KitMaker: 979 posts
Armorama: 959 posts
Posted: Saturday, February 04, 2012 - 06:21 AM UTC
She is looking great !
sauceman
Visit this Community
Ontario, Canada
Joined: September 28, 2006
KitMaker: 2,672 posts
Armorama: 2,475 posts
Posted: Tuesday, February 07, 2012 - 01:05 AM UTC
Nice work on the paint, really liking this kit. Can't wait to get one!


cheers
Karl187
#284
Visit this Community
Northern Ireland, United Kingdom
Joined: October 04, 2006
KitMaker: 3,094 posts
Armorama: 2,942 posts
Posted: Tuesday, February 07, 2012 - 02:36 AM UTC
Mauro, Steven, Richard- thanks for your comments guys!

Mauro- I might have used Deck Tan as the base but I chose Khaki Drab because I had two pots of it versus just one pot of Deck Tan!

So, some more painting progress:


So after a session of free-handing the Deck Tan color I was fairly happy with the layout of the camo scheme. I based it loosely on the scheme in the kit instructions. I say 'loosely' because only top-down and left side profiles are detailed, so you have to make up the rest based on what those profiles give you. I had earlier painted the wheels in various camo colors so knowing where they were positioned helped me fine tune the camo.

Once I was done with the layout I then got the Silly Putty out and cleaned up the lines to correspond with the look of the real thing. A bit of fine tuning was required here and there, mostly making sure the scheme looked right and ensuring I had made space for the black color to come- thats why you can see a few areas of over-spray- the NATO Black patches will be going on those areas.

So, NATO Black is the next step.

Thanks for reading and taking the time to check out the thread.

-Karl187-
sauceman
Visit this Community
Ontario, Canada
Joined: September 28, 2006
KitMaker: 2,672 posts
Armorama: 2,475 posts
Posted: Tuesday, February 07, 2012 - 03:06 AM UTC
Looking good, I think detailing the tow cable is going to be entertaining


cheers
Karl187
#284
Visit this Community
Northern Ireland, United Kingdom
Joined: October 04, 2006
KitMaker: 3,094 posts
Armorama: 2,942 posts
Posted: Tuesday, February 07, 2012 - 05:15 AM UTC
Thanks Richard- How do you mean detailing the tow cable? You mean painting and weathering? If so I wouldn't worry too much- it is string but it has hardened up with primer and further coats of paint- its quite stiff actually, I reckon it will paint up okay !
sauceman
Visit this Community
Ontario, Canada
Joined: September 28, 2006
KitMaker: 2,672 posts
Armorama: 2,475 posts
Posted: Tuesday, February 07, 2012 - 06:51 AM UTC
Yes I mean trying to reach it as it's all threaded under the fuel cans LOL.


cheers
Karl187
#284
Visit this Community
Northern Ireland, United Kingdom
Joined: October 04, 2006
KitMaker: 3,094 posts
Armorama: 2,942 posts
Posted: Tuesday, February 07, 2012 - 11:25 PM UTC

Quoted Text

Yes I mean trying to reach it as it's all threaded under the fuel cans LOL.


cheers


Ah, I see what you mean now! Yeah, I never seem to pay much attention to what I do with tow cables, then I end up having a tricky time painting them as you said!
Still, the advantages of painting figures is that I always have plenty of small brushes knocking about for jobs like that !
Warsawpact
Visit this Community
Västra Götaland, Sweden
Joined: September 25, 2006
KitMaker: 321 posts
Armorama: 273 posts
Posted: Wednesday, February 08, 2012 - 03:41 AM UTC
Karl, i'm admiring your paint job! This looks so good and i can't wait to see how the overall look will be one it's finished.
And as i've said before, it's great to have your build as a spledning example that i can learn from, and try to apply on my T-90.

One thing that i encountered during the washing stage of my T-90 wheels was that the green color i selected got almost black. I managed to fix this by lightening up the green tone a bit.
Have you had similar thoughts on your color selection?
Just a heads-up if you are planing a heavy wash on your, splenind looking, T-90.

...now i'll head back to my painting and eating cold-medicine.


Spiderfrommars
Visit this Community
Milano, Italy
Joined: July 13, 2010
KitMaker: 3,845 posts
Armorama: 3,543 posts
Posted: Wednesday, February 08, 2012 - 04:21 AM UTC
That's great Karl!

Using kakhi drab as base has allowed you to give a more convincing appearance to your paint job. I can see some slight shade of brown-green under your deck tan spots, and that's is a very pleasant effect in my opinion

I think I'll do the same on mine, thanks a million for sharing
BBD468
Visit this Community
Texas, United States
Joined: March 08, 2010
KitMaker: 2,465 posts
Armorama: 2,383 posts
Posted: Wednesday, February 08, 2012 - 05:55 AM UTC
Hi Karl,

Sweet paint job man! i like the colors alot.

Gary
afv_rob
Visit this Community
England - East Anglia, United Kingdom
Joined: October 09, 2005
KitMaker: 2,556 posts
Armorama: 2,199 posts
Posted: Wednesday, February 08, 2012 - 06:56 AM UTC
Looking good Karl!

Wish I had access to my airbrush equipment so I could do some spraying myself!
RWFG01
Visit this Community
Nordrhein-Westfalen, Germany
Joined: June 30, 2009
KitMaker: 16 posts
Armorama: 15 posts
Posted: Thursday, February 09, 2012 - 12:19 AM UTC
I have just found this resin road wheels - are they correct for our t-90?

http://panzerart.pl/index.php/welcome/produkt/128

Does anyone have any experience with Panzerart?
Spiderfrommars
Visit this Community
Milano, Italy
Joined: July 13, 2010
KitMaker: 3,845 posts
Armorama: 3,543 posts
Posted: Thursday, February 09, 2012 - 05:21 AM UTC

Quoted Text

I have just found this resin road wheels - are they correct for our t-90?

http://panzerart.pl/index.php/welcome/produkt/128

Does anyone have any experience with Panzerart?


Actual wheel


Panzerart wheel


Zvezda wheels


Jens they seem nice, but if I were you I didn't waste my money...I can't say about the dimensions but Zvezda wheels look very good. they look even better than the resin ones

Just my opinion anyway
afv_rob
Visit this Community
England - East Anglia, United Kingdom
Joined: October 09, 2005
KitMaker: 2,556 posts
Armorama: 2,199 posts
Posted: Thursday, February 09, 2012 - 05:41 AM UTC
The Panzerart wheels are no good in my opinion. The edges on the spokes are way too sharp and square and don't look anything like the real thing. Changing the kit wheels isn't necessary at all.

I also wouldn't personally consider buying the Panzerart wheels for any T-72 projects with the Tamiya kit kit. The Miniarm wheels are excellent and the best choice. Some may say pricey, but you get what you pay for.

There is some discrepancy between the the width of the Zvezda wheels and the width of the Tamiya/Miniarm wheels. I think maybe Zvezdas are bit too wide. Of course this isn't a major issue, just sayin...
Karl187
#284
Visit this Community
Northern Ireland, United Kingdom
Joined: October 04, 2006
KitMaker: 3,094 posts
Armorama: 2,942 posts
Posted: Thursday, February 09, 2012 - 05:57 AM UTC
Hey guys- thanks so much for all your comments and support, it means a lot to me and I'm glad you like the build !

Christian- I didn't experience a significant darkening of the Khaki Drab when I gave them a dark wash- I used Mig Productions Dark Wash.

Regarding the wheels- if I had to choose I would go for the Miniarm ones. The Zvezda ones are good but they lack the small lip where the steel meets the rubber tread. As I said before the actual lip is very small (as you can see from the picture Mauro posted)- a future PE set may include a rim of some sort but if you happen to have a compass cutter and some thin plastic card you could make your own. Apart from that the wheels are spot on- good fit and good detail.

The painting is almost finished- I am just doing the fine tuning at the moment. One thing to look out for though: My barrel snapped> !
I sometimes hold the barrel on tank turrets in order to paint some areas and although it is probably a bad habit I've never had a barrel snap before- but the last 1/4 snapped as I lifted it. Luckily the break was not totaly, it hung on by a thing shred! And, as it was clean, was easy to repair- now I have to remember not to grab it by the barrel again! I just thought I would let people know in case they share this particular habit.

Spiderfrommars
Visit this Community
Milano, Italy
Joined: July 13, 2010
KitMaker: 3,845 posts
Armorama: 3,543 posts
Posted: Thursday, February 09, 2012 - 06:07 AM UTC

Quoted Text

The Panzerart wheels are no good in my opinion. The edges on the spokes are way too sharp and square and don't look anything like the real thing. Changing the kit wheels isn't necessary at all.


I agree. Miniarm wheels are the best ones


Panzerart wheels probably are good for an early T-90


...and of course for a t-72


RWFG01
Visit this Community
Nordrhein-Westfalen, Germany
Joined: June 30, 2009
KitMaker: 16 posts
Armorama: 15 posts
Posted: Friday, February 10, 2012 - 12:38 AM UTC
Thank you guys for all your help regarding the wheels!

So I have come to the conclusion to use the kit wheels - and save the money for some kind of add-on metal barrel, that hopefully comes out soon.

Great to have such a good forum!!
Karl187
#284
Visit this Community
Northern Ireland, United Kingdom
Joined: October 04, 2006
KitMaker: 3,094 posts
Armorama: 2,942 posts
Posted: Friday, February 10, 2012 - 05:43 AM UTC
Camouflage painting is finished!


Putting the black color on took a little longer than expected. The main reason for this was taking the time to work out where the black splotches would go. The painting instructions show only a few bits of black in small bits, tapered sharply at both ends. I've only seen this on one example and I prefered the slightly larger black splotches I had seen on most references.

It took a lot of just sitting and looking at the tank on the bench, trying to work out what would go best and where. Then another problem appeared- NATO Black. Originally I thought this was a decent match for the color in references but it turned out not to have enough intensity versus the Khaki Drab- so much so it appared more black-grey than black. Thus this was swapped in favor of plain Tamiya Flat Black- bearing in mind various weathering stages to come this provided a much better color intensity against Khaki Drab. You can see what I am talking about in these pictures- the NATO Black is the leftmost black in both pictures and the black in the middle is Flat Black:


Some more pictures:


So what's next? Well first of all there is some detail painting to do and obviously the machine gun has to be painted and fitted. Then I'll be moving on to the first stages of weathering and hopefully I will also be starting to construct the groundwork for the scene I'm planning.

As ever- thanks for reading and stopping by to check out the thread.

-Karl187-
Spiderfrommars
Visit this Community
Milano, Italy
Joined: July 13, 2010
KitMaker: 3,845 posts
Armorama: 3,543 posts
Posted: Friday, February 10, 2012 - 06:29 AM UTC
I think you perfectly guessed the colors Karl!

It looks perfect in my opinion

I'm going to use the same paints which you've used when I make my exemplar

Thanks a lot mate

Cheers
dylans
Visit this Community
British Columbia, Canada
Joined: March 05, 2009
KitMaker: 394 posts
Armorama: 380 posts
Posted: Friday, February 10, 2012 - 02:15 PM UTC
woot woot I got my T90 kit today from the lhs.

fantastic stuff Karl. i will be using your build as inspiration for mine.

can I make a suggestion about your pictures?
get rid of the lightbox/tent that you are using. check out the difference between the shots of your workbench and the ones from the lightbox.

the shots under a bare bulb are much more sharp and the colours are not as washed out.

I've had great results with a couple of bare 6500k cfl bulbs and a white background.

cheers
Dylan


Karl187
#284
Visit this Community
Northern Ireland, United Kingdom
Joined: October 04, 2006
KitMaker: 3,094 posts
Armorama: 2,942 posts
Posted: Friday, February 10, 2012 - 11:38 PM UTC
Mauro- I'm glad you like it mate, means a lot to me!

Dylan- thanks for the compliments my friend, I really appreciate it and I'm glad you've now got your T-90 to crack on with! I know what you mean about the lightbox- the weird thing is some days it is fine and the pictures are nice and clear with a nice crisp white background, other times it just seems to go a bit yellowy, also seems to depend on which camera I am using. Anyway, I think I will drop the background for now, its a nuisance to set up anyway as I have to clear the bench of clutter first !
Karl187
#284
Visit this Community
Northern Ireland, United Kingdom
Joined: October 04, 2006
KitMaker: 3,094 posts
Armorama: 2,942 posts
Posted: Tuesday, February 14, 2012 - 06:13 AM UTC
Right so, more progress!

Once the painting was done it was time to move on to detail painting. There's not much of this to do. The tow cable was picked out in Gun Metal, the inside of various lights were painted Mr. Hobby Chrome and the various small lights on the tank were also painted and some of the non-glazed periscopes were painted Royal Blue.

Then it was time for some weathering. Most T-90s aren't all that old and they have not seen combat service so most will be in a pretty good state. Thats not to say they haven't seen a fair bit of wear and tear but for me it meant keeping chipping to a minimum. I always find drybrushing brings out a nice worn look and I used the following colors- Khaki Drab parts were drybrushed with Vallejo Iraqi Sand, Deck Tan parts with a mix of Pale Sand and Off White and Flat Black with Andrea Slate Grey. Some areas received much heavier applications and remember at this stage that subsequent weathering stages will tone everything down so I always make sure to account for this when weathering at this stage.

The last thing was to chipping to the side skirts- these are heavy rubber and the paint comes off in various areas, particularly around the bottom and where each skirt joins the next (there's plenty of reference photos showing various stages of chipping), plus there would probably be scrapes aswell from obstacles. Dark Rubber was used to do the chipping and scrapes.


Now its time for a coat of future and decals.

Thanks for reading.

-Karl187-