Quebec, Canada
Joined: November 19, 2011
KitMaker: 1,389 posts
Armorama: 1,388 posts
Posted: Wednesday, February 06, 2013 - 01:00 PM UTC
haha! Thanks bro.
Ok here pics of the new workshop...Still under construction dough


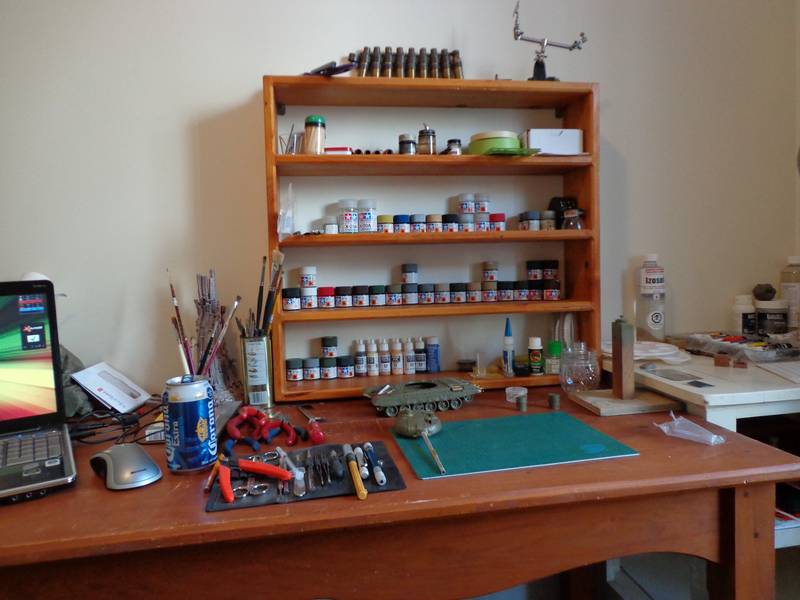
Notice the .50 cal shells?
I still got to figure out a new paint station, a photo booth and how the hell am I going to find place to unload the last box!
Darn! didn`t notice the corona can!!!! bah you know... moving require to pay beer and pizza to everyone(including me!)
Enjoy.
Phil.

Modeling...
I rest my case.
Georgia, United States
Joined: August 19, 2009
KitMaker: 347 posts
Armorama: 338 posts
Posted: Wednesday, February 06, 2013 - 02:09 PM UTC
i have found brass wire from michales (dont know if you have those where you are but any craft store that sells stuff to make jewelry) should have what you need and it is soft so it will be easy to bend and form to the shape you want
just be yourself, have fun, and keep it legal
Georgia, United States
Joined: August 19, 2009
KitMaker: 347 posts
Armorama: 338 posts
Posted: Wednesday, February 06, 2013 - 02:14 PM UTC
you could get some brass wire from any craft store that sells stuff to make jewelry and it will br soft easy to bend also i believe the pics came from a site called
www.primeportal.net i saw these photos researching my t-62am i wanted to add fuel lines from the rear drums as well but i could not find any photos worth while hope this helps
just be yourself, have fun, and keep it legal
Quebec, Canada
Joined: November 19, 2011
KitMaker: 1,389 posts
Armorama: 1,388 posts
Posted: Thursday, February 07, 2013 - 01:53 AM UTC
Thanks Ronnie, I do use prime portal for quick reference pics. Oddly enough I have trouble finding a store that sell copper wire around here

So thanks for the jewlery tip, I`ll look into it.
Phil.
Modeling...
I rest my case.
Quebec, Canada
Joined: November 19, 2011
KitMaker: 1,389 posts
Armorama: 1,388 posts
Posted: Saturday, February 09, 2013 - 05:32 AM UTC
saturday morning update. The snorkel is almost finish, just a little cleaning needed. Ive scratched the retaining pin with some styrene rod and Ive used a pe chain from the spare pe.
Now back to the turret!
Phil.
Modeling...
I rest my case.
Georgia, United States
Joined: August 19, 2009
KitMaker: 347 posts
Armorama: 338 posts
Posted: Saturday, February 09, 2013 - 05:56 AM UTC
i tried to post to you the other day but i will try again you could use some soft brass wire from an arts and craft store IE hobby lobby or michales that selll stuff to make jewelry i have found that works well and the brass is easy to manipulate and bend
just be yourself, have fun, and keep it legal
Georgia, United States
Joined: August 19, 2009
KitMaker: 347 posts
Armorama: 338 posts
Posted: Saturday, February 09, 2013 - 05:58 AM UTC
ok thats is twice i wrote to you and after i posted got the already updated post i did not see until after the last post you had already recieved it lolololol hope you have a good day
just be yourself, have fun, and keep it legal
Quebec, Canada
Joined: November 19, 2011
KitMaker: 1,389 posts
Armorama: 1,388 posts
Posted: Saturday, February 09, 2013 - 06:16 AM UTC
Thx Ronnie, you to. I aleready went and bought some
Phil.
Modeling...
I rest my case.
Texas, United States
Joined: March 08, 2010
KitMaker: 2,465 posts
Armorama: 2,383 posts
Posted: Saturday, February 09, 2013 - 06:40 AM UTC
Hey Brother Phil, great job on the tube and flange covers. Those were a very nice touch. more please!
Gary
Quebec, Canada
Joined: November 19, 2011
KitMaker: 1,389 posts
Armorama: 1,388 posts
Posted: Saturday, February 09, 2013 - 07:46 AM UTC
Thx Gary!
I`ll do my best to have another update tomorow, lets say a mounted snorkel, maybe some smoke grenades...maybe.
Phil.
Modeling...
I rest my case.
Quebec, Canada
Joined: November 19, 2011
KitMaker: 1,389 posts
Armorama: 1,388 posts
Posted: Monday, February 11, 2013 - 02:49 AM UTC
Hi everyone,
I finally decided to go with the kit`s smoke grenades, I`m keeping the turned ones for another project. Let me tell you this: Tamiya usually have the sweetest attachement point but they really pooped the ones for the smoke discharger...Turned out ok I guess

Here is where I am:

Still got work on the turret: IR lamp and tool boxes. Afterward it`s miniarm tracks and primer I guess!

Thanks for watching and comments.
Phil.
Modeling...
I rest my case.
Joined: April 09, 2011
KitMaker: 181 posts
Armorama: 175 posts
Posted: Monday, February 11, 2013 - 04:16 AM UTC
Quoted Text
Tamiya usually have the sweetest attachement point but they really pooped the ones for the smoke discharger...Turned out ok I guess
Totally agree on that point, the attachment points are just little faint angled cutouts in the turret, and when I did my T-72 I could hardly even see them, plus the Tamiya smoke dischargers are just horrible, the mounting plates seem to be very simplified, just thick lugs of plastic.
If I remember right (was a long time ago), there is very little to set them at the correct angle, I kinda gave up with mine, and just glued them on any old how, lol

Quebec, Canada
Joined: November 19, 2011
KitMaker: 1,389 posts
Armorama: 1,388 posts
Posted: Monday, February 11, 2013 - 02:09 PM UTC
Hahaha! Same story here...It looks like someone did the smoke discharger and die before sharing the secret way to plug them into the turret

Modeling...
I rest my case.
Ceara, Brazil
Joined: February 21, 2011
KitMaker: 89 posts
Armorama: 88 posts
Posted: Monday, February 11, 2013 - 03:55 PM UTC
Quebec, Canada
Joined: November 19, 2011
KitMaker: 1,389 posts
Armorama: 1,388 posts
Posted: Tuesday, February 12, 2013 - 02:10 AM UTC
Thanks for the good words Lury, Much apreciated!
Modeling...
I rest my case.
Quebec, Canada
Joined: November 19, 2011
KitMaker: 1,389 posts
Armorama: 1,388 posts
Posted: Wednesday, February 13, 2013 - 02:26 AM UTC
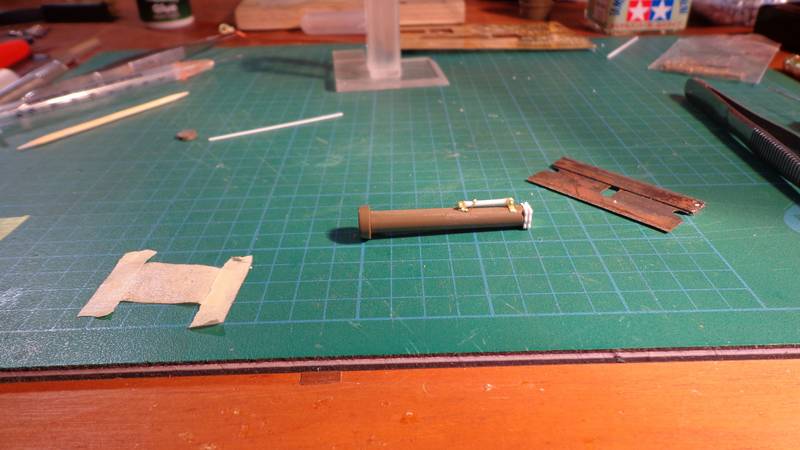
Small update on the smoke discharger wire.
Scratched the junction box that was missing and now I got to conect the discharger to the main wire.
 smoke01
 par
asmodeuss, sur Flickr
Phil.
Modeling...
I rest my case.
Joined: April 09, 2011
KitMaker: 181 posts
Armorama: 175 posts
Posted: Wednesday, February 13, 2013 - 02:29 PM UTC
Quoted Text
Hahaha! Same story here...It looks like someone did the smoke discharger and die before sharing the secret way to plug them into the turret
Here's my smoke dischargers, they ended up a little wobbly, plus one fell off a while back, never did find it, I connected my smoke dischargers to the main wire with very thin brass wire, it was a fiddly job and never looked right tbh, I kinda just gave up in the end.
 http://redarmour.blogspot.co.uk/p/tamiya-t-72-ootb.html
 Quebec, Canada
Joined: November 19, 2011
KitMaker: 1,389 posts
Armorama: 1,388 posts
Posted: Thursday, February 14, 2013 - 01:44 AM UTC
Superb work Matt!
The wireing is indeed kinda hard to get right...But some wire is still better than none!
Phil
Modeling...
I rest my case.
Texas, United States
Joined: March 08, 2010
KitMaker: 2,465 posts
Armorama: 2,383 posts
Posted: Thursday, February 14, 2013 - 02:37 AM UTC
Nice touch with the wireing an junction box. When the time comes i build me a T-72...im useing yours as reference.
Gary
Joined: April 09, 2011
KitMaker: 181 posts
Armorama: 175 posts
Posted: Thursday, February 14, 2013 - 08:58 AM UTC
Quoted Text
The wireing is indeed kinda hard to get right...But some wire is still better than none!
Phil
Indeed yes
I am very jealous of your gun barrel, it looks fantastic, I wish I had fitted one to mine, I had a lot of trouble with the joint line on my Tamiya barrel, and never did get it looking right tbh.
I am looking forward to seeing the tracks, I might retro-fit some better tracks to mine, not sure.
Quebec, Canada
Joined: November 19, 2011
KitMaker: 1,389 posts
Armorama: 1,388 posts
Posted: Thursday, February 14, 2013 - 01:07 PM UTC
thx Matt, the main gun is from Jbmodel, 8 bucks. you should get one. Jerzy the owner is a real good fellow. As for the tracks I`ll see if miniarm`s are ant good soon
Phil.
Modeling...
I rest my case.
Quebec, Canada
Joined: November 19, 2011
KitMaker: 1,389 posts
Armorama: 1,388 posts
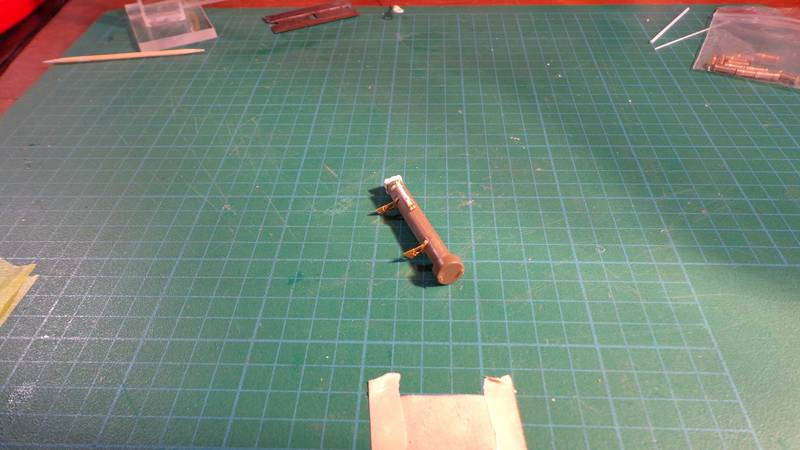
Posted: Friday, February 15, 2013 - 02:15 AM UTC
I`ve done right side of the somoke discharger wireing...Not so happy with results. The Boggs gave me a sweet option that I will try on the left side: using finely streched sprue as small wire. If it turn out good, wich I think it will, I`ll correct the right side.
Have a look.
 smoke02
 par
asmodeuss, sur Flickr
The unfinished left side.
 smoke03
 par
asmodeuss, sur Flickr
Thanks for watching and comments.
Phil.
Modeling...
I rest my case.
Joined: April 09, 2011
KitMaker: 181 posts
Armorama: 175 posts
Posted: Friday, February 15, 2013 - 10:55 AM UTC
I want your camera, ooh the pictures I could take with your camera.
An easy way to get very fine wire for doing electrical work is to buy some picture hanging wire (art shops), then just pull out the strands (ie rip it apart)
Art shops are a gold mine of useful 'tings'
Quebec, Canada
Joined: November 19, 2011
KitMaker: 1,389 posts
Armorama: 1,388 posts
Posted: Saturday, February 16, 2013 - 02:22 AM UTC
Quoted Text
I want your camera, ooh the pictures I could take with your camera.
An easy way to get very fine wire for doing electrical work is to buy some picture hanging wire (art shops), then just pull out the strands (ie rip it apart)
Art shops are a gold mine of useful 'tings'
Matt, the camera is a sony cyber-shot dsc-w650 that my wife bought me as a present for my bday. it was on sale at 70$ canadian dollars. Thx for the picture frame wire tip...think I got some.
Phil.
Modeling...
I rest my case.
Quebec, Canada
Joined: November 19, 2011
KitMaker: 1,389 posts
Armorama: 1,388 posts
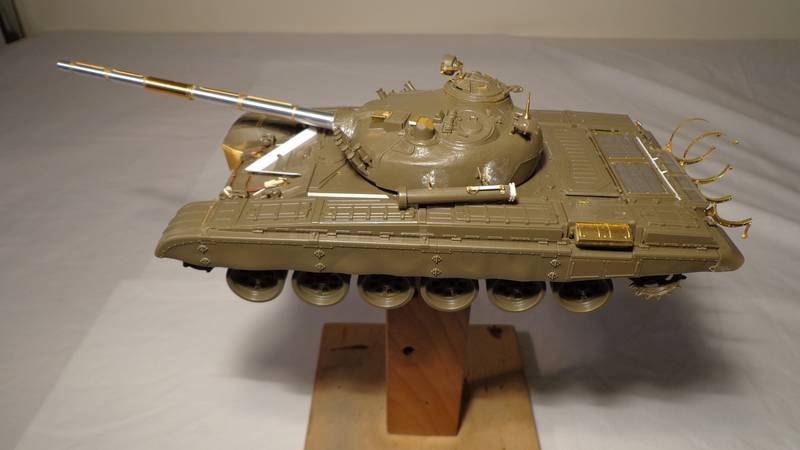
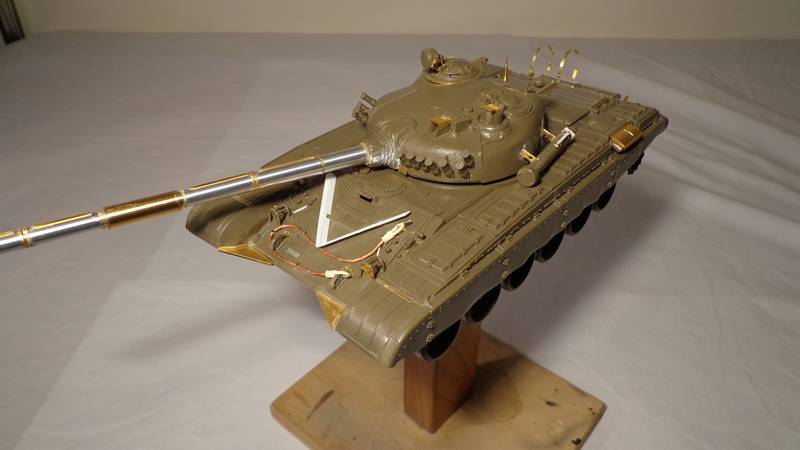
Posted: Saturday, February 16, 2013 - 09:28 AM UTC
Here is where I am.
 finishedturret05
 par
asmodeuss, sur Flickr
 finishedturret04
 par
asmodeuss, sur Flickr
 finishedturret02
 par
asmodeuss, sur Flickr
 finishedturret03
 par
asmodeuss, sur Flickr
 finishedturret01
 par
asmodeuss, sur Flickr
Thanks for watching and comments.
Phil.
Modeling...
I rest my case.


