


Hosted by Darren Baker
Riich Models RV35011

Plasticbattle

#003

Joined: May 14, 2002
KitMaker: 9,763 posts
Armorama: 7,444 posts

Posted: Sunday, November 24, 2013 - 12:16 AM UTC
Fantastic build Mike. Both the UC and the base work. Cant forget the figures either .... everythings to a very high standard.


Keef1648

Joined: January 23, 2008
KitMaker: 1,240 posts
Armorama: 1,192 posts

Posted: Sunday, November 24, 2013 - 01:29 AM UTC
Mike such problems are sent to try our model making decisions and I think your option is the better one. Not of course to belittle Robert's input and comparison. It was most helpful to see them side by side.
I think the area (Italy) and the color tones used in the base knit/bond well with the outside circumference color of the module.
Black or even your 'charcol' would, in my humble opinion, have been too much of a stark contrast...
Nice work Sir, my hat is off to you..
Keith.
I think the area (Italy) and the color tones used in the base knit/bond well with the outside circumference color of the module.
Black or even your 'charcol' would, in my humble opinion, have been too much of a stark contrast...
Nice work Sir, my hat is off to you..
Keith.

thebear

Joined: November 15, 2002
KitMaker: 3,960 posts
Armorama: 3,579 posts
Posted: Sunday, November 24, 2013 - 03:34 AM UTC
Hi Mike ...I think you made the right choice for the dio base color... The fact that this is supposed to be in Sicily or southern Italy ,lt gives it that dusty chalky feeling ...Looks great sir. Congrats.
Rick
Rick


jrutman
Joined: April 10, 2011
KitMaker: 7,941 posts
Armorama: 7,934 posts
Posted: Sunday, November 24, 2013 - 03:35 AM UTC
Spectacular finish with a big flourish! Will be nice to see when you"bring it home" by adding the plaque as that will be a nice touch but to me,all the cool stuff is already done.
J
J
SdAufKla
Joined: May 07, 2010
KitMaker: 2,238 posts
Armorama: 2,158 posts

Posted: Wednesday, December 04, 2013 - 01:04 PM UTC
Wow, hard to believe it's already been over a week since my last up-date...
@ Robert: I appreciated the exchange of ideas and the offer - thanks!
@ Frank: Thank you for the kind words.
@ Keith: As always, I value and appreciate your input and observations. Thanks for keeping me on track!
@ Richard: I'm glad you see the color that way. It was my intent to use a color on the cut-away portion of the base that was complementary to the terrain, and I'm happy someone else thinks the color I used accomplished that.
@ Jerry: Hang in there with me old friend. There's many more miles to travel on this dusty trail!
So, I got a PM the other day from someone who wanted some details about how I do my oil washes. In my reply, I said that I would post up some pictures here that would hopefully illustrate what I was trying to explain. This made me realize that I've been neglecting the build blog here. Hopefully this post will catch-up anyone still following the build.
In regards to my technique for washes, I'm an "old school" modeler, and I pretty much use traditional materials that have been shared around modeling circles for about as long as I've been building. There's probably very little that's new or enlightening, but for what it's worth, I'll try to explain without being too boring, patronizing, or condescending...
I use mostly pin washes and not general, all-over washes. I feel that I have more control and can achieve better precision doing this. The down side is that this is tedious and time consuming. I work in small areas, usually with one color at a time. As I finish an area with that color, I move on to the next, working my way around the model. I'll then move on to the next color, and so on.
I pre-wet the area I intend to work on with clean,straight mineral spirits using the same brush for the washes - no need for two brushes.
I then apply the pin wash to a few details (say here on the carrier, maybe a half-dozen or so rivet heads), use a clean brush dampened with straight mineral spirits to clean away any excess and brush out any tide marks. Then I do another spot. I usually try to position the model using blocks or paint bottles to prop it up so that I can use both hands if necessary for the painting (one hand bracing the other, usually). Not allowing the washes to dry too long or working on too large an area allows me to clean up any excess, feather the edges of the washes, and clean up tide marks before the set up.
Being selective in the application of the washes is important to avoid making some areas too dark, especially over light colored areas - like the "mud" cammo here on the carrier. A general Raw Umber wash applied over these areas would turn them quite dark.
I don't have any set finishing sequence that I follow all the time. Without trying to sound pretentious, I try to take my vision for the model and work my way back mentally to the bare plastic, pealing the layers of the finish away from the final layer down to the plastic. My finishing sequence for that model then becomes adding those imaginary layers back one at a time to the base plastic.
Because I like to build in sub-assemblies and to keep parts off to finish them separately, I tend to have a lot of branches and sequels to my finishing sequence where I have to stop work on the main structure to finish a sub-assembly or detail part which will require its own mini finishing sequence that will have to be matched to some point in the main structure's finishing sequence - usually at the point where I will assemble that sub element to the main.
I will often make quick notes for myself to keep track of what I'm planning to do and help me find the most efficient sequence for airbrushing colors, applying markings, etc.
I'm not saying that this is the "right" way or the "best" way, nor certainly not the "only" way, to approach finishing. This is just what works for me, and the only critic I'm really interested in pleasing is me.
The materials that I use for washes and most weathering are very simple and easily obtained at any art supply store - mostly oil paints and dry artist pigments. I also use artist textured gel mediums for some things. This is not to say that I disdain some of the newer proprietary weathering solutions and filters, just that what I use works for me and as long as something works, I have no need or impulse to change.
Anyways, on to the subject of washes...
Here are the materials that I've used on the Universal Carrier build.
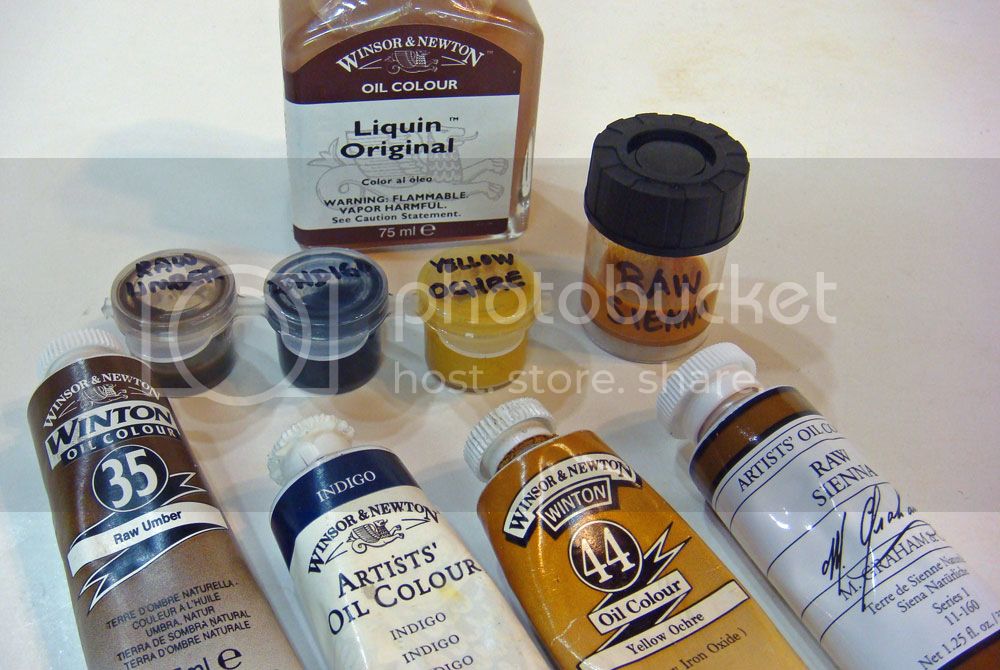
Not shown is a gallon-sized jug of ordinary hardware store odorless mineral spirits which is my "go-to" thinner and general brush cleaner for artist oils.
I mix about two parts mineral spirits to one part of W&N Liquin to make the wash thinner. The Liquin makes controlling the washes and moving them around much easier than just straight mineral spirits. Note that I do not gloss coat my models before doing the washes or color modulation. I apply the oils directly over the flat dried acrylics (mostly Tamiya).
To this I add roughly 25% by volume of oil paint. The pigments in the wash will tend to settle over a painting session, and I find this desirable. It allows me to dip my brush and take up a drop of wash with whatever amount of pigment / opacity I desire for the particular spot. That is, I constantly, on the fly, vary the concentration of the washes that I'm using to suit my tastes and intentions.
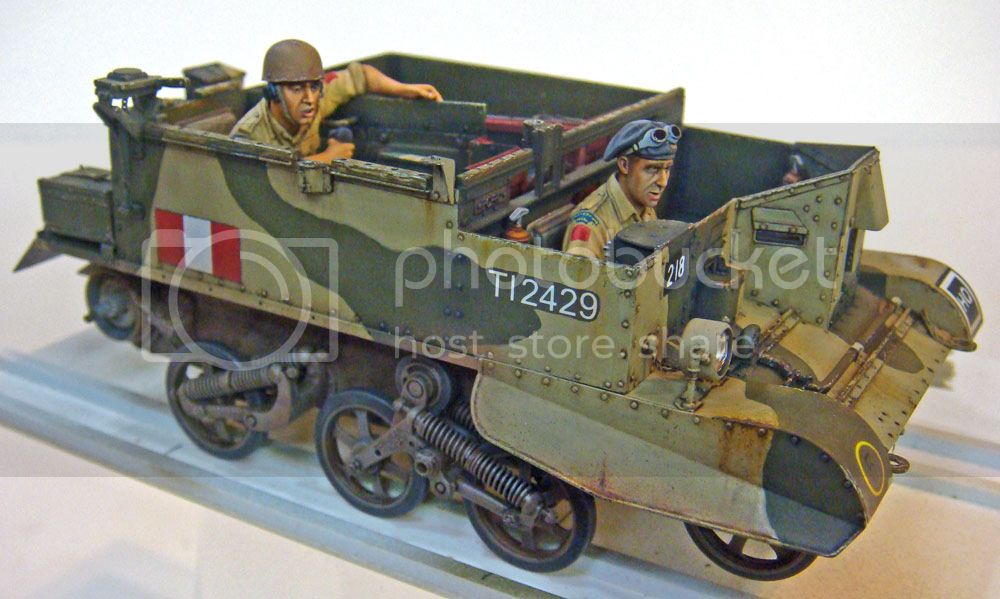
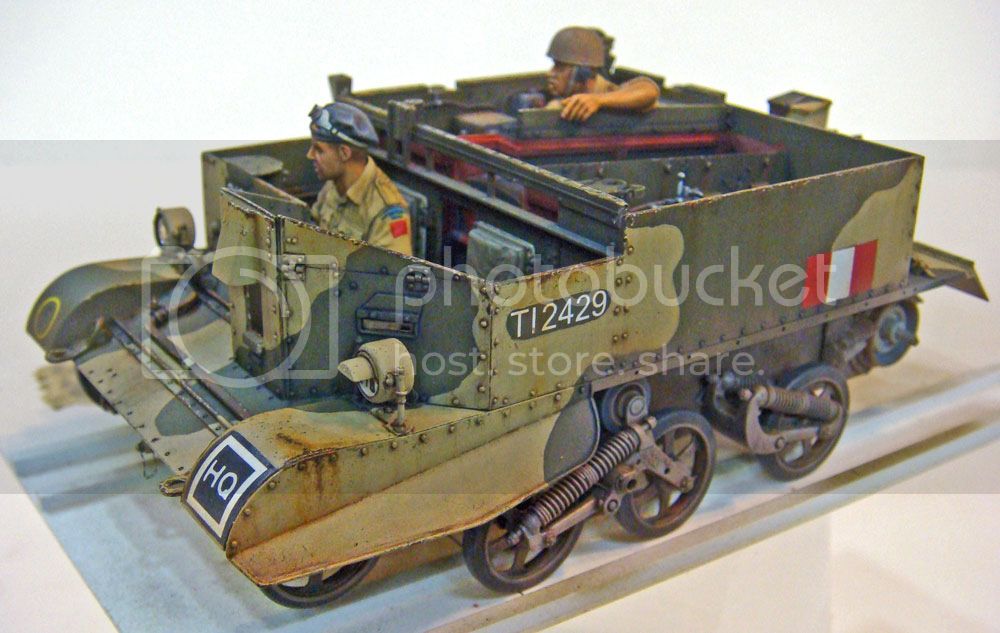
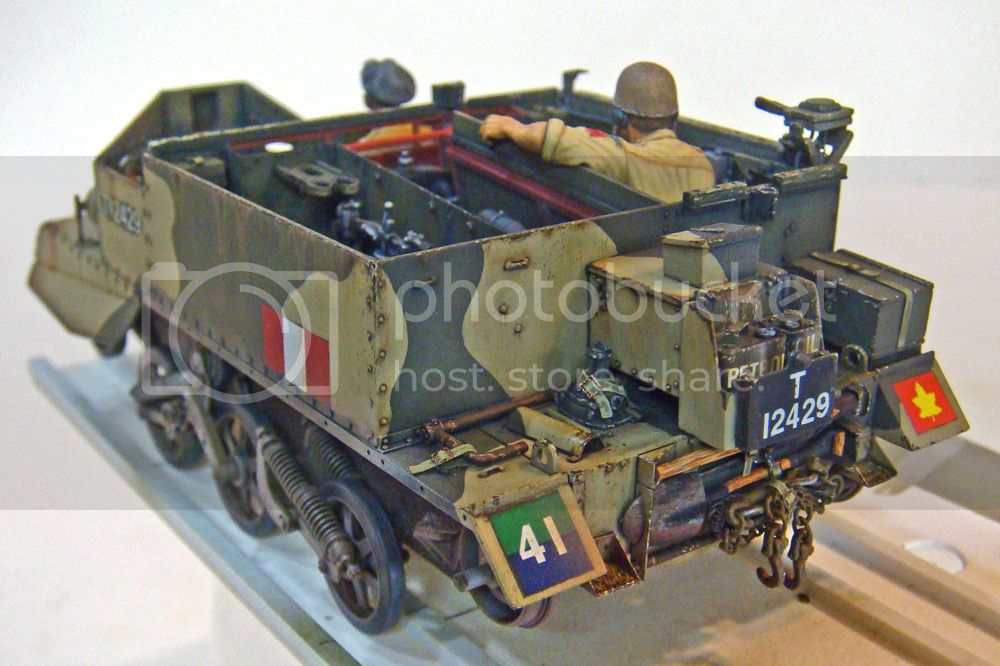
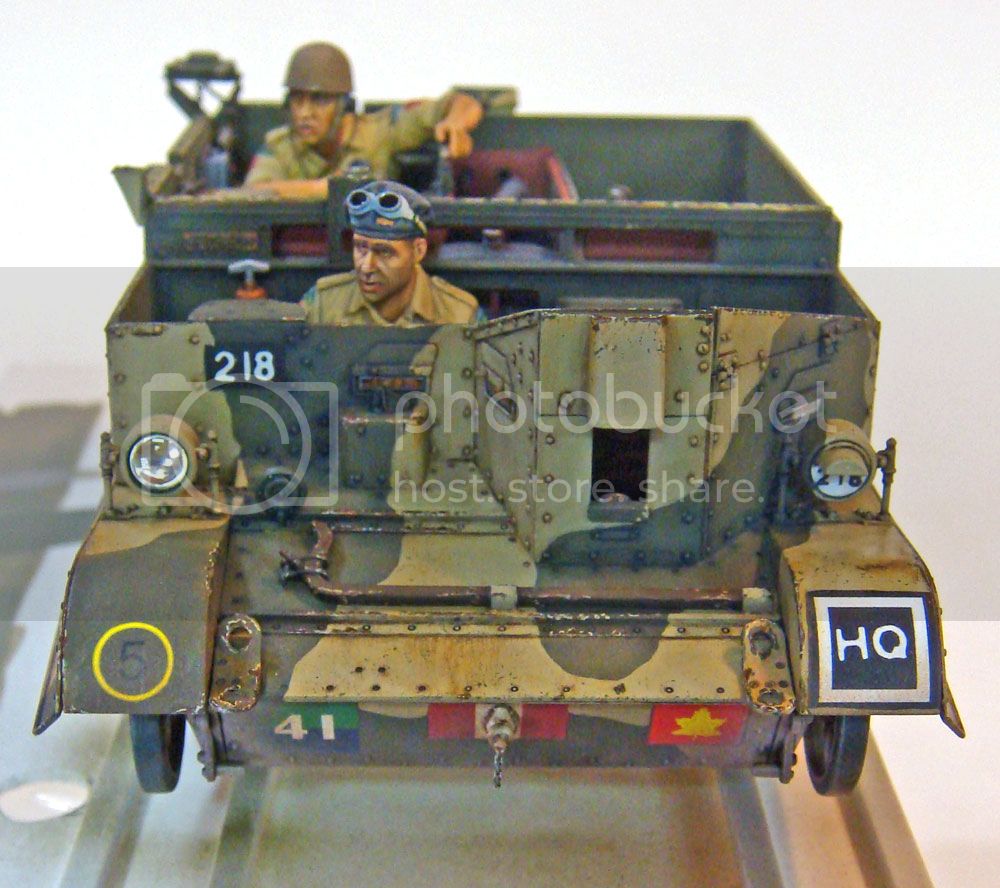
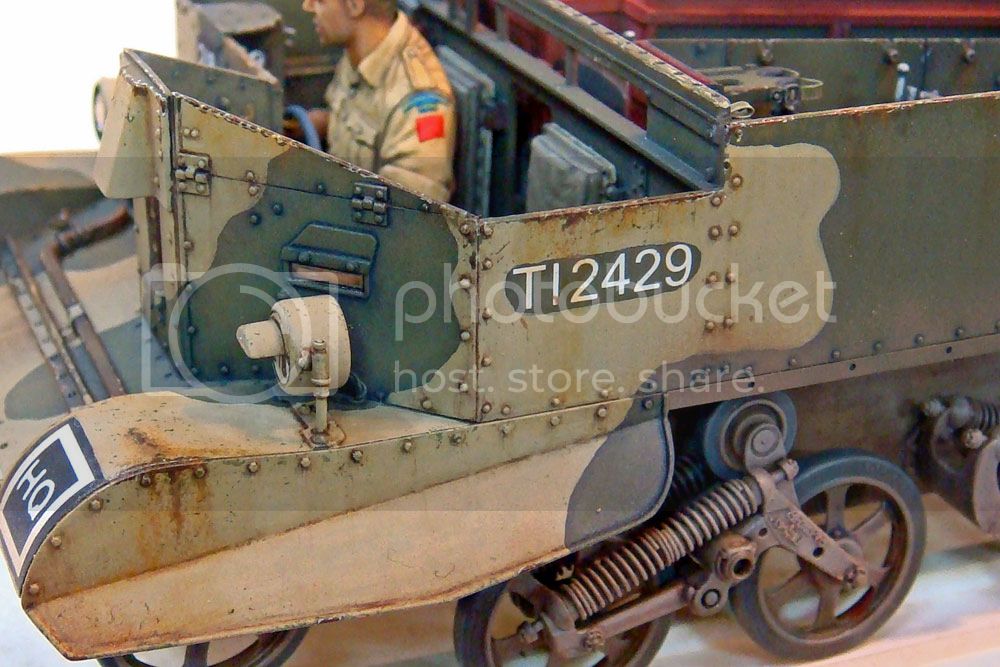
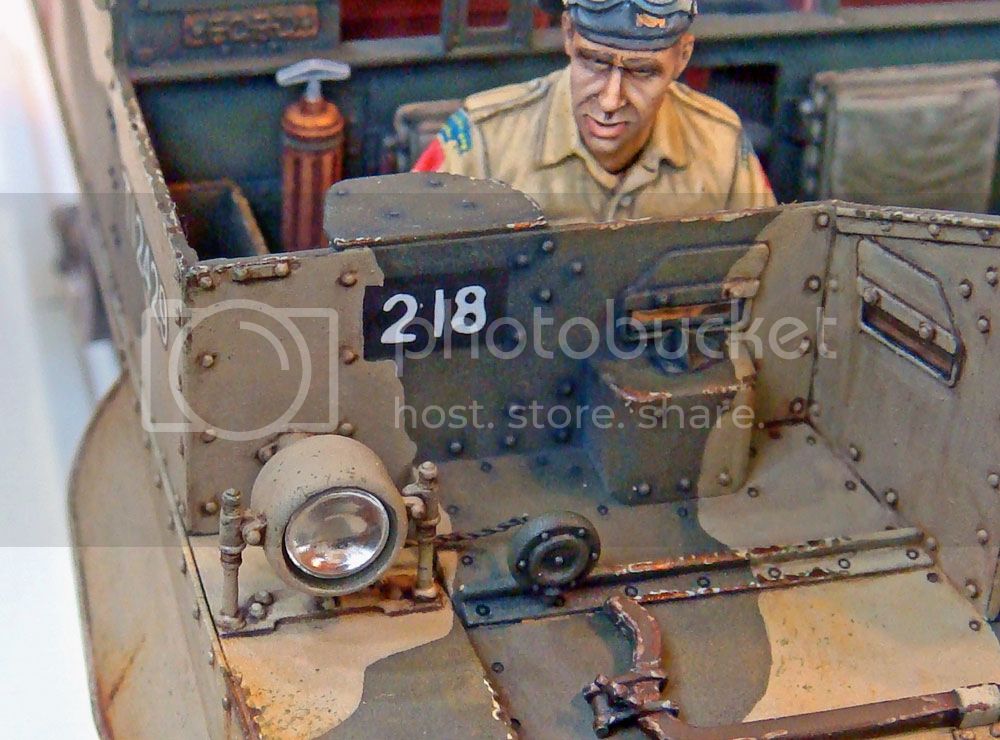
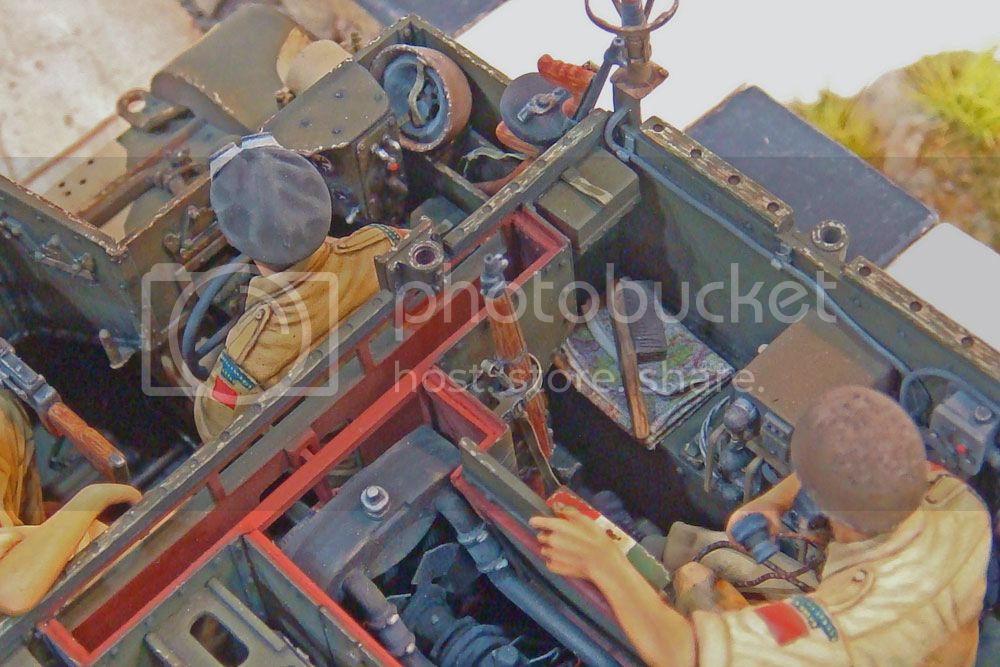
On the carrier, I used mostly Indigo pin washes on the dark green areas and Raw Umber pin washes on the "mud" colored areas. When I felt it was right, I sometimes streaked these across the alternate color, but generally I confined them to the colors described. I chose the Indigo because it's a very dark blue and would create dark greenish tinted shadows on the green areas. The Raw Umber created nice dark brown shadows on the "mud." Over the "field" areas of the dark green I used "filters" made with the Yellow Ocher to lighten and brighten the green highlights.
You can look closely at the extreme close-ups and see the two different colors used as pin washes - Indigo and Raw Umber.
Over the chipped areas, I applied rust stains made with Raw Sienna oil paint. This modulates the base colors, adds variety to the finish, and helps blend the rusty chips into the overall finish. In a few places, I used Burnt Sienna straight from the tube to create darker rust streaks, and on some of these I added streaks made from the Raw Umber wash.
The lower hull was base coated using a mix of about 50:50 Tamiya Flat Earth and Khaki over some light applications of artist textured acrylic gel - pumice and fine sand. I kept this heavy earth texture to a minimum because of the final look I want for this subject. On a heavier weathered vehicle, I might have used more and combined it with textured applications of dry pigments.
I allowed some (but not too much) of the airbrushed earth base color to encroach onto the green and "mud" camouflaged areas. This is the initial blending of the weathering from the lower hull to the upper hull.
I detail painted the rubber tires on the road and idler wheels and return rollers after the airbrushed base color.
I did use a general, over-all wash of the same Raw Umber on the lower hull and suspension. After this dried, I dry-brushed these areas with artist oil pints mixed from Titanium White, Raw Umber, Raw Sienna and Yellow Ocher.
So, after some intermediate assembly of some details (the tools, clear parts, etc), I'm now ready for a dust glaze over the entire exterior. (I've already airbrushed this in the interior.) This glaze will tone down the contrast and brightness of the markings and some of the details (raw wood tool handles, etc) and tie the weathering all together.
Because this glaze will dry with a slight sheen, I'll over spray it with Testors Dull Coat. Just before I mount the carrier on the base, I may apply some additional light pigment dusting - this just depends on how things are looking at that stage.

You'll note some areas with a slight sheen from the oils. These are no problem since I will apply Dull Coat later.
The sand shields are held on right now with white glue (PVA), and I'll pop these off to add the tracks and drive sprockets back.
I still have a number of details (crew weapons, antenna mounts, etc) that I'm working on. However, things are coming together now...
Happy modeling!
@ Robert: I appreciated the exchange of ideas and the offer - thanks!
@ Frank: Thank you for the kind words.
@ Keith: As always, I value and appreciate your input and observations. Thanks for keeping me on track!
@ Richard: I'm glad you see the color that way. It was my intent to use a color on the cut-away portion of the base that was complementary to the terrain, and I'm happy someone else thinks the color I used accomplished that.
@ Jerry: Hang in there with me old friend. There's many more miles to travel on this dusty trail!
So, I got a PM the other day from someone who wanted some details about how I do my oil washes. In my reply, I said that I would post up some pictures here that would hopefully illustrate what I was trying to explain. This made me realize that I've been neglecting the build blog here. Hopefully this post will catch-up anyone still following the build.
In regards to my technique for washes, I'm an "old school" modeler, and I pretty much use traditional materials that have been shared around modeling circles for about as long as I've been building. There's probably very little that's new or enlightening, but for what it's worth, I'll try to explain without being too boring, patronizing, or condescending...
I use mostly pin washes and not general, all-over washes. I feel that I have more control and can achieve better precision doing this. The down side is that this is tedious and time consuming. I work in small areas, usually with one color at a time. As I finish an area with that color, I move on to the next, working my way around the model. I'll then move on to the next color, and so on.
I pre-wet the area I intend to work on with clean,straight mineral spirits using the same brush for the washes - no need for two brushes.
I then apply the pin wash to a few details (say here on the carrier, maybe a half-dozen or so rivet heads), use a clean brush dampened with straight mineral spirits to clean away any excess and brush out any tide marks. Then I do another spot. I usually try to position the model using blocks or paint bottles to prop it up so that I can use both hands if necessary for the painting (one hand bracing the other, usually). Not allowing the washes to dry too long or working on too large an area allows me to clean up any excess, feather the edges of the washes, and clean up tide marks before the set up.
Being selective in the application of the washes is important to avoid making some areas too dark, especially over light colored areas - like the "mud" cammo here on the carrier. A general Raw Umber wash applied over these areas would turn them quite dark.
I don't have any set finishing sequence that I follow all the time. Without trying to sound pretentious, I try to take my vision for the model and work my way back mentally to the bare plastic, pealing the layers of the finish away from the final layer down to the plastic. My finishing sequence for that model then becomes adding those imaginary layers back one at a time to the base plastic.
Because I like to build in sub-assemblies and to keep parts off to finish them separately, I tend to have a lot of branches and sequels to my finishing sequence where I have to stop work on the main structure to finish a sub-assembly or detail part which will require its own mini finishing sequence that will have to be matched to some point in the main structure's finishing sequence - usually at the point where I will assemble that sub element to the main.
I will often make quick notes for myself to keep track of what I'm planning to do and help me find the most efficient sequence for airbrushing colors, applying markings, etc.
I'm not saying that this is the "right" way or the "best" way, nor certainly not the "only" way, to approach finishing. This is just what works for me, and the only critic I'm really interested in pleasing is me.
The materials that I use for washes and most weathering are very simple and easily obtained at any art supply store - mostly oil paints and dry artist pigments. I also use artist textured gel mediums for some things. This is not to say that I disdain some of the newer proprietary weathering solutions and filters, just that what I use works for me and as long as something works, I have no need or impulse to change.
Anyways, on to the subject of washes...
Here are the materials that I've used on the Universal Carrier build.

Not shown is a gallon-sized jug of ordinary hardware store odorless mineral spirits which is my "go-to" thinner and general brush cleaner for artist oils.
I mix about two parts mineral spirits to one part of W&N Liquin to make the wash thinner. The Liquin makes controlling the washes and moving them around much easier than just straight mineral spirits. Note that I do not gloss coat my models before doing the washes or color modulation. I apply the oils directly over the flat dried acrylics (mostly Tamiya).
To this I add roughly 25% by volume of oil paint. The pigments in the wash will tend to settle over a painting session, and I find this desirable. It allows me to dip my brush and take up a drop of wash with whatever amount of pigment / opacity I desire for the particular spot. That is, I constantly, on the fly, vary the concentration of the washes that I'm using to suit my tastes and intentions.
On the carrier, I used mostly Indigo pin washes on the dark green areas and Raw Umber pin washes on the "mud" colored areas. When I felt it was right, I sometimes streaked these across the alternate color, but generally I confined them to the colors described. I chose the Indigo because it's a very dark blue and would create dark greenish tinted shadows on the green areas. The Raw Umber created nice dark brown shadows on the "mud." Over the "field" areas of the dark green I used "filters" made with the Yellow Ocher to lighten and brighten the green highlights.
You can look closely at the extreme close-ups and see the two different colors used as pin washes - Indigo and Raw Umber.
Over the chipped areas, I applied rust stains made with Raw Sienna oil paint. This modulates the base colors, adds variety to the finish, and helps blend the rusty chips into the overall finish. In a few places, I used Burnt Sienna straight from the tube to create darker rust streaks, and on some of these I added streaks made from the Raw Umber wash.
The lower hull was base coated using a mix of about 50:50 Tamiya Flat Earth and Khaki over some light applications of artist textured acrylic gel - pumice and fine sand. I kept this heavy earth texture to a minimum because of the final look I want for this subject. On a heavier weathered vehicle, I might have used more and combined it with textured applications of dry pigments.
I allowed some (but not too much) of the airbrushed earth base color to encroach onto the green and "mud" camouflaged areas. This is the initial blending of the weathering from the lower hull to the upper hull.
I detail painted the rubber tires on the road and idler wheels and return rollers after the airbrushed base color.
I did use a general, over-all wash of the same Raw Umber on the lower hull and suspension. After this dried, I dry-brushed these areas with artist oil pints mixed from Titanium White, Raw Umber, Raw Sienna and Yellow Ocher.
So, after some intermediate assembly of some details (the tools, clear parts, etc), I'm now ready for a dust glaze over the entire exterior. (I've already airbrushed this in the interior.) This glaze will tone down the contrast and brightness of the markings and some of the details (raw wood tool handles, etc) and tie the weathering all together.
Because this glaze will dry with a slight sheen, I'll over spray it with Testors Dull Coat. Just before I mount the carrier on the base, I may apply some additional light pigment dusting - this just depends on how things are looking at that stage.


You'll note some areas with a slight sheen from the oils. These are no problem since I will apply Dull Coat later.
The sand shields are held on right now with white glue (PVA), and I'll pop these off to add the tracks and drive sprockets back.
I still have a number of details (crew weapons, antenna mounts, etc) that I'm working on. However, things are coming together now...
Happy modeling!

Big-John
Joined: August 12, 2010
KitMaker: 731 posts
Armorama: 711 posts

Posted: Wednesday, December 04, 2013 - 01:26 PM UTC
Wow Mike, the weathering looks really exceptional! Looking forward to the finish line!

AlanL

Joined: August 12, 2005
KitMaker: 14,499 posts
Armorama: 11,675 posts
Posted: Wednesday, December 04, 2013 - 11:27 PM UTC
Hi Mike,
Excellent work, carrier is looking very sharp.
Cheers
Al
Excellent work, carrier is looking very sharp.
Cheers
Al
Petro
Joined: November 02, 2003
KitMaker: 984 posts
Armorama: 846 posts
Posted: Thursday, December 05, 2013 - 01:02 AM UTC
Beautiful work.
I like the Indigo wash on the green camouflage paint. I wou;d never think of changing to a different wash for a different color.
I like the streaking effects too.
I like the Indigo wash on the green camouflage paint. I wou;d never think of changing to a different wash for a different color.
I like the streaking effects too.

SDavies

Joined: January 09, 2010
KitMaker: 979 posts
Armorama: 959 posts

Posted: Thursday, December 05, 2013 - 01:08 AM UTC
Great model, very impressive
jrutman
Joined: April 10, 2011
KitMaker: 7,941 posts
Armorama: 7,934 posts
Posted: Thursday, December 05, 2013 - 02:33 AM UTC
You mean it gets even better? Yes,apparently,it does. Nice finishing work bro.
I suppose I crossed the line of departure early and should synchronize my watch?
I am happy that you posted all of the basic modeling stuff in this blog because I forgot how to do most of this stuff,not having built a vehicle in so many years.
J
I suppose I crossed the line of departure early and should synchronize my watch?
I am happy that you posted all of the basic modeling stuff in this blog because I forgot how to do most of this stuff,not having built a vehicle in so many years.
J

Tedwards252
Joined: July 12, 2012
KitMaker: 72 posts
Armorama: 70 posts

Posted: Thursday, December 05, 2013 - 06:46 AM UTC
Always impressive Mike. Absolutely fantastic!

DaGreatQueeg

Joined: August 01, 2005
KitMaker: 1,049 posts
Armorama: 841 posts

Posted: Thursday, December 05, 2013 - 06:59 AM UTC
Just love your figure painting!
It was also nest to follow your blurb on your weathering techniques.
I don't gloss my models either before weathering by post shading and pin washes and it's always interesting to see how others do it .....
cheers
Brent
It was also nest to follow your blurb on your weathering techniques.
I don't gloss my models either before weathering by post shading and pin washes and it's always interesting to see how others do it .....
cheers
Brent
Keef1648
Joined: January 23, 2008
KitMaker: 1,240 posts
Armorama: 1,192 posts
Posted: Friday, December 06, 2013 - 12:50 AM UTC
And to think, out of the box build and finished (almost) in the same calendar year... 
Truly a great build full of help for us struggling to glue things together.
First class Mike, lovely work and finish on each and every part.
Looking forward to seeing you at our AMPS chapter Christmas gathering at the store this coming Wednesday...
Keith.
Truly a great build full of help for us struggling to glue things together.
First class Mike, lovely work and finish on each and every part.
Looking forward to seeing you at our AMPS chapter Christmas gathering at the store this coming Wednesday...
Keith.

majjanelson
Joined: December 14, 2006
KitMaker: 1,355 posts
Armorama: 979 posts
Posted: Friday, December 06, 2013 - 02:33 AM UTC
Wonderful work, Mike.
Also an excellent explanation to your wash technique. As Marc noted, switching wash colors for the different camouflage areas is something I've not noticed before and I don't believe many modelers think to do.
Methinks you still have a dust weathering application to do, but it seems to me for the wear and tear of the paint, the markings on the sides and the fenders maybe need some "damage & wear"?
None the less, superb execution, sir!
majjanelson
Joined: December 14, 2006
KitMaker: 1,355 posts
Armorama: 979 posts
Posted: Friday, December 06, 2013 - 05:15 AM UTC
OOPS!! Just reread your entire post above and saw at the end you do mention adding a dust glaze and possibly some pigments.
Need to work on my attention to detail.

Need to work on my attention to detail.

dvarettoni
Joined: September 28, 2005
KitMaker: 778 posts
Armorama: 763 posts
Posted: Tuesday, December 10, 2013 - 10:27 AM UTC
outstanding mike you always make it look so simple hope to see it tomarow dave 
SdAufKla
Joined: May 07, 2010
KitMaker: 2,238 posts
Armorama: 2,158 posts
Posted: Friday, December 13, 2013 - 01:01 PM UTC
@ John: Well, 'bout time to stick a fork in it, 'cause it's done!
@ Alan: Thanks for checking in!
@ Marc: Glad you liked it so far. Hopefully the final results won't hurt your eyes!
@ Steven: Cheers! BTW: It's good to see you making progress on your Tiger I project. I'm really enjoying following along with that.
@ Jerry: It's time to send the L.T. forward to make contact with the guide and get this lash-up back through the FFL!
@ Trevor: Thank you!
@ Brent: As my old friend Jerry can tell you, I've been trying to up my game painting figures for a very long time. It's good that it seems to finally be paying off a little. Glad you liked them!
@ keith: Come on, now! It's only been four months... That's a speed build in my book!
@ Jeff: All glazed and dusted now! (Sounds like a advert for Dunkin' Doughnuts!)
@ Dave V: Just the basics, sir! But to paraphrase Clausewitz: "In model-building everything is simple. It's just that the simple things are hard," or some such nonsense...
Anyways, I'm finally done with this one.
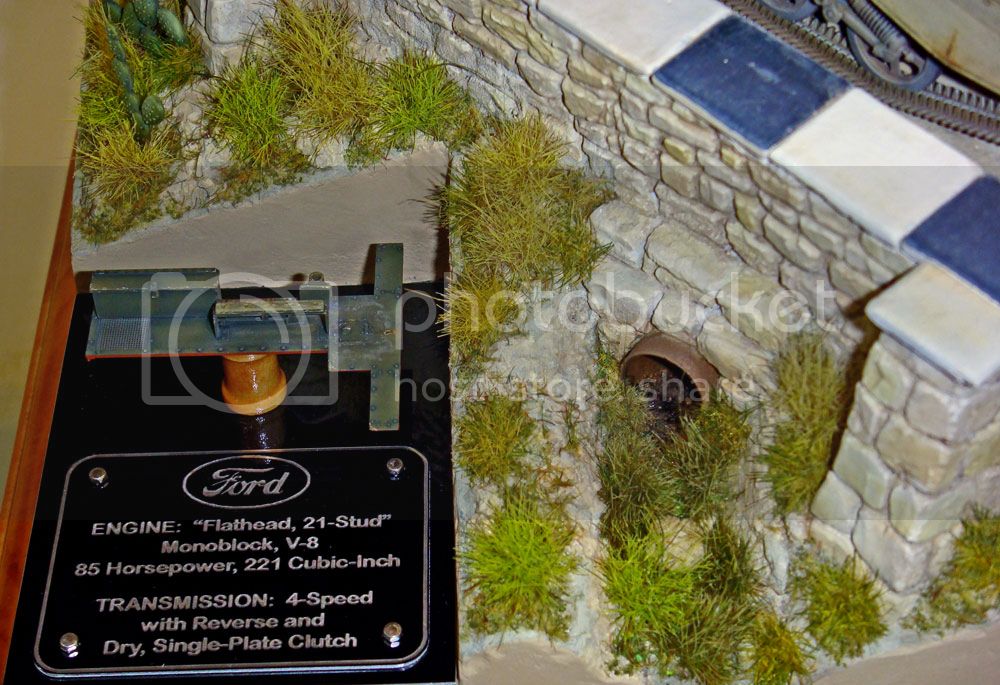
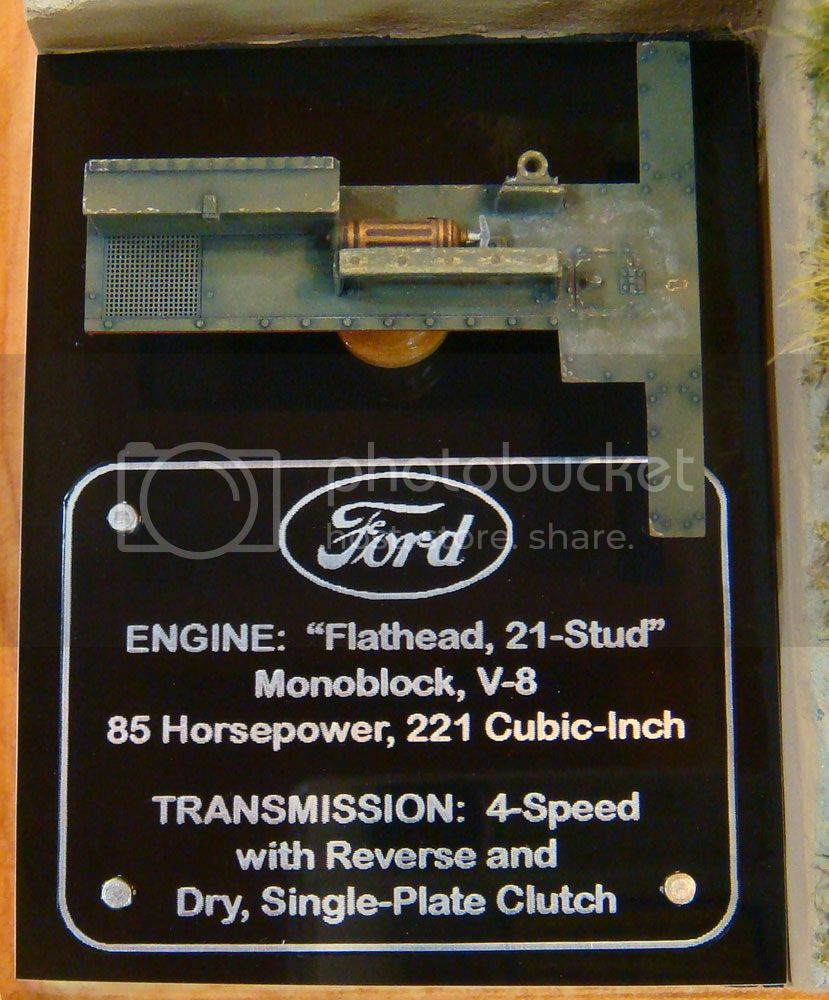
Riich Models "Universal Carrier Mk I" is a very, very nice little kit. I know I've been pretty critical of the figures and instructions, but really, aside form the figures (which do require a ton of work to fit the vehicle), the model is wonderfully engineered. The instructions are OK, they just don't offer any directions to combine painting and assembly. I think this is unfortunate since the kit's interior is so very detailed and, IMO, will present itself much better if nicely painted.
However, with some forethought, the average modeler can certainly figure out his own assembly sequence to combine interior painting with kit assembly.
I believe that this is the tightest fitting kit that I've ever built. The tolerances for fit are so close that in many instances, a single coat of paint was enough to throw things off. I don't consider this a bad thing, just something that needs to be taken into account.
The PE parts that are included in the kit are equally well engineered and its obvious that the kit designer incorporated the PE with his design and not as an afterthought. This does mean that the PE is necessary for the build (the PE parts are not optional plastic part replacements). However, the fit of the PE parts to the plastic parts is exceptional, and most attachment locations have positive locating features.
I think there's been some unjustified criticisms of the kit tracks by a few folks. Hopefully, the in-progress and finished photos will show that the kit tracks can be built and do a nice job of replicating the prototype tracks. Unless someone wants to construct the suspension to depict it articulated, I can't see any reason to consider replacing Riich's tracks.
Riich's Universal Carrier is not a build for the beginner or basic skill level modeler, but anyone with a few kits under his belt should be able to handle it. Construction can be simplified by omitting the entire engine (just use the radiator and oil cooler) and radio (which most carriers did not have). Bypassing the figures is another simplification.
At any rate, the Riich carrier is a finely detailed replica of the prototype which does this historically significant subject justice.
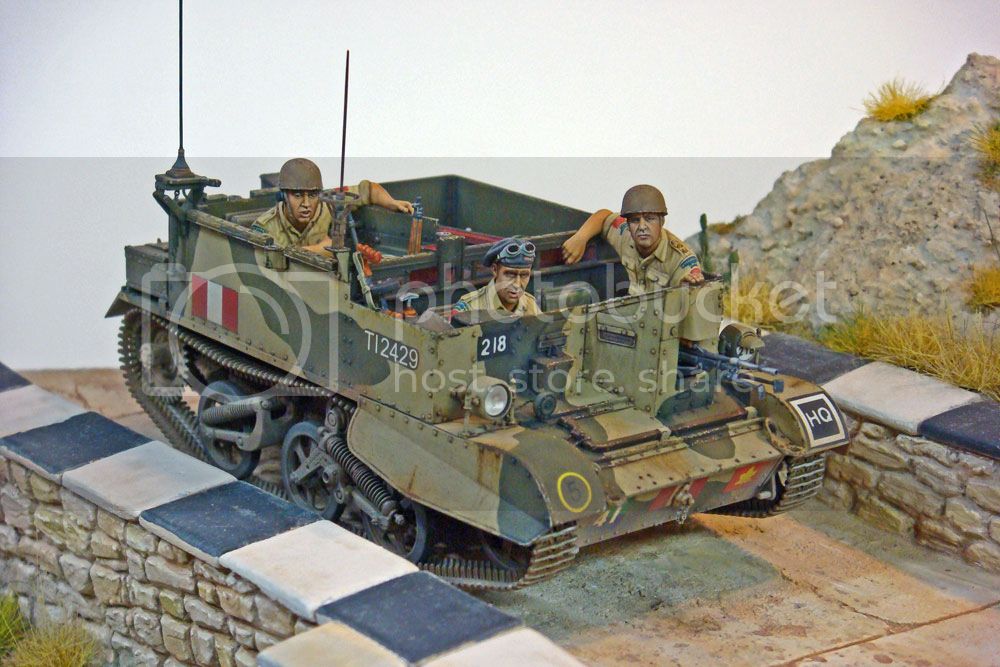
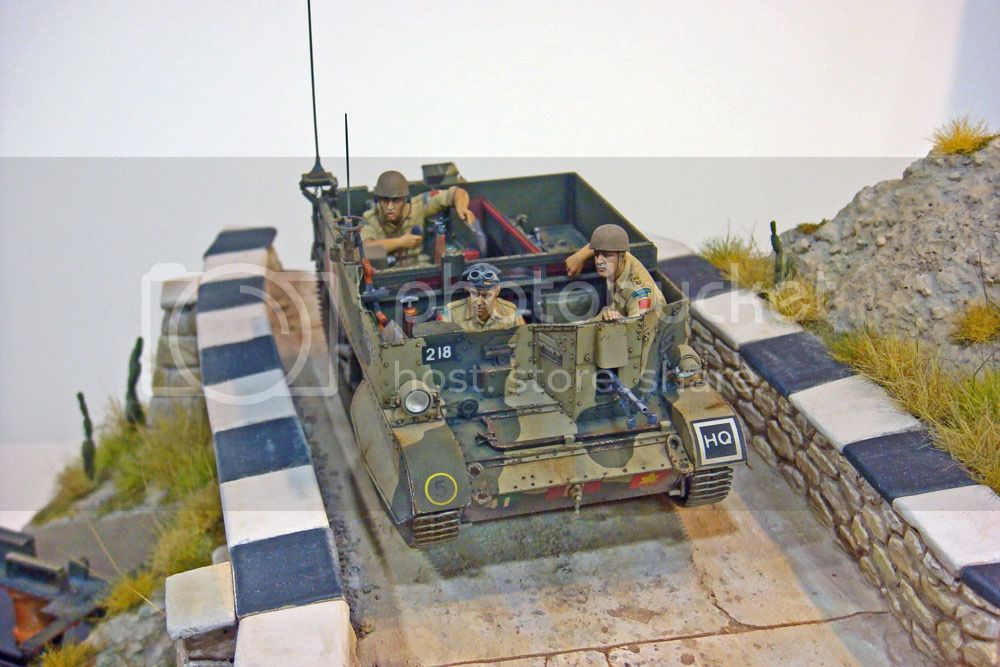
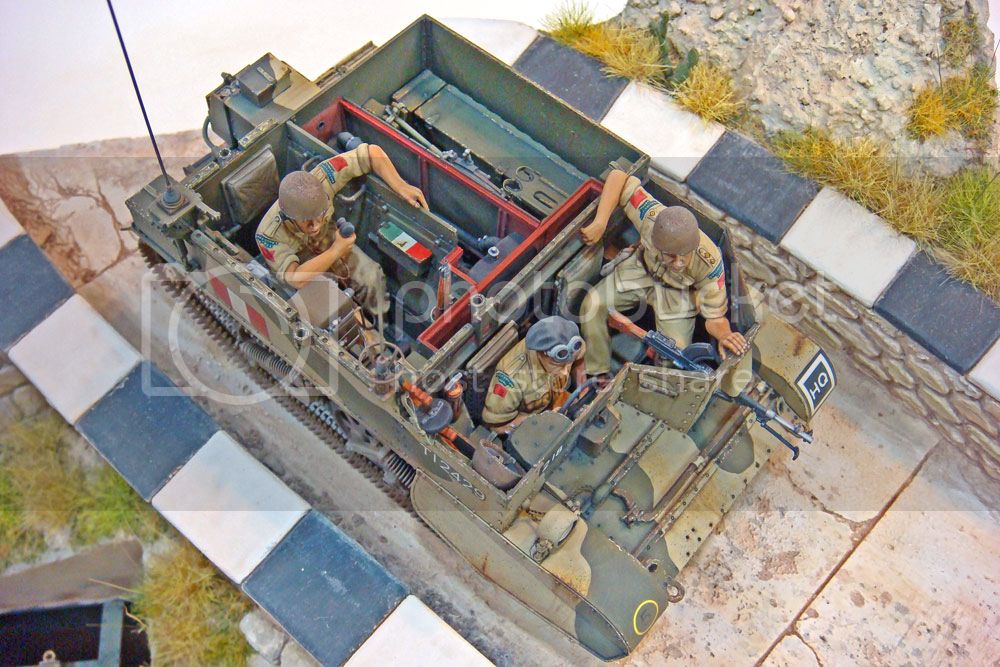
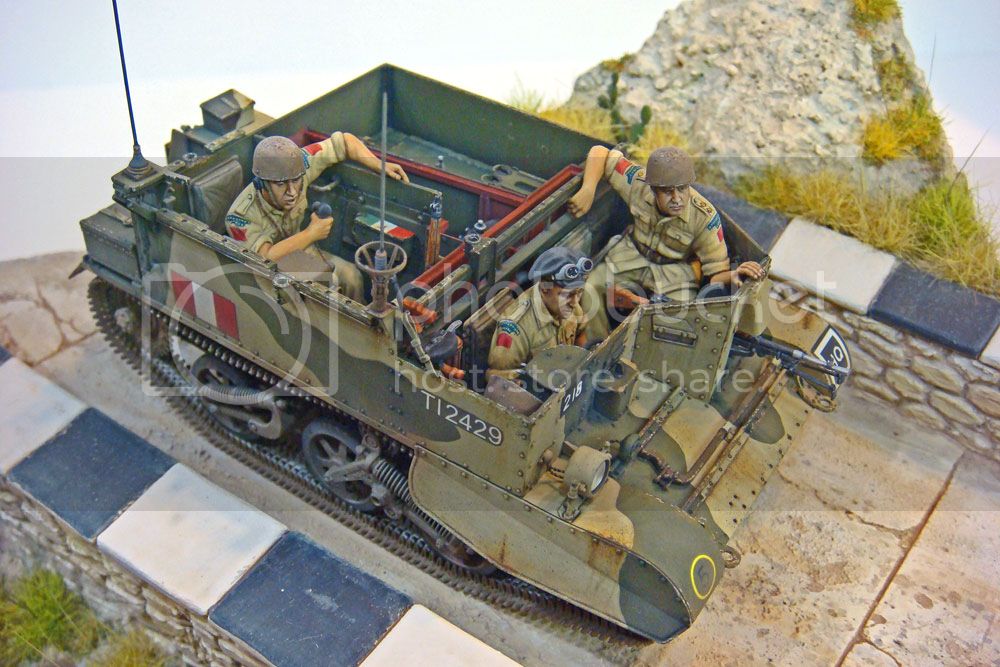
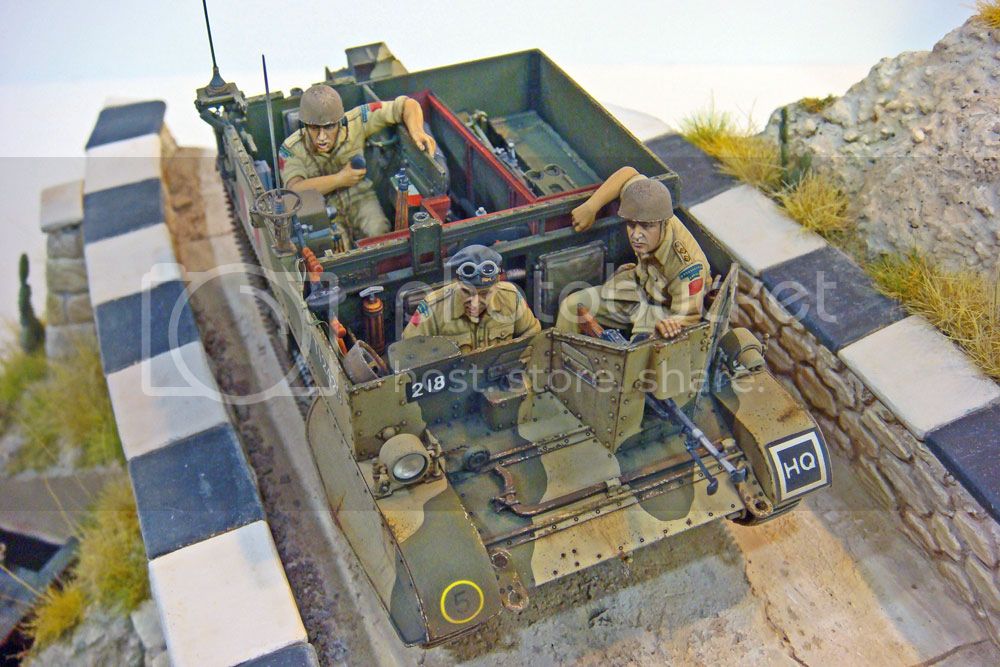
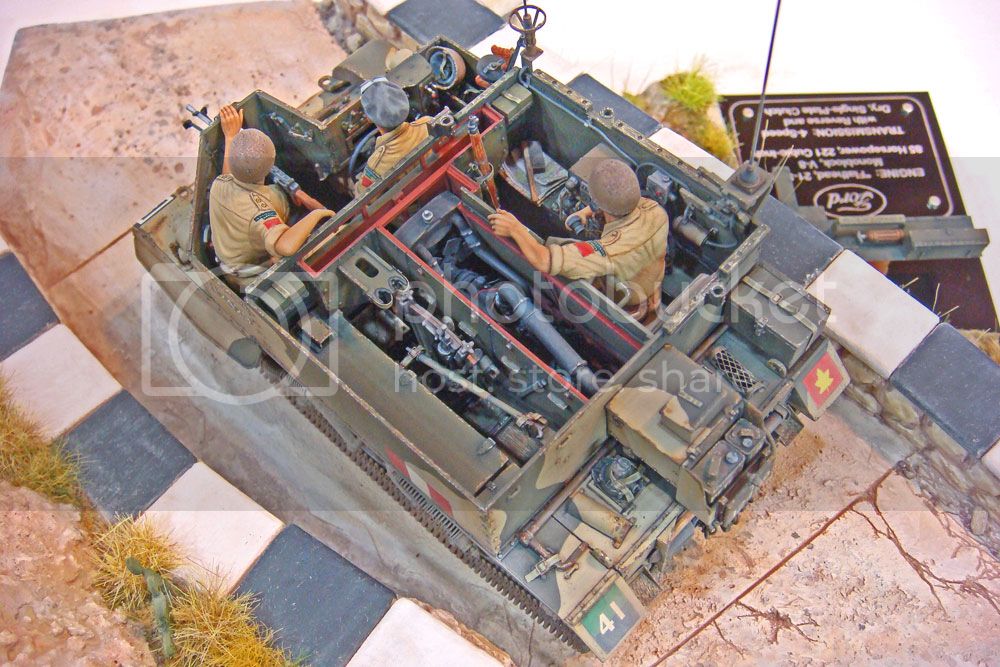
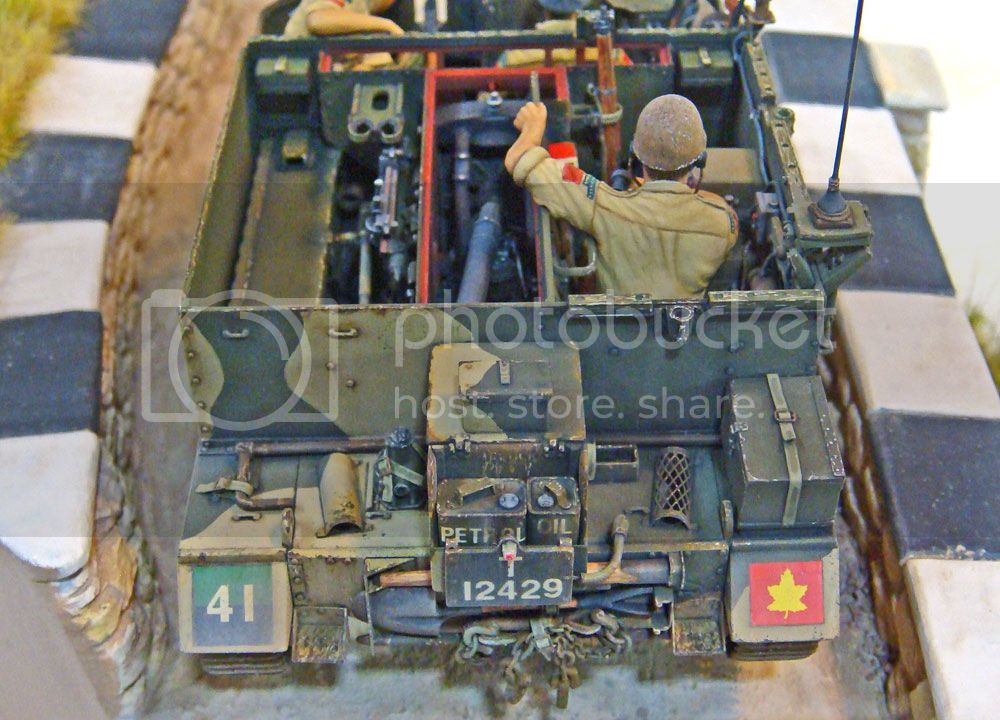
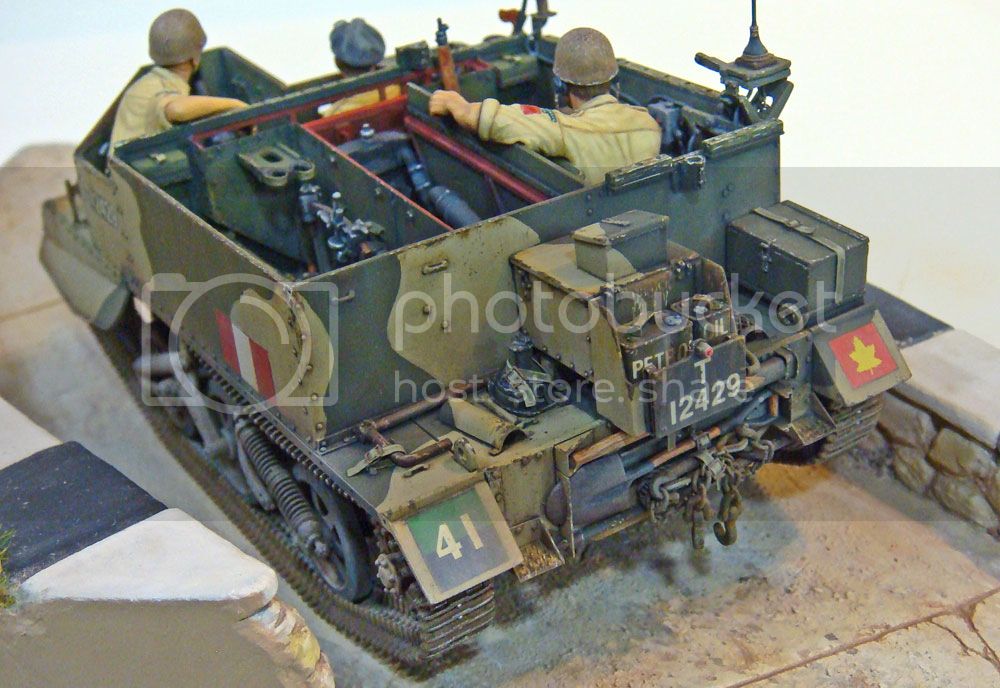
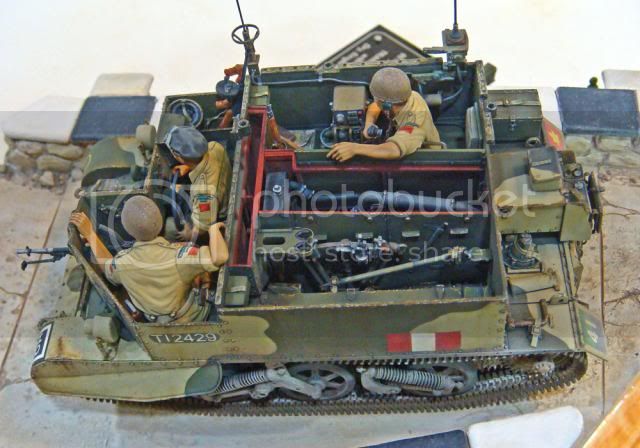
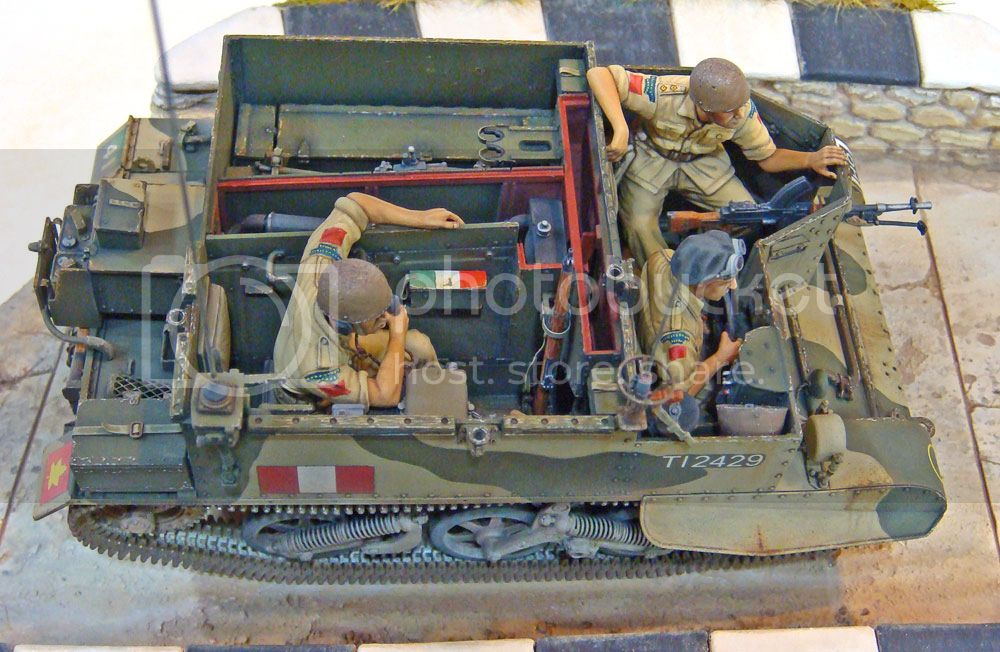
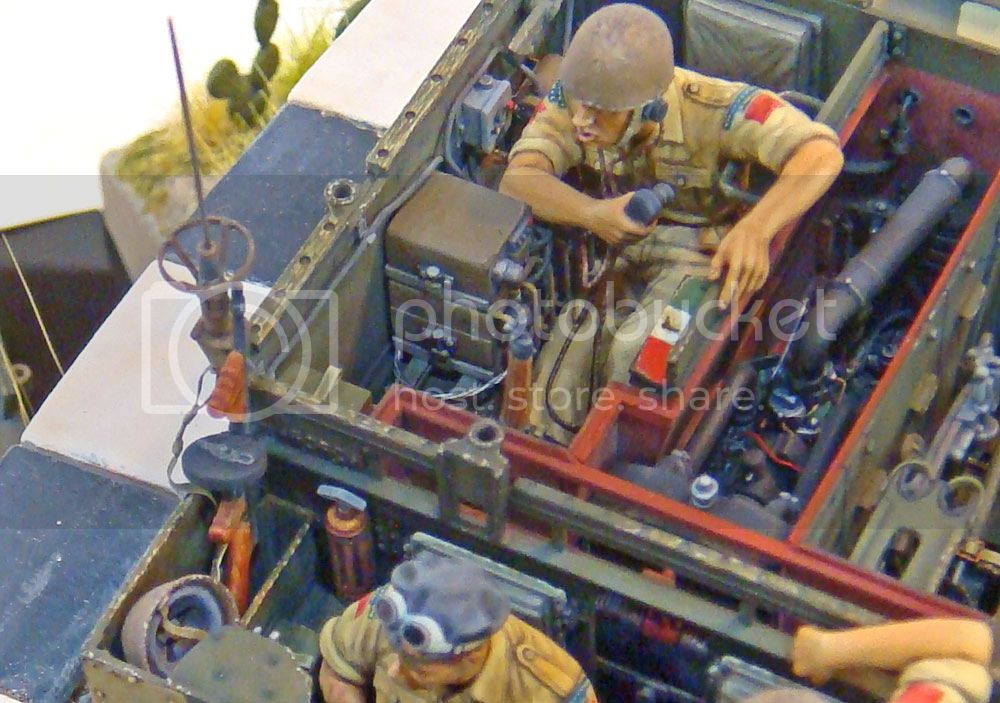
Here're a few pics of my completed carrier and vignette. (I apologize in advance for any redundant shots or any that are out of focus.)


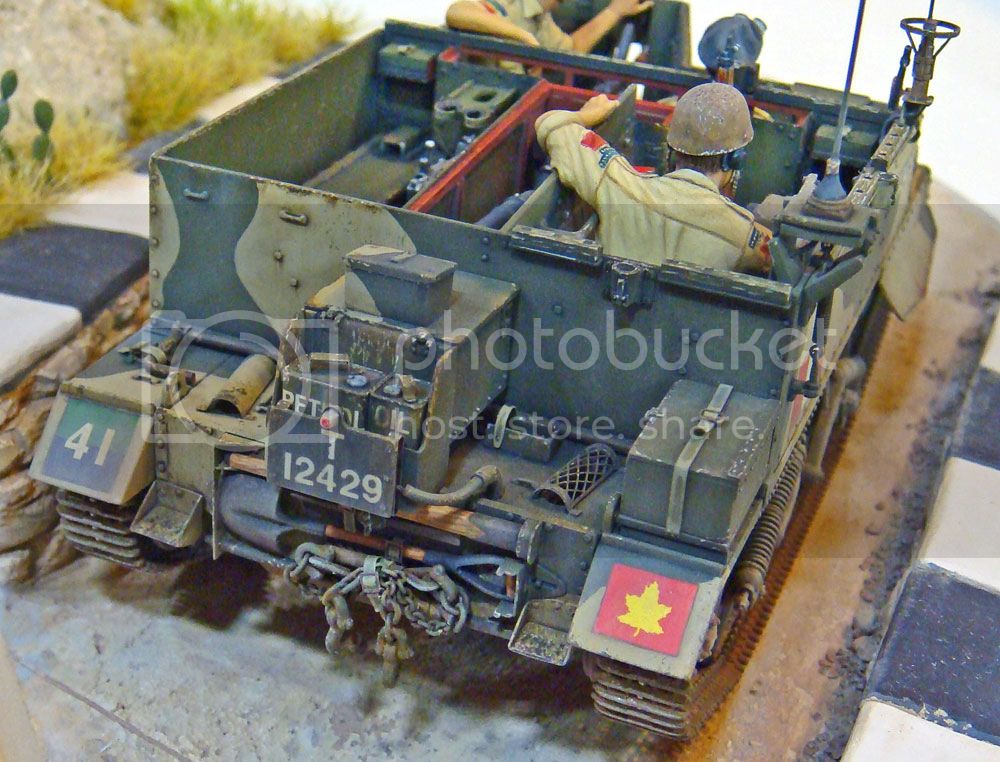
A few last construction notes:
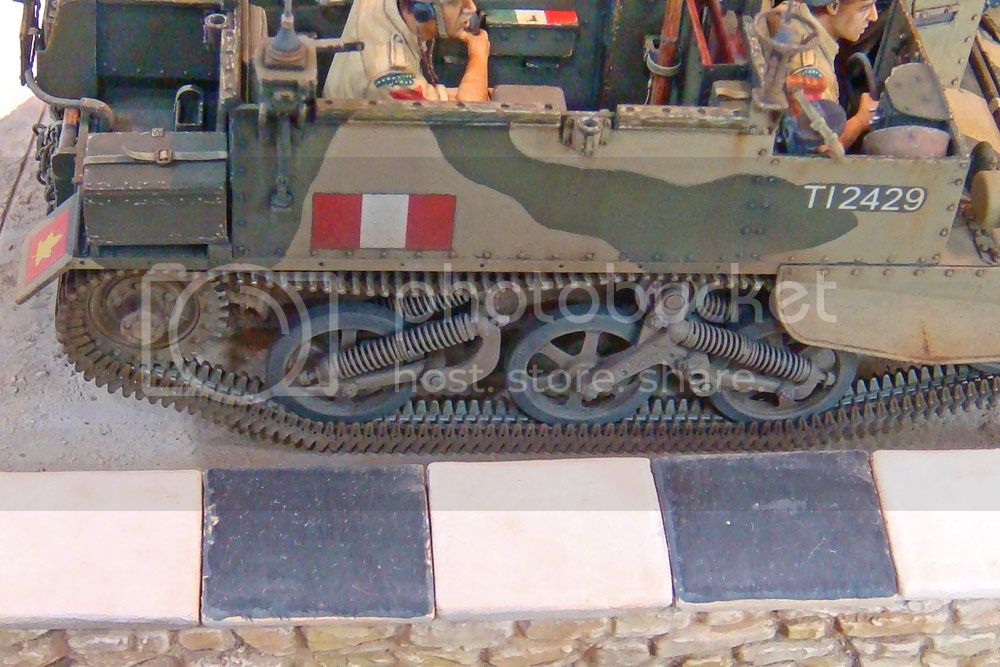
I did replace the kit armored glass vision blocks with .010 clear styrene. The clear kit parts wouldn't fit into their holes after I painted their edges.
The clear headlight is an MV Products replacement.
The No. 19 radio antenna bases are the RB Models brass and PE offerings with tapered .015 Plastruct styrene rod antennas.
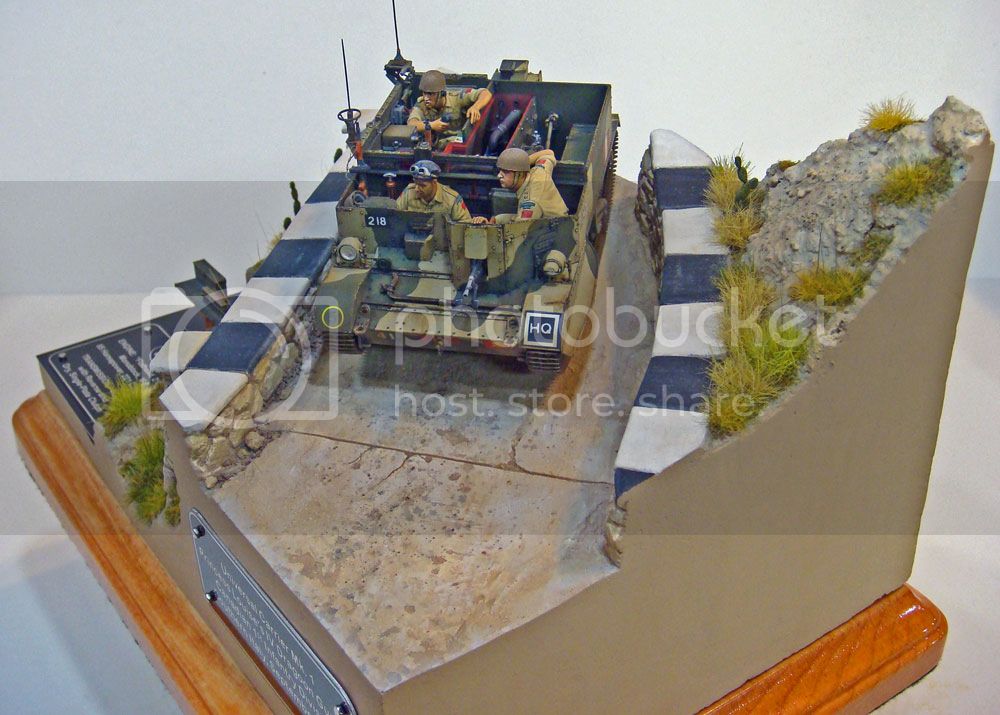
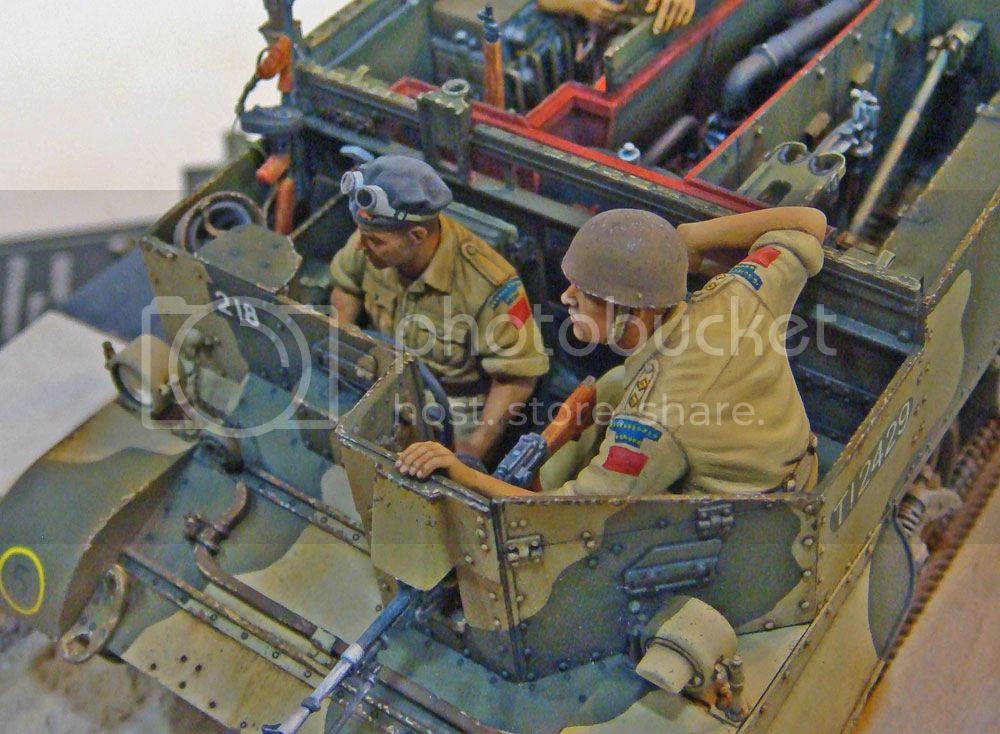
The driver has an M1928 sub machine gun taken from a MB figure set. I have replaced the Cutts muzzle compensator and added the sling from foil and sling swivels from fuse wire. I used the same materials for the radio operator's SMLE rifle sling.
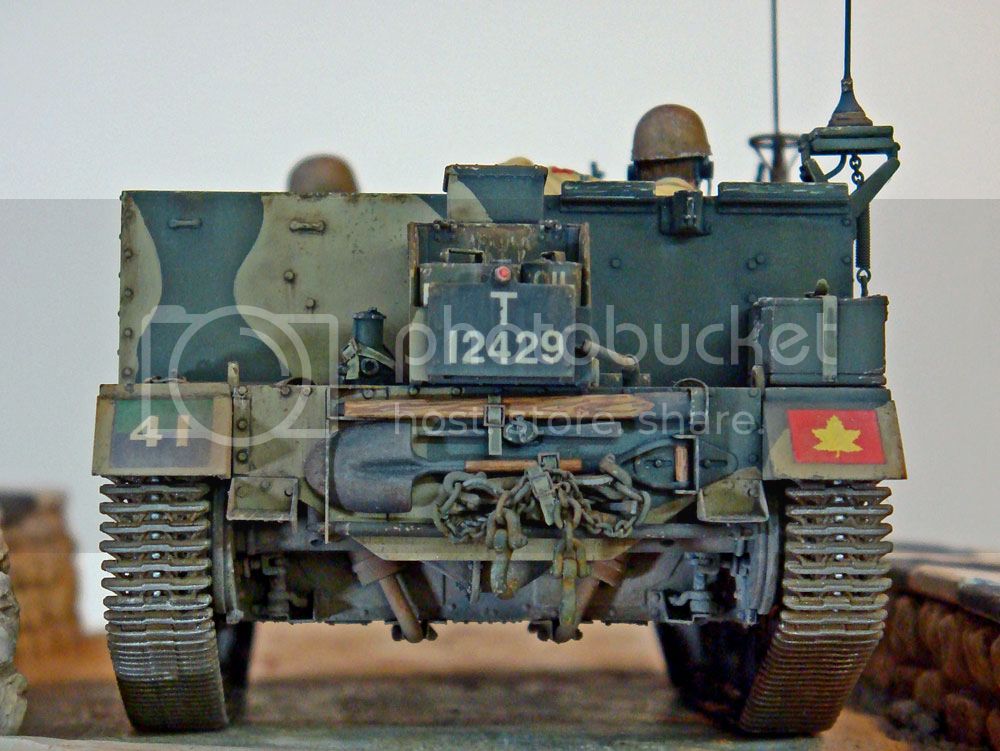
The decals for the Petrol and Oil can and the rear registration number are Woodland Scenics Dry Transfers on clear water-slide decal paper.
I did thin the kit sand shields on their backsides using a sanding block.
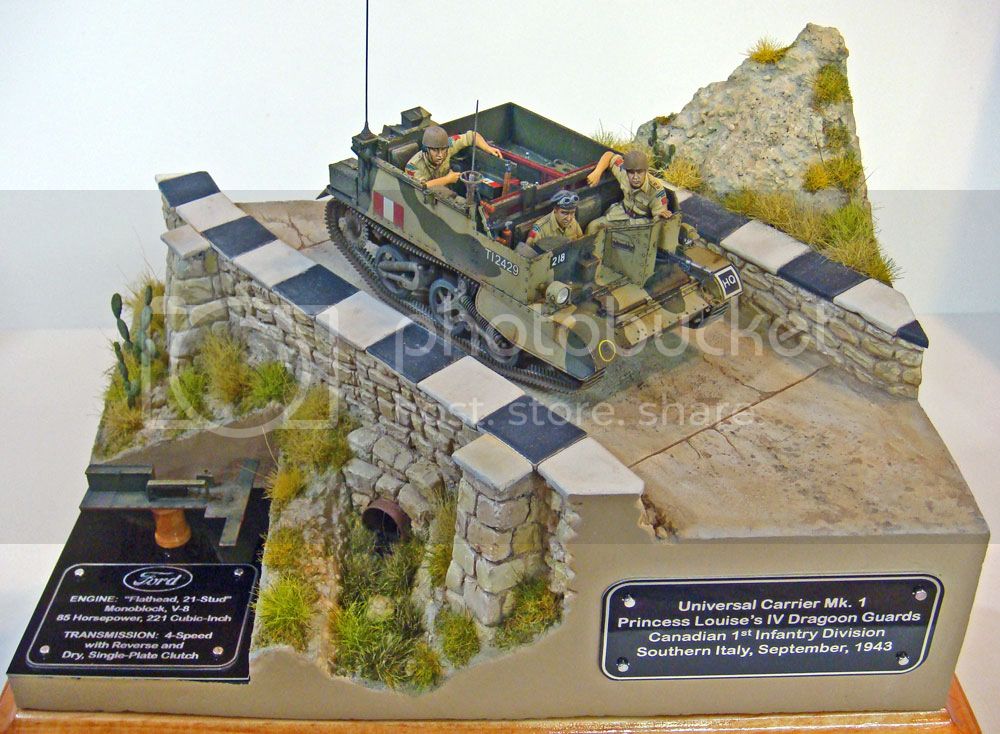
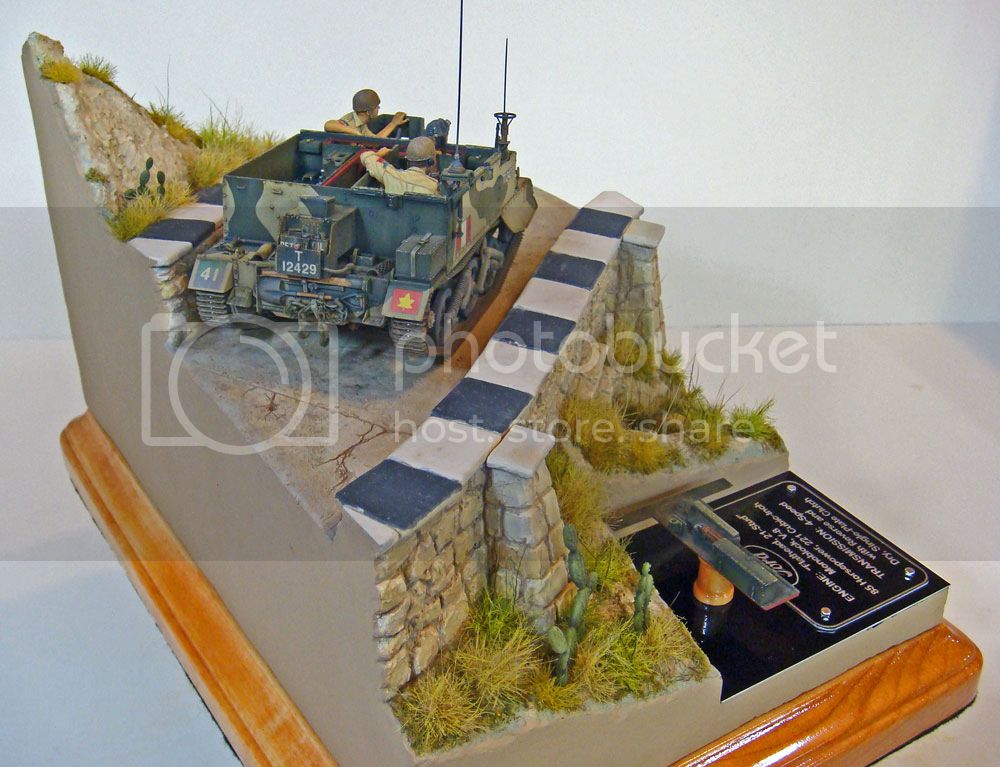
Finally, you'll note in the downhill (nose-down) attitude of the carrier on the vignette. This makes viewing the details on the lower rear hull much easier. It also makes it easier for someone viewing the carrier from the front to look into the open-top and see the engine and other details.
So, barring any comments or questions you guys might have, this is the end of my build blog for the Riich Models "Universal Carrier, Mk I."
Thanks for all the comments and observations along the way. I really appreciated the feedback!
Happy modeling!
@ Alan: Thanks for checking in!
@ Marc: Glad you liked it so far. Hopefully the final results won't hurt your eyes!
@ Steven: Cheers!
BTW: It's good to see you making progress on your Tiger I project. I'm really enjoying following along with that.@ Jerry: It's time to send the L.T. forward to make contact with the guide and get this lash-up back through the FFL!
@ Trevor: Thank you!
@ Brent: As my old friend Jerry can tell you, I've been trying to up my game painting figures for a very long time. It's good that it seems to finally be paying off a little. Glad you liked them!
@ keith: Come on, now! It's only been four months... That's a speed build in my book!
@ Jeff: All glazed and dusted now! (Sounds like a advert for Dunkin' Doughnuts!)
@ Dave V: Just the basics, sir! But to paraphrase Clausewitz: "In model-building everything is simple. It's just that the simple things are hard," or some such nonsense...
Anyways, I'm finally done with this one.
Riich Models "Universal Carrier Mk I" is a very, very nice little kit. I know I've been pretty critical of the figures and instructions, but really, aside form the figures (which do require a ton of work to fit the vehicle), the model is wonderfully engineered. The instructions are OK, they just don't offer any directions to combine painting and assembly. I think this is unfortunate since the kit's interior is so very detailed and, IMO, will present itself much better if nicely painted.
However, with some forethought, the average modeler can certainly figure out his own assembly sequence to combine interior painting with kit assembly.
I believe that this is the tightest fitting kit that I've ever built. The tolerances for fit are so close that in many instances, a single coat of paint was enough to throw things off. I don't consider this a bad thing, just something that needs to be taken into account.
The PE parts that are included in the kit are equally well engineered and its obvious that the kit designer incorporated the PE with his design and not as an afterthought. This does mean that the PE is necessary for the build (the PE parts are not optional plastic part replacements). However, the fit of the PE parts to the plastic parts is exceptional, and most attachment locations have positive locating features.
I think there's been some unjustified criticisms of the kit tracks by a few folks. Hopefully, the in-progress and finished photos will show that the kit tracks can be built and do a nice job of replicating the prototype tracks. Unless someone wants to construct the suspension to depict it articulated, I can't see any reason to consider replacing Riich's tracks.
Riich's Universal Carrier is not a build for the beginner or basic skill level modeler, but anyone with a few kits under his belt should be able to handle it. Construction can be simplified by omitting the entire engine (just use the radiator and oil cooler) and radio (which most carriers did not have). Bypassing the figures is another simplification.
At any rate, the Riich carrier is a finely detailed replica of the prototype which does this historically significant subject justice.
Here're a few pics of my completed carrier and vignette. (I apologize in advance for any redundant shots or any that are out of focus.)


A few last construction notes:
I did replace the kit armored glass vision blocks with .010 clear styrene. The clear kit parts wouldn't fit into their holes after I painted their edges.
The clear headlight is an MV Products replacement.
The No. 19 radio antenna bases are the RB Models brass and PE offerings with tapered .015 Plastruct styrene rod antennas.
The driver has an M1928 sub machine gun taken from a MB figure set. I have replaced the Cutts muzzle compensator and added the sling from foil and sling swivels from fuse wire. I used the same materials for the radio operator's SMLE rifle sling.
The decals for the Petrol and Oil can and the rear registration number are Woodland Scenics Dry Transfers on clear water-slide decal paper.
I did thin the kit sand shields on their backsides using a sanding block.
Finally, you'll note in the downhill (nose-down) attitude of the carrier on the vignette. This makes viewing the details on the lower rear hull much easier. It also makes it easier for someone viewing the carrier from the front to look into the open-top and see the engine and other details.
So, barring any comments or questions you guys might have, this is the end of my build blog for the Riich Models "Universal Carrier, Mk I."
Thanks for all the comments and observations along the way. I really appreciated the feedback!
Happy modeling!
majjanelson
Joined: December 14, 2006
KitMaker: 1,355 posts
Armorama: 979 posts
Posted: Friday, December 13, 2013 - 01:30 PM UTC
Mike,
W O W!
Just....
W O W!
W O W!
Just....
W O W!

ColinEdm

Joined: October 15, 2013
KitMaker: 1,355 posts
Armorama: 1,229 posts
Posted: Friday, December 13, 2013 - 02:07 PM UTC
Wow, that is absolutely stunning, beautiful work!
jrutman
Joined: April 10, 2011
KitMaker: 7,941 posts
Armorama: 7,934 posts
Posted: Friday, December 13, 2013 - 02:47 PM UTC
From beginning to end,top to bottom,it's a brilliant piece of modeling. All aspects are equal,groundwork,vehicle and figures,all awesome.
You put more effort into one fig than I do for 5 or 6!! What I have learned from this( actually I learned a lot of stuff) is to slow myself down and take more time with basic stuff like trimming,sanding,shading,etc. That has to be the key to how all your stuff seems to have not one brushstroke out of place.Incridable color seperation
Inspirational work bubba,
J
J
AlanL
Joined: August 12, 2005
KitMaker: 14,499 posts
Armorama: 11,675 posts
Posted: Saturday, December 14, 2013 - 02:02 AM UTC
Hi Mike,
A really superb build and finish. It's been a pleasure top follow the blog and you'll have cracking display when finished.
This level of workmanship should inspire us all.
I look forward to seeing your plan for the top grill and the final display setting on the base.
Cheers
Al
A really superb build and finish. It's been a pleasure top follow the blog and you'll have cracking display when finished.
This level of workmanship should inspire us all.
I look forward to seeing your plan for the top grill and the final display setting on the base.
Cheers
Al
Big-John
Joined: August 12, 2010
KitMaker: 731 posts
Armorama: 711 posts
Posted: Sunday, December 15, 2013 - 01:26 AM UTC
EXCELLENT!!!!
Now I need to spend a few hours pouring over the pics!
Congrats on the finish Mike, One to be very proud of!
Now I need to spend a few hours pouring over the pics!
Congrats on the finish Mike, One to be very proud of!
DaGreatQueeg
Joined: August 01, 2005
KitMaker: 1,049 posts
Armorama: 841 posts
Posted: Sunday, December 15, 2013 - 01:37 AM UTC
Great finish and I can't wait for your next project!
cheers
Brent
cheers
Brent

jvazquez
Joined: September 26, 2006
KitMaker: 857 posts
Armorama: 811 posts
Posted: Sunday, December 15, 2013 - 03:03 AM UTC
Brilliant work!!
Really enjoyed following this build.
Congrats!
Really enjoyed following this build.
Congrats!
SdAufKla
Joined: May 07, 2010
KitMaker: 2,238 posts
Armorama: 2,158 posts
Posted: Sunday, December 15, 2013 - 05:41 AM UTC
@ Jeff: I always appreciate your support and feedback. I'll bring the vignette to our meeting next month to see if it stands up under first-hand scrutiny!
@ Colin: Thank you, sir, for the kind words.
@ Jerry: I always look forward to your comments and feedback and have valued your opinions for all the many years we've known each other. A special thanks to you, too, though, for the tips and ideas on doing the stone walls on the base. Seeing your work definitely motivated and inspired me to give it a try the "Rutman-way."
@ Alan: Thanks for following along, Al. I think the the display of the engine compartment top will be just the way it's shown in these photos, so except for collecting dust, it's pretty much finished.
@ John: Thanks for following along, John, and all of the feedback along the way. If you want a picture of some dark nook or crevice that I've over-looked, just let me know. My camera seems to have an unlimited number of pixels, so I'll be happy to use some more for you!
@ Brent: I'm glad you like it. I don't normally announce my future project plans in advance, but I do have an AFV Club Churchill that seems to be calling my name and a pile of research notes to go along with it... At any rate, I'll hopefully have something new started and posted up in a couple of weeks. Maybe you'll find it interesting.
@ James: Thanks for the props. I'm glad you enjoyed the build blog.
I also need to send out special thanks to a few guys who went above and beyond in helping me sort out research questions and issues:
Stephen Tegner - Who generously allowed me to use his photos in many of of my posts. Stephen's been very helpful for several of my projects, and he certainly deserves credit and acknowledgement for that. Thanks, Steve!
Ron Volstad - Who took the time to PM me with observations that led me to correct the shape of the radiator opening and who very generously sent me the factory plan drawings to solve the "mystery" of the dip stick! The final results are certainly better for your input.
James Tainton - Who shared his Universal Carrier photos which also answered and solved several detail issues. Thank you, sir!
Robert Blocker - Who acted as an artistic sounding board. Although I didn't take the direction you suggested, the discussion helped to clarify in my own mind my vision for the display. Hopefully the final results are not too hard on your eyes!
I also really appreciated all of the many comments and observations from everybody who posted them. I hope I was polite enough to thank you all individually as you posted, and I apologize for any omissions or unintended slights.
Finally, I have to thank all of the guys in my local AMPS chapter, AMPS Central SC "Wildcats." You're all very tolerant and understanding (or at least you're very polite about it!) month after month as I bring in my latest little cup full of bits and pieces to show off at our meetings. Your friendship and encouragement keep me going more than you'll probably ever know.
Happy modeling!
 |

WEB HOSTING BY


Copyright ©2021 Armorama and Kitmaker Network, a subsidiary of Silver Star Enterprises
All Rights Reserved. Please read our Conditions of Use and Privacy Policy.
All Rights Reserved. Please read our Conditions of Use and Privacy Policy.