Campaigns: Completed Campaigns
Campaigns that are completed should be grouped here.
Hosted by Richard S.
Operation Fall Gelb 1940 Campaign
nng-nng
Visit this Community
Bayern, Germany
Joined: October 22, 2013
KitMaker: 380 posts
Armorama: 376 posts
Posted: Tuesday, January 07, 2014 - 02:48 AM UTC
nice wor on your Panzer IIs, semms like a really good kit, but as I saw it in the shop I feared to by the old one with just a few new parts...

I´ve started my Renault R35:


In an way oversized box, you´ll get a pretty small french tank, two pretty odd looking crew figures and a french AT-gun with crew... the instructions look like printed with a office photocopier.
Detail is (if it`s there) pretty soft, and the suspension seems a bit wobbly.


turret and suspension is done now, main hull almost ready, added the casting structure with an old brush by dissolving the plastic surface

panzerbob01
Visit this Community
Louisiana, United States
Joined: March 06, 2010
KitMaker: 3,128 posts
Armorama: 2,959 posts
Posted: Tuesday, January 07, 2014 - 02:59 AM UTC
Raul;

Good progress going on there, friend!

I'll assume that you have NOT cemented the hull top to the tub yet... BEFORE you do this, you should put that small guard-bar piece into the vent grill on the rear-right side of the hull. I know about the pain and suffering caused by my not having done this before I cemented my hull top and tub! In fact, I waited to add that little piece until after I had gone on to mount the fender boxes...

Looks like those tracks are set up just fine!

Bob
Raulito
Visit this Community
Buenos Aires, Argentina
Joined: January 24, 2013
KitMaker: 112 posts
Armorama: 105 posts
Posted: Tuesday, January 07, 2014 - 04:21 AM UTC

Quoted Text


Fabian
nice wor on your Panzer IIs, semms like a really good kit, but as I saw it in the shop I feared to by the old one with just a few new parts...


This Panzer II A,B,C is a completely new kit released in 2008, in fact the prehistoric Panzer II F with the Afrika Korps figures, that dates from the early 70’s was the first armor model I´ve build many many years ago, a nice little kit but unacceptable for today standards. Good for kids thou.

Fine effect on the R35 turret. I’ll be follow your job on this nice kit.


Quoted Text


Bob
I'll assume that you have NOT cemented the hull top to the tub yet... BEFORE you do this, you should put that small guard-bar piece into the vent grill on the rear-right side of the hull. I know about the pain and suffering caused by my not having done this before I cemented my hull top and tub!.


Oh, my! You assume wrong. I DO cemented the hull top to the tub. Fortunately I don´t put the stowage boxes yet, so I think there will be easy to install the small guard-bar piece.

The tracks are not glued thou, that´s why they show some misalignment.

I´m not a Follow-the-instructions-to-the-letter kind of guy but I was doing it with this…until now.

Thank you for the advice and kind comments.

Raul
Bluestab
Visit this Community
South Carolina, United States
Joined: December 03, 2009
KitMaker: 2,160 posts
Armorama: 1,906 posts
Posted: Tuesday, January 07, 2014 - 04:48 AM UTC
Fabian,
Nice progress. I've got mine on hold until I clear a couple things from the bench but I did go ahead and got the lower hull assembled. I added a piece of styrene scrap to the side and rear joints to give it some added strength.

By the way, can anyone recommend some French troops? I've got a few old Des Kit examples I picked up back in the 90s, the Tamiya ones with their UE Carrier, and Dragon's Blitz figures. I'm looking for soldiers marching or in non-attacking poses.
hofpig
Visit this Community
England - South East, United Kingdom
Joined: March 04, 2007
KitMaker: 1,330 posts
Armorama: 1,017 posts
Posted: Tuesday, January 07, 2014 - 05:00 AM UTC
Alex,

Skp do a seated one sat on a box head in hands (just got mine!) Nemrod maybe oh and MK35 are a french manufacturer who do various ones.

Paul
steph2102
Visit this Community
Isere, France
Joined: April 23, 2011
KitMaker: 735 posts
Armorama: 606 posts
Posted: Tuesday, January 07, 2014 - 05:52 AM UTC
hello, for the french soldiers, he will BLITZ KIT
steph
http://www.blitz-kit.fr/liste-produit.php?page=2&cat=figurine&PHPSESSID=p00q9qtq6r56doi3gcjod8j3k2
Bluestab
Visit this Community
South Carolina, United States
Joined: December 03, 2009
KitMaker: 2,160 posts
Armorama: 1,906 posts
Posted: Tuesday, January 07, 2014 - 06:12 AM UTC
Thanks guys. I'll give those a look.
panzerbob01
Visit this Community
Louisiana, United States
Joined: March 06, 2010
KitMaker: 3,128 posts
Armorama: 2,959 posts
Posted: Tuesday, January 07, 2014 - 07:36 AM UTC

Quoted Text


Quoted Text


Fabian
nice wor on your Panzer IIs, semms like a really good kit, but as I saw it in the shop I feared to by the old one with just a few new parts...


This Panzer II A,B,C is a completely new kit released in 2008, in fact the prehistoric Panzer II F with the Afrika Korps figures, that dates from the early 70’s was the first armor model I´ve build many many years ago, a nice little kit but unacceptable for today standards. Good for kids thou.

Fine effect on the R35 turret. I’ll be follow your job on this nice kit.


Quoted Text


Bob
I'll assume that you have NOT cemented the hull top to the tub yet... BEFORE you do this, you should put that small guard-bar piece into the vent grill on the rear-right side of the hull. I know about the pain and suffering caused by my not having done this before I cemented my hull top and tub!.


Oh, my! You assume wrong. I DO cemented the hull top to the tub. Fortunately I don´t put the stowage boxes yet, so I think there will be easy to install the small guard-bar piece.

The tracks are not glued thou, that´s why they show some misalignment.

I´m not a Follow-the-instructions-to-the-letter kind of guy but I was doing it with this…until now.

Thank you for the advice and kind comments.

Raul


How I wished hard that I had indeed assumed wrongly! But that guard piece does not, alas, fit easily in from the front (outside). I had to do some surgery and pull the upper off a bit to work the piece into its place. Thus why I mentioned "pain and suffering". It is possible to "fake" the install a bit but take care - there's a fairly specific look for this piece and the Tamiya folks did not make it easy to get there from the outside!

I'm not sure what you are meaning about "track alignment". They look like nicely-formed runs, to me...!

Bob
Vista85
Visit this Community
Bergamo, Italy
Joined: January 03, 2014
KitMaker: 118 posts
Armorama: 112 posts
Posted: Tuesday, January 07, 2014 - 10:28 AM UTC

Quoted Text


And here I thought the only narrow Pz.III wheels came in that Dragon E "France" kit! If you have some of these lying around, and the proper early sprocket, why, I would guess you are in good shape!

Bob


Hi Bob
I'm studing better my kit and references about Pz III Ausf F to be able to do a correct work and i discovered some interesting things.
Kit's road whells are the wider type 95mm (2,6mm x35=91mm),but it's not a problem because i have all early 75 road wheels(2.05x35=71,75mm) from a old Dragon Stug Ausf A Wittman kit.
Most important, Magic Track of my Ausf F kit are intermedial 380mm wide (10,85x35=379,75mm)!
Sprocket wheels have same dimension of older parts and they are suitable with both 360 and 380mm tracks,not with 400mm tracks.
So i can build a correct early Ausf F only changing the road wheels with early tipe(75mm).
Now a question to chose correct tracks dimension:when were introduced 380mm wide tracks?
In my opinion they were introduced with wider road wheels(95mm)before the change of sprocket wheel with late type(like ausf H and successive versions with 400mm tracks)
Raulito
Visit this Community
Buenos Aires, Argentina
Joined: January 24, 2013
KitMaker: 112 posts
Armorama: 105 posts
Posted: Tuesday, January 07, 2014 - 12:22 PM UTC

Quoted Text

BOB
How I wished hard that I had indeed assumed wrongly! But that guard piece does not, alas, fit easily in from the front (outside). I had to do some surgery and pull the upper off a bit to work the piece into its place. Thus why I mentioned "pain and suffering". It is possible to "fake" the install a bit but take care - there's a fairly specific look for this piece and the Tamiya folks did not make it easy to get there from the outside!


Before broke it in the process and repair it I manage to install the part.


I´m sure it will break again during manipulation, if so I´ll replace it with wire because it´s absolutely out of scale.


Quoted Text

BOB
I'm not sure what you are meaning about "track alignment". They look like nicely-formed runs, to me...!


This is what I meant with “misalignment”.


Thank you for all the advice, you are always here to help, Bob. Thank you very much.

Raúl
panzerbob01
Visit this Community
Louisiana, United States
Joined: March 06, 2010
KitMaker: 3,128 posts
Armorama: 2,959 posts
Posted: Tuesday, January 07, 2014 - 04:12 PM UTC
Raul;

You do have a valid point on that wire guard... the kit piece IS rather "robust" - looking, isn't it!

But before I jumped onto doing a particular scratch "solution", I would look around a bit to see if there are some other "period" pics showing this - the wire guard on that museum relic just somehow looks a bit "off", to me... But I can be very wrong on this!

I see now what you meant by "track alignment". My best guess for what I see happening here is that your sprocket wheels are somehow canted or tilted a bit... maybe pull the tracks off and look carefully at the sprockets from the front. IF they are tilted in on top even just a bit, and / or your return rollers are maybe a little out-of-line, your tracks can get pretty "tilted-looking". Also, when you have your tracks off, look at the alignment of all the road-wheels relative to the sprocket. ALL want to be very much in the same line. I found that my road-wheels needed to be carefully moved in and out a bit to get stuff very "true" - at which point, the tracks were pretty well aligned (= vertical).

It's hard to believe that you have the links joined up wrongly - so I think your solution more likely lies in above stuff. Give it a look!

Cheers!

Bob
panzerbob01
Visit this Community
Louisiana, United States
Joined: March 06, 2010
KitMaker: 3,128 posts
Armorama: 2,959 posts
Posted: Wednesday, January 08, 2014 - 06:00 AM UTC
@Fabian;

The old Heller R35... It's an interesting subject for sure, but roughly-served way back when Heller released this one! Now that HobbyBoss is about ready to float a modern kit of this thing... high time for all us Heller kit owners to get them done!

But how appropriate for this campaign! One of the quintessential French players in the 1940 drama And, despite the kit's softness of detail and other difficulties, it can, with some TLC, be made to look pretty interesting. So... do some scratch detailing here and there, maybe swap in some other tracks, and graze the Web for images to get more of a feel for the little beast!

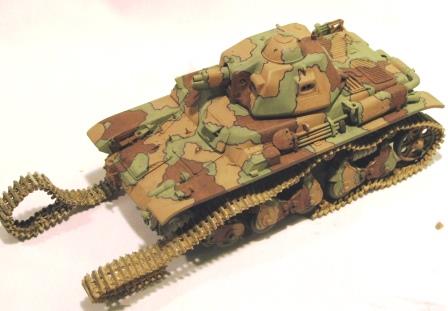
I have mostly completed my Heller R35 project - after only about 3.5 years or so! (perhaps worse, I've had this kit on my shelf since 1971 ) Still dogging around as I have no good decals for it, but also don't have any appropriate stencils for any markings I "like"! Here's a pic of the old shelf-haunter, for whatever it's worth... Along with some scratch fittings and bolt-heads and such, and a set of Fruil metal Hotchkiss H39 tracks (a wonderful donation to my frustrated cause - not exactly right for the R35 but more than close enough, IMO, and way better than those awful Heller rubberband things!)I tried out doing one of those French blotch camo patterns with black deliniations between blotches... a black "Sharpie" pen works pretty nicely to create the base lines, which then can be better painted-over if desired.


Mine is a candidate for the "unfinished business" campaign, perhaps, although all it wants is decals and weathering and a tiny amount of final assembly.

I will be watching and wait with great anticipation for whatever you do with this venerable thing!

Bob
nng-nng
Visit this Community
Bayern, Germany
Joined: October 22, 2013
KitMaker: 380 posts
Armorama: 376 posts
Posted: Wednesday, January 08, 2014 - 11:16 AM UTC
Looking good Bob,
and you´re right, It seems to be the last chance for the kit
The tracks are awful, too long and not even fitting the drive weel... but that´s nothing new with Heller

As you said you used the H39 tracks...so I´m assuming they fit in there some way?
Hobby Boss made some plastic link by links (and the would perfectly fit in the budged I planed, as the only other apart from the metal ones would be the Trupeter R35 tracks wich would cost more than the kit...)

And I´m also undecided what cammo and decals to use... but I´ve got some time left until I solved the track problem...
pablo_g
Visit this Community
Wojewodztwo Slaskie, Poland
Joined: October 21, 2003
KitMaker: 529 posts
Armorama: 500 posts
Posted: Thursday, January 09, 2014 - 08:49 AM UTC
Hello,
Great theme for a campaign in the history of wwII blitzkrieg is for me the most interesting. Also, I'm going to take part in this campaign. I built a model of Sd.Kfz. 10/4 with Italeri.
By the way, I found in my collection the image of France in 1940, this image will be published for the first time.


Paweł
panzerbob01
Visit this Community
Louisiana, United States
Joined: March 06, 2010
KitMaker: 3,128 posts
Armorama: 2,959 posts
Posted: Thursday, January 09, 2014 - 10:22 AM UTC

Quoted Text

Looking good Bob,
and you´re right, It seems to be the last chance for the kit
The tracks are awful, too long and not even fitting the drive weel... but that´s nothing new with Heller

As you said you used the H39 tracks...so I´m assuming they fit in there some way?
Hobby Boss made some plastic link by links (and the would perfectly fit in the budged I planed, as the only other apart from the metal ones would be the Trupeter R35 tracks wich would cost more than the kit...)

And I´m also undecided what cammo and decals to use... but I´ve got some time left until I solved the track problem...


The Fruils fit OK - probably no matter what tracks you try to apply to that kit sprocket, you'll need to do some surgery to that, and maybe a little trimming on the road and roller wheels, as well... But the results are so so so much better than the original...

The real tracks looked pretty similar between R35 and the H38/39.

IF we were patient enough... HobbyBoss will market both its R35 and a track set. Of course that may not happen soon. And besides, the urge to bin the Heller monster would well up like a flood! Better, I think, to turn off the little screen, pretend you've heard nor seen nothing about any coming new modern R35 kit, and focus on the tired bird in hand! It WILL come out OK, with a bit of cussing and fussing.

I am going to be manly and strive to actually get this little thing done and posted. Besides, there's a show coming up in a couple of weeks and I need to have something to go onto the tables... "the low-hanging fruit", even if pre-spoiled, and all that!

Bob
panzerbob01
Visit this Community
Louisiana, United States
Joined: March 06, 2010
KitMaker: 3,128 posts
Armorama: 2,959 posts
Posted: Thursday, January 09, 2014 - 10:25 AM UTC

Quoted Text

Hello,
Great theme for a campaign in the history of wwII blitzkrieg is for me the most interesting. Also, I'm going to take part in this campaign. I built a model of Sd.Kfz. 10/4 with Italeri.
By the way, I found in my collection the image of France in 1940, this image will be published for the first time.


Paweł


Another cool pic from the B.O.D of the Blitz!

And, hey! There, right up front, is yet another interesting WWII French subject (Somua S35) currently represented by a dreadful old French kit!

Bob
nng-nng
Visit this Community
Bayern, Germany
Joined: October 22, 2013
KitMaker: 380 posts
Armorama: 376 posts
Posted: Thursday, January 09, 2014 - 12:18 PM UTC
Here we go, doing a Heller revival
thought about using the Somua as as as kit for the Campaign... maybe someday, just before someone else is releasing a new one


If I wanted to use the Heller teacks I had to do some trimming anyway... so thanks for the confirmation.
BTW: Nice pic you dug out, Paweł
pablo_g
Visit this Community
Wojewodztwo Slaskie, Poland
Joined: October 21, 2003
KitMaker: 529 posts
Armorama: 500 posts
Posted: Thursday, January 09, 2014 - 12:43 PM UTC

Quoted Text

BTW: Nice pic you dug out, Paweł


I have a photo from a friend. His grandfather was drafted into the Wehrmacht at the beginning of the war, he fought in France and the Soviet Union. Unfortunately, I have only this one, with tanks.

Paweł
Removed by original poster on 01/12/14 - 01:15:00 (GMT).
Raulito
Visit this Community
Buenos Aires, Argentina
Joined: January 24, 2013
KitMaker: 112 posts
Armorama: 105 posts
Posted: Saturday, January 11, 2014 - 01:22 PM UTC

Quoted Text

BOB
I see now what you meant by "track alignment". My best guess for what I see happening here is that your sprocket wheels are somehow canted or tilted a bit... maybe pull the tracks off and look carefully at the sprockets from the front. IF they are tilted in on top even just a bit, and / or your return rollers are maybe a little out-of-line, your tracks can get pretty "tilted-looking". Also, when you have your tracks off, look at the alignment of all the road-wheels relative to the sprocket. ALL want to be very much in the same line. I found that my road-wheels needed to be carefully moved in and out a bit to get stuff very "true" - at which point, the tracks were pretty well aligned (= vertical).

It's hard to believe that you have the links joined up wrongly - so I think your solution more likely lies in above stuff. Give it a look!


Yes, Bob, I´m sure this canted or tilted sprocket or idler wheel should be the cause. The road wheels are pretty well aligned.

Day 3 – Steps 07 to 10 – Upper hull completion.

This time I glued the tools to the upper hull since I will not add further detail on them, no PE claps on this one. I want it to be a quick simple canvas to start my favorite part: painting.


Now onto the turret.

See you soon.

Raul
16dollars
Visit this Community
Baden-Württemberg, Germany
Joined: September 14, 2012
KitMaker: 69 posts
Armorama: 69 posts
Posted: Sunday, January 12, 2014 - 03:26 AM UTC
I had a good start with my Pz35. It's going together in a breeze..

thebear
Visit this Community
Quebec, Canada
Joined: November 15, 2002
KitMaker: 3,960 posts
Armorama: 3,579 posts
Posted: Sunday, January 12, 2014 - 07:52 AM UTC
Looking good guys...That 35t looks good but I'm going to wait to see what Bronco does with it before I decide on which kit to buy... but the Academy kit is looking good.

Rick
Raulito
Visit this Community
Buenos Aires, Argentina
Joined: January 24, 2013
KitMaker: 112 posts
Armorama: 105 posts
Posted: Monday, January 13, 2014 - 04:09 PM UTC
Day 4 – Steps 11 to 15 – Turret

The build is ended. The only things left are the PE muffler guard and gluing the guns.

One question thou, the RB 2cm KwK comes with a little PE and I don´t have a clue where to put it. There is a notch in the barrel where I suppose it goes but not sure how.

Some photos.


Next will be painting.

See you then.

Raul
panzerbob01
Visit this Community
Louisiana, United States
Joined: March 06, 2010
KitMaker: 3,128 posts
Armorama: 2,959 posts
Posted: Monday, January 13, 2014 - 05:08 PM UTC
Raul;

Looks like a Pz II! Now for the paint...!

That little PE is the lock-tab that fits on top of the receiver at the base of the exchangeable barrel... the lock tab is a sort of "set-screw" or key that prevents the barrel from unscrewing itself during firing. You need to have the front end of the "receiver" protrude out from the mantel so that the slot is exposed and on top. The RB barrel has the front end of the receiver milled in...

I cannot tell from your photos whether your barrel is far enough out to expose that slot, but there it is.

Bob
nng-nng
Visit this Community
Bayern, Germany
Joined: October 22, 2013
KitMaker: 380 posts
Armorama: 376 posts
Posted: Tuesday, January 14, 2014 - 01:44 AM UTC

Quoted Text

Looking good guys...That 35t looks good but I'm going to wait to see what Bronco does with it before I decide on which kit to buy... but the Academy kit is looking good.

Rick


Bronco is doing a 35(t)? good to know that before...
I bought the ALan Marder II D.... Bronco releases a new one
I bought the Heller R35... Bronco is anouncing a new one...

Hey you guys from Bronco, I´ve just recently bought the Somua (coudn´t pass it for the price) and Maquettes ZIS-30... would you mind not making these in the next 5 years?

As far as I know the Academy 35(t) was state of the art, as all the other (even the Tamiya one) are based on an older CMK kit