Hosted by Richard S.
Panzer IV Campaign
Nito74

Joined: March 04, 2008
KitMaker: 5,386 posts
Armorama: 4,727 posts

Posted: Saturday, May 30, 2015 - 01:25 AM UTC
that's ok Kevin
KevPak

Joined: June 04, 2014
KitMaker: 137 posts
Armorama: 128 posts
Posted: Monday, June 01, 2015 - 05:44 AM UTC
And here's yet another installment of my Pz. Beob. IV project. I decided to take a little break from the tank and try to improve my figure building/painting skills and started work on the driver. I used the tank commander from theDragon "Das Reich Division: 1943-1944" set, heavily repositioned of course:


I'll finish him at a later time. Now to start work on the turret. As mentioned previously, the Pz. Beobachtungswagen IV used the Sturmgeschuetz III cupola rather than the standard Panzer IV cupola. The cupola sat on kind of a raised mound that was not included in the kit.

I therefore had to hunt around for a part that was roughly the correct shape and size. I found it in a kit that has been sitting in my closet for over ten years - the old, old Tamiya Panther kit (the one that was originally built for RC control):

So I sawed off the bottom of this kit's cupola and glued it to the Stug. III cupola provided the Pz. Beob. kit:


Then glued the hybrid cupola to the turret roof along with the other structures on the roof - the large thickened ventilation cover with the compass housing, the antenna mount (which takes the place of the Nahverteidigungswaffe close-defense weapon on the ordinary ausf. J), and the periscope to the left of the commander's cupola:

I positioned the periscope in a mostly retracted position as I will be including the commander in the hatch and I did not want to distract from his presence by including a fully extended periscope as shown in this photo of a Pz. Befehswagen IV:

I scratchbuilt the rain guards above the turret doors as the ones included in the kit were too short and too thick:

My final alteration to the turret was to convert my model to a late version by removing the gunner's front vision port and filling the resulting hole with putty:

{I also rebuilt the visor above the gunner's sighting aperture)
The gun presented another challenge - the muzzle brake was grossly oversized. Here is the barrel and muzzle brake from the kit:

Fortunately, I had THREE spare muzzle brakes that were included in my previous build of the Dragon Panzer IV ausf. H (thanks Dragon!). So I hacked off the CyberHobby MB and glued on one of the Dragon spares to the end of the barrel. Here's the new barrel with its muzzle brake transplant:

Finally, I glued the revamped barrel to the gun mantlet (which also came from the Panzer IV ausf. H kit) and attached the mantlet to the turret. Here's two final shots of the turret assembly to date:


And that concludes this update. Thanks for following.


I'll finish him at a later time. Now to start work on the turret. As mentioned previously, the Pz. Beobachtungswagen IV used the Sturmgeschuetz III cupola rather than the standard Panzer IV cupola. The cupola sat on kind of a raised mound that was not included in the kit.

I therefore had to hunt around for a part that was roughly the correct shape and size. I found it in a kit that has been sitting in my closet for over ten years - the old, old Tamiya Panther kit (the one that was originally built for RC control):

So I sawed off the bottom of this kit's cupola and glued it to the Stug. III cupola provided the Pz. Beob. kit:


Then glued the hybrid cupola to the turret roof along with the other structures on the roof - the large thickened ventilation cover with the compass housing, the antenna mount (which takes the place of the Nahverteidigungswaffe close-defense weapon on the ordinary ausf. J), and the periscope to the left of the commander's cupola:

I positioned the periscope in a mostly retracted position as I will be including the commander in the hatch and I did not want to distract from his presence by including a fully extended periscope as shown in this photo of a Pz. Befehswagen IV:

I scratchbuilt the rain guards above the turret doors as the ones included in the kit were too short and too thick:

My final alteration to the turret was to convert my model to a late version by removing the gunner's front vision port and filling the resulting hole with putty:

{I also rebuilt the visor above the gunner's sighting aperture)
The gun presented another challenge - the muzzle brake was grossly oversized. Here is the barrel and muzzle brake from the kit:

Fortunately, I had THREE spare muzzle brakes that were included in my previous build of the Dragon Panzer IV ausf. H (thanks Dragon!). So I hacked off the CyberHobby MB and glued on one of the Dragon spares to the end of the barrel. Here's the new barrel with its muzzle brake transplant:

Finally, I glued the revamped barrel to the gun mantlet (which also came from the Panzer IV ausf. H kit) and attached the mantlet to the turret. Here's two final shots of the turret assembly to date:


And that concludes this update. Thanks for following.

dcandal

Joined: September 07, 2006
KitMaker: 918 posts
Armorama: 212 posts

Posted: Monday, June 01, 2015 - 05:48 PM UTC
Posted: Monday, June 01, 2015 - 07:21 PM UTC

dcandal

Joined: September 07, 2006
KitMaker: 918 posts
Armorama: 212 posts

Posted: Wednesday, June 03, 2015 - 12:44 AM UTC
LikesTanks

Joined: May 07, 2013
KitMaker: 242 posts
Armorama: 234 posts

Posted: Thursday, June 04, 2015 - 06:58 AM UTC
Some very nice builds here, I particularly like Oleg's Stug - nice camo and restrained weathering.
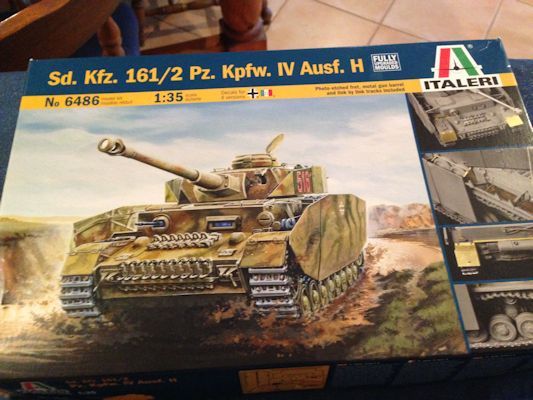
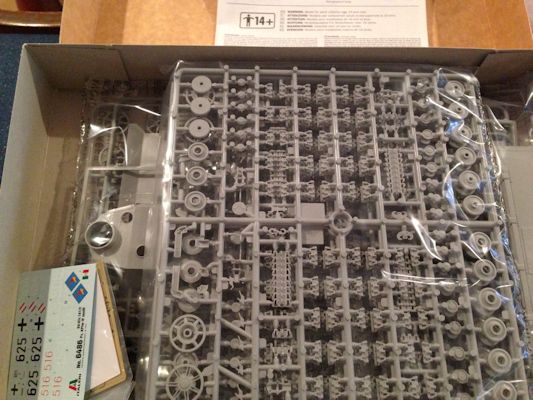
I'm in with Italeri's (somewhat) upgraded Panzer IV H. I managed to lose the starting pic from January, but as there was almost no progress till May it's still a virtually unstarted kit

This still has sprues from its incarnation as the old F1/F2/G, but also has 3 track/wheel sprues from what seems to be a jagdpanzer IV L/70 kit. So at last steel return rollers for a later H and the correct pressed hubcaps, although the track is the earlier uncleated variety. With not too much effort this could be built as anything from an early-H to a mid-J, with both exhaust types, alternate idlers and 3 different muzzle brake styles. I won't say it's a great kit, but it seems a decent representation of a Pz IV and I'm a sucker for this tank
I'm in with Italeri's (somewhat) upgraded Panzer IV H. I managed to lose the starting pic from January, but as there was almost no progress till May it's still a virtually unstarted kit

This still has sprues from its incarnation as the old F1/F2/G, but also has 3 track/wheel sprues from what seems to be a jagdpanzer IV L/70 kit. So at last steel return rollers for a later H and the correct pressed hubcaps, although the track is the earlier uncleated variety. With not too much effort this could be built as anything from an early-H to a mid-J, with both exhaust types, alternate idlers and 3 different muzzle brake styles. I won't say it's a great kit, but it seems a decent representation of a Pz IV and I'm a sucker for this tank


dcandal

Joined: September 07, 2006
KitMaker: 918 posts
Armorama: 212 posts

Posted: Friday, June 05, 2015 - 03:59 AM UTC
ltb073

Joined: March 08, 2010
KitMaker: 3,662 posts
Armorama: 3,078 posts

Posted: Saturday, June 06, 2015 - 06:09 PM UTC
OK guys I made some progress on the Kugelblitz
the hull

But then whe I went to assemble the ball turret I got a bit annoyed Either Dragon forgot to supply the 2 turret bracket part J15 or the previous owner of the kit took them out
 So i made some out of a PE fret
The top half

the lower half

assembled

Now ready for primer

it was primed yesterday and the base coat of Dunkelgelb was just sprayed
the hull

But then whe I went to assemble the ball turret I got a bit annoyed
 Either Dragon forgot to supply the 2 turret bracket part J15 or the previous owner of the kit took them out
 So i made some out of a PE fret
The top half


the lower half

assembled

Now ready for primer

it was primed yesterday and the base coat of Dunkelgelb was just sprayed


Bigrip74

Joined: February 22, 2008
KitMaker: 5,026 posts
Armorama: 1,604 posts

Posted: Saturday, June 06, 2015 - 07:28 PM UTC
Sal, the turret looks great (who needs parts when you can make them, and they work better than original) cant wait to see the paint photos.
Bob
Bob
ltb073

Joined: March 08, 2010
KitMaker: 3,662 posts
Armorama: 3,078 posts

Posted: Sunday, June 07, 2015 - 03:41 PM UTC
Quoted Text
Sal, the turret looks great (who needs parts when you can make them, and they work better than original) cant wait to see the paint photos.
Bob
Thanks Bob


Im gonna go with a tri color camo schema I think


dcandal

Joined: September 07, 2006
KitMaker: 918 posts
Armorama: 212 posts

Posted: Monday, June 08, 2015 - 02:59 AM UTC
KevPak

Joined: June 04, 2014
KitMaker: 137 posts
Armorama: 128 posts
Posted: Monday, June 08, 2015 - 09:04 AM UTC
Now for yet another Pz. Beob. IV J update. The next items to be built are the supporting brackets for the turret schurzen. The ones provided in the kit are woefully inadequate - too thick and lacking some important details. Here are the parts from the kit:

So I scratchbuilt my own. Using my panzer IV H as a 3D reference I duplicated the brackets using plastic strip:


Now to throw some paint on. Using photos from the web I attempted to duplicate a late-war (1945) 3-color camo scheme with broad bands of dunkelgelb, rotbraun and olivgrun
with "soft-hard" margins.

I then faded and blended the edges of the colors with Lifecolors Sandgrau (basically dunkelgelb with less of a greenish tint).

I weathered the scheme with chipping (raw umber applied with a pin), washed details with raw umber and apllied raw sienna to simulate dirt. Last I highlighted edges with a #2 pencil to simulate worn metal.


Here's two final shots of the entire assembly to date to give an idea of what the final model will look like:


More to come.

So I scratchbuilt my own. Using my panzer IV H as a 3D reference I duplicated the brackets using plastic strip:


Now to throw some paint on. Using photos from the web I attempted to duplicate a late-war (1945) 3-color camo scheme with broad bands of dunkelgelb, rotbraun and olivgrun
with "soft-hard" margins.

I then faded and blended the edges of the colors with Lifecolors Sandgrau (basically dunkelgelb with less of a greenish tint).

I weathered the scheme with chipping (raw umber applied with a pin), washed details with raw umber and apllied raw sienna to simulate dirt. Last I highlighted edges with a #2 pencil to simulate worn metal.


Here's two final shots of the entire assembly to date to give an idea of what the final model will look like:


More to come.

dcandal

Joined: September 07, 2006
KitMaker: 918 posts
Armorama: 212 posts

Posted: Tuesday, June 09, 2015 - 10:44 PM UTC
edmund

Joined: November 10, 2014
KitMaker: 668 posts
Armorama: 456 posts
Posted: Wednesday, June 10, 2015 - 12:20 AM UTC
What happened to the Bruckenleger IV ? Was it disabled or destroyed ?
edmund

Joined: November 10, 2014
KitMaker: 668 posts
Armorama: 456 posts
Posted: Wednesday, June 10, 2015 - 02:37 AM UTC
alewar

Joined: December 27, 2006
KitMaker: 773 posts
Armorama: 765 posts

Posted: Sunday, June 14, 2015 - 02:02 AM UTC
Hi. Still worki g with the Paine. I use Ammo paint 89/29/14/20150610.jpg" border="0" alt="Image hosted by servimg.com" />
Regards
Álvaro
Regards
Álvaro
alewar

Joined: December 27, 2006
KitMaker: 773 posts
Armorama: 765 posts

Posted: Sunday, June 14, 2015 - 05:40 AM UTC
KevPak

Joined: June 04, 2014
KitMaker: 137 posts
Armorama: 128 posts
Posted: Sunday, June 14, 2015 - 08:57 AM UTC
Looks good Alvaro - lots of details. Now it's time for another exciting Pz. Boeb. update. Hopefully I can finish this before the campaign deadline. After fashioning and attaching the turret schurzen brackets it's time to fit the actual schurzen. I started by painting the schurzen dunkelgelb. On the inside surfaces I added some red primer at the bottom edges to depict incomplete coverage of the DG.

I attached the rear semicircular piece first:

Before proceeding, I made the screens at the bottom of the rear section. I'm guessing these were simply to provide additional storage space.

The strands should be aligned with the long axis of the turret but these look good enough for me!


Then I attached the front and middle (door) sections:


Then applied the camo colors and the national insignia (Balkankreuz) which will be the only markings I apply:


Now to apply chipping and weathering:


Then added the turret antenna and the commander's hatch cover. This completes the turret assembly.

Now it's starting to look like a tank!


I attached the rear semicircular piece first:

Before proceeding, I made the screens at the bottom of the rear section. I'm guessing these were simply to provide additional storage space.

The strands should be aligned with the long axis of the turret but these look good enough for me!


Then I attached the front and middle (door) sections:


Then applied the camo colors and the national insignia (Balkankreuz) which will be the only markings I apply:


Now to apply chipping and weathering:


Then added the turret antenna and the commander's hatch cover. This completes the turret assembly.

Now it's starting to look like a tank!


Posted: Sunday, June 14, 2015 - 12:54 PM UTC
Just started to build my entry for this campaign, On Track Model 10.5cm K18 auf Pz SfI IVa Dicker Max. 


alewar

Joined: December 27, 2006
KitMaker: 773 posts
Armorama: 765 posts

Posted: Sunday, June 14, 2015 - 07:01 PM UTC
Thanks Kevin, your one looks excellent.
BTW, you use masks for the camo?. I start to produce my own mask as I posted before.
Regards from the cold south
Alvaro
BTW, you use masks for the camo?. I start to produce my own mask as I posted before.
Regards from the cold south
Alvaro
Posted: Monday, June 15, 2015 - 04:49 PM UTC
Ausf F2 G, Panzer Grey added.


dcandal

Joined: September 07, 2006
KitMaker: 918 posts
Armorama: 212 posts

Posted: Wednesday, June 17, 2015 - 05:44 PM UTC
Posted: Friday, June 19, 2015 - 09:00 AM UTC
Finally got back to working on this one. Basic cammo is done. MK tracks are ready to go on, and need to detail and weather.

TangoOscarMike

Joined: April 02, 2015
KitMaker: 35 posts
Armorama: 19 posts
Posted: Friday, June 19, 2015 - 01:19 PM UTC
Starting my Italeri Panzer IV Ausf H


Posted: Saturday, June 20, 2015 - 01:01 AM UTC
Calling this one done. After looking at the pics I may go back and tighten a few things up. Thanks for a great campaign.


 |


