Campaigns: Completed Campaigns
Campaigns that are completed should be grouped here.
Hosted by Richard S.
Panzer IV Campaign
minas-ithil
#110
Visit this Community
Florida, United States
Joined: September 20, 2005
KitMaker: 248 posts
Armorama: 224 posts
Posted: Sunday, July 05, 2015 - 07:40 PM UTC
Fellow PzIV folks,
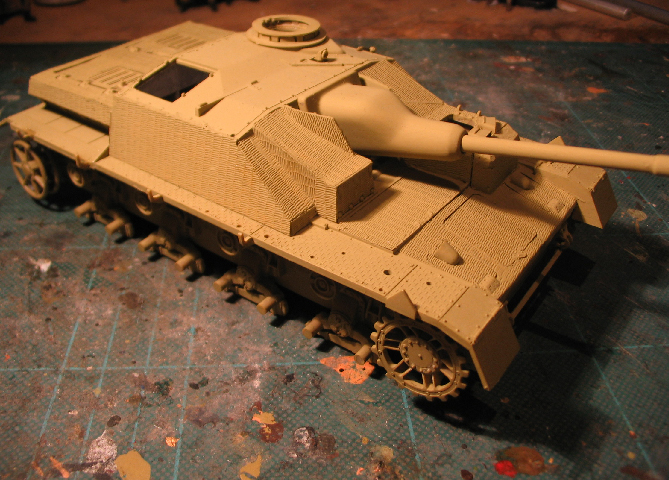
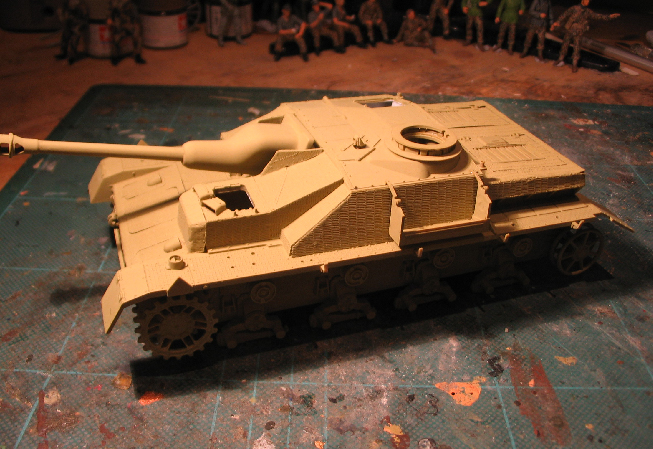
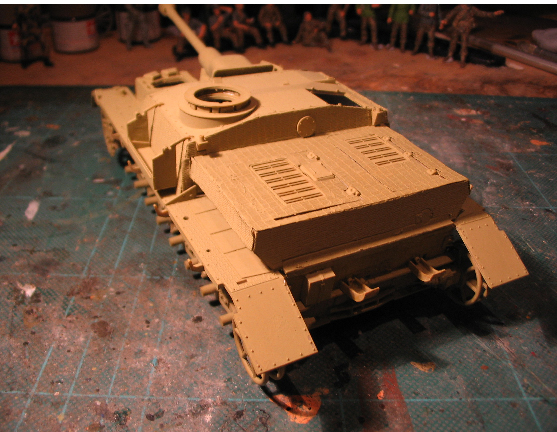
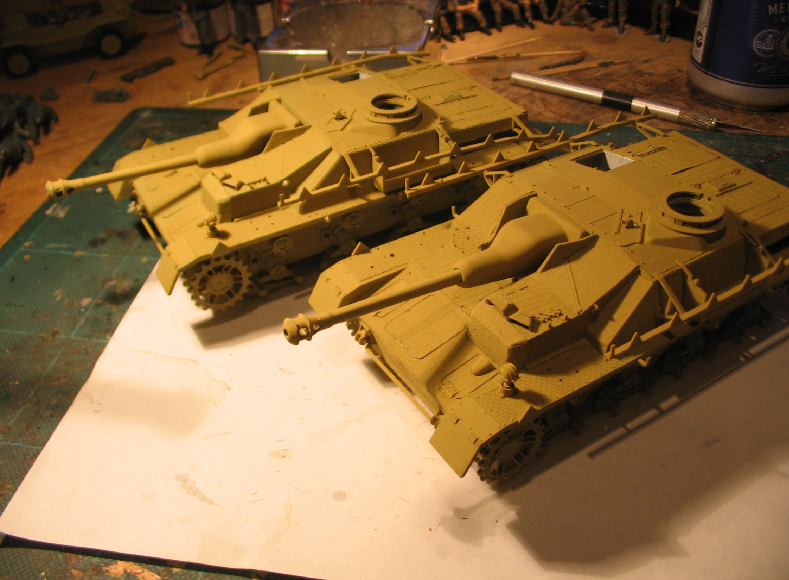
Good work on the campaign so far, plenty of excellent builds going on. I was able to get in a litle build time this weekend on my 1/76 JagdpanzerIV. Here is the current progress:


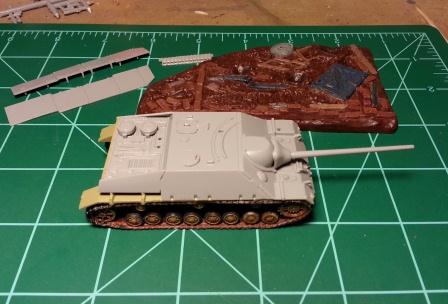
The lower half has been basically painted, since the tracks need to be mounted before the upper hull. The base has also been base-coated to prep for coming detail work and weathering. So only about 10 parts left and then the paint fest commences!

Thanks,
Stephen
KevPak
Visit this Community
United States
Joined: June 04, 2014
KitMaker: 137 posts
Armorama: 128 posts
Posted: Monday, July 06, 2015 - 08:35 AM UTC
You guessed it - time for another Panzer IV Beob. update - this one will finish the tank (although I hope to add 3-4 figures at some point in the near future). The first item is to paint the side skirts. I tried to portray splattered mud on the bottom edges of the skirts using putty:


And now for the hull antennas. Remember that this vehicle had 3 radio sets - one located in the turret and two in the hull. The Sternantenna (star antenna) was located on the right rear hull. The part provided in the kit had spokes that were too thick so I replaced them with thin plastic rod:


I then attached it to the rear hull plate along with the standard left rear antenna:


That finishes the tank itself. But no combat vehicle is complete without a few "accessories." The first to be added is a tow cable. For any of you who have tried to use the wire provided in the Dragon kits, you know what a frustrating experience it can be to try to get it into the right shape - virtually impossible in my experience! That's why I am so impressed with this gem of a product that I picked up in my local Michael's craft store:


It's main advantage over the wire provided in the Dragon kits is that it is easily bent into shape and retains the shape:


So I cut it to the right length and glued the tow cable ends on and painted the assembly. And then attached to the tank:


I then added a few items to the wire basket storage spaces that I made two posts ago. On the left I added two jerry cans:


On the right I added a cord of firewood (OK, that's an exaggeration) and a helmet:


And added the universal rusty pail to the rear hull:


Last item to be added is the spare antenna box, located under the schurzen brackets on the right hull side, as shown in this photo of a captured Pz. Beob:


This looks like a temporary or improvised stowage but I have another photo of an operational tank (which I unfortunately can't share with you as it is from a private collection) which shows that this was indeed where it was stored. So I scratchbuilt the part from plastic strip (this item is not included in the kit):


Made a bracket for it under the first schurzen bracket:


And then slid the box through it and glued in place:


And that's it for the tank. I will try to post pics of the figures as I complete them (although I wouldn't hold your breath). Here's some final shots:


Thanks for a great campaign! Congrats to everyone who has finished and for all of you who are still working on your builds - keep up the good work and best of luck!


Steel_Spektor
Visit this Community
Queensland, Australia
Joined: December 19, 2012
KitMaker: 74 posts
Armorama: 68 posts
Posted: Tuesday, July 07, 2015 - 09:09 AM UTC
Grasshopper is done! Burnt out on armor now so I bought a BF109 to occupy my time. Some cracking builds going on in here.

 photo IMG_20150520_152229_zps2uadwqfd.jpg

 photo IMG_20150606_134621_zpsdkjckpxz.jpg

 photo IMG_20150707_165751_zps4fiogejo.jpg

 photo IMG_20150708_092809_zpskxncj8o8.jpg
dcandal
Visit this Community
Buenos Aires, Argentina
Joined: September 07, 2006
KitMaker: 918 posts
Armorama: 212 posts
Posted: Wednesday, July 08, 2015 - 12:57 AM UTC
After giving a grey prime I had painted it with panzer gre and gave some shadows,


dcandal
Visit this Community
Buenos Aires, Argentina
Joined: September 07, 2006
KitMaker: 918 posts
Armorama: 212 posts
Posted: Wednesday, July 08, 2015 - 01:00 AM UTC
I had also replace the tow cable of the kit with one made with wire,


TheMedic
Visit this Community
California, United States
Joined: March 05, 2005
KitMaker: 37 posts
Armorama: 31 posts
Posted: Wednesday, July 08, 2015 - 12:58 PM UTC
I'm calling this one done. My contribution to the Panzerkampfwagen IV Campaign. Started this project on Dec. 1st with the intent of only building the 1/35 scale Sturmpanzer IV Brummbar (Late production model) from Dragon with some aftermarket zimmerit and schürzen.


I then decided to add some Fruilmodel Tracks I picked up a local model swap meet and contest.


And then it escalated to a whole new level. I decided to start experimenting with mold making and casting and combined the results with the current project.


And here's the finished result. My diorama called: "Verdammt Schafe!" (Damn Sheep!) Located on the Gothic Line somewhere in Northern Italy during the late summer, 1944.


The structure is scratch built from foam board, balsa, cork, tile grout and Verlinden roof tile.


The mattress was sculpted from clay and allowed to air harden before painted. The rest of the odds and ends are from the spare parts box.


Thank for looking! I truly enjoyed this campaign and found I definitely challenged myself on this build.
justsendit
Visit this Community
Colorado, United States
Joined: February 24, 2014
KitMaker: 3,033 posts
Armorama: 2,492 posts
Posted: Wednesday, July 08, 2015 - 07:27 PM UTC
Brilliant! I love the concept! Great attention to detail!

—mike
erichvon
Visit this Community
England - East Midlands, United Kingdom
Joined: January 17, 2006
KitMaker: 1,694 posts
Armorama: 1,584 posts
Posted: Wednesday, July 08, 2015 - 08:44 PM UTC
Beautifully done dio. Painting and execution are outstanding and the sheep are a really nice touch. Something completely different. Top work!
Namabiiru
Staff MemberAssociate Editor
MODEL SHIPWRIGHTS
#399
Visit this Community
Rhode Island, United States
Joined: March 05, 2014
KitMaker: 2,888 posts
Armorama: 1,920 posts
Posted: Thursday, July 09, 2015 - 04:07 AM UTC
That is really outstanding! Love the both the concept and the execution. But not enough sheep poop!

edmund
Visit this Community
United States
Joined: November 10, 2014
KitMaker: 668 posts
Armorama: 456 posts
Posted: Thursday, July 09, 2015 - 04:39 AM UTC

Quoted Text


Quoted Text

Is this the 9109 ?


This is the old Dragon Kit from 1996 kit #6046
9109 comes with Magic Tracks and better barrels

. Thank you .
edmund
Visit this Community
United States
Joined: November 10, 2014
KitMaker: 668 posts
Armorama: 456 posts
Posted: Thursday, July 09, 2015 - 04:41 AM UTC

Quoted Text

Here are the finished photos of my Tristar Pz IV Ausf B.
The same photos are in campaign gallery.
This has been a great campaign, lots of great models and even more to come.
Tom


Thanks,
Tom

. How were tracks to assemble ? After assembly did they want to twist and come apart ?
KevPak
Visit this Community
United States
Joined: June 04, 2014
KitMaker: 137 posts
Armorama: 128 posts
Posted: Thursday, July 09, 2015 - 05:29 AM UTC
Luke - love your Heuschrecke! It can be really hard to get a convincing monotone paint scheme but yours is one that is very well done.

Jerry - outstanding dio! Am I to understand correctly that you molded each sheep individually? Did you sculpt the molds too? Superb work, however you did it!
erichvon
Visit this Community
England - East Midlands, United Kingdom
Joined: January 17, 2006
KitMaker: 1,694 posts
Armorama: 1,584 posts
Posted: Thursday, July 09, 2015 - 02:24 PM UTC
This is where I'm up to today. I've just had another one arrive in the post just now so I'll make a start on zimmeritting that later today before I start putting it together. I'm going to wait until I've got both of them to the same stage so I only need to get the airbrush out once and do both of them at the same time. Hopefully I should be okay for time.


dcandal
Visit this Community
Buenos Aires, Argentina
Joined: September 07, 2006
KitMaker: 918 posts
Armorama: 212 posts
Posted: Monday, July 13, 2015 - 12:55 AM UTC
Here I show you the Panzer IV finished,


Namabiiru
Staff MemberAssociate Editor
MODEL SHIPWRIGHTS
#399
Visit this Community
Rhode Island, United States
Joined: March 05, 2014
KitMaker: 2,888 posts
Armorama: 1,920 posts
Posted: Monday, July 13, 2015 - 03:27 AM UTC
Really nice, Daniel!

dcandal
Visit this Community
Buenos Aires, Argentina
Joined: September 07, 2006
KitMaker: 918 posts
Armorama: 212 posts
Posted: Monday, July 13, 2015 - 03:49 AM UTC
Thanks Mark!!!!
ZAPanzer
Visit this Community
North-West, South Africa
Joined: September 12, 2012
KitMaker: 88 posts
Armorama: 49 posts
Posted: Monday, July 13, 2015 - 07:12 PM UTC
Daniel: Great PzIV

Jerry that Brummbar looks awesome too.
erichvon
Visit this Community
England - East Midlands, United Kingdom
Joined: January 17, 2006
KitMaker: 1,694 posts
Armorama: 1,584 posts
Posted: Friday, July 17, 2015 - 06:28 AM UTC
Ready to lay down the camo pattern now...

minas-ithil
#110
Visit this Community
Florida, United States
Joined: September 20, 2005
KitMaker: 248 posts
Armorama: 224 posts
Posted: Wednesday, July 22, 2015 - 01:48 AM UTC
To One and All,
Finally finished with the little 1/76 Matchbox (Revell) Jagdpanzer IV. Actually a nice little kit and not too bad considering its age.


These will be posted in the gallery as well.

JERRY: Your Brummbar came out extremely nice and the flock of sheep are great. Did you sculpt a master of the sheep and cast them, or did you use a commercial model and then modify it? Regardless, a diorama to be proud of.


Thanks,
Stephen (Minas-Ithil)
eMan
#298
Visit this Community
Hong Kong S.A.R. / 繁體
Joined: August 08, 2002
KitMaker: 1,182 posts
Armorama: 665 posts
Posted: Wednesday, July 22, 2015 - 12:26 PM UTC
Progress update of Dicker Max.


eMan
#298
Visit this Community
Hong Kong S.A.R. / 繁體
Joined: August 08, 2002
KitMaker: 1,182 posts
Armorama: 665 posts
Posted: Sunday, July 26, 2015 - 06:17 AM UTC
More update pics.

Wulfen
Visit this Community
Oregon, United States
Joined: November 24, 2008
KitMaker: 53 posts
Armorama: 52 posts
Posted: Tuesday, July 28, 2015 - 02:56 AM UTC
Still working on getting this done in time.

Update pics:


Lighting was bad for those which is why they look yellowed.
Only made a few really minor changes to the kit. Good thing I had reference books though some of the stuff would have been unplaceable without diagrams that actually showed where things belonged instead of just an arrow pointing to the general area.

Here it is primered.. just need to get some paint on it now.

Namabiiru
Staff MemberAssociate Editor
MODEL SHIPWRIGHTS
#399
Visit this Community
Rhode Island, United States
Joined: March 05, 2014
KitMaker: 2,888 posts
Armorama: 1,920 posts
Posted: Tuesday, July 28, 2015 - 04:06 AM UTC

Quoted Text


Good thing I had reference books though some of the stuff would have been unplaceable without diagrams that actually showed where things belonged instead of just an arrow pointing to the general area.


Yeah, those Dragon instructions are awesome, aren't they?

erichvon
Visit this Community
England - East Midlands, United Kingdom
Joined: January 17, 2006
KitMaker: 1,694 posts
Armorama: 1,584 posts
Posted: Tuesday, July 28, 2015 - 06:27 AM UTC
While Dragons kits are really nice detailwise their instructions are crap. Talk about vague! James, I had to do exactly the same thing when I did a DML Sdkfz 250. Surfed the net for pictures of real ones and worked from them. Ironic really, they put lots of effort into the detail of the kit but no effort into the detail of the instructions. Bizarre! Doesn't look like I'm going to get my two Stug IV's finished in time with only two days to go. I should have joined earlier I suppose but having said that I didn't need the Stugs a few months ago lol. Such is life. Some lovely builds in this campaign and I've picked up one or two ideas for future use.
pablo_g
Visit this Community
Wojewodztwo Slaskie, Poland
Joined: October 21, 2003
KitMaker: 529 posts
Armorama: 500 posts
Posted: Tuesday, July 28, 2015 - 11:54 PM UTC
I finished,:-)--<
I congratulate all the beautiful models and thanks for a great campaign.


Paweł