Campaigns: Completed Campaigns
Campaigns that are completed should be grouped here.
Hosted by Richard S.
WWII Panther Tanks!
pablo_g
Visit this Community
Wojewodztwo Slaskie, Poland
Joined: October 21, 2003
KitMaker: 529 posts
Armorama: 500 posts
Posted: Saturday, April 04, 2015 - 01:50 PM UTC
Hello,
Nicely done Keith.
Here are some pictures of the progress on my Panther. The tank is painted with primer, when it dries it will paint camouflage.


Paweł
pablo_g
Visit this Community
Wojewodztwo Slaskie, Poland
Joined: October 21, 2003
KitMaker: 529 posts
Armorama: 500 posts
Posted: Saturday, April 04, 2015 - 02:01 PM UTC
Hello,
Cool models, guys.
Here are some pictures of the progress on my Panther. The tank is painted with primer, when it dries it will paint camouflage.


Paweł
JonDicks
Visit this Community
Queensland, Australia
Joined: October 13, 2009
KitMaker: 223 posts
Armorama: 224 posts
Posted: Monday, April 06, 2015 - 01:09 PM UTC
Sorry about the quick iphone photos
Wash is on, with streaking grime, rainmarks and chipping. All with AK products. So is the mud pigments but you can't see that well in these photos. Wheels and tracks (and better photos I promise) next.
SGTJKJ
#041
Visit this Community
Kobenhavn, Denmark
Joined: July 20, 2006
KitMaker: 10,069 posts
Armorama: 4,677 posts
Posted: Monday, April 06, 2015 - 01:47 PM UTC
Nice looking weathering, Jon. Looking forward to see more.

Pawel, nice progress.

Keith, great build. Thanks for the updated pictures.

I have still not progressed a lot with my build past the base color, but I will get cracking soon with some hard edged camouflage.
ltb073
Visit this Community
New York, United States
Joined: March 08, 2010
KitMaker: 3,662 posts
Armorama: 3,078 posts
Posted: Thursday, April 09, 2015 - 05:21 AM UTC
Some great looking Panthers here guy
I got the base coat of dunklegelb on what any opinions on the homemade zimm
 photo P1090306.jpg
 photo P1090307.jpg
 photo P1090308.jpg
Pytagoras
Visit this Community
Møre og Romsdal, Norway
Joined: December 03, 2012
KitMaker: 300 posts
Armorama: 285 posts
Posted: Thursday, April 09, 2015 - 11:09 PM UTC
Oh man, I did it again. Went straight from finished assembly to finished build and no updates in between.

Anyhow, here is my contribution to the campaign in the form of a Dragon Panther Ausf. F., kit bought from fellow Armorama user "retiredyank".


JonDicks
Visit this Community
Queensland, Australia
Joined: October 13, 2009
KitMaker: 223 posts
Armorama: 224 posts
Posted: Friday, April 10, 2015 - 12:11 PM UTC
Nice work Vegard.

Well here are my finished pics


rolltide31
#377
Visit this Community
Texas, United States
Joined: June 27, 2010
KitMaker: 1,481 posts
Armorama: 93 posts
Posted: Sunday, April 12, 2015 - 01:11 AM UTC
Hi all,

Well as I mentioned earlier I have finally overcome my frustration with these two Panther tanks. I finally applied the based coat of Dark Yellow and began the camouflage with red brown.


The tools are primarily done so as soon as I lay down the dark green camouflage I can move on to the minor details and finish the twins off.

Unfortunately due to an upcoming move I wont be able to complete the diorama I had originally planned for these two. Once the move is done I will though.

All comments, suggestions, or criticism are always welcome.

Everyones builds are looking great.

Thanks

Dave
AnalogKid
Visit this Community
Texas, United States
Joined: December 20, 2014
KitMaker: 46 posts
Armorama: 42 posts
Posted: Sunday, April 12, 2015 - 05:20 AM UTC
Greetings All,

This is my first update for my JagdPanther build. I have had every intention of getting on the computer and post an update but my near-by workbench would always call me over to put more work into this kit. If I have a choice between getting on the computer or firing up my airbrush...the airbrush always wins

In my initial post I wrote about using the Dragon late-model JagdPanther along with the Lion Roar detail set which is primarily photo-etch details along with an aluminum barrel. As I was pouring over the kit since my last post the feature of the separately molded roof intrigued me. I thought that this might make a view of the interior a bit easier to pull off as the roof could be placed on top without gluing and easily removed for internal viewing enjoyment. When I get to that point in the build I’ll discuss the fit of the roof on the hull.

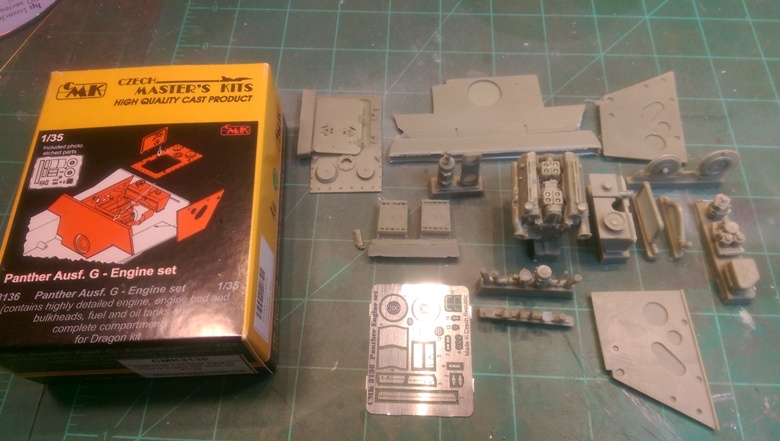
I researched what was available for aftermarket details for JagdPanther interiors and found 3 kits from CMK: Internal Detail Set which includes the main gun, ammo storage racks, and detailed floor; the Driver’s Detail Set which includes the transmission and driver/radioman positions; and a Panther G engine/compartment. All kits are primarily resin with a little bit of photo-etch thrown in. Like my desire to practice soldering photo-etch brass parts I decided I was up for more punishment and wanted to practice my resin working skills so I purchased these 3 detail sets from Sprue Brothers. I’ve posted photos of the detail sets below.


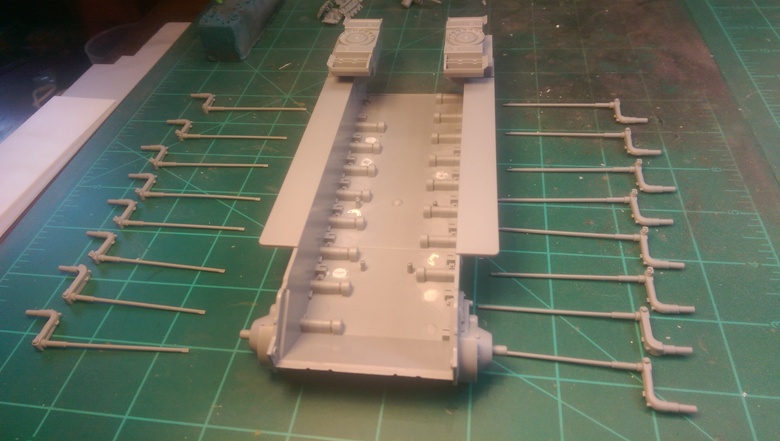
I started by getting rid of the ejection pin marks in the floor of the hull. Some of them were actually raised so sanding them down took little time. The others I filled with Vallejo plastic putty and sanded smooth. I covered with gray Vallejo Model Color this paint is relatively thick and acted as a primer to smooth out the surface of the floor after sanding. Next went in the torsion bars with little issue. It should be noted here that the CMK resin detail kits mention they are for the Dragon kit. Well, they are not. Each comes with a floor piece with torsion bars molded in the areas that will be visible to the eye. The floors will not fit in the Dragon kit (at least this one) with the torsion bar guides in-place (the parts molded into the floor of the kit) without major modification to the hull floor. I also own an unbuilt Tamiya JagdPanther kit and the floor parts do indeed fit on the floor of this kit (as there are no torsion bars on this kit). However, the trade-off is that the roof is not molded separately on the Tamiya kit; the separately molded roof on the Dragon kit was what drove me go this route in the first place. My strategy will be to build the internal detail kits up without the floor pieces. Hopefully I can pull it off.


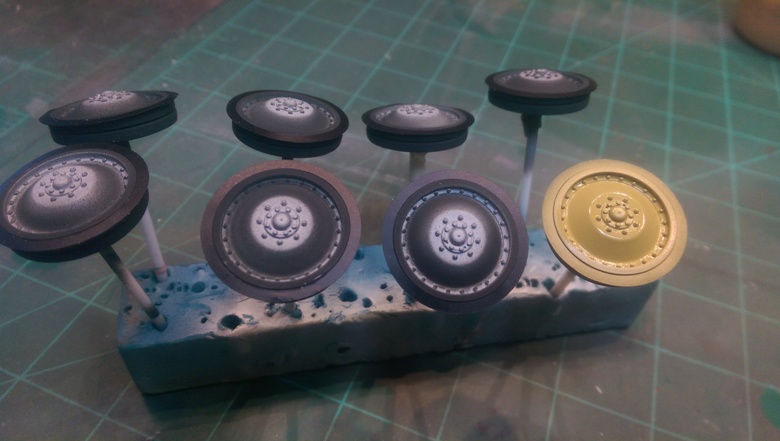
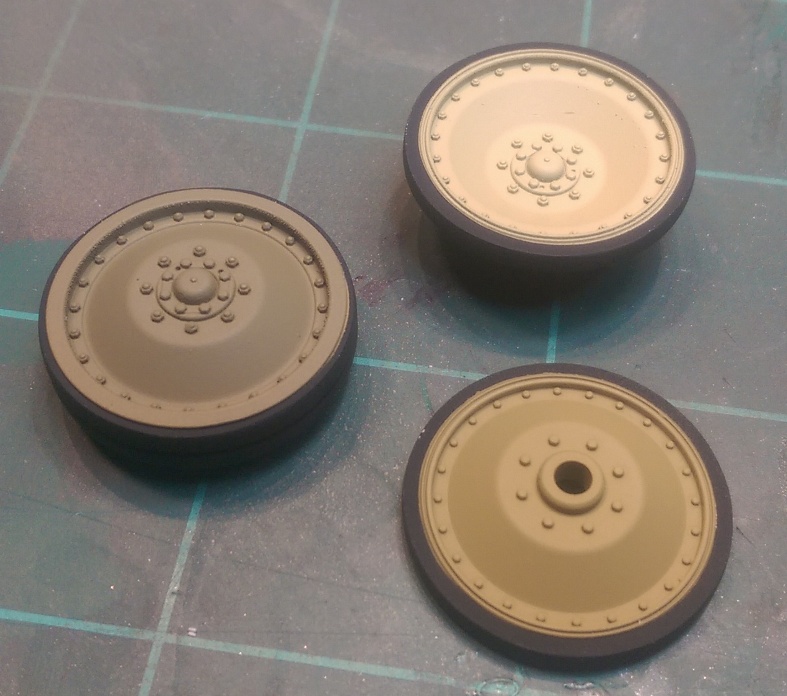
I addition to the Lion Roar and CMK detail kits/sets I decided to try for the first time the Eduard wheel masks. My circle template that I usually use for masking tires did not have an exact fit diameter with the Dragon Panther wheels. I have posted a couple of pics below showing the masks in use and the finished product. I am satisfied with the results. There are some very minor discrepancies but these will be covered with an oil wash. I did the wheels out of sequence with the rest of the build only because I was curious to see how the masks would work out. I give them a thumbs-up.


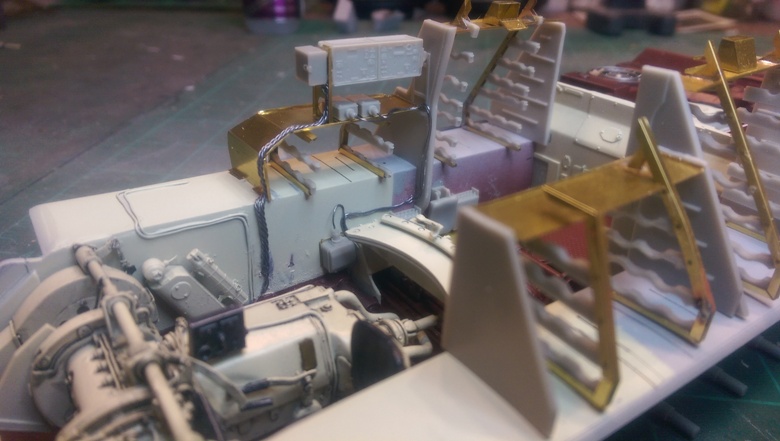
Other work includes the soldering of the rear storage bins along with work on the rear of the hull. I am using Trumpeter scale chains in areas outlined for PE chain placement. The PE chains just are not holding up to my cutting, they are just too thin/small/frail. I like the way these Trumpeter chains are holding up and look. I also have larger chain from Barrel Depot that will use where larger chains are called for.


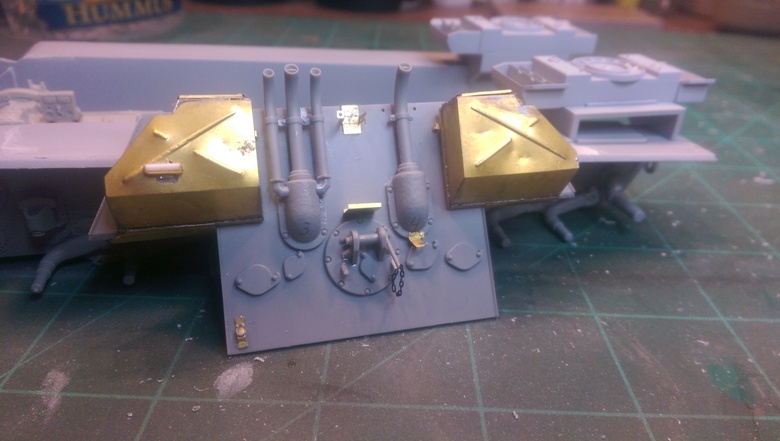
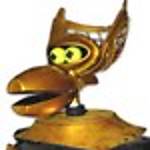
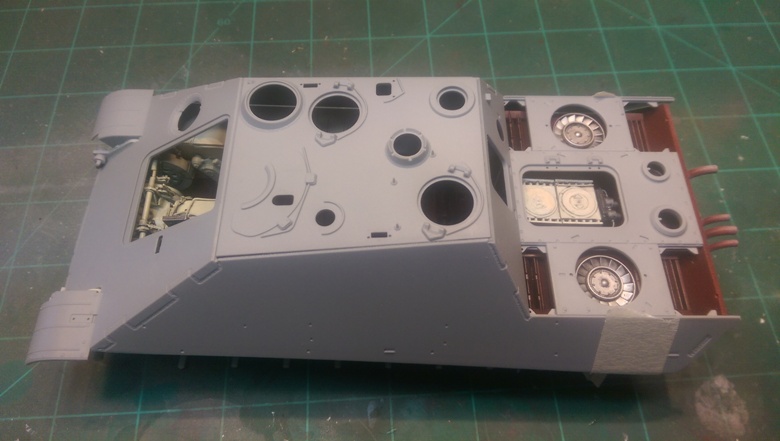
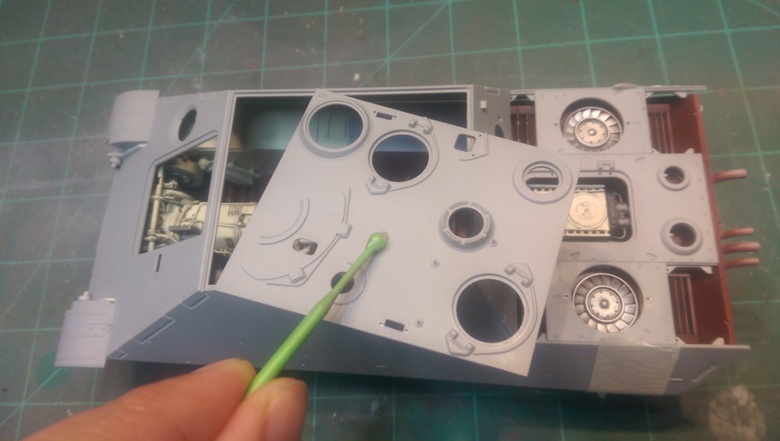
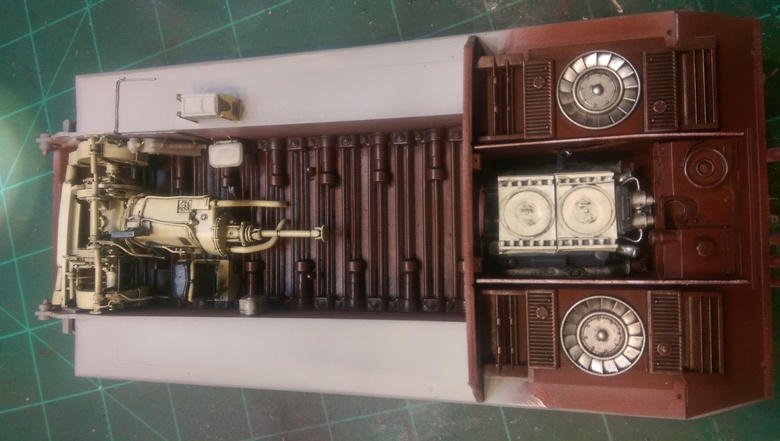
I added lead wire tubing/wiring on the transmission guided by pictures of the JagdPanther in the Imperial War Museum as this seems the best documented interior I could find. I covered with Tamiya surface primer (thinned with Tamiya lacquer thinner) and then with an overall Vallejo Model Air Aged White (71.132) and then an oil wash. The bottom of the hull I covered with the same Tamiya surface primer/lacquer mix and then I utilized Vallejo RAL 8012 polyurethane surface primer (74.605). I’m using this Vallejo primer mainly for its color characteristics and relying on the Tamiya primer (thinned with lacquer for “bite”) for my primer coat. I plan on using these two Vallejo colors as my interior colors for this project.

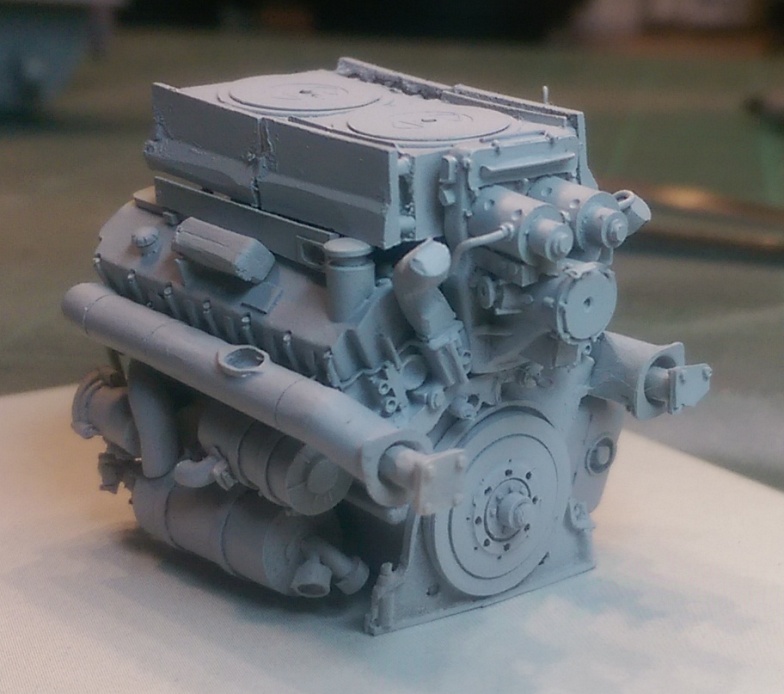
I decided to switch to the back of the TD and put the Maybach engine together. Below is a photo of the engine glued and primed with Tamiya surface primer. The picture below it shows the engine painted and in place as well as the transmission and driver’s seat dry fit in the front of the vehicle.


Work over the next few weeks will focus on finishing up the interior. I’m finished with all the parts from the Driver’s set and engine detail set and will be moving on to the larger, more daunting Interior set. I’ll finish up the interior with the engine in the back deck and then move on to exterior work which will entail a lot of the Lion Roar PE details.

This is taking longer than I thought it would (so far about 50 hours put into this project) but I am deliberately taking my time in order to make sure this piece looks top notch in the end. I should, however, make it before the campaign deadline in June…fingers crossed!

-Len
ColinEdm
Staff MemberAssociate Editor
ARMORAMA
Visit this Community
Alberta, Canada
Joined: October 15, 2013
KitMaker: 1,355 posts
Armorama: 1,229 posts
Posted: Sunday, April 12, 2015 - 08:46 AM UTC
Holy cow, that is looking good Len! All the others that have finished are looking good too!
SGTJKJ
#041
Visit this Community
Kobenhavn, Denmark
Joined: July 20, 2006
KitMaker: 10,069 posts
Armorama: 4,677 posts
Posted: Monday, April 13, 2015 - 07:09 PM UTC
Beautiful work on the interior, Len. Looks really nice. It is almost a pity to lock in those details in the hull.

looking forward to see more.
AnalogKid
Visit this Community
Texas, United States
Joined: December 20, 2014
KitMaker: 46 posts
Armorama: 42 posts
Posted: Tuesday, April 14, 2015 - 01:59 AM UTC
Thank you all for the very supportive comments...very much appreciated. Constructive critiques are also very much welcome: if I'm doing something wrong please let me know

As far as closing up the interior I plan on building the kit so the roof will be removable. In this particular kit (Dragon) the roof is molded as a separate piece so that go me thinking to add the interior...and hence the progress you see so far. Below are some pics I took today illustrating what I intend to do with this kit. With any luck I'll be able to pull it off

-Len


SGTJKJ
#041
Visit this Community
Kobenhavn, Denmark
Joined: July 20, 2006
KitMaker: 10,069 posts
Armorama: 4,677 posts
Posted: Tuesday, April 14, 2015 - 03:18 PM UTC
Nice Idea, Len. Great to be able to see the interior with all the effort you put into it.

I have made a little more progress. The late war fictive camo is on. Always wanted to try these wavy semi horisontal lines. Pretty satisfied with the first try.

More to follow.


DaGreatQueeg
Visit this Community
Napier, New Zealand
Joined: August 01, 2005
KitMaker: 1,049 posts
Armorama: 841 posts
Posted: Wednesday, April 15, 2015 - 02:40 PM UTC
Great work on the JP so far Len, it's very rare to see one with an interior.

Nice start on the camo too Jesper!


My here's my latest 1/72nd Panther project, 3x Panzer Brigade Ersatz M10s. The donor Panthers hulls are Dragon Ds with M10 conversion kits from Cpl Overby.

I completed most of the assembly on one over the weekend to sort out any issues before tackling the other two. It took a bit of grinding to get he D hull to fit, our fault for not using Gs or Erstaz M10s as donor kits. Was a decision based on cost and availability as Dragon Panthers are getting hard to find now. Any nothing that average modelling skills can't cope with ....

cheers
Brent


SGTJKJ
#041
Visit this Community
Kobenhavn, Denmark
Joined: July 20, 2006
KitMaker: 10,069 posts
Armorama: 4,677 posts
Posted: Sunday, April 19, 2015 - 12:36 AM UTC
A little more progress on the "July 1945" Panther. The main stuff is now on. Next are some small details to fix and the tracks. Then it is on to weathering.


ColinEdm
Staff MemberAssociate Editor
ARMORAMA
Visit this Community
Alberta, Canada
Joined: October 15, 2013
KitMaker: 1,355 posts
Armorama: 1,229 posts
Posted: Sunday, April 19, 2015 - 01:25 AM UTC
Very nice Jesper, love the camo!
SGTJKJ
#041
Visit this Community
Kobenhavn, Denmark
Joined: July 20, 2006
KitMaker: 10,069 posts
Armorama: 4,677 posts
Posted: Tuesday, April 21, 2015 - 05:24 AM UTC
Thanks, Colin. I am also pretty satisfied with it. It is always fun to do a little what if once in a while with some artistic license.
SGTJKJ
#041
Visit this Community
Kobenhavn, Denmark
Joined: July 20, 2006
KitMaker: 10,069 posts
Armorama: 4,677 posts
Posted: Sunday, April 26, 2015 - 04:03 PM UTC
After much fiddling with the track links the first track run is on. Now on for the next side.

More to follow son.

Arnzer
Visit this Community
Pas-de-Calais, France
Joined: August 01, 2013
KitMaker: 26 posts
Armorama: 23 posts
Posted: Monday, April 27, 2015 - 06:23 PM UTC
Hello friends,

I'm back with a JagdPanther (from Dragon) which is taking dust on my attic.

I bought tracks from Friul Model, and a metal gun from RB Models.


Let's go for almost two months of fun!

See you soon.
SGTJKJ
#041
Visit this Community
Kobenhavn, Denmark
Joined: July 20, 2006
KitMaker: 10,069 posts
Armorama: 4,677 posts
Posted: Tuesday, April 28, 2015 - 01:42 PM UTC
The tracks on the other side are on. They are tighter than I would have preferred, but I used all the links included in the kit. One extra link pr. side would have helped a lot. A little weird that Dragon only supplies the exact number of links.

Anyway, it will work as it is.

Next is some weathering. More to follow


AnalogKid
Visit this Community
Texas, United States
Joined: December 20, 2014
KitMaker: 46 posts
Armorama: 42 posts
Posted: Thursday, April 30, 2015 - 06:33 AM UTC
Hello All,

Here with a quick update. Just finished with the rear bulkhead, drivetrain details, ammo racks, radios, and some internal cabling. Need to finish up the interior with some hardware (brackets, etc) and floor plates and then on to the gun. Hoping to finish the interior this weekend, paint it, add some oil wash and paint chipping...then to seal it up for good and onto the outside of this TD.

-Len


woltersk
Visit this Community
Utah, United States
Joined: May 27, 2003
KitMaker: 1,026 posts
Armorama: 654 posts
Posted: Thursday, April 30, 2015 - 06:46 AM UTC

Quoted Text

The tracks on the other side are on. They are tighter than I would have preferred, but I used all the links included in the kit. One extra link pr. side would have helped a lot. A little weird that Dragon only supplies the exact number of links.

Anyway, it will work as it is.


@Jesper--Is there any way you can adjust the idlers? Turn them inwards to add slack to the track? That trick worked on my Dragon kit.

If not, it's not that noticeable and hardly detracts from a great build! Looking forward to seeing it completed.

Keith
woltersk
Visit this Community
Utah, United States
Joined: May 27, 2003
KitMaker: 1,026 posts
Armorama: 654 posts
Posted: Thursday, April 30, 2015 - 06:53 AM UTC
Brent, Len, David, Jon, Vegard, Pawel, Sal, Jesper, and everyone else I missed 'cause there are so many builds going on--Wow! Awesome jobs all around! Camo airbrushing, weathering, interiors, PE...this is one impressive campaign.

Keith
SGTJKJ
#041
Visit this Community
Kobenhavn, Denmark
Joined: July 20, 2006
KitMaker: 10,069 posts
Armorama: 4,677 posts
Posted: Friday, May 01, 2015 - 11:55 AM UTC
Thanks for the tip, Keith. No way to fix it now, as everything is glued in place. I guess some late war tankers put the tracks on too tight
MLD
Visit this Community
Vermont, United States
Joined: July 21, 2002
KitMaker: 3,569 posts
Armorama: 2,070 posts
Posted: Friday, May 01, 2015 - 08:31 PM UTC
Coming into the home stretch here.
Tracks are in for weathering, lower hull next.
47 wire loops today and then final cammo paints.