
#041
Kobenhavn, Denmark
Joined: July 20, 2006
KitMaker: 10,069 posts
Armorama: 4,677 posts
Posted: Saturday, May 02, 2015 - 11:29 AM UTC
Wow, looks great, Mike. What kit is this?
Good luck with all the loops - hope you keep your sanity

Looking forward to see more

Campaign'oholic - 252+ campaigns completed
Vermont, United States
Joined: July 21, 2002
KitMaker: 3,569 posts
Armorama: 2,070 posts
Posted: Saturday, May 02, 2015 - 05:31 PM UTC
The kit is the old DML/Shanghai dragon ( ex Gunze molds) panther base kit with s Real Models flak turret. 47 loops is a bit of hyperbole. It's only 12 foliage loops, three grab handles, and three lifting loops.
If you can keep your head when all about you are losing theirs,
perhaps you've misunderstood the situation.
North Carolina, United States
Joined: January 21, 2004
KitMaker: 803 posts
Armorama: 740 posts
Posted: Saturday, May 02, 2015 - 07:29 PM UTC
wow, there are some really impressive builds on here! I know its not an official entry into the campaign, but my kitty turned out a little "different"
https://gallery.kitmaker.net/data/500/IMG_0031_sm.jpgOntario, Canada
Joined: November 03, 2012
KitMaker: 2,275 posts
Armorama: 2,233 posts
Posted: Saturday, May 02, 2015 - 07:36 PM UTC
My 4..actually I did 5. I upload some build pix.The Panther II with fictional 88mm has metal tracks, so it will be awhile to finish. 4 Dragon kits & 1 Cyberhobby kit. This is my 3rd Panther II kit lol.

My 5th, Panther F. All still need tool & detail painting / weathering/ decals etc..

Another shot of Cyberhobby kit.

PS- I built 6 Sherman's this winter


#041
Kobenhavn, Denmark
Joined: July 20, 2006
KitMaker: 10,069 posts
Armorama: 4,677 posts
Posted: Saturday, May 02, 2015 - 10:59 PM UTC
Mike, the Real models conversion is new to me, but looks cool.
Joe, is that a marsian desert camouflage?

David, that is an entire kitty zoo! You got the Panther bug for sure!

Looking really cool!
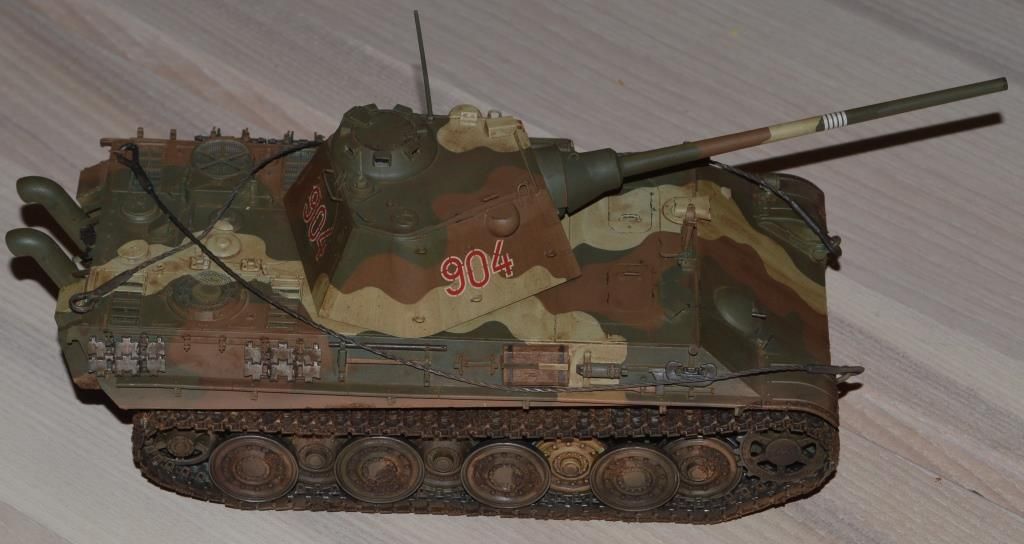
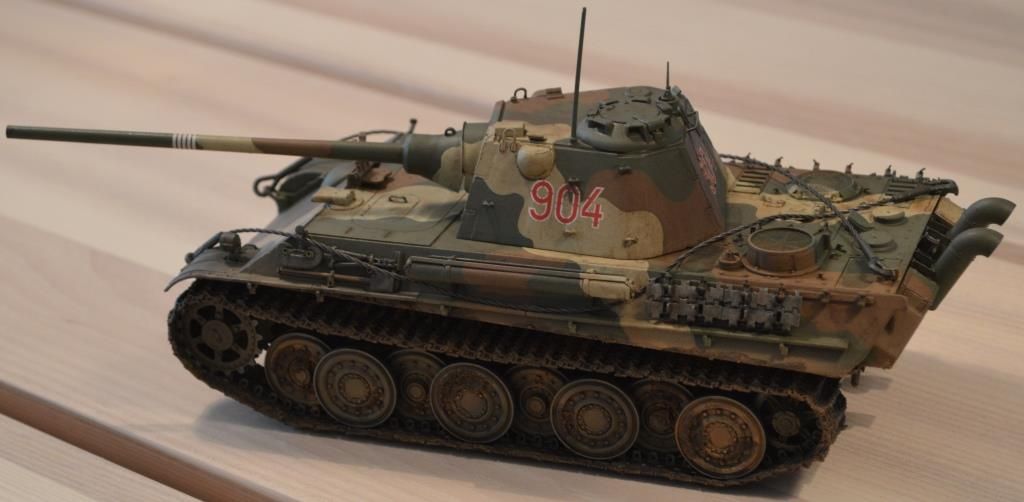
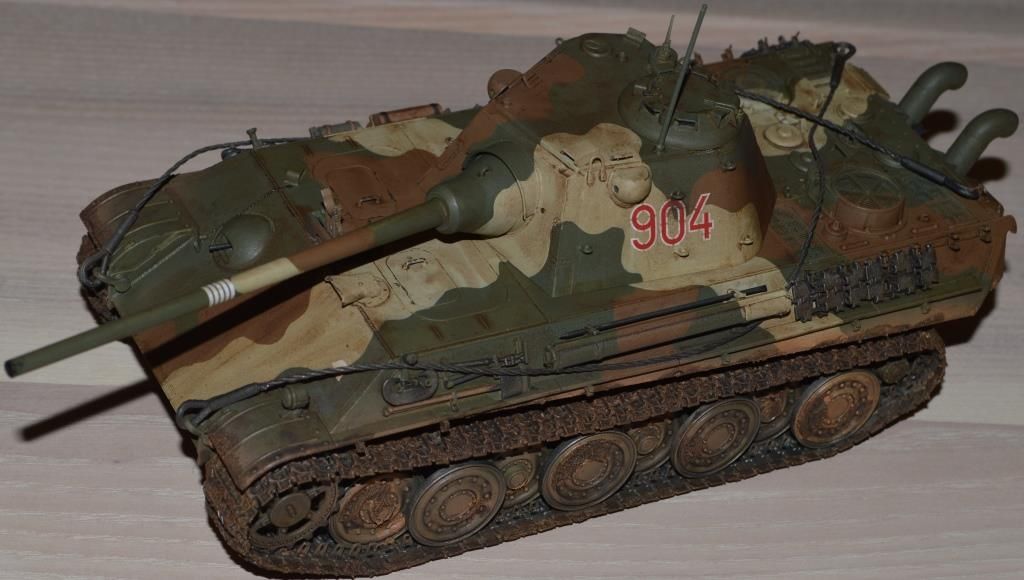
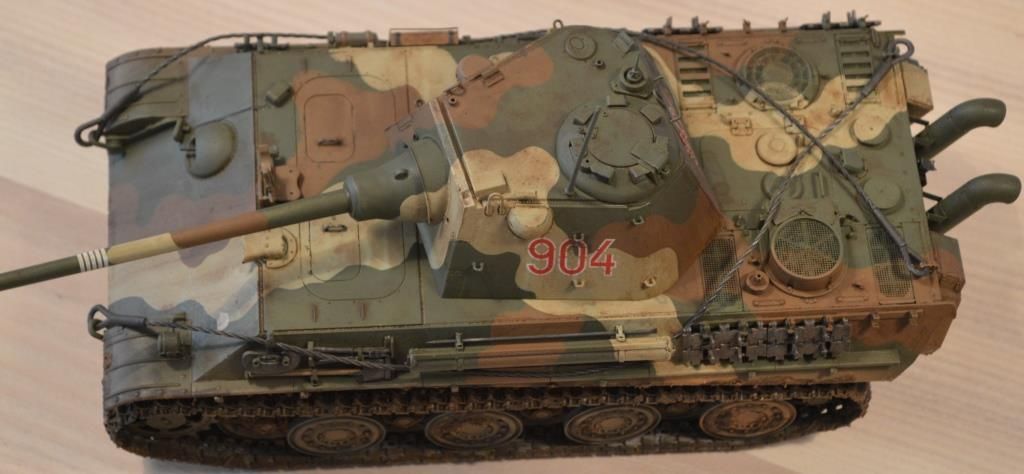
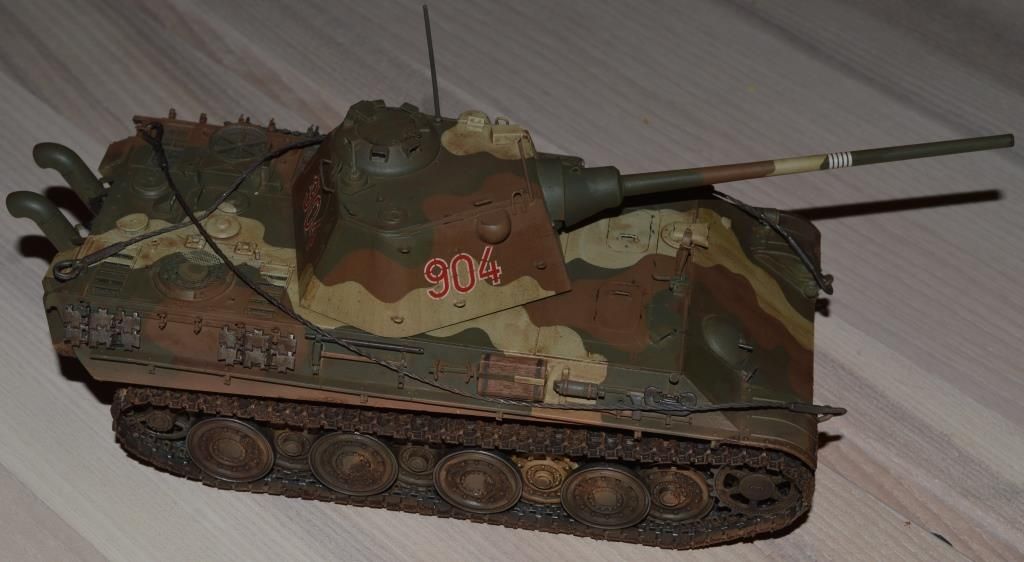
I have now finished my build for this campaign. It has been a long time underway with a lot of projects in between. However, I am pretty satisfied with the final result. A late Summer '45 panzer.
Campaign'oholic - 252+ campaigns completed
Wojewodztwo Slaskie, Poland
Joined: October 21, 2003
KitMaker: 529 posts
Armorama: 500 posts
Posted: Sunday, May 03, 2015 - 12:07 AM UTC
Hello,
Great Panther gentlemen, a good job, I also soon I finish mine.

Paweł

#501
Kerala, India / भारत
Joined: August 25, 2009
KitMaker: 292 posts
Armorama: 91 posts
Posted: Sunday, May 03, 2015 - 01:03 PM UTC
This will be my entry for the campaign

It's a Tamiya 1/48 Panther G with the diecast lower hull. Hope to finish it before the deadline.
Cheers


#041
Kobenhavn, Denmark
Joined: July 20, 2006
KitMaker: 10,069 posts
Armorama: 4,677 posts
Posted: Sunday, May 03, 2015 - 09:35 PM UTC
Thanks, Pawel. Looking forward to see your build.
Nice choice, Raj. Hope you make the deadline.
Campaign'oholic - 252+ campaigns completed
Napoli, Italy
Joined: April 17, 2014
KitMaker: 652 posts
Armorama: 600 posts
Posted: Wednesday, May 06, 2015 - 05:08 PM UTC
Dear All,
This is really a great campaign. A lot of great built !
This is my entry for the campaign:

It's a vintage (historical

) Tamiya 1/35 Panther Ausf.G Late version. I have this kit in my stash from about 20 years (


)
Now it is the right time to start. This is just after few hours night-time work:

I'll finishis in time !
Regards
Giovanni
Napoli, Italy
Joined: April 17, 2014
KitMaker: 652 posts
Armorama: 600 posts
Posted: Sunday, May 10, 2015 - 05:41 PM UTC
Dear All,
It 's me again, with hull almost completed and black primer:

then, base coat dunkelgelb:

Hope to have some spare time during this week.
Regards
Giovanni
Texas, United States
Joined: December 20, 2014
KitMaker: 46 posts
Armorama: 42 posts
Posted: Tuesday, May 12, 2015 - 07:31 AM UTC
Hello again, fellow Panther enthusiasts,
Fantastic work so far...I love checking out everyone else's progress...it motivates me and keeps me going.
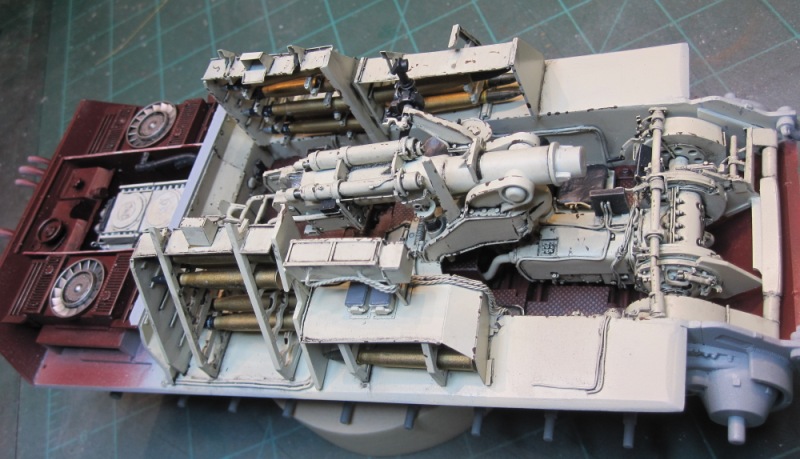
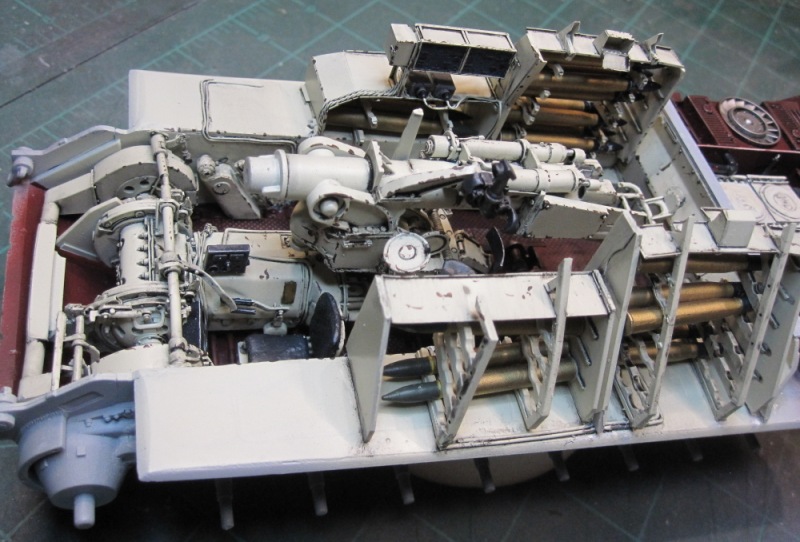
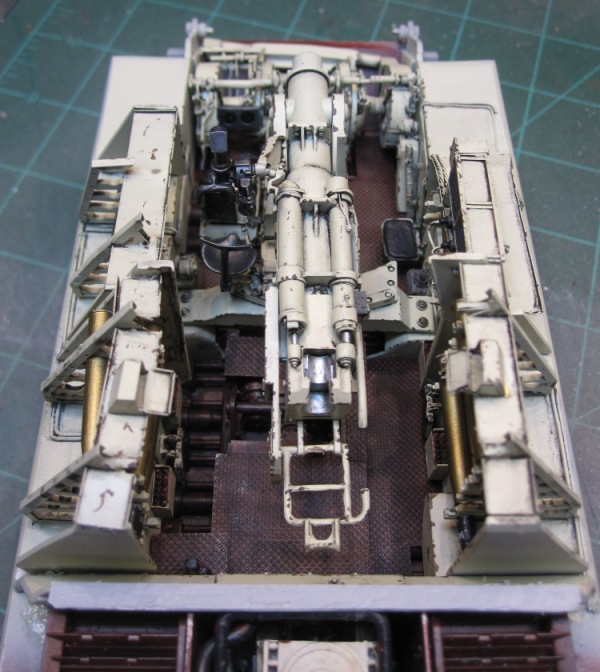
Another quick update before I seal up my JagdPanther for good (well, hopefully I remember everything and will not need to open it up again). Just about finished with the interior, just a couple more touch-ups to go then on to the outside and more PE work. Interior is painted in Vallejo Model Air "Aged White" while the floors are Vallejo Primer RAL 8012. An oil wash was added and then some paint chipping on top of that. The rounds are AFV Club painted with Alcad II brass. All the parts are held in with either CA glue or Gator Grip acrylic glue where I did not want to strip paint to make a bond...and the bond did not have to be particularly strong. I find acrylic glue is good for these sorts of applications. PE parts are kept together by soldering.
-Len
California, United States
Joined: June 11, 2009
KitMaker: 461 posts
Armorama: 370 posts
Posted: Wednesday, May 13, 2015 - 11:24 PM UTC
Hello all,
It's been a while since I last posted WIP pictures of my Jadgpanther so, here's to catching up.
I first primed it with Vallejo Black

And then, tried to initiate the Black and White technique. Here are the results


And finally, a shot with the road wheels dry fitted

I airbrushed it with AK Interactive's German Dunkelgelb Modulation Set.


I have since airbrushed this with Vallejo's Gloss Varnish in preparation for applying decals and chipping. I will also start working on the tracks. I will post some more pictures of the WIP. Hopefully, I can finish this model in time.
Thanks,
Joseph
Ankara, Turkey / Türkçe
Joined: November 30, 2004
KitMaker: 459 posts
Armorama: 109 posts
Posted: Friday, May 15, 2015 - 05:05 PM UTC
My JP is in progress.


Wojewodztwo Slaskie, Poland
Joined: October 21, 2003
KitMaker: 529 posts
Armorama: 500 posts
Posted: Sunday, May 17, 2015 - 02:27 AM UTC
New York, United States
Joined: March 08, 2010
KitMaker: 3,662 posts
Armorama: 3,078 posts
Posted: Monday, May 18, 2015 - 12:12 AM UTC
Active Campaigns on the bench:
Operation Fall Gelb - Pz.Kpfw. IV Ausf. C
Engineering the Future - M-26 Recovery Vehicle
115 Campaigns completed

#501
Kerala, India / भारत
Joined: August 25, 2009
KitMaker: 292 posts
Armorama: 91 posts
Posted: Tuesday, May 19, 2015 - 03:00 PM UTC
Update on my build.
I managed to complete most of the assembly and the painting. Have to paint the rubber on the roadwheels and then assemble and paint the tracks. Was trying to do the ambush scheme, but my limited airbrush skills prevented me from getting the exact scheme I wanted so I finished it as an "artist's impression" scheme

 Assembly 80% completed
 Painting in progress
 Artist's Impression
I would welcome any comments & suggestions on how to do a better job in the future.
Cheers


#377
Texas, United States
Joined: June 27, 2010
KitMaker: 1,481 posts
Armorama: 93 posts
Posted: Tuesday, May 19, 2015 - 08:05 PM UTC
Hi all,
As much as I hate to do this I will be removing myself from the campaign. between real life interuptions and overall aggrevation with the kit (and my lack of skill) it has become too much and I will not be able to finish by the deadline.
My hats off to all the great buildrs participating in the campaign, your Panther's look great. Good luck.
RollTide
In Dry Dock #1: 1/350 IJN SHOKAKU (Fujimi)
In Dry Dock #2: 1/350 IJN Tama (Aoshima)
Rimini, Italy
Joined: March 18, 2007
KitMaker: 91 posts
Armorama: 88 posts
Posted: Wednesday, May 20, 2015 - 11:04 AM UTC
Hi Guys,
I can finally resume work on my Panther A early.I hope to complete it soon

Here are some photos of my progress:


the red arrow above shows the housing of the smoke grenade launcher closed with plasticard it was not installed on early 'A' model.

Masterclub track links a nightmare!
Comments and advice are welcome.
best
Antonio

#041
Kobenhavn, Denmark
Joined: July 20, 2006
KitMaker: 10,069 posts
Armorama: 4,677 posts
Posted: Wednesday, May 20, 2015 - 12:38 PM UTC
Wow! A lot of great builds towards to end of this camaign. Looks great, guys!
Looking forward to see them all finsihed by the deadline.

Campaign'oholic - 252+ campaigns completed
North-West, South Africa
Joined: September 12, 2012
KitMaker: 88 posts
Armorama: 49 posts
Posted: Wednesday, May 20, 2015 - 02:17 PM UTC
Hi
I'm calling this done, will post in the gallery later


Napoli, Italy
Joined: April 17, 2014
KitMaker: 652 posts
Armorama: 600 posts
Posted: Wednesday, May 20, 2015 - 03:12 PM UTC
Hi Antonio,
Quoted Text
Hi Guys,
I can finally resume work on my Panther A early.I hope to complete it soon 
Here are some photos of my progress:
the red arrow above shows the housing of the smoke grenade launcher closed with plasticard it was not installed on early 'A' model.
Masterclub track links a nightmare!
Comments and advice are welcome.
best
Antonio
I have the same in my stash, waiting. Noted the mistake of the launcher on the turret.
Fully agree about masterclub track links. You will go ahead with them or change with something else ?
Saluti
Giovanni
Napoli, Italy
Joined: April 17, 2014
KitMaker: 652 posts
Armorama: 600 posts
Posted: Wednesday, May 20, 2015 - 03:15 PM UTC
Hi Robert,
Quoted Text
Hi
I'm calling this done, will post in the gallery later
I like your JP, very nice build and paint.
Only the chain on the bow looks a bit strange for me. Do you have some reference for this ? For my curiosity...
Cheers
Giovanni
Rimini, Italy
Joined: March 18, 2007
KitMaker: 91 posts
Armorama: 88 posts
Posted: Wednesday, May 20, 2015 - 03:34 PM UTC
Hi Giovanni,
I just finished assembling all.

Yes,I am going to use them.
best
Antonio
North-West, South Africa
Joined: September 12, 2012
KitMaker: 88 posts
Armorama: 49 posts
Posted: Wednesday, May 20, 2015 - 04:02 PM UTC
Hi Giovanni
I've seen it on other models and I liked the look, for instance
http://media.moddb.com/images/groups/1/6/5449/CR-crjqfagZHa.jpgI've haven't seen it on any period photos yet.
Rob
Texas, United States
Joined: December 20, 2014
KitMaker: 46 posts
Armorama: 42 posts
Posted: Thursday, May 21, 2015 - 06:09 AM UTC
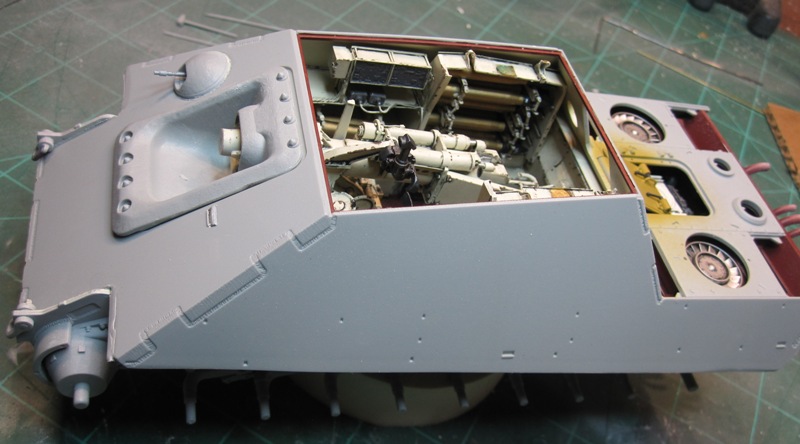
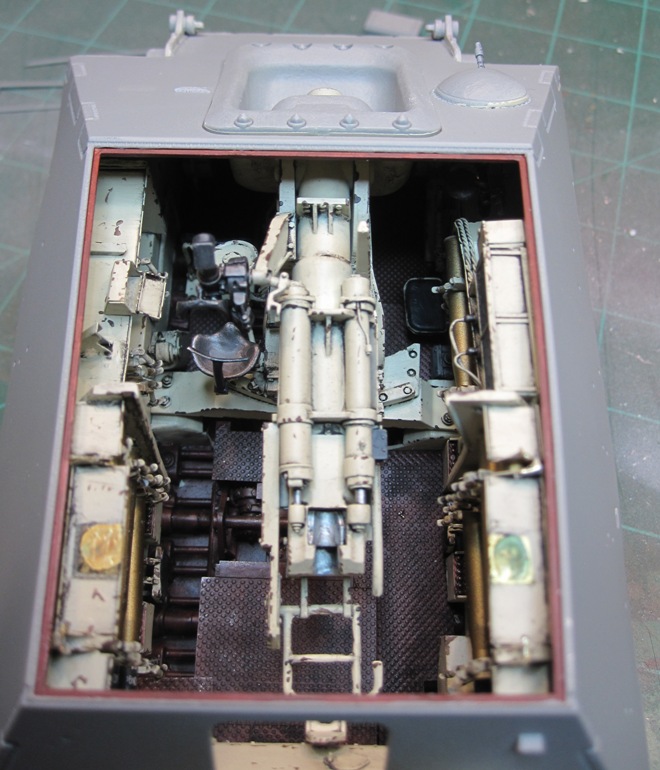
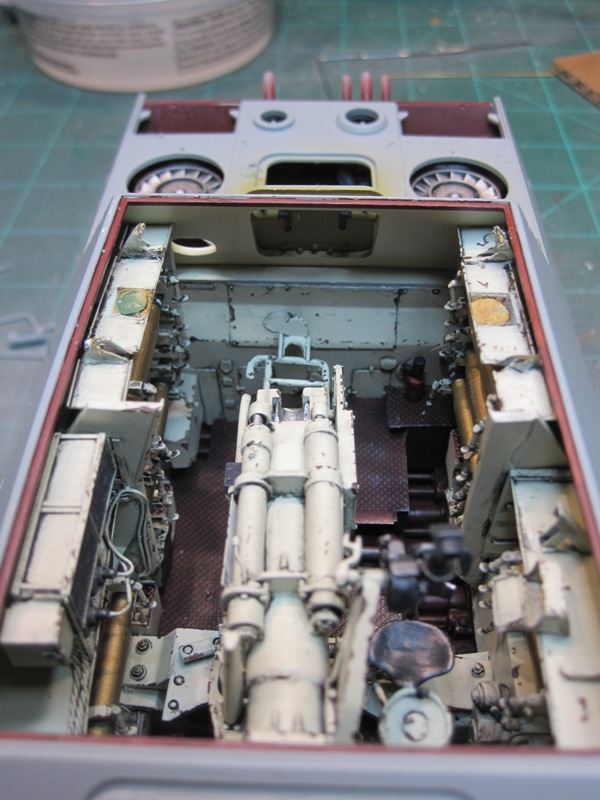
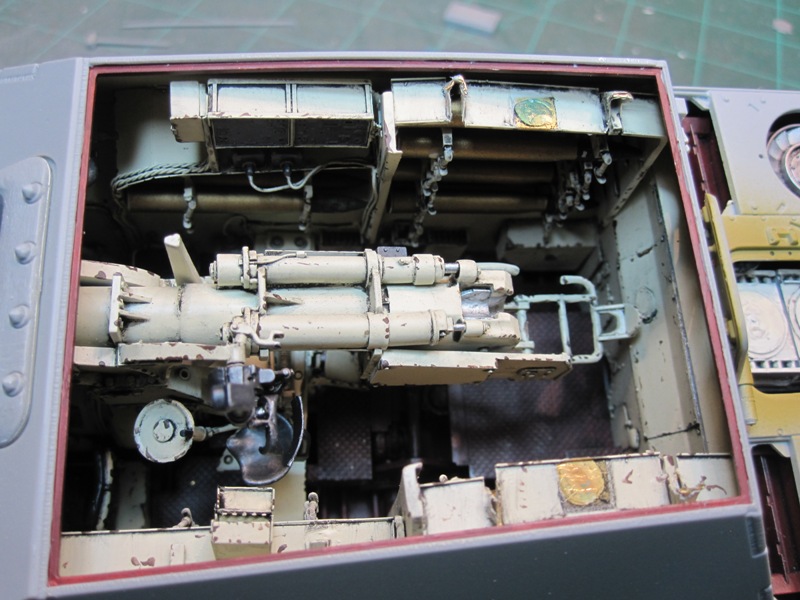
Hello everyone...here with another update to my JagdPanther build:
I finally sealed-up the hull. I could have gone on and on with dry fitting and getting it absolutely perfect but when you combine aftermarket resin and PE with a kit like this there is no "perfect", only close. However, it is coming along better than I thought it would and I am satisfied enough to press on.
One of the major issues is attaching the upper hull and having it pressing against the ammo racks. The racks have a tendency to pop off and you have to go back in and re-glue the racks back in their position.
So far, 71 hours invested in this one with 20 days to go in the campaign. I am going to attempt to make the deadline but will not sacrifice quality for the sake of speed. If I forgo the ribbon so be it. But, I will still post pics of the completed build no matter what. Fingers-crossed - no distractions for the next 3 weeks

-Len


 Looking really cool!




 ) Tamiya 1/35 Panther Ausf.G Late version. I have this kit in my stash from about 20 years (


 )
)



 Yes,I am going to use them.


