

Hosted by Richard S.
20 Bucks for the win
stoney

Joined: October 16, 2006
KitMaker: 480 posts
Armorama: 399 posts

Posted: Saturday, February 21, 2015 - 11:14 PM UTC
quick coffee and Tamiya rattle can grey primer, found a few seams and areas to hit.
nng-nng

Joined: October 22, 2013
KitMaker: 380 posts
Armorama: 376 posts
Posted: Sunday, February 22, 2015 - 01:54 AM UTC
Nice progress chaps.
Had to swith to something stronger than beer as I was comparing the Heller Somua with the pics I took at Bovington... probably will join you with pics tomorrow.
@Gary. Yeah, know the struggle. I´ve build one of those some time back, the stiffest tracks I ever used. I tied them around the sprocket with some wire, just to break them a few days later by dropping it...
Had to swith to something stronger than beer as I was comparing the Heller Somua with the pics I took at Bovington...
probably will join you with pics tomorrow. @Gary. Yeah, know the struggle. I´ve build one of those some time back, the stiffest tracks I ever used. I tied them around the sprocket with some wire, just to break them a few days later by dropping it...

Bluestab

Joined: December 03, 2009
KitMaker: 2,160 posts
Armorama: 1,906 posts
Posted: Monday, February 23, 2015 - 01:59 AM UTC
I'm still in with CyberHobby's 1/35 SA-9 Gaskin. I built the BRDM-2/3 kit in its Dragon form back in the 90s. The apparent differences are the missile related stuff and the retractable wheels...the SA-9 doesn't have them. I'm undecided between doing an Iraqi vehicle or a Cold War Soviet vehicle. I've been feeling nostalgic of late so I might do the Cold War one.

I'll probably start one day this week. I have to catch up on a couple of things on the workbench.
I'll probably start one day this week. I have to catch up on a couple of things on the workbench.

Yeti01012001

Joined: July 28, 2005
KitMaker: 360 posts
Armorama: 334 posts
Posted: Monday, February 23, 2015 - 03:09 AM UTC
Here is a couple more shots of my entry,just starting the first part of the weathering process


AnalogKid
Joined: December 20, 2014
KitMaker: 46 posts
Armorama: 42 posts

Posted: Monday, February 23, 2015 - 05:13 AM UTC
Greetings Everyone,
Here with my initial post for this campaign. I just finished up on Friday over in the WoT campaign and will now be tackling this kit and when time permits working on a crew figure over in the Improve Your Figures campaign simultaneously.
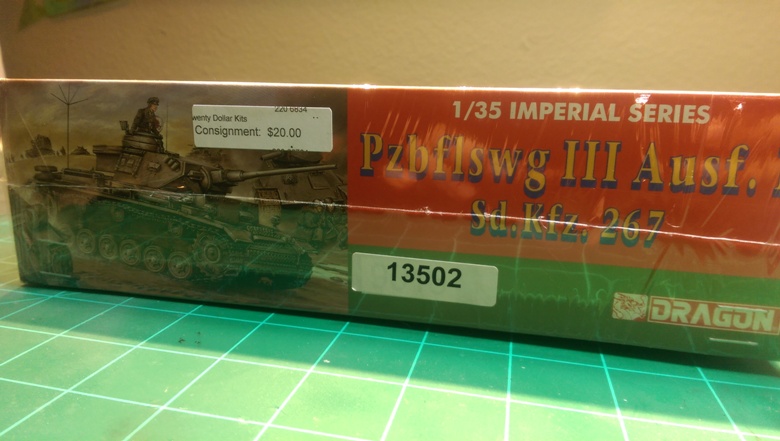
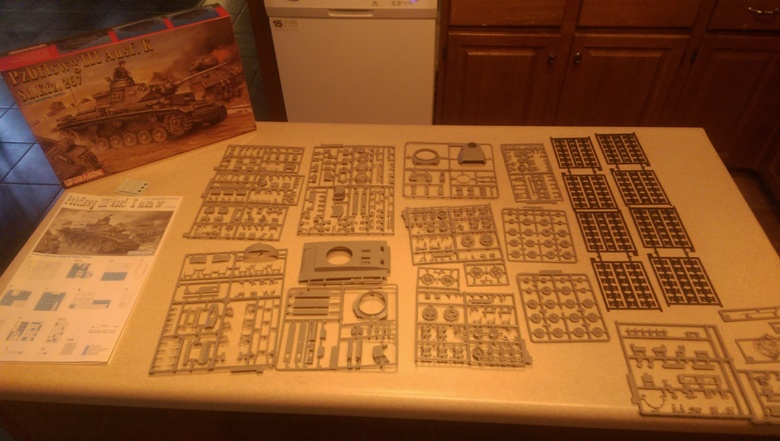
I picked the Panzer III K by Dragon. Yes, I know, Panzer IIIs seem to be all over this site but I don't have one yet in my personal collection. Plus, I found this kit at my LHS on the consignment shelf for $20 - perfect! When I saw it (a month or two ago) I immediately thought of this campaign.
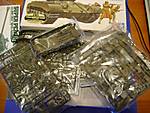
Below are two pics: one showing the price tag on the box before the plastic came off and the second showing all the sprues, just cleaned...ready to go. I'll be doing this one straight out-of-the-box in order to keep it to $20.
Here with my initial post for this campaign. I just finished up on Friday over in the WoT campaign and will now be tackling this kit and when time permits working on a crew figure over in the Improve Your Figures campaign simultaneously.
I picked the Panzer III K by Dragon. Yes, I know, Panzer IIIs seem to be all over this site but I don't have one yet in my personal collection. Plus, I found this kit at my LHS on the consignment shelf for $20 - perfect! When I saw it (a month or two ago) I immediately thought of this campaign.
Below are two pics: one showing the price tag on the box before the plastic came off and the second showing all the sprues, just cleaned...ready to go. I'll be doing this one straight out-of-the-box in order to keep it to $20.
TankManNick
Joined: February 01, 2010
KitMaker: 551 posts
Armorama: 543 posts
Posted: Monday, February 23, 2015 - 12:53 PM UTC
Here's the unstarted sprue shot:


I've been taking a close look at this model and it looks like a great little kit! Only the two part barrel will need careful attention. The supplied brass wire might be too thick for the tow cables. I know - big deal right? The clear film for the 'scopes might be tricky. Has anyone had experience with that? I'm assuming right now that I will be painting the inside of the scopes black and put this film in the front. Kinda did the same thing on an Italeri Panther once. As far as I can tell right now it looks accurate, so this will probably be an OOB build - not so entertaining I know but there you go! (Might be best for a first campaign vehicle build.) Will have fun with dust and weathering though. Now I just need to clear some stuff out the way so I can start! Might be a while I'm afraid...
I've been taking a close look at this model and it looks like a great little kit! Only the two part barrel will need careful attention. The supplied brass wire might be too thick for the tow cables. I know - big deal right? The clear film for the 'scopes might be tricky. Has anyone had experience with that? I'm assuming right now that I will be painting the inside of the scopes black and put this film in the front. Kinda did the same thing on an Italeri Panther once. As far as I can tell right now it looks accurate, so this will probably be an OOB build - not so entertaining I know but there you go! (Might be best for a first campaign vehicle build.) Will have fun with dust and weathering though. Now I just need to clear some stuff out the way so I can start! Might be a while I'm afraid...
Removed by original poster on 02/26/15 - 09:24:41 (GMT).

tigersix

Joined: August 08, 2003
KitMaker: 12 posts
Armorama: 10 posts

Posted: Wednesday, February 25, 2015 - 02:27 PM UTC
A quick pic of the Pershing for my build, I have decided to do a complete OOB build. construction started and I will post in progress shot in week or two.
Les
Les

hofpig

Joined: March 04, 2007
KitMaker: 1,330 posts
Armorama: 1,017 posts

Posted: Wednesday, February 25, 2015 - 03:00 PM UTC
I have done some and I'll post some pics later, but I had a bit of luck on the AM front JADAR hobby in Poland make wheels(the kit ones are terrible) and do a p/e set by part, with the exchange rate being very favourable at the moment( the wheels alone cost just over £2.50!) I can get them at fit it at pretty much the £20.00! I had to double check the exchange rates several times just to see if I was seeing things but the full P/e set contains all the welds to suit and replacement armoured vision slits, hinges etc. The only weld seams still missing are the ones around the rear armour for the tyres so I'll still have to do that one myself! Taking the postage elements of the kit off means £8.90 of extras just brings the total back £20.00 so I can afford it as long as you guy's agree to it!
Paul
Paul

nng-nng
Joined: October 22, 2013
KitMaker: 380 posts
Armorama: 376 posts
Posted: Thursday, February 26, 2015 - 03:11 AM UTC
Quoted Text
Taking the postage elements of the kit off means £8.90 of extras just brings the total back £20.00 so I can afford it as long as you guy's agree to it!
No need to calculate shipping in, absolutely fine. Pretty amazing to get such full deal for almost 20 quid, is it?
hofpig
Joined: March 04, 2007
KitMaker: 1,330 posts
Armorama: 1,017 posts
Posted: Thursday, February 26, 2015 - 12:50 PM UTC
Quoted Text
Quoted TextTaking the postage elements of the kit off means £8.90 of extras just brings the total back £20.00 so I can afford it as long as you guy's agree to it!
No need to calculate shipping in, absolutely fine. Pretty amazing to get such full deal for almost 20 quid, is it?
Yeah all told I think it comes about £19.85 or something like that. With the postage it would have been more like £28! The postage from Poland came about the same cost as the items!
Paul
jasperck
Joined: December 14, 2010
KitMaker: 79 posts
Armorama: 79 posts
Posted: Sunday, March 01, 2015 - 04:44 AM UTC
I just ordered a Trumpeter KV-1 (heavy cast turret) in 1/35 scale from ScaleHobbyist.com for $21.79... Count me in!
MikeyBugs95
Joined: May 27, 2013
KitMaker: 2,210 posts
Armorama: 1,712 posts
Posted: Tuesday, March 03, 2015 - 08:29 PM UTC
You need to PM the mod of the campaigns section to sticky this campaign.

Nito74

Joined: March 04, 2008
KitMaker: 5,386 posts
Armorama: 4,727 posts
Posted: Tuesday, March 03, 2015 - 10:33 PM UTC

MikeyBugs95
Joined: May 27, 2013
KitMaker: 2,210 posts
Armorama: 1,712 posts
Posted: Thursday, March 05, 2015 - 10:48 PM UTC
Here is my start to the group build.

I'm going to be washing it, first off, as it's covered in mold release. But uh... After some basic construction first...
I'm going to be washing it, first off, as it's covered in mold release. But uh... After some basic construction first...
MikeyBugs95
Joined: May 27, 2013
KitMaker: 2,210 posts
Armorama: 1,712 posts
Posted: Friday, March 06, 2015 - 03:26 PM UTC
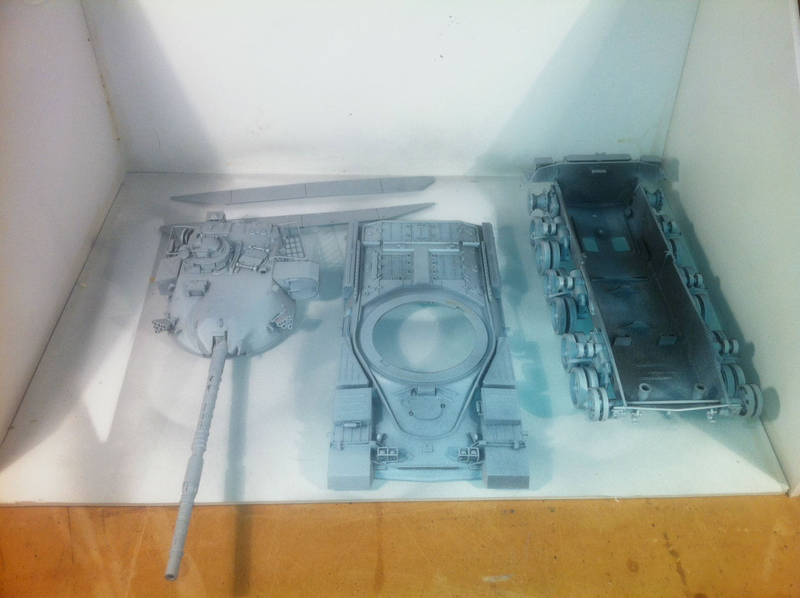
Ok, I already have an update. No pics though. I have pretty much finished the build. The entire hull and running is finished and all assembled. I have to paint it and assemble the link-n-length tracks. There were many parts that needed some serious sanding as they were VERY thick. The sprue gates were also VERY thick. The thickest gates I've ever seen. I replaced 2 handles with wire as they were quite thick. There were 2 more that I could replace as there were holes where they were supposed to go. I also added 2 headlights from my spares. The only non-OOTB was the wire, headlights and the gun, which was a pretty poor excuse for a gun... You can see it in my start picture... It's the long thing in the top left corner of the top sprue.
nng-nng
Joined: October 22, 2013
KitMaker: 380 posts
Armorama: 376 posts
Posted: Friday, March 06, 2015 - 04:29 PM UTC
Good progress chaps. Like where that´s going. 
Finally came around making my start pic:

Kit is completely unstarted, the two figures are from the Heller R35 I build last year, but the same ones are included in the kit. Thought there might be an use for them serving as a base for some sculpting paractice
I planed building the German version, all parts needed for the modification seem to be included in the PE set...
Finally came around making my start pic:
Kit is completely unstarted, the two figures are from the Heller R35 I build last year, but the same ones are included in the kit. Thought there might be an use for them serving as a base for some sculpting paractice
I planed building the German version, all parts needed for the modification seem to be included in the PE set...
hofpig
Joined: March 04, 2007
KitMaker: 1,330 posts
Armorama: 1,017 posts
Posted: Friday, March 06, 2015 - 06:29 PM UTC
Hi Guys,

Just the engine fitted to the frame(which seemed to take forever!) and the floor pan fitted which was also problematic as there were no pins or holes to locate it, you have to use the outer body shell to make a best guestimate as to where it should fit.
In the mean time the bits I ordered from Poland arrived! I can now see why the wheels are so cheap!


Ugly great pour attachment points and horrible sink marks on top of the tyres, still they will be better than the ones that come with the kit. They can sit on the bubble holes/dents and the pours will be invisible inside the vehicle. The photoetch on the other hand is pretty good. Masses of fine, narrow weld beads, all the hinges that are rubbish or missing and better scale thickness shield for the top. I just need to work out how to roll up the hinges now!

More soon once I work out where to put the front suspension as the instruction shows holes to aid in mounting but the frame has none.
Paul
Just the engine fitted to the frame(which seemed to take forever!) and the floor pan fitted which was also problematic as there were no pins or holes to locate it, you have to use the outer body shell to make a best guestimate as to where it should fit.
In the mean time the bits I ordered from Poland arrived! I can now see why the wheels are so cheap!
Ugly great pour attachment points and horrible sink marks on top of the tyres, still they will be better than the ones that come with the kit. They can sit on the bubble holes/dents and the pours will be invisible inside the vehicle. The photoetch on the other hand is pretty good. Masses of fine, narrow weld beads, all the hinges that are rubbish or missing and better scale thickness shield for the top. I just need to work out how to roll up the hinges now!
More soon once I work out where to put the front suspension as the instruction shows holes to aid in mounting but the frame has none.
Paul
jasperck
Joined: December 14, 2010
KitMaker: 79 posts
Armorama: 79 posts
Posted: Friday, March 06, 2015 - 11:39 PM UTC
My kit came in the mail the other day and I started right away. The molds are starting to show their age, as there are some pretty serious mold seams and flash to take care of.


(In case you can't read it, the phone says "Thursday, March 5")
A couple of Steely Dan records and a few cups of coffee later, we have something that resembles a KV-1...


I used putty to fill the turret seam and then used my knife to replicate the weld line after soaking the surface with liquid cement. Ejector pin marks on the tracks were sanded down or filled with Micro Kristal Klear. The shapes look right and the detail is wonderful for a slightly old kit.
(In case you can't read it, the phone says "Thursday, March 5")
A couple of Steely Dan records and a few cups of coffee later, we have something that resembles a KV-1...
I used putty to fill the turret seam and then used my knife to replicate the weld line after soaking the surface with liquid cement. Ejector pin marks on the tracks were sanded down or filled with Micro Kristal Klear. The shapes look right and the detail is wonderful for a slightly old kit.
Nito74
Joined: March 04, 2008
KitMaker: 5,386 posts
Armorama: 4,727 posts
Posted: Saturday, March 07, 2015 - 04:17 AM UTC
Quoted Text
Good progress chaps. Like where that´s going.
Finally came around making my start pic:
Kit is completely unstarted, the two figures are from the Heller R35 I build last year, but the same ones are included in the kit. Thought there might be an use for them serving as a base for some sculpting paractice
I planed building the German version, all parts needed for the modification seem to be included in the PE set...
I did that one many years ago.. I don't miss it.
Good Luck Fabian !!!!

panzerbob01
Joined: March 06, 2010
KitMaker: 3,128 posts
Armorama: 2,959 posts
Posted: Saturday, March 07, 2015 - 05:31 AM UTC
N - N;
Good Luck and God-Speed, friend. Better you than me! In a fit of hopeful foolishness coupled with a growing sense of resignation over ever seeing a modern kit come along, I bought that one (same boxing!) a couple years ago... Looked in the box... And put it in the dark recesses of the stash closet. Now that Tamiya has put one out in somewhat modern form, I'm saved "by the bell" and won't need to actually fight with, er, BUILD, the darned Heller thing!
But I do look forward to seeing how you tame the beast!
Bob
Good Luck and God-Speed, friend. Better you than me! In a fit of hopeful foolishness coupled with a growing sense of resignation over ever seeing a modern kit come along, I bought that one (same boxing!) a couple years ago... Looked in the box... And put it in the dark recesses of the stash closet.
Now that Tamiya has put one out in somewhat modern form, I'm saved "by the bell" and won't need to actually fight with, er, BUILD, the darned Heller thing! But I do look forward to seeing how you tame the beast!
Bob
nng-nng
Joined: October 22, 2013
KitMaker: 380 posts
Armorama: 376 posts
Posted: Saturday, March 07, 2015 - 04:35 PM UTC
Thanks for your support, I guess I need it
In order to keep my sanity on a reasonable level I´ll ignore the shape issues of the turret and decided not to go crazy on superdetailing.
I hope adding the casting texture will improve the looks, and new bolts, PE and other small details will do the job.
If not I´ll draw the last ace out of my sleve:

One of the seemingly verry rare Befehls-Somua, fitted with an extra frame antenna... not good for the sanity-level... but will look pretty unique...
In order to keep my sanity on a reasonable level I´ll ignore the shape issues of the turret and decided not to go crazy on superdetailing.
I hope adding the casting texture will improve the looks, and new bolts, PE and other small details will do the job.
If not I´ll draw the last ace out of my sleve:
One of the seemingly verry rare Befehls-Somua, fitted with an extra frame antenna... not good for the sanity-level... but will look pretty unique...
hofpig
Joined: March 04, 2007
KitMaker: 1,330 posts
Armorama: 1,017 posts
Posted: Saturday, March 07, 2015 - 05:14 PM UTC
Fabian, That will really make it look cool!
Paul
Paul
MikeyBugs95
Joined: May 27, 2013
KitMaker: 2,210 posts
Armorama: 1,712 posts
Posted: Saturday, March 07, 2015 - 10:25 PM UTC
TKS primed. I need to buy a cheap airbrush to use for the primer coats.


jasperck
Joined: December 14, 2010
KitMaker: 79 posts
Armorama: 79 posts
Posted: Monday, March 09, 2015 - 06:16 AM UTC
Everyone's builds are looking great!
Eric That Tamiya kit is wonderful. Maybe not the most accurate or the most detailed, but still a joy. I need to give it another try soon...
Gary Love the camo. The filters and streaking look great too.
Michael I think I'll need to build a light tank after this heavy and the T-90! Tiny little tracked vehicles look so cool.
Fabian Good luck with that Heller kit. Anything with frame antennae is gonna be cool!
As for my project...
Over the past few days I finished construction, sprayed Vallejo black primer, let that dry, and then took care of the green. I used Vallejo Model Air black green as a preshade and then sprayed a base coat of Russian green followed by an initial highlight of Russian green with some RLM gold yellow and a secondary highlight of Russian green mixed with white.


The modulation looks a little over the top now, but it'll get toned down after all the weathering work. I always wish I had done more drastic modulation on my models, so I'm giving it a try...
Next step is detail painting.
Eric That Tamiya kit is wonderful. Maybe not the most accurate or the most detailed, but still a joy. I need to give it another try soon...
Gary Love the camo. The filters and streaking look great too.
Michael I think I'll need to build a light tank after this heavy and the T-90! Tiny little tracked vehicles look so cool.
Fabian Good luck with that Heller kit. Anything with frame antennae is gonna be cool!
As for my project...
Over the past few days I finished construction, sprayed Vallejo black primer, let that dry, and then took care of the green. I used Vallejo Model Air black green as a preshade and then sprayed a base coat of Russian green followed by an initial highlight of Russian green with some RLM gold yellow and a secondary highlight of Russian green mixed with white.
The modulation looks a little over the top now, but it'll get toned down after all the weathering work. I always wish I had done more drastic modulation on my models, so I'm giving it a try...
Next step is detail painting.
 |

WEB HOSTING BY


Copyright ©2021 Armorama and Kitmaker Network, a subsidiary of Silver Star Enterprises
All Rights Reserved. Please read our Conditions of Use and Privacy Policy.
All Rights Reserved. Please read our Conditions of Use and Privacy Policy.