Kildare, Ireland
Joined: November 21, 2007
KitMaker: 3,212 posts
Armorama: 2,807 posts
Posted: Monday, March 02, 2015 - 02:35 AM UTC
Quoted Text
By the way, how can I post images in my posts?
So far I've only succeeded in placing links to the images, as in the above post...
put "

" after it without any spaces
And welcome to the campaign!
edit: it wont show the commands

damn stupid puters
Michigan, United States
Joined: June 10, 2008
KitMaker: 230 posts
Armorama: 34 posts
Posted: Tuesday, March 03, 2015 - 05:14 AM UTC
Thanks Sean & JIMB. Was gone for a few days, but hope to get back to her tomorrow.
EJ
Fair Winds and Following Seas
EJ
Nova Scotia, Canada
Joined: February 07, 2015
KitMaker: 58 posts
Armorama: 27 posts
Posted: Tuesday, March 03, 2015 - 06:12 AM UTC
Hi everyone

I have my Sherman to the point that I'm happy with, just need to put a flat coat on it and then complete the tracks! I have one set started but I'm waiting on an optivisor to arrive so I can give my eyes a break. The Bronco tracks go together easily but are darn small. Here are some pics
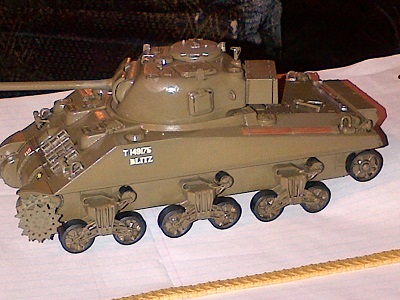
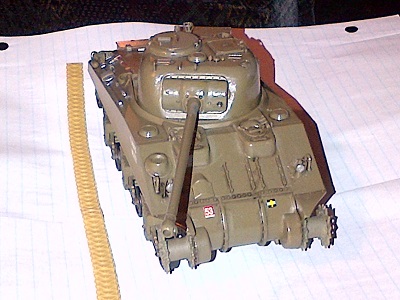
Ron
United States
Joined: February 23, 2009
KitMaker: 113 posts
Armorama: 91 posts
Posted: Tuesday, March 03, 2015 - 10:36 PM UTC
Hi folks,
I've just enlisted to this campaign as I have a few items that fit the bill for started but not completed. I'm going to start on this with a King Tiger from Dragon (kit 6303). I will get a photo of the kit as it sits now so I can get started on this campaign.
Dave
Kildare, Ireland
Joined: November 21, 2007
KitMaker: 3,212 posts
Armorama: 2,807 posts
Posted: Wednesday, March 04, 2015 - 01:54 AM UTC
Welcome Dave!
Nice Sherman Ron. Just watch Fury two nights ago...not into WWII armour so not sure how accurate they were but they did look good on screen.
Quebec, Canada
Joined: January 12, 2004
KitMaker: 274 posts
Armorama: 159 posts
Posted: Saturday, March 14, 2015 - 02:09 AM UTC
Hi guys,
I'm finally seeing the light at the end of the tunnel with this build!


Still to do:
Working on the slat armor, the tow cables, painting the last minute details (lights and such) and a last touch of pigments.
Your comments are welcome,
Chris
On the workbench:
M1117 - HB Leo 2A6M Can - RM LAV-III - Meng AMX-30B2 - Takom Leopard C2 MEXAS - Strv 103B and FM Boba Fett Slave-1 (taking forever to finish)
Kildare, Ireland
Joined: November 21, 2007
KitMaker: 3,212 posts
Armorama: 2,807 posts
Posted: Saturday, March 14, 2015 - 02:15 AM UTC
Looks great. Love the weathering. Is the slat plastic or PE?
Quebec, Canada
Joined: January 12, 2004
KitMaker: 274 posts
Armorama: 159 posts
Posted: Saturday, March 14, 2015 - 03:52 AM UTC
Quoted Text
Looks great. Love the weathering. Is the slat plastic or PE?
Thank you! The slat armor is plastic... I don't have the skills or patience to work on such a complex set!
On the workbench:
M1117 - HB Leo 2A6M Can - RM LAV-III - Meng AMX-30B2 - Takom Leopard C2 MEXAS - Strv 103B and FM Boba Fett Slave-1 (taking forever to finish)

#0
United States
Joined: July 31, 2011
KitMaker: 472 posts
Armorama: 453 posts
Posted: Saturday, March 14, 2015 - 07:56 PM UTC
I decided to join up. My entry is The Banchou, cobbled together from scavenged parts in an abandoned car factory during the Soviet invasion of Japan. Originally for the what if IV, but I slowed down and stalled while trying to make a simple stowage box. Banchou koe ga sakebu! The Banchou's voice cried out, and I must finish it.
I left off at this:


And after starting back up I'm here:


Finally made that box with evergreen and some PE from a Skif T-80UD kit I binned long ago. Added the Type 74 kit lights on the fender with voyager PE, with some wiring. Not sure if I want to paint the lights and add mesh or use a solid cover like in the winter type 74 kit.
The Banchou next to the T-54 for the World of Tanks II campaign. Still working on it's tracks, while the Banchou's are already done. Worked out the placing for the ERA on the turret and glued (months ago), not sure I want to undo all of that and add the supports but I'll probably have too. The IR light is place but will be fitted with PE from the voyager set and should sit higher (it's leaning forwards), so the driver figure should be OK.

Michigan, United States
Joined: June 10, 2008
KitMaker: 230 posts
Armorama: 34 posts
Posted: Sunday, March 15, 2015 - 04:57 AM UTC
Update to the little wood flattie, Got tied up with life for a bit, but back to the bench now.
The do-da's in front are the centerboard, rudder, gunnel trim, mast and booms, all ready to be installed yet. Then the rigging and a bit of dressing, rope coils and other trappings of a working oyster boat. I boogered the deck stain yesterday by spilling a bit of clear gloss on it. Instead of letting it dry and sanding the lump down, I tried to wipe it off, therby removing the layer of Vallejo matt clear and the wiped stain under it back to the white base. Crap. I might have to cover it with a crate or a lobster pot or something. Anyway, it's been a fun little wood kit to build. I like these to space in between regular plastic kit builds as it takes me a year to to an aircraft carrier. Here she is at present. Should have her done in a week or so.

EJ
Fair Winds and Following Seas
EJ

#431
Florida, United States
Joined: February 20, 2014
KitMaker: 376 posts
Armorama: 311 posts
Posted: Tuesday, March 17, 2015 - 06:08 PM UTC
No grand strides but I am making some progress. Got all the handrails and footholds attached followed with a coat of primer. The headlight cutouts still need some attention. Since this was nothing more than an artist concept, I have a little artistic license, especially for all those areas not visible in the drawing – aft, port & topside. I have metal barrels but the turret is shaping up to be a royal pain as well.


Slow is smooth and smooth is fast
Charlie on time!

#431
Florida, United States
Joined: February 20, 2014
KitMaker: 376 posts
Armorama: 311 posts
Posted: Wednesday, March 18, 2015 - 07:23 AM UTC
Little more work accomplished. Have managed to essentially get the hull completed. I still need to add headlights and paint the driver’s vision blocks. Since this represents a conceptual rendering I am refraining from lathering on washes or any type of wear and tear. To me, the bow of this thing makes it look like a gooned-up frog.
Next will be the tracks and then the turret.


Slow is smooth and smooth is fast
Charlie on time!
Hessen, Germany
Joined: July 17, 2013
KitMaker: 338 posts
Armorama: 331 posts
Posted: Wednesday, March 18, 2015 - 11:32 PM UTC
Hi all,
I just joined this campaign and the picture below shows my entry: an unfinished E-100 from Dragon in Braille Scale started last summer.

I added quite a few changes to the basic model, most importantly adding metal barrels, night vision equipment (including a storage box on the back of the turret) and a "redesign" of the lower part of the turret front in order to avoid the shot trap well known from the Panther...
Actually, all that tank needs is installing the running gear and some paint/ weathering...


Have fun everybody!
Kildare, Ireland
Joined: November 21, 2007
KitMaker: 3,212 posts
Armorama: 2,807 posts
Posted: Thursday, March 19, 2015 - 03:10 AM UTC
Welcome Nicholas. Nice details, especially given the scale
Hessen, Germany
Joined: July 17, 2013
KitMaker: 338 posts
Armorama: 331 posts
Posted: Thursday, March 19, 2015 - 08:28 PM UTC
Quoted Text
Welcome Nicholas. Nice details, especially given the scale
Thx for the compliment. Obviously, I also will have to install the grills once i have painted the engine deck, and I'm planning to cover these up with armor plate, like seen on late panther Gs and late King Tigers (I have PE left over from some King Tiger that fits almost perfectly).
Also, I'll add some additional camo out of "fabric" strips, and some tools...
FInally, I'm planning to have the beast sit in a nice diorama with a factory building in ruins, and other what-if vehicles and infantry, including a Flakpanther 5,5 cm, an E-25 tank hunter and an E-25 AA-tank with Kugelblitz-turret... I will show pics of a flakpanther in another campaign thread (WWII panther tanks).
United States
Joined: February 23, 2009
KitMaker: 113 posts
Armorama: 91 posts
Posted: Friday, March 20, 2015 - 04:41 AM UTC
Here is the King Tiger I've been working on for years. I hope this campaign gets me to finish this one.
Dave

Kildare, Ireland
Joined: November 21, 2007
KitMaker: 3,212 posts
Armorama: 2,807 posts
Posted: Monday, March 23, 2015 - 01:28 PM UTC
Unfinished? That's barely started Dave

Welcome to the campaign!
United States
Joined: February 23, 2009
KitMaker: 113 posts
Armorama: 91 posts
Posted: Monday, March 23, 2015 - 11:00 PM UTC
Yeah well I got more done since then but you are correct I do have a lot to get done.
I hope to have it built before the weekend or over the weekend and then I can start painting.
Dave
Michigan, United States
Joined: June 10, 2008
KitMaker: 230 posts
Armorama: 34 posts
Posted: Wednesday, March 25, 2015 - 04:51 AM UTC
Little wood Flattie update
Got a bit more done this week. Before I started on it, I had been asked if it would float, so, I put it in the kitchen sink to see. There's no top hamper yet, so it could be top heavy then, but for now, it floats beautifully.


Got a few more bits installed - the rub rails along the sides, the coaming trim on the well, companionway door and hatch, mop board around the base of the cabin and some cleats.


The bench is getting messier as I near completion.

Next, the stand, centerboard and rudder. Instructions say to glue the rudder in place, but I'm gonna make straps and pintles so it actually works. then the metal trimwork and the mast and rigging.
EJ
Fair Winds and Following Seas
EJ
Napier, New Zealand
Joined: August 01, 2005
KitMaker: 1,049 posts
Armorama: 841 posts
Posted: Wednesday, March 25, 2015 - 05:01 AM UTC
Great stuff EJ, nice to see it in it's natural element! And probably a relief not to see it at the bottom of the sink too I bet

Brent
Available for commissions,visit my Flickr Albums and modelling/painting blog to discuss .......
http://houseofqueeg.wordpress.com/
https://www.flickr.com/photos/134514258@N04/albums
Buenos Aires, Argentina
Joined: September 07, 2006
KitMaker: 918 posts
Armorama: 212 posts
Posted: Wednesday, March 25, 2015 - 10:05 PM UTC
California, United States
Joined: December 24, 2002
KitMaker: 4,105 posts
Armorama: 2,492 posts
Posted: Saturday, March 28, 2015 - 05:19 AM UTC
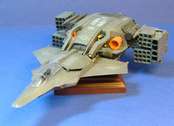
I intend to finish my kitbashed "spare parts" Sci-Fi fighter that dates back to 2001!
In 2005, I lost the forward section of the canopy when I went outside to spray tint on it. I don't know if it blew away with a breeze or what, but I just could not find it. Since it is a kitbashed fighter made from spare parts, it took me months to figure out where the canopy came from. I knew it came from a 1/72 two-seater F-18D, but I forgot which kit it was from. Eventually, I found out it was from a 1/72 Italeri F-18C/D "Wild Weasel" kit so I bought another kit just for that canopy.
I will tint the canopy, add a pilot and ejection seat, a few touches, and that's it. After all these years, I hope to finally finish this build.
Michigan, United States
Joined: June 10, 2008
KitMaker: 230 posts
Armorama: 34 posts
Posted: Saturday, March 28, 2015 - 05:36 AM UTC
Quoted Text
Great stuff EJ, nice to see it in it's natural element! And probably a relief not to see it at the bottom of the sink too I bet 
Brent
Nice part of being wood instead of plastic, wood floats on it's own.

Fair Winds and Following Seas
EJ
Namabiiru
 Associate Editor
#399
Rhode Island, United States
Joined: March 05, 2014
KitMaker: 2,888 posts
Armorama: 1,920 posts
Posted: Saturday, March 28, 2015 - 02:33 PM UTC
Quoted Text
Quoted Text
Great stuff EJ, nice to see it in it's natural element! And probably a relief not to see it at the bottom of the sink too I bet 
Brent
Nice part of being wood instead of plastic, wood floats on it's own. 
So does plastic, doesn't it?

Anyway, wooden ship models are just intrinsically cool. Looks great EJ--so much better than the one I did.


#186
Texas, United States
Joined: May 24, 2006
KitMaker: 771 posts
Armorama: 750 posts
Posted: Saturday, March 28, 2015 - 10:43 PM UTC
Started this kit in the 2009 time frame when I lived in Milwaukee. Since then it's collected dust in Roseville, CA, and now Mexico City. Time to finish it!

 damn stupid puters


