

Another great build from you, Si. A real beauty - all your time and effort really paid off.
Hosted by Richard S.
Official: Flak You Two: The Flak is Back!
SGTJKJ

#041

Joined: July 20, 2006
KitMaker: 10,069 posts
Armorama: 4,677 posts

Posted: Tuesday, November 03, 2015 - 01:44 AM UTC

canuck100a

Joined: September 13, 2005
KitMaker: 96 posts
Armorama: 96 posts

Posted: Tuesday, November 03, 2015 - 02:02 AM UTC
Si,
Excellent job...so much detail.
Eric
Excellent job...so much detail.
Eric

JonDicks

Joined: October 13, 2009
KitMaker: 223 posts
Armorama: 224 posts
Posted: Tuesday, November 03, 2015 - 02:48 PM UTC
I'm starting with my 88.

Hopefully I can find the time build this one quickly.
Hopefully I can find the time build this one quickly.
MGS_Polla

Joined: September 10, 2015
KitMaker: 54 posts
Armorama: 46 posts

Posted: Thursday, November 05, 2015 - 02:20 AM UTC
so GREAT pictures gentlemen!
nice works in this campaign! im newbie with this; once the campaign will finished, do we will have some kind of gallery of finished kits?
:-p
cheers!
nice works in this campaign! im newbie with this; once the campaign will finished, do we will have some kind of gallery of finished kits?
:-p
cheers!

tatbaqui
#040

Joined: May 06, 2007
KitMaker: 2,713 posts
Armorama: 2,451 posts

Posted: Thursday, November 05, 2015 - 04:11 AM UTC
Quoted Text
so GREAT pictures gentlemen!
nice works in this campaign! im newbie with this; once the campaign will finished, do we will have some kind of gallery of finished kits?
:-p
cheers!
You may post them here Luis:
https://gallery.kitmaker.net/showgallery.php/cat/29935
Cheers,
Tat
JonDicks
Joined: October 13, 2009
KitMaker: 223 posts
Armorama: 224 posts
Posted: Thursday, November 05, 2015 - 01:29 PM UTC
Some slight progress. This kit is great to put together, once you understand the options and instructions.


Namabiiru

#399

Joined: March 05, 2014
KitMaker: 2,888 posts
Armorama: 1,920 posts

Posted: Thursday, November 05, 2015 - 05:47 PM UTC
Thanks, Tat!
Good looking build so far, Jon. I love the 88!

Good looking build so far, Jon. I love the 88!
SGTJKJ
#041
Joined: July 20, 2006
KitMaker: 10,069 posts
Armorama: 4,677 posts
Posted: Thursday, November 05, 2015 - 07:23 PM UTC
Nice progress, Jon.
Looking forward to see more.
Looking forward to see more.
JonDicks
Joined: October 13, 2009
KitMaker: 223 posts
Armorama: 224 posts
Posted: Friday, November 06, 2015 - 06:54 AM UTC
Managed some good long benchtime yesterday and today.


JonDicks
Joined: October 13, 2009
KitMaker: 223 posts
Armorama: 224 posts
Posted: Friday, November 06, 2015 - 09:21 AM UTC
Just got some paint on

MGS_Polla
Joined: September 10, 2015
KitMaker: 54 posts
Armorama: 46 posts
Posted: Sunday, November 08, 2015 - 09:26 AM UTC
Hi Tat! thanks for the info!
Jon: woooow! nice job!!! looking great!
cheers!
Jon: woooow! nice job!!! looking great!
cheers!
JonDicks
Joined: October 13, 2009
KitMaker: 223 posts
Armorama: 224 posts
Posted: Sunday, November 08, 2015 - 02:32 PM UTC
Hi all,
Bashing the base!

I want the effect of an old and beaten base with a newer gun on top.
Bashing the base!
I want the effect of an old and beaten base with a newer gun on top.
Namabiiru
#399
Joined: March 05, 2014
KitMaker: 2,888 posts
Armorama: 1,920 posts
Posted: Sunday, November 08, 2015 - 05:19 PM UTC
Looks like you're achieving that effect, Jon. Nice work!

Bluestab
Joined: December 03, 2009
KitMaker: 2,160 posts
Armorama: 1,906 posts
Posted: Monday, November 09, 2015 - 02:27 AM UTC
Update on the Trumpeter LAV-AD.
Rear hull. Assembly was straightforward. The only glitch were the jerry can and jerry can racks. Trumpy molds them as one piece with separate handles. They provide PE for straps and racks. As an alternative, they would have you cut off the molded on straps and racks. They do this with their recovery version as well. That is absolutely stupid in my opinion. At least send the bare cans. Anyway, used the styrene versions.

On to the upper hull. Nice looking upper hull, specific to this variant so no wackadoo cutting mods or anything.

I'm moving through this...no sense in showing step by step for each piece. Upper hull with driver's hatch, winch rollers, cover plates added, and the various tie down points and handles.
One of the mount arms for the mirrors on the light assemblies was broken. I repaired this and decided to leave them off for now. As an aside, Trumpy provides PE alternatives for the headlight mounts. As with the jerry cans, you have to perform some surgery to reuse the lights and mirror arms with the PE mount. I decided to use the styrene parts.
I left tools off for now.

The other side of the upper hull, including the PE intake covers. The kit uses the smaller exhaust. Trumpy molded on a tow cable (arrow)and it looks...well it looks like a molded on tow cable. I was tempted to cut it off but instead I'll leave it, paint it, and then cover it with stowage.

Hull assembly basically done.


And that's where I am now. The next update should be the turret.
Rear hull. Assembly was straightforward. The only glitch were the jerry can and jerry can racks. Trumpy molds them as one piece with separate handles. They provide PE for straps and racks. As an alternative, they would have you cut off the molded on straps and racks. They do this with their recovery version as well. That is absolutely stupid in my opinion. At least send the bare cans. Anyway, used the styrene versions.
On to the upper hull. Nice looking upper hull, specific to this variant so no wackadoo cutting mods or anything.
I'm moving through this...no sense in showing step by step for each piece. Upper hull with driver's hatch, winch rollers, cover plates added, and the various tie down points and handles.
One of the mount arms for the mirrors on the light assemblies was broken. I repaired this and decided to leave them off for now. As an aside, Trumpy provides PE alternatives for the headlight mounts. As with the jerry cans, you have to perform some surgery to reuse the lights and mirror arms with the PE mount. I decided to use the styrene parts.
I left tools off for now.
The other side of the upper hull, including the PE intake covers. The kit uses the smaller exhaust. Trumpy molded on a tow cable (arrow)and it looks...well it looks like a molded on tow cable. I was tempted to cut it off but instead I'll leave it, paint it, and then cover it with stowage.
Hull assembly basically done.
And that's where I am now. The next update should be the turret.
tatbaqui
#040
Joined: May 06, 2007
KitMaker: 2,713 posts
Armorama: 2,451 posts
Posted: Tuesday, November 10, 2015 - 06:57 PM UTC
Hello,
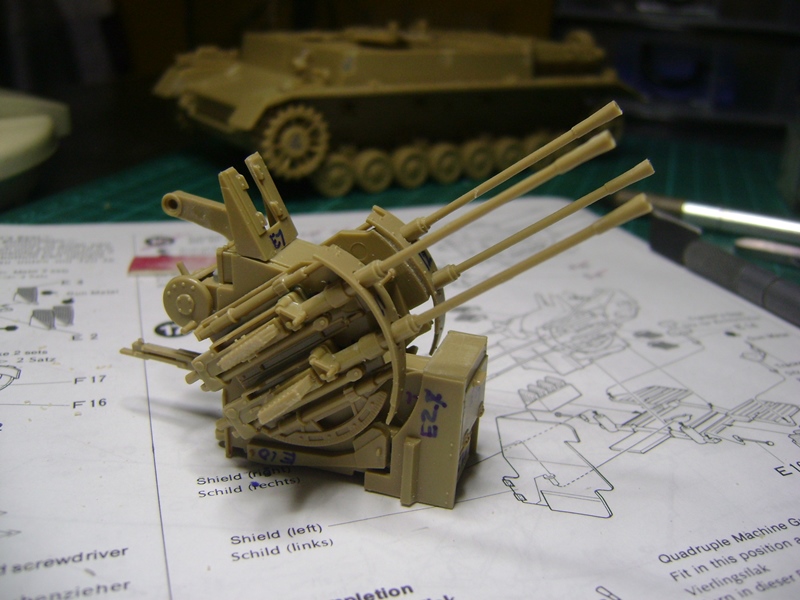
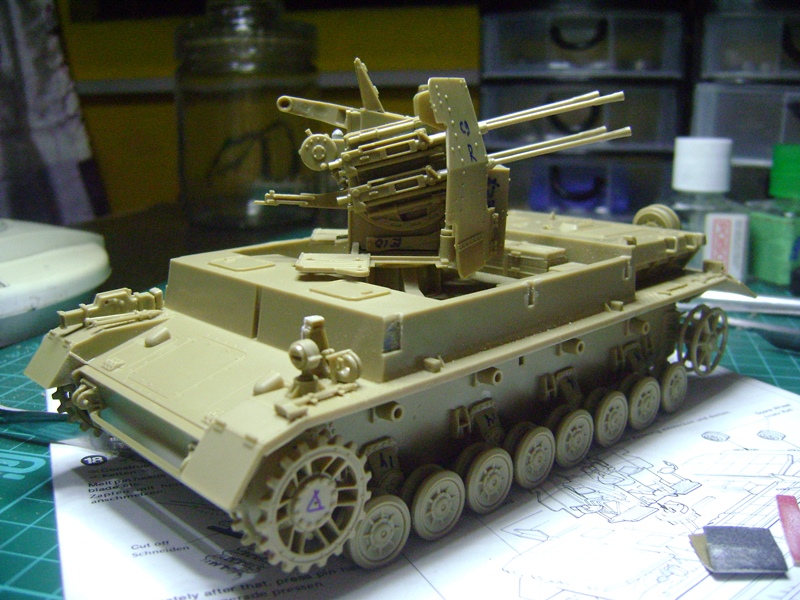
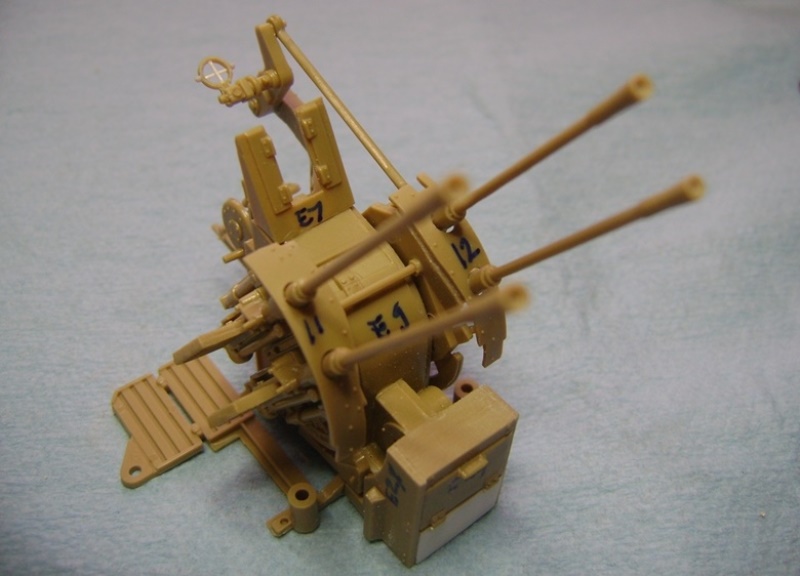
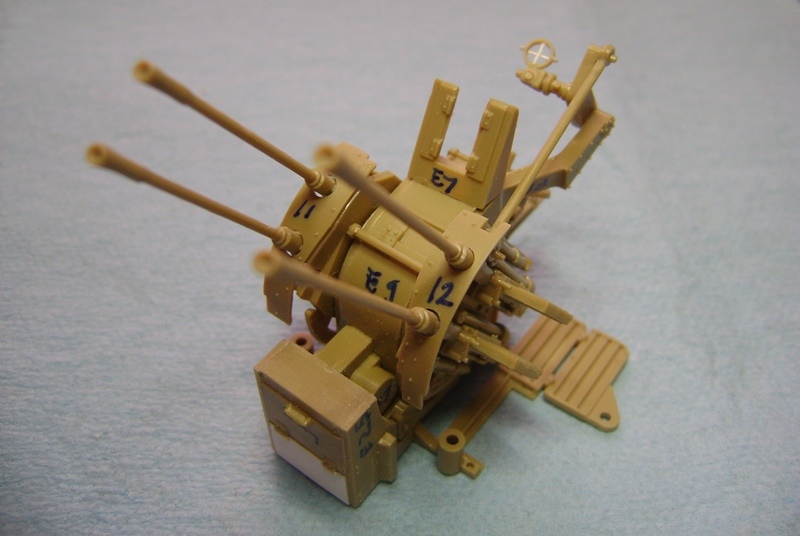
Flakvierling WIP:

Cheers,
Tat
Flakvierling WIP:
Cheers,
Tat
JonDicks
Joined: October 13, 2009
KitMaker: 223 posts
Armorama: 224 posts
Posted: Wednesday, November 11, 2015 - 04:06 PM UTC
Nice work Tat!
I have done some more tinkering on the 88.


I have done some more tinkering on the 88.
JonDicks
Joined: October 13, 2009
KitMaker: 223 posts
Armorama: 224 posts
Posted: Wednesday, November 11, 2015 - 04:10 PM UTC
and one more

Namabiiru
#399
Joined: March 05, 2014
KitMaker: 2,888 posts
Armorama: 1,920 posts
Posted: Wednesday, November 11, 2015 - 05:39 PM UTC
Fantastic-looking builds, guys!
@Alex: Those do seem like some rather odd design choices on Trumpeter's part for what appears to be an otherwise nice kit.
@Alex: Those do seem like some rather odd design choices on Trumpeter's part for what appears to be an otherwise nice kit.
tatbaqui
#040
Joined: May 06, 2007
KitMaker: 2,713 posts
Armorama: 2,451 posts
Posted: Sunday, November 15, 2015 - 09:59 AM UTC
Thanks Jon! Your build has come along quite nice and quick -- me I have just started to put primer on some of the sub-assemblies.
The kit-supplied gunsight was just a plain, solid piece. So I thought I'd fix it up a bit. Drilled through plastic, and wedged the thinnest styrene strip I have for the crosshairs:
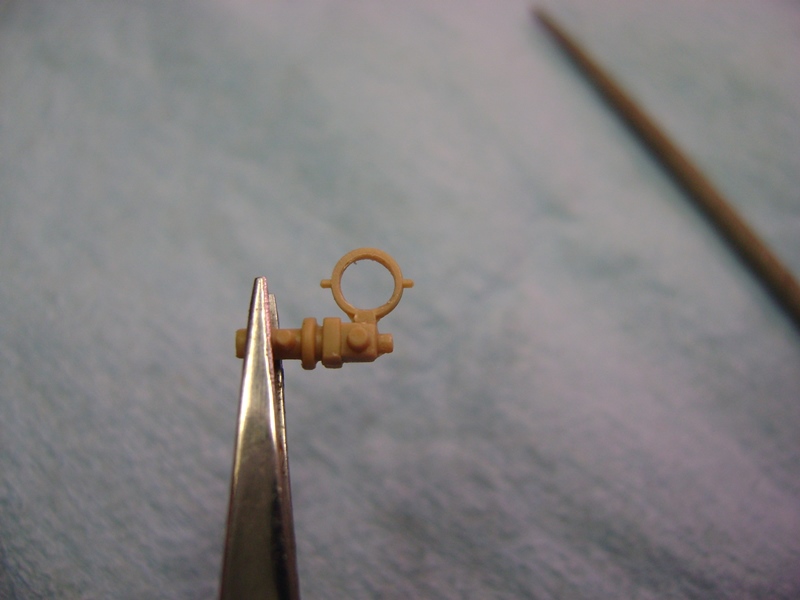
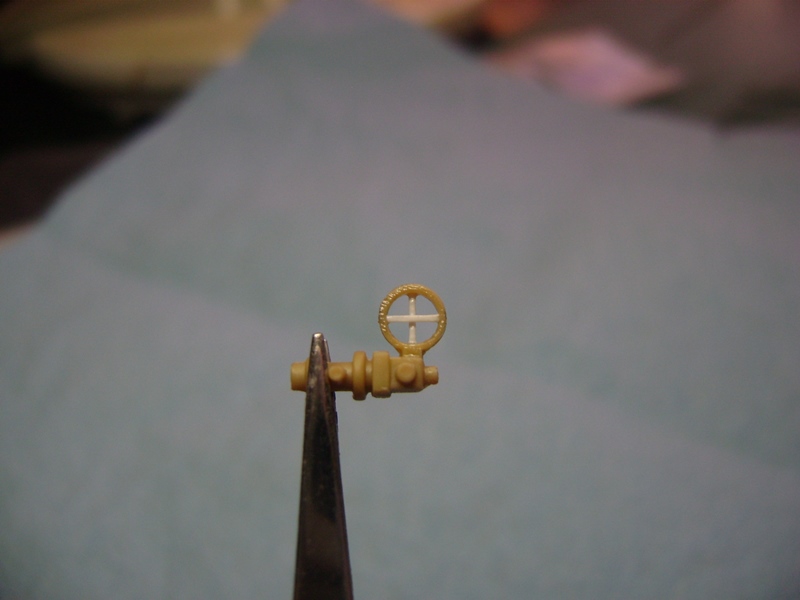
I've tried using wire for the crosshairs. While the gauge looks better scale-wise I just couldn't mount it properly.
On to some paintwork.
Cheers,
Tat
The kit-supplied gunsight was just a plain, solid piece. So I thought I'd fix it up a bit. Drilled through plastic, and wedged the thinnest styrene strip I have for the crosshairs:
I've tried using wire for the crosshairs. While the gauge looks better scale-wise I just couldn't mount it properly.
On to some paintwork.
Cheers,
Tat
Bluestab
Joined: December 03, 2009
KitMaker: 2,160 posts
Armorama: 1,906 posts
Posted: Monday, November 16, 2015 - 04:14 AM UTC
Update on the LAV-AD.
With the hull basically done, it's time to start on the turret. I couldn't find a lot of information on the turret interior so I really stuck to the basics. I prepainted the interior Tamiya Sky, to represent sea foam green. The instruments were painted a neutral gray, but for some reason look green in the picture. The nobs are black. Even with the hatches open you really cannot see much of the turret's interior. And there's no way to place crew in without hacking off their legs. If you had the references you could rework the turret floor.

Turret halves together. Vulcan gun assembled. With the gun you have to be careful so the barrels line up straight. I prepainted the barrels to avoid any problems getting paint on the barrels.
The arrow is the sight for the Stingers. It's in one piece and closed. It would have been nice to have the option to model it open. The kit really could have used PE for the wiper arms.
The kit comes with masks for the turret windows. They went on well but really didn't want to stay on.

I started on the Stinger missile pods. The kit has included a rocket pod to swap out in place of one of the Stinger units. I decided to go Stingers all the way. So two Stinger pods built.

Turret assembly basically done...front and rear views.


Paint. I didn't want to do overall green like the kit suggests. I have two overall sand LAVs on the shelf...a 25mm turreted one and a recovery version. I had a coupel of ideas so I went ahead and sprayed it with a base coat of sand. I dusted the lower hull so the green still shows through. You may notice that only half of the wheels are in the paint tray.

Out of paint.

For camo I decided to add a secondary splatter effect olive green. I used a green sharpie to sort of mark out areas I needed green...like where the green wheel hubs would be.

I used a small stencil brush to apply the green. I used Poly S acrylic so I could fix any mess-ups. After covering the sharpie marks I played it by ear on adding more green. I really didn't want to over do it.

Another view. This view also shows the addition of a wire protector for the driver. The instructions just call for them on the turret. Pictures I've seen show them with and without one in front of the driver's position.

I started drybrushing. I didn't want to overdo things so I kept it simple. By the way, the turret elevation is not great and it doesn't like to stay elevated.

A view of the other side. You can also see the attempt to paint the molded on cable. I was so tempted to shave it off and swap it out with wire. I probably would have made a mess of it though.

I still have the wheels, pioneer tools, detail painting, touch-ups, and decals left. I'll probably will add some sort of stowage. I tacked the hatch covers on so if I decide to add crew figures it will be easy to open them up. I should have this one finished soon.
With the hull basically done, it's time to start on the turret. I couldn't find a lot of information on the turret interior so I really stuck to the basics. I prepainted the interior Tamiya Sky, to represent sea foam green. The instruments were painted a neutral gray, but for some reason look green in the picture. The nobs are black. Even with the hatches open you really cannot see much of the turret's interior. And there's no way to place crew in without hacking off their legs. If you had the references you could rework the turret floor.
Turret halves together. Vulcan gun assembled. With the gun you have to be careful so the barrels line up straight. I prepainted the barrels to avoid any problems getting paint on the barrels.
The arrow is the sight for the Stingers. It's in one piece and closed. It would have been nice to have the option to model it open. The kit really could have used PE for the wiper arms.
The kit comes with masks for the turret windows. They went on well but really didn't want to stay on.
I started on the Stinger missile pods. The kit has included a rocket pod to swap out in place of one of the Stinger units. I decided to go Stingers all the way. So two Stinger pods built.
Turret assembly basically done...front and rear views.
Paint. I didn't want to do overall green like the kit suggests. I have two overall sand LAVs on the shelf...a 25mm turreted one and a recovery version. I had a coupel of ideas so I went ahead and sprayed it with a base coat of sand. I dusted the lower hull so the green still shows through. You may notice that only half of the wheels are in the paint tray.
Out of paint.
For camo I decided to add a secondary splatter effect olive green. I used a green sharpie to sort of mark out areas I needed green...like where the green wheel hubs would be.
I used a small stencil brush to apply the green. I used Poly S acrylic so I could fix any mess-ups. After covering the sharpie marks I played it by ear on adding more green. I really didn't want to over do it.
Another view. This view also shows the addition of a wire protector for the driver. The instructions just call for them on the turret. Pictures I've seen show them with and without one in front of the driver's position.
I started drybrushing. I didn't want to overdo things so I kept it simple. By the way, the turret elevation is not great and it doesn't like to stay elevated.
A view of the other side. You can also see the attempt to paint the molded on cable. I was so tempted to shave it off and swap it out with wire. I probably would have made a mess of it though.
I still have the wheels, pioneer tools, detail painting, touch-ups, and decals left. I'll probably will add some sort of stowage. I tacked the hatch covers on so if I decide to add crew figures it will be easy to open them up. I should have this one finished soon.
SGTJKJ
#041
Joined: July 20, 2006
KitMaker: 10,069 posts
Armorama: 4,677 posts
Posted: Monday, November 16, 2015 - 02:59 PM UTC
A lot of great progres on your builds! Really great work, guys.
I am about to start my build in a week or two.
More to follow.
I am about to start my build in a week or two.
More to follow.
MGS_Polla
Joined: September 10, 2015
KitMaker: 54 posts
Armorama: 46 posts
Posted: Tuesday, November 17, 2015 - 04:56 AM UTC
amazing LAV!!! nice pictures! cheers!

deerstalker36
Joined: May 16, 2010
KitMaker: 232 posts
Armorama: 218 posts
Posted: Wednesday, November 18, 2015 - 04:49 PM UTC
a slow progress update, these Aussie summers dont encourage sitting in the model room


I deceided to do a slight upgrade, just the air conditioning unit on the turret roof to do now


I deceided to do a slight upgrade, just the air conditioning unit on the turret roof to do now

SGTJKJ
#041
Joined: July 20, 2006
KitMaker: 10,069 posts
Armorama: 4,677 posts
Posted: Wednesday, November 18, 2015 - 05:06 PM UTC
Looks good, Colin. Some nice extra detail that sets it apart from normal Gepards.
Looking forward to see more.
Looking forward to see more.
Namabiiru
#399
Joined: March 05, 2014
KitMaker: 2,888 posts
Armorama: 1,920 posts
Posted: Wednesday, November 18, 2015 - 11:49 PM UTC
As the campaign leader, I feel totally ashamed that I haven't even started my build yet when I see everyone doing such great work!  Oh well, only two more builds to complete and then I can dive into something more flaky.
Oh well, only two more builds to complete and then I can dive into something more flaky.  |

WEB HOSTING BY


Copyright ©2021 Armorama and Kitmaker Network, a subsidiary of Silver Star Enterprises
All Rights Reserved. Please read our Conditions of Use and Privacy Policy.
All Rights Reserved. Please read our Conditions of Use and Privacy Policy.