

Robert,
Sorry to hear about your health issues. I hope you are feeling better soon!
Gaz
Campaigns: Active Campaigns
Campaigns that are either in planning or underway should be grouped here.
Campaigns that are either in planning or underway should be grouped here.
Hosted by Richard S.
France 1940

GazzaS

#424

Joined: April 23, 2015
KitMaker: 4,648 posts
Armorama: 2,248 posts

Posted: Wednesday, September 25, 2019 - 09:47 AM UTC

SpeedyJ

Joined: September 17, 2013
KitMaker: 1,617 posts
Armorama: 1,150 posts
Posted: Wednesday, September 25, 2019 - 11:30 AM UTC
Thanks Peter & Gaz.
Kind regards,
Robert Jan
Kind regards,
Robert Jan

kunjuro

Joined: October 27, 2013
KitMaker: 520 posts
Armorama: 488 posts
Posted: Wednesday, September 25, 2019 - 12:03 PM UTC
@Robert - hope you get well soon, man.
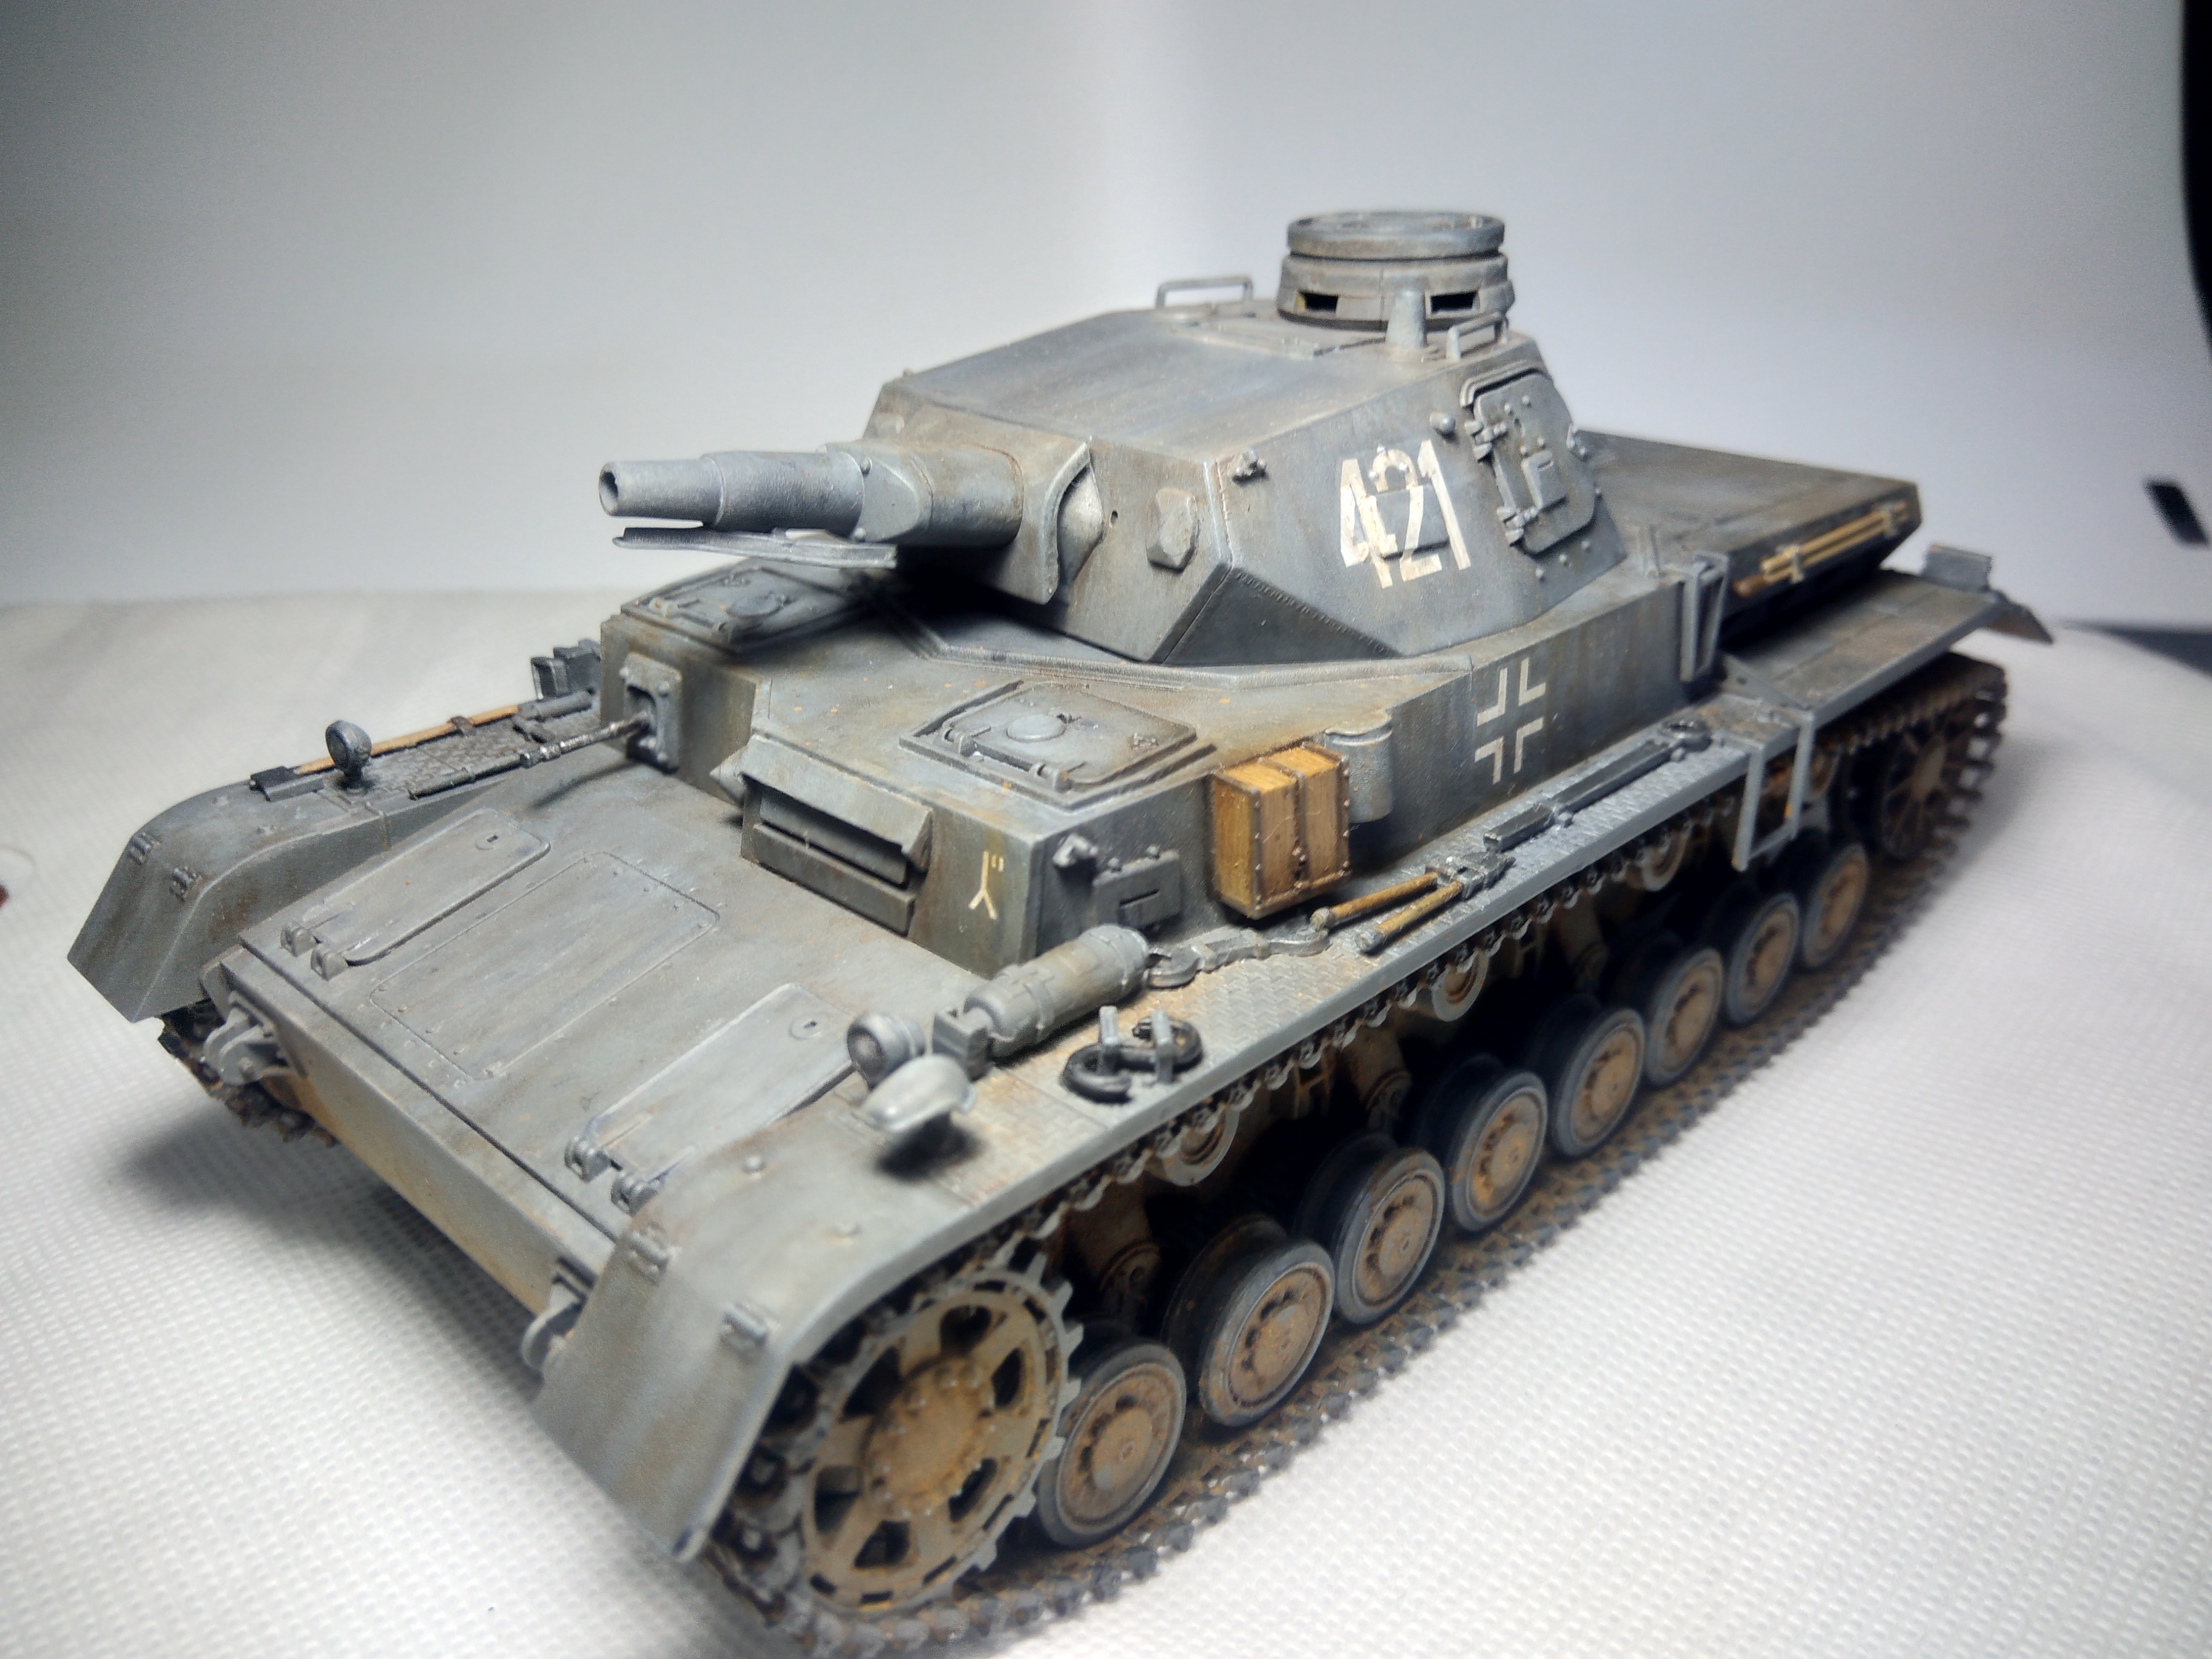
Thanks for all the kind words everyone. I'm still struggling with having a broken compressor, but I do admit that going back to basics just by using spray cans and paintbrushes is refreshing.
On that note, I added an oil dot filter all over the hull of the Panzer IV. It did add quite a bit more character to the paint but I think I may have overdone it - the brown in particular was a bit heavy. What do you guys think? Should I tone it back or keep it as is? I'm planning to do some more detail painting when I get home later. I also need to weather the running gear: not sure if I'll do purely pigments or add a bit of oil weathering.
I would appreciate any constructive criticism! Thanks folks.

27-1025

Joined: September 16, 2004
KitMaker: 1,281 posts
Armorama: 1,222 posts
Posted: Wednesday, September 25, 2019 - 02:04 PM UTC
Finally putting some work into this thing. Lots of very nice interior parts that will never be seen once things are close up.


petbat
Joined: August 06, 2005
KitMaker: 3,353 posts
Armorama: 3,121 posts
Posted: Wednesday, September 25, 2019 - 02:07 PM UTC
Looks quite effective Nigel. Just some food for thought - try not to drag the dot in a straight line from one panel over another. What you are trying to depict is grime washed down by rain, so any gap or difference in height will cause water to divert - e.g. the gap around the transmission cover in the front of the hull. Most grime above it would run in the gap then down the sides and dribble off the bottom corner or run a little further inward along the bottom edge, then down. This would mean the area under the cover would have more grime evidence that the area above it. Also consider where the grime would com from - dust would be all over, but mud would only be splattered up from the vehicle in front, or the boots of troops climbing up. So again, more depth and larger patches in travel areas and less where the likelihood of mud deposits would be low such as around more delicate fittings like lights, etc.
Also consider that mud/dust will run down vertical surfaces, but pool on horizontal ones, so less streaks on the top of fenders and more patchiness and more collected along joints, creases, etc, where water would be drawn and the grime with it. I wet the surface with water, add a little acrylic paint, then using a wet brush push the paint out in a random pattern thinning it here and there as I go. Then using a dry brush soak up the excess and then more clean wet brush to ensure a patchy fil effect is obtained like this:


Also consider that mud/dust will run down vertical surfaces, but pool on horizontal ones, so less streaks on the top of fenders and more patchiness and more collected along joints, creases, etc, where water would be drawn and the grime with it. I wet the surface with water, add a little acrylic paint, then using a wet brush push the paint out in a random pattern thinning it here and there as I go. Then using a dry brush soak up the excess and then more clean wet brush to ensure a patchy fil effect is obtained like this:

GazzaS
#424
Joined: April 23, 2015
KitMaker: 4,648 posts
Armorama: 2,248 posts
Posted: Wednesday, September 25, 2019 - 02:09 PM UTC
Hi Nigel,
It may be too much for some, but I really like it. I certainly would not change it.
Gaz
It may be too much for some, but I really like it. I certainly would not change it.
Gaz
GazzaS
#424
Joined: April 23, 2015
KitMaker: 4,648 posts
Armorama: 2,248 posts
Posted: Wednesday, September 25, 2019 - 02:10 PM UTC
Chris,
Thats a nice effort you on the interior.
Thats a nice effort you on the interior.
petbat
Joined: August 06, 2005
KitMaker: 3,353 posts
Armorama: 3,121 posts
Posted: Wednesday, September 25, 2019 - 02:13 PM UTC
Never say never Chris. Ever thought of open hatches and LED lights... 

Bigrip74
Joined: February 22, 2008
KitMaker: 5,026 posts
Armorama: 1,604 posts

Posted: Thursday, September 26, 2019 - 06:43 AM UTC
Chris, as everyone else has stated! Very nice job and please continue.
The hull and turret is clean and has a new coat of primer.


The hull and turret is clean and has a new coat of primer.
27-1025
Joined: September 16, 2004
KitMaker: 1,281 posts
Armorama: 1,222 posts
Posted: Thursday, September 26, 2019 - 08:20 AM UTC
38T is looking great. Have always liked that little tank.
petbat
Joined: August 06, 2005
KitMaker: 3,353 posts
Armorama: 3,121 posts
Posted: Thursday, September 26, 2019 - 09:33 AM UTC
Always hate to strip and repaint models myself, but looks like it was a nice clean removal job Bob.
Bigrip74
Joined: February 22, 2008
KitMaker: 5,026 posts
Armorama: 1,604 posts
Posted: Thursday, September 26, 2019 - 10:13 AM UTC
Peter. I use 91% alcohol to clean my brushes and since I use acrylic paint I submerged the Pz in a small food container with the alcohol then covered for 2 days. Most of the paint resolved and I only needed to use a paper towel with the alcohol to remove the rest.
Chris, this is my 4th. Maquette kit and Ive had great luck with assembly and they all turned out good.
Bob
Chris, this is my 4th. Maquette kit and Ive had great luck with assembly and they all turned out good.
Bob
kunjuro
Joined: October 27, 2013
KitMaker: 520 posts
Armorama: 488 posts
Posted: Sunday, September 29, 2019 - 02:46 AM UTC
Hi folks,
I think I'm nearly done with the Panzer IV. I might just do a bit of panel lining, and further weathering the muffler.


I think I'm nearly done with the Panzer IV. I might just do a bit of panel lining, and further weathering the muffler.
Bigrip74
Joined: February 22, 2008
KitMaker: 5,026 posts
Armorama: 1,604 posts
Posted: Sunday, September 29, 2019 - 04:24 AM UTC
Nigel, nice job. The weathering looks good also.
What gray did you use?
Bob
What gray did you use?
Bob
petbat
Joined: August 06, 2005
KitMaker: 3,353 posts
Armorama: 3,121 posts
Posted: Sunday, September 29, 2019 - 07:24 AM UTC
Looks great Nigel. The finish is really well done.
Just a couple of things if you are interested to know. The handle on the wire cutters needs to be painted either a tan-ish brown or red brown. These were bakelite coated.
Also the gun cleaning rods were wood with metal ends that screwed the parts together and the cover over the brush was a brown leather or a canvas cover.

and being really picky (as I am from time to time)
The tools were painted black like these towing S hooks.

.. and the wood used in German pioneer tools was a light colour

as I said, only if you are interested to know
Just a couple of things if you are interested to know. The handle on the wire cutters needs to be painted either a tan-ish brown or red brown. These were bakelite coated.
Also the gun cleaning rods were wood with metal ends that screwed the parts together and the cover over the brush was a brown leather or a canvas cover.
and being really picky (as I am from time to time)
The tools were painted black like these towing S hooks.
.. and the wood used in German pioneer tools was a light colour
as I said, only if you are interested to know
kunjuro
Joined: October 27, 2013
KitMaker: 520 posts
Armorama: 488 posts
Posted: Sunday, September 29, 2019 - 02:51 PM UTC
Quoted Text
Looks great Nigel. The finish is really well done.
Just a couple of things if you are interested to know. The handle on the wire cutters needs to be painted either a tan-ish brown or red brown. These were bakelite coated.
Also the gun cleaning rods were wood with metal ends that screwed the parts together and the cover over the brush was a brown leather or a canvas cover.
and being really picky (as I am from time to time)
The tools were painted black like these towing S hooks.
.. and the wood used in German pioneer tools was a light colour
as I said, only if you are interested to know
Thanks mate. These are extremely helpful photos. I'll make some corrections later on to match these.

BravoTwoZero
Joined: June 11, 2009
KitMaker: 461 posts
Armorama: 370 posts
Posted: Tuesday, October 01, 2019 - 10:04 AM UTC
Hello everyone,
I've made some progress on my R35. Boy, I didn't realize that I would have my work cut out on this project. I thought I was going to build a simple and small tank as I was interested in the camouflage pattern. I didn't realize that this is an interior-type kit. Lots of tiny pieces! This would be my very first interior kit. Now, I'm considering finishing this with open turret and engine deck (maybe). Either open or closed hatch, I decided to follow the instructions and built the interior.
Here are pictures of the engine.


Here are pictures of the interior, without the engine.

Nobody will ever see this detail.

Here's the driver compartment.

And here are overall pictures of the interior.


The rear of the tank is also full of detail. Each of those sprockets (?) consists of at least 8 small parts!

Very complicated but nice looking kit.


The road wheel assembly looks equally complicated too. We'll see how it goes.
Thanks,
Joseph
I've made some progress on my R35. Boy, I didn't realize that I would have my work cut out on this project. I thought I was going to build a simple and small tank as I was interested in the camouflage pattern. I didn't realize that this is an interior-type kit. Lots of tiny pieces! This would be my very first interior kit. Now, I'm considering finishing this with open turret and engine deck (maybe). Either open or closed hatch, I decided to follow the instructions and built the interior.
Here are pictures of the engine.
Here are pictures of the interior, without the engine.
Nobody will ever see this detail.
Here's the driver compartment.
And here are overall pictures of the interior.
The rear of the tank is also full of detail. Each of those sprockets (?) consists of at least 8 small parts!
Very complicated but nice looking kit.
The road wheel assembly looks equally complicated too. We'll see how it goes.
Thanks,
Joseph
deathdork
Joined: March 26, 2007
KitMaker: 314 posts
Armorama: 296 posts
KitMaker: 314 posts
Armorama: 296 posts
Posted: Tuesday, October 01, 2019 - 05:32 PM UTC
Joseph wanted to give you and atta boy. That interior was really hard when I played with one particularly the photo etch on the seat. Looking forward to the final result!
GazzaS
#424
Joined: April 23, 2015
KitMaker: 4,648 posts
Armorama: 2,248 posts
Posted: Tuesday, October 01, 2019 - 05:40 PM UTC
Wow, Everybody! Some great work!
Bob R., Your 38T is coming together greatly!
Nigel, the weathering on your Panzer IV is exceptional!
Joseph, That is a lot of interior detail! I'm impressed with your tenacity. It looks great!
Gaz
Bob R., Your 38T is coming together greatly!
Nigel, the weathering on your Panzer IV is exceptional!
Joseph, That is a lot of interior detail! I'm impressed with your tenacity. It looks great!
Gaz
petbat
Joined: August 06, 2005
KitMaker: 3,353 posts
Armorama: 3,121 posts
Posted: Tuesday, October 01, 2019 - 08:09 PM UTC
A real pity to button all that excellent detail and crisp build Joseph. Looking forward to seeing this one finished
kunjuro
Joined: October 27, 2013
KitMaker: 520 posts
Armorama: 488 posts
Posted: Thursday, October 03, 2019 - 03:44 AM UTC
Hi folks! I've taken your feedback and improved on the weathering on the kit. Here she is now.
I might add a bit more steel pigments on the raised portions track as it isn't super recognizable. I might also tone the rusting on the muffler down a bit. Aside from that, I think I'm nearly done with this. Any constructive criticism is highly appreciated!


I might add a bit more steel pigments on the raised portions track as it isn't super recognizable. I might also tone the rusting on the muffler down a bit. Aside from that, I think I'm nearly done with this. Any constructive criticism is highly appreciated!
petbat
Joined: August 06, 2005
KitMaker: 3,353 posts
Armorama: 3,121 posts
Posted: Thursday, October 03, 2019 - 07:30 AM UTC
You have really taken up the ideas and run with them Nigel, and have a very fine build as a result.
Touch up the grey in the centre of the red light where the red has bled over, give the MG a very thin very dark Gray pin wash to bring out the detail and you will have a very sweet build indeed.
I wouldn't lighten the track treads any more. These were a high Manganese content casting and were naturally a dark grey colour out of the mould. Where you see light colours in photos is just the reflected light caught by the camera, not a light metal sheen.

I do notice a seam line on the FE, but not sure if you can remedy that now.

Really enjoyed seeing this one come together and get improved. Looking forward to seeing your next build.
Touch up the grey in the centre of the red light where the red has bled over, give the MG a very thin very dark Gray pin wash to bring out the detail and you will have a very sweet build indeed.
I wouldn't lighten the track treads any more. These were a high Manganese content casting and were naturally a dark grey colour out of the mould. Where you see light colours in photos is just the reflected light caught by the camera, not a light metal sheen.
I do notice a seam line on the FE, but not sure if you can remedy that now.
Really enjoyed seeing this one come together and get improved. Looking forward to seeing your next build.

Antilles

Joined: March 22, 2015
KitMaker: 671 posts
Armorama: 45 posts
Posted: Friday, October 04, 2019 - 01:32 AM UTC
Tim, Peter and Gary: Glad You like the little Dio!
Chris: Nice looking interior!
Bob: Fine removal of the old paint. I am always afraid to to this. But Your result looks good.
Joseph: Stunning work on Your R35!
Nigel: Your tank looks great. Congratulation.
Oliver
Chris: Nice looking interior!
Bob: Fine removal of the old paint. I am always afraid to to this. But Your result looks good.
Joseph: Stunning work on Your R35!
Nigel: Your tank looks great. Congratulation.
Oliver
Antilles
Joined: March 22, 2015
KitMaker: 671 posts
Armorama: 45 posts
Posted: Friday, October 04, 2019 - 01:34 AM UTC
Quoted Text
...I wouldn't lighten the track treads any more. These were a high Manganese content casting and were naturally a dark grey colour out of the mould...
Peter, were these tracks made of a Hadfield Steel?
Oliver

TimReynaga
Joined: May 03, 2006
KitMaker: 2,500 posts
Armorama: 297 posts
Posted: Friday, October 04, 2019 - 01:54 AM UTC
Nigel,
Your Panzer IV is looking cool, the dusty weathering looks just right to my eye!
On another note, may I suggest that those using Imgur to post pics consider reducing the pixel size of the images on the Imgur site - the large images actually post on the site as poorer quality, and they take a long time to load when posted on the site.
Resizing Imgur images is pretty easy to accomplish.
First go to Imgur and open up any of your images there.
Then move the cursor over the image. The words edit image will appear on the lower right just below the picture.

Click on edit image. In the upper right numbers (in this example 4914 X 3408) will appear. These represent the number of pixels in the image.

Overtype the first number (4914 in the example) with 800.
Click the Apply button at the upper left. The numbers will automatically readjust proportionally (in the example, to 800 X 555).
Click Save button to preserve your image at the rescaled size.
The smaller rescaled image will appear sharper than the larger original when you post it on any of the KitMaker sites.
original 4914 X 3408 pixel image:
reduced 800 X 555 pixel image:
Note the sharper details on the second image, especially the deck planking and rigging lines. I know it seems illogical that an image with a reduced number of pixels would produce a sharper result online, but it works!

Your Panzer IV is looking cool, the dusty weathering looks just right to my eye!
On another note, may I suggest that those using Imgur to post pics consider reducing the pixel size of the images on the Imgur site - the large images actually post on the site as poorer quality, and they take a long time to load when posted on the site.
Resizing Imgur images is pretty easy to accomplish.
First go to Imgur and open up any of your images there.
Then move the cursor over the image. The words edit image will appear on the lower right just below the picture.
Click on edit image. In the upper right numbers (in this example 4914 X 3408) will appear. These represent the number of pixels in the image.
Overtype the first number (4914 in the example) with 800.
Click the Apply button at the upper left. The numbers will automatically readjust proportionally (in the example, to 800 X 555).
Click Save button to preserve your image at the rescaled size.
The smaller rescaled image will appear sharper than the larger original when you post it on any of the KitMaker sites.
original 4914 X 3408 pixel image:
reduced 800 X 555 pixel image:
Note the sharper details on the second image, especially the deck planking and rigging lines. I know it seems illogical that an image with a reduced number of pixels would produce a sharper result online, but it works!

 |

WEB HOSTING BY


Copyright ©2021 Armorama and Kitmaker Network, a subsidiary of Silver Star Enterprises
All Rights Reserved. Please read our Conditions of Use and Privacy Policy.
All Rights Reserved. Please read our Conditions of Use and Privacy Policy.