

Jesper,
I wonder if putting the model in the refrigerator overnight would help fight the sag? I have some of that putty, but haven't tried it out yet.
Overall not too bad though. the model looks good. Maybe the crew changed their mind and only mostly painted over the other color...
Happy Modeling,
Zon
Campaigns: Active Campaigns
Campaigns that are either in planning or underway should be grouped here.
Campaigns that are either in planning or underway should be grouped here.
Hosted by Richard S.
20/20 in 2020 Official thread

zontar

Joined: August 27, 2006
KitMaker: 1,646 posts
Armorama: 1,557 posts
Posted: Tuesday, May 05, 2020 - 10:16 AM UTC
petbat

Joined: August 06, 2005
KitMaker: 3,353 posts
Armorama: 3,121 posts
Posted: Tuesday, May 05, 2020 - 10:19 AM UTC
The Luchs is great Gaz. Finished off nicely with the figures. It is such a big vehicle, I doubt anyone would have noticed the size of the figures.
The Luch's baby brother is looking good too Richard. You can really see how small it is by the MG....
Welcome Hyder. Another interesting build to follow. Not what you normally see on here, so I will be looking forward to seeing this one done.
Nice little extras there adding some interest Johanan. A bit late for you now, but I think you will find the command radio sets were located in the sponson space over the tracks in the 9 command versions built and the standard unit in the turret as depicted ( which is why there is an aerial on the turret and one for the star aerial on the side of the hull on command ones). Where you have them now is probably right in the face of the operator when seated. The MG was removed and port covered over but the visors were both operable....

I'll crawl back in my box now.
Still looks good Jesper. In Australia, the AK putty becomes liquid in our heat, like treacle. I have tried 'silly putty' masks and that too flattens out over night. It can drip off a model when it is hot too. I read that if you give the paint an hour to dry, then put the model in a plastic container in the freezer overnight, it will stop these putty types distorting. I haven't tried it though. Maybe you can try it on a scrap test case for the future?
The Luch's baby brother is looking good too Richard. You can really see how small it is by the MG....
Welcome Hyder. Another interesting build to follow. Not what you normally see on here, so I will be looking forward to seeing this one done.
Nice little extras there adding some interest Johanan. A bit late for you now, but I think you will find the command radio sets were located in the sponson space over the tracks in the 9 command versions built and the standard unit in the turret as depicted ( which is why there is an aerial on the turret and one for the star aerial on the side of the hull on command ones). Where you have them now is probably right in the face of the operator when seated. The MG was removed and port covered over but the visors were both operable....
I'll crawl back in my box now.
Still looks good Jesper. In Australia, the AK putty becomes liquid in our heat, like treacle. I have tried 'silly putty' masks and that too flattens out over night. It can drip off a model when it is hot too. I read that if you give the paint an hour to dry, then put the model in a plastic container in the freezer overnight, it will stop these putty types distorting. I haven't tried it though. Maybe you can try it on a scrap test case for the future?

petbat
Joined: August 06, 2005
KitMaker: 3,353 posts
Armorama: 3,121 posts
Posted: Tuesday, May 05, 2020 - 10:20 AM UTC
Zon just beat me on the post re refrigerator!!

sinsling

Joined: January 16, 2007
KitMaker: 86 posts
Armorama: 85 posts
Posted: Tuesday, May 05, 2020 - 02:51 PM UTC
Peter,
Can't thank you enough for the heads-up! No worries the radio sets and shelving are still loose for painting so working it back into the sponson is do-able. But man what a weird spot. I guess it was a tiny vehicle though! Ok a little adjustment required then. Thanks for the heads up!
Johanan
Can't thank you enough for the heads-up! No worries the radio sets and shelving are still loose for painting so working it back into the sponson is do-able.
But man what a weird spot. I guess it was a tiny vehicle though! Ok a little adjustment required then. Thanks for the heads up!Johanan
petbat
Joined: August 06, 2005
KitMaker: 3,353 posts
Armorama: 3,121 posts
Posted: Tuesday, May 05, 2020 - 07:33 PM UTC
Being beside the radio operator is not that unusual for German tank design. The Panther and Tiger have the sets fitted over the transmission between the driver and operator with the radios facing side ways. As you say, the 38t being so small, the over sponson area is pretty much the only place available.
SGTJKJ

#041

Joined: July 20, 2006
KitMaker: 10,069 posts
Armorama: 4,677 posts

Posted: Wednesday, May 06, 2020 - 07:18 AM UTC
Zon, thanks for the tip. It is worth trying next time.
Also using smaller blobs of making putty might help as this would give less gravity pull.
Also using smaller blobs of making putty might help as this would give less gravity pull.

sinsling
Joined: January 16, 2007
KitMaker: 86 posts
Armorama: 85 posts
Posted: Friday, May 08, 2020 - 09:50 PM UTC
Finally managed to find time to finish the interior upper hull incl. the command radio sets, transformers and wiring, and close up the hull.
Thanks again to Peter for the heads-up re the radio position. I also rebuilt the co-driver's visor with a simple replacement. Hardly any of all this can be seen once the 2cm hanglafette is in place.


Now to press on to completing the exterior.
Thanks again.
Johanan
Thanks again to Peter for the heads-up re the radio position. I also rebuilt the co-driver's visor with a simple replacement. Hardly any of all this can be seen once the 2cm hanglafette is in place.
Now to press on to completing the exterior.
Thanks again.
Johanan
petbat
Joined: August 06, 2005
KitMaker: 3,353 posts
Armorama: 3,121 posts
Posted: Saturday, May 09, 2020 - 08:38 AM UTC
Looks excellent Johanan. Nice work on the wash to bring out detail and give it the lived in look.

GazzaS

#424
Joined: April 23, 2015
KitMaker: 4,648 posts
Armorama: 2,248 posts

Posted: Saturday, May 09, 2020 - 12:23 PM UTC
Those interior details look great!

k_mero4

Joined: November 26, 2017
KitMaker: 393 posts
Armorama: 369 posts
Posted: Sunday, May 10, 2020 - 07:35 AM UTC
Sinsling, the interior of the machine looks very, very good. Congratulations.
Some development on my project. Unfortunately, the small information about the interior makes me interpret. Here are some photos.


Success and have fun.
Kalin
Some development on my project. Unfortunately, the small information about the interior makes me interpret. Here are some photos.
Success and have fun.
Kalin

GulfWarrior
Joined: January 05, 2010
KitMaker: 1,051 posts
Armorama: 1,029 posts

Posted: Sunday, May 10, 2020 - 11:42 AM UTC
Last night I put down a coat of Lucky Ultra Matt from Ammo by Mig. This morning I found these strange white flecks on it. 

Any ideas on how to get rid of them?

Any ideas on how to get rid of them?

GazzaS
#424
Joined: April 23, 2015
KitMaker: 4,648 posts
Armorama: 2,248 posts
Posted: Sunday, May 10, 2020 - 11:57 AM UTC
Angel,
That looks awesome. I don't believe I've ever seen that configuration before.
Richard,
looks great!
That looks awesome. I don't believe I've ever seen that configuration before.
Richard,
looks great!
GulfWarrior
Joined: January 05, 2010
KitMaker: 1,051 posts
Armorama: 1,029 posts
Posted: Sunday, May 10, 2020 - 11:59 AM UTC
Thanks Gary! I still want to get those flecks off; but I don't know what to use that won't mess up the paint.

ayovtshev
#490
Joined: September 22, 2016
KitMaker: 1,432 posts
Armorama: 1,390 posts

Posted: Sunday, May 10, 2020 - 04:03 PM UTC
Nice job on scratchbuilding those mesh covers/hatches, Kalin!

petbat
Joined: August 06, 2005
KitMaker: 3,353 posts
Armorama: 3,121 posts
Posted: Sunday, May 10, 2020 - 10:07 PM UTC
Quoted Text
Last night I put down a coat of Lucky Ultra Matt from Ammo by Mig. This morning I found these strange white flecks on it.
Any ideas on how to get rid of them?
Hi Richard.
It is hard to tell what the flecks are from a pic. Usually it can be:
- paint applied too heavily and flat base has separated from the medium before drying
- Humidity and temperature (especially at night) Trapping/ adding moisture to the coat
- Flat coat not mixed well enough or a non-compatible thinner is used.
I would guess maybe no.1 here, given there seems to be a build up around episcope mounts, hinges, etc.
If you are going to add a pin wash, the build up should be taken care of. The flecks on flat panels may come off with slight buffing with a nylon kitchen scourer. Try it on the bottom if there are flecks there. You may need to do another flat coat.
Another thing you can try is Windex or similar. Moisten (not wet) a clean cloth with Windex and gently wipe over the flecks. Not too many passes and do not go hard or heavy or you may lift the paint, especially on raised detail. If it does not come off after 2 or 3 light wipes, then I'd not try another - and wash the model...
If push comes to shove, sand/scour the flecks off and repaint. You should not need a heavy layer of paint to touch up this time around. Good Luck.
petbat
Joined: August 06, 2005
KitMaker: 3,353 posts
Armorama: 3,121 posts
Posted: Sunday, May 10, 2020 - 10:35 PM UTC
Looking Great Kalin. Is this a kit in itself, or are you scratch building a conversion using a 222/223 as a base?
Great to see some scratch building from you - Angel should be as happy as I am!!
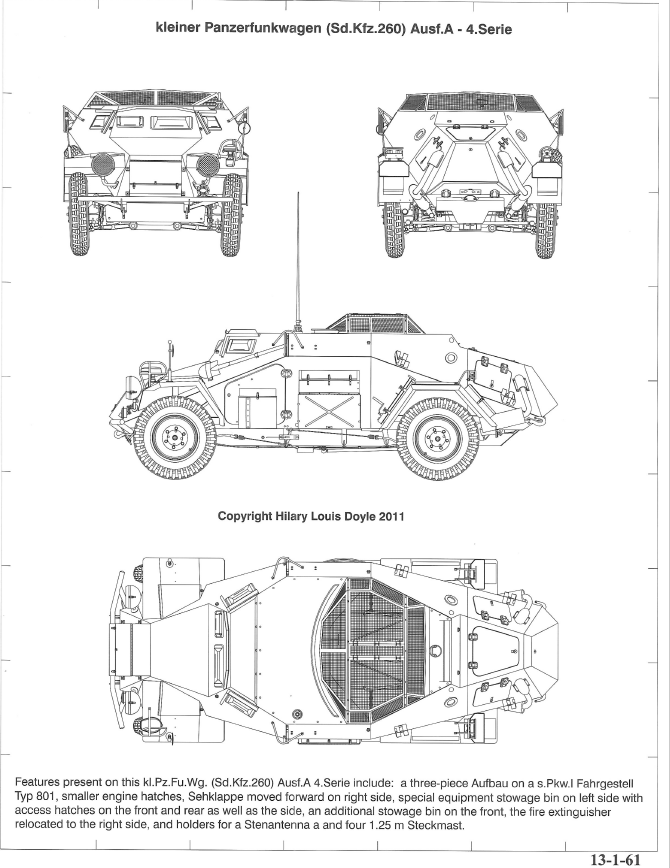
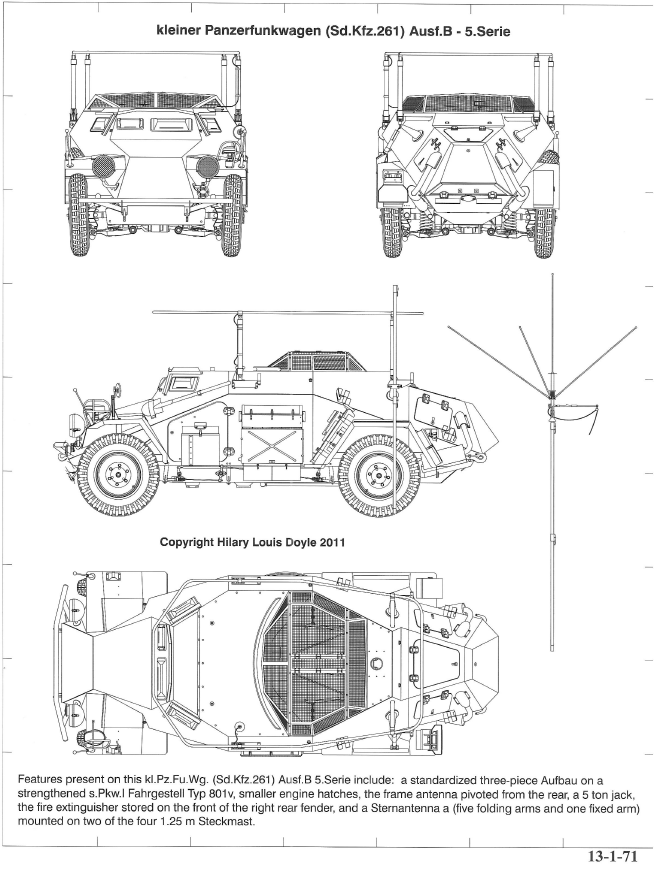
Only one thing, which you may be interested to know, is that your turret front seems a bit long and pointed and the curved rain channel fitted to these vehicles will not have room to fit in front.
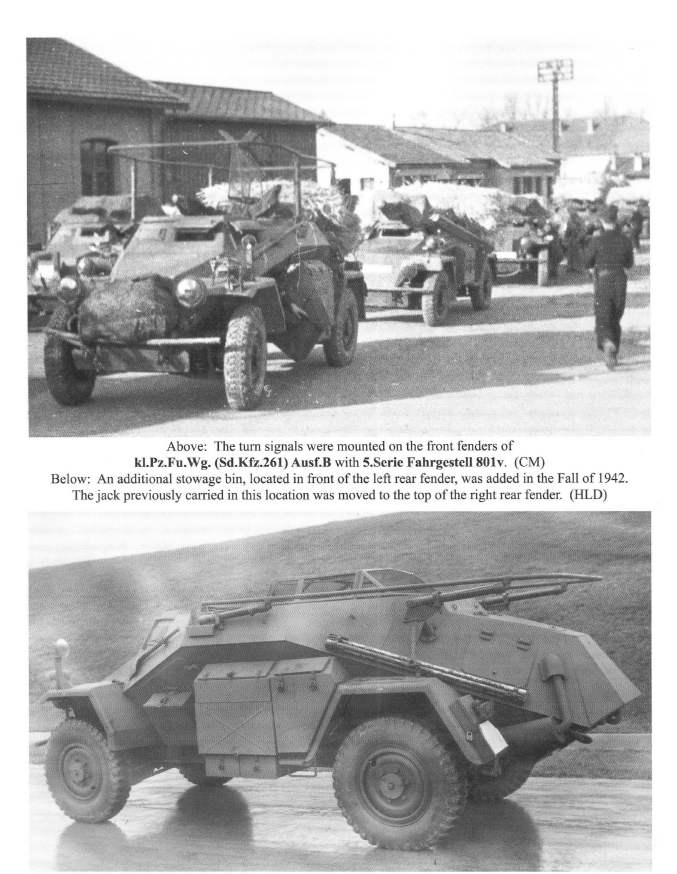
You might find these pics interesting to show you what I mean and also give you some tips on the Ausf A and Ausf B differences. (From Panzertracts 13-1 - fantastic books if you like references.)
Great to see some scratch building from you - Angel should be as happy as I am!!
Only one thing, which you may be interested to know, is that your turret front seems a bit long and pointed and the curved rain channel fitted to these vehicles will not have room to fit in front.
You might find these pics interesting to show you what I mean and also give you some tips on the Ausf A and Ausf B differences. (From Panzertracts 13-1 - fantastic books if you like references.)
barkingdigger
#013

Joined: June 20, 2008
KitMaker: 3,981 posts
Armorama: 3,403 posts
Posted: Monday, May 11, 2020 - 12:17 AM UTC
Hi all, some really nifty modelling going on here! Thought it was time to offer my own build - a Beobachtungspanzer rebuilt from the Bundeswehr's KanonenJagdpanzer as kitted by Revell. I have the gun TD for another active campaign, but couldn't resist getting a second one for here! (They were used with mortar units as observation & command vehicles...)


The one thing that I need more info on is the TZG90 device that Revell includes - I can find lots of info and pics of it on a tripod (ground use) but only one grainy shot of one on a vehicle, with the vital mount details hidden by a camo net. Anyone able to help?
BTW Richard, that looks like maybe some dust got on your paint as it cured - have you tried scraping one or two of the spots to see if they come off? It's a PITA, but may be the best way to fix without a strip/repaint.
GulfWarrior
Joined: January 05, 2010
KitMaker: 1,051 posts
Armorama: 1,029 posts
Posted: Monday, May 11, 2020 - 12:58 AM UTC
Thanks guys. I'll try your suggestions.
k_mero4
Joined: November 26, 2017
KitMaker: 393 posts
Armorama: 369 posts
Posted: Monday, May 11, 2020 - 05:39 AM UTC
Thanks for the comments, gentlemen.
Peter, it is true that the dome is slightly long, I used a model in 1/48 as a basis. The error obviously came from sizing. In addition, the information I use shows me the difference in the configuration of the dome between yours and mine.

The last one is from Panzer Tracts No.13. Panzer Tracts No.13-1 unfortunately I don't have it.
But the latter is no excuse to correct my mistake.
Kalin
Peter, it is true that the dome is slightly long, I used a model in 1/48 as a basis. The error obviously came from sizing. In addition, the information I use shows me the difference in the configuration of the dome between yours and mine.
The last one is from Panzer Tracts No.13. Panzer Tracts No.13-1 unfortunately I don't have it.
But the latter is no excuse to correct my mistake.
Kalin
barkingdigger
#013
Joined: June 20, 2008
KitMaker: 3,981 posts
Armorama: 3,403 posts
Posted: Monday, May 11, 2020 - 06:14 AM UTC
Did Mr Doyle change his mind between the first set of drawings in 1983 and the second set in 2011? Or do they actually represent different vehicles?
k_mero4
Joined: November 26, 2017
KitMaker: 393 posts
Armorama: 369 posts
Posted: Monday, May 11, 2020 - 06:59 AM UTC
Nice question, Tom. I cannot answer unequivocally. There is very little information in my country.
Kalin
Kalin
petbat
Joined: August 06, 2005
KitMaker: 3,353 posts
Armorama: 3,121 posts
Posted: Monday, May 11, 2020 - 08:37 AM UTC
Hi Kalin.
Yes, more information came to light since PT 13 was printed and to be honest, Hilary Doyle's line drawings were a bit hit and miss back then anyway.
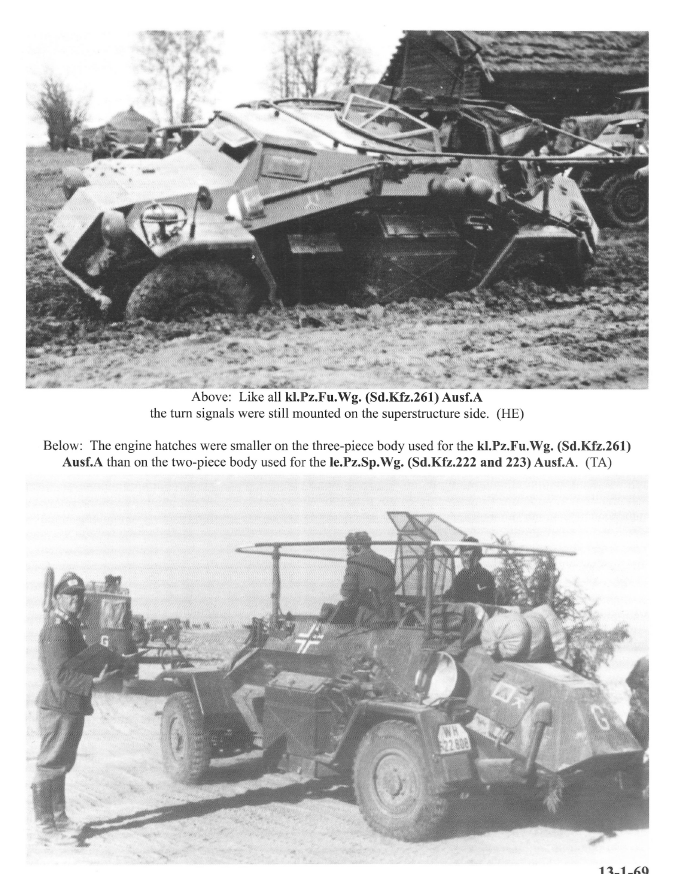
PT 13 has just one picture of the vehicle on page 56 - which is the same as the last picture I posted - and the line drawings seem to be based on loose interpretation of that at the time.
A good example of the 'hit and miss' in the same book is the '4 Rad Troppen on page 35. It appears that Doyle used his basic 8 rad drawings and 'cut and paste' for the 4 Rad. Therefore the drawing has an exhaust cover well forward of the rear plate, atrapezoidal shape for the 8 rad side stowage box in front of the rear wheel, a flat fender section above the spare wheel and a sharp angle on the rear of the front fender. However, the pic of one of the 2 chassis actually made, which is on the same page right under the drawing, shows the armoured exhaust cover very close to the rear plate, a clearly pointed fender above the spare wheel, the shadow shows a curve on the rear of the front fender, a wider flange on the outside of the fender, and no stowage compartment lid!
Regardless of all the above, as I always say, build it as you want to, for your pure enjoyment of it. Us Rivet counters and borderline Obsessive Compulsives be damned!!! Keep up the good work
Yes, more information came to light since PT 13 was printed and to be honest, Hilary Doyle's line drawings were a bit hit and miss back then anyway.
PT 13 has just one picture of the vehicle on page 56 - which is the same as the last picture I posted - and the line drawings seem to be based on loose interpretation of that at the time.
A good example of the 'hit and miss' in the same book is the '4 Rad Troppen on page 35. It appears that Doyle used his basic 8 rad drawings and 'cut and paste' for the 4 Rad. Therefore the drawing has an exhaust cover well forward of the rear plate, atrapezoidal shape for the 8 rad side stowage box in front of the rear wheel, a flat fender section above the spare wheel and a sharp angle on the rear of the front fender. However, the pic of one of the 2 chassis actually made, which is on the same page right under the drawing, shows the armoured exhaust cover very close to the rear plate, a clearly pointed fender above the spare wheel, the shadow shows a curve on the rear of the front fender, a wider flange on the outside of the fender, and no stowage compartment lid!
Regardless of all the above, as I always say, build it as you want to, for your pure enjoyment of it. Us Rivet counters and borderline Obsessive Compulsives be damned!!!
Keep up the good work 
roman

Joined: July 20, 2004
KitMaker: 99 posts
Armorama: 95 posts

Posted: Wednesday, May 13, 2020 - 07:07 PM UTC
Renault UE beobachtungswagen
Tamiya, Blast models, 1:35
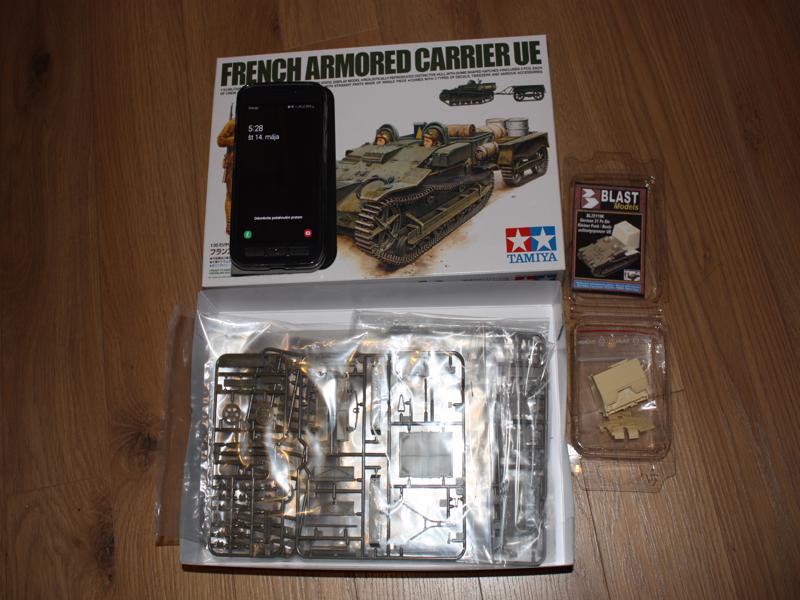
Tamiya, Blast models, 1:35
zontar
Joined: August 27, 2006
KitMaker: 1,646 posts
Armorama: 1,557 posts
Posted: Wednesday, May 13, 2020 - 07:48 PM UTC
Aloha All,
Great work as always from this group.
I've made a little progress on my M-20, getting a good start on the interior with a base color. Need to pick up some more of the details and add a wash and some abuse.


Happy Modeling,
Zon
Great work as always from this group.
I've made a little progress on my M-20, getting a good start on the interior with a base color. Need to pick up some more of the details and add a wash and some abuse.
Happy Modeling,
Zon
GazzaS
#424
Joined: April 23, 2015
KitMaker: 4,648 posts
Armorama: 2,248 posts
Posted: Wednesday, May 13, 2020 - 08:01 PM UTC
Looks good, Zon!
 |

WEB HOSTING BY


Copyright ©2021 Armorama and Kitmaker Network, a subsidiary of Silver Star Enterprises
All Rights Reserved. Please read our Conditions of Use and Privacy Policy.
All Rights Reserved. Please read our Conditions of Use and Privacy Policy.