Armor/AFV: Large Scale
1/16 and Larger Armor Modeling
Hosted by Darren Baker
Amazing T-34 model
sgirty
Visit this Community
Ohio, United States
Joined: February 12, 2003
KitMaker: 1,315 posts
Armorama: 0 posts
Posted: Tuesday, June 22, 2004 - 01:48 AM UTC
Hi. Have been working on completing and painting the engine, fan, gearbox/brake units, the forward bulkhead between the engine and fighting compartment and the bulkhead that holds the air clearners, and have them pretty much all done. Looks pretty good too. After they were painted I gave each one a spray of Dullcote and then a wash of Van Dyck Brown. Once that was dry I gave them a selective wash of Burnt Sienna for rust stains. I feel like I've already built a kit just in these pieces, and I've just scratched the surfact of the complete model.

I painted those brake pieces--C33--on top a copper color. This most likely isn't right, but it does give a splash of color back in that area. And I think that once it's all weathered it will blend in okay.

I was kind of wondering just how that white color on the interior was going to blend in with the rest of the items in there, but I see that once I've washed it some with various oils mentioned above, it's going to do just fine. Plus the white is going to allow any other weathering a person decides to do to the inside to stand out well on its own, and with the other weathering colors.

Am not going to paint the spring ends--H10 and H19-- on the longer springs, as they are totally covered up anyway.

I was surprised that the generator on the engine calls for an orange color, but once again, when it's weathered, it tends to 'fit' in well with the rest.

Man this is big! I can't imagine what this thing is going to look like once it's all done.

Take care, Sirty
Plasticbattle
#003
Visit this Community
Donegal, Ireland
Joined: May 14, 2002
KitMaker: 9,763 posts
Armorama: 7,444 posts
Posted: Tuesday, June 22, 2004 - 02:07 AM UTC
Its almost possible to see the excitement in your comments, guys . Please post some photos as you go along .. especiallyany painted work and any scratched items. Cheers.
sgirty
Visit this Community
Ohio, United States
Joined: February 12, 2003
KitMaker: 1,315 posts
Armorama: 0 posts
Posted: Tuesday, June 22, 2004 - 02:46 AM UTC
Hi, Plasticbattle, Is there a post somewhere that tells exactly how to post pictures here? I got them in the computer, mostly by luck, and would like to send them along if I can find the instructions to do so.

Thanks and take care, Sgirty
jimbrae
Visit this Community
Provincia de Lugo, Spain / España
Joined: April 23, 2003
KitMaker: 12,927 posts
Armorama: 9,486 posts
Posted: Tuesday, June 22, 2004 - 02:53 AM UTC
Now Sqirty, after all that work, surely your going to buy a metal gunbarrel as well? Take a look at this:

1/16th Metal Gun Barrel ....Jim

(it's in the FINEMOLDS story)
seyahmit
Visit this Community
Missouri, United States
Joined: March 14, 2004
KitMaker: 51 posts
Armorama: 0 posts
Posted: Tuesday, June 22, 2004 - 06:14 AM UTC
sgirty, did you have any difficulties with the brakes? It was kind of a pain to bend and glue the plastic around the brake drum.

As for posting a picture, you will need to sign up for a free image hosting service and upload your pictures. Then you can use the img button and paste the url of the picture you want to post here.

Maybe someone can suggest a good service for you to use.
john17
Visit this Community
Wisconsin, United States
Joined: January 23, 2003
KitMaker: 920 posts
Armorama: 3 posts
Posted: Tuesday, June 22, 2004 - 09:00 AM UTC
Well after "hearing" the excitement in your posts, and reading the review I broke down and picked up the 1943 version. As I am moving to a new house in a week, I will just have to sit and drool in the box until I get my new workstation set up.

As with the others, I'll post progress pics as I go along. (no pics of me drooling though...that just wouldn't be mature) :-)

So, has anybody checked any leads on appropriate figures for this beast? I'll be scoping the net for some 120mm figures for this. I certainly hope I don't have to sculpt my own.

Boy...if enough of us jump on the bandwagon (or medium tank in this case) we could almost start a group build just on this model.

Can't wait to see more from you guys.

Take care,

John
sgirty
Visit this Community
Ohio, United States
Joined: February 12, 2003
KitMaker: 1,315 posts
Armorama: 0 posts
Posted: Tuesday, June 22, 2004 - 09:10 AM UTC
Hi,seyahmit: Understand what you're talking about on the brake pieces--C33. It would have been much better if Trumpeter had formed these out of PE instead of plastic, as the 'bending' of this plastic around those wheels, just doesn't quite get it. I found that after bending it around 2 or 3 times, they began to show weak spots and I did have one break three-fourths of the way across on the bottom of the part before I glued it on to the wheel. But, luckily, as it was across the bottom, and a little filling with Green Stuff and some sanding cleaned this up okay. And it's not seen anyway where it's at. As these two pieces were drying, I put a rubber band tightly around them, making sure that I didn't break off those two little tips on top of C-33 in doing so, and they came out okay. Guess the model gods decided to give this poor child a break here. Sure I'll pay for this somewhere else. Ha, ha! Could it also be that I may be actually getting better at this hobby? That's a frightening thought.

I had to be sure, at least on mine, that I got the front of of these linings glued all the way down onto the wheels to get them to line up with the holes in those stands--C17 and 18. The area is kind of tricky to get all this to 'fit' together. I actually had to end up cutting off those little slots on the inside of the brake wheels where they fit into the gearbox, so I could get those wheels turned enough to line up those little holes on the stands better. When I put the whole thing together for the last time, I'll put the gear box/brake unit in first by itself, then the fan/engine combination once I get those little ends of the brakes in those holes on the stands.

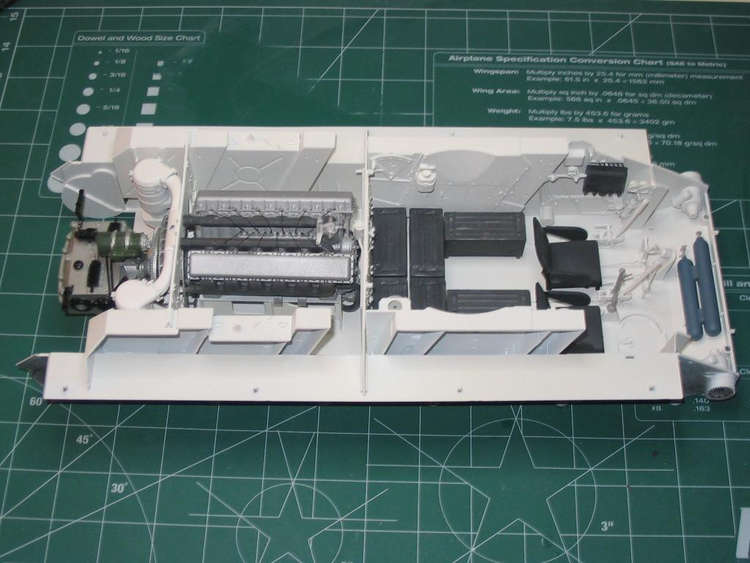
Right now I'm having trouble getting the two rear side panels--D2 and D1, plus the bulkhead with the aircleaners on it--E7--to fit altogether as a unit in the body so that the hull top sits down on the bottom as it should. Have a 'high spot' there somewhere, and will have to sand and fit, sand and fit, till I get the top and bottom hull pieces to fit correctly with these three pieces inside. But all things in good time.

My main trouble is having a tendency to 'rush' things sometimes as I go along. This is where I get into the most trouble, so when I run into a problen, I just sit things aside for awhile and let the old brain box 'cook' on the problem till I find a solution, instead of just charging ahead and messing it up. Something I've done more than once without learning from it.

Oh well, such are the challenges of thie hobby I suppose.

Take care and good luck, Sgirty
Plasticbattle
#003
Visit this Community
Donegal, Ireland
Joined: May 14, 2002
KitMaker: 9,763 posts
Armorama: 7,444 posts
Posted: Tuesday, June 22, 2004 - 09:13 AM UTC
Hey Sgirty. You have 3mb of space free here on armorama. If you click on gallery on the left hand column it brings you to the main gallery page. Above where it says "welcome sgirty" (left side) is a link to your own gallery .... you must be logged in.
On the right side there is a link called "upload photos". Here you can load upto 10 photos at a time. they will automatically come into your own gallery. Then as you open each picture there is url below it that you can copy and paste direct into your message. Pretty simple .... give it a go and maybe you can ask more specific questions if you are having trouble. There always loads of people willing to help.
jejack2
Visit this Community
Maryland, United States
Joined: April 09, 2002
KitMaker: 322 posts
Armorama: 0 posts
Posted: Tuesday, June 22, 2004 - 10:24 AM UTC
Well after 3 hours!!! (and a few cuts and superglued fingertips) I managed to add the sparkplug wires, and fuel lines (well as close as I was able to) The pics aren't the greatest, but I'll try again later!


Oh and just a thought about those brake parts, anyone thought about maybe heating them in hot water before bending them? Would this work? Have seen people talk about heating plastic/resin parts in hot water to fix warped parts...just a thought! anyway enjoy.
cfbush2000
Visit this Community
North Dakota, United States
Joined: December 01, 2001
KitMaker: 1,796 posts
Armorama: 1,207 posts
Posted: Tuesday, June 22, 2004 - 02:46 PM UTC

Quoted Text


So, has anybody checked any leads on appropriate figures for this beast? I'll be scoping the net for some 120mm figures for this. I certainly hope I don't have to sculpt my own.
John


Welcome to the club John.
I have done quite a bit of searching on the web for figures with no luck.
Have fun with the kit and keep us posted.
Chuck
cfbush2000
Visit this Community
North Dakota, United States
Joined: December 01, 2001
KitMaker: 1,796 posts
Armorama: 1,207 posts
Posted: Wednesday, June 23, 2004 - 01:12 PM UTC
Hey Guys
Has anyone figured out how to make the top removable? I've been playing with that and found that once the rear plate (with the round access panel) is glued on the fit get a little better . There is no way I'm gonna glue on the hull top and loose all the engine compartment detail.
Now, I need to take a nap. :-)
Chuck
john17
Visit this Community
Wisconsin, United States
Joined: January 23, 2003
KitMaker: 920 posts
Armorama: 3 posts
Posted: Wednesday, June 23, 2004 - 03:22 PM UTC
I see several of you are also toying with the idea of whether or not to leave the top as removable so as to see the interior work better.

I was thinking about this and have decided against doing it. However, I do think I would like to light up the interior with a couple grain of rice bulbs. That would help make the interior more visible through the hatches. I would probably even make the external headlight lit as well.

Do any of you know where any interior lights would be on the t34? I'm assuming they would have had them.

I appreciate any help you can give me regarding this.


Thanks!

John
cfbush2000
Visit this Community
North Dakota, United States
Joined: December 01, 2001
KitMaker: 1,796 posts
Armorama: 1,207 posts
Posted: Wednesday, June 23, 2004 - 04:29 PM UTC

Quoted Text

IDo any of you know where any interior lights would be on the t34? I'm assuming they would have had them.


John,
My main concern is to get a better view of the engine. I think one can see the interior pretty well by removing the turret.
As to lighting, if you look at step 2 of the instructions you will see F18 which is a light panel . This light would be just to the right rear of the machine gunner's seat. There is another light in the turret roof.
My info comes from the panoramic view on the Tamiya T-34 Tank CD-rom.
The ammo boxes on the fighting compartment floor (some think they are batteries ) would be a great place to hine the batteries for the lights.
HTH
Chuck
didiumus
Visit this Community
Utah, United States
Joined: March 18, 2003
KitMaker: 564 posts
Armorama: 312 posts
Posted: Thursday, June 24, 2004 - 09:35 AM UTC
This might help fuel the fires....

http://gallery43349.fotopic.net/c113276_25.html

Really nice pictures, albeit of the -85 model.

Scott Gentry
StukeSowle
Visit this Community
Washington, United States
Joined: November 08, 2002
KitMaker: 599 posts
Armorama: 357 posts
Posted: Thursday, June 24, 2004 - 08:01 PM UTC
Wandered down to my LHS today and they had a couple of these puppies in. The owner let me crack one open and finger it. The thing that hit me first was the sheer size of the thing! It's huge!!

The detail looked so good in person, the cast texture looks realistic, the vinyl tires, the working tracks...oh my. Time to start saving up for a bit. I must have this one.
sgirty
Visit this Community
Ohio, United States
Joined: February 12, 2003
KitMaker: 1,315 posts
Armorama: 0 posts
Posted: Thursday, June 24, 2004 - 11:52 PM UTC
Hi. Thanks jejack2 for showing us the photos of your wiring of the engine. Very nice job. You sure do have some patience there. After seeing the correct way things go, I tore mine down, to some extent, and at least put in the plug wires correctly. Didn't risk fooling with those fuel lines on this one. Maybe I'll try that on one of the /85s later on. I consider myself lucky just to get the motor back together again with out too much damage to it. Ha, ha!

Haven't had much time to work on it lately, but with every little bit I do I find myself more and more infatuated not only with the kit itself, but also with the vehicle in general. Am learning a lot about it through the model, which is the reason I like doing the models to begin with. Even decided to add the Russian rank for a while, just for a change of pace.

Just love this getting older. Get to spend more and more and more time at the various doctor's offices in the area, helping to boost the local economy and that of the West Indies as well, through their vacations. Going to have to get a notebook just to keep track of them all anymore. Ha, ha!

Good luck and take care, Sgirty
cfbush2000
Visit this Community
North Dakota, United States
Joined: December 01, 2001
KitMaker: 1,796 posts
Armorama: 1,207 posts
Posted: Friday, June 25, 2004 - 12:16 AM UTC
sgirty,
I know what you mean about getting older. The changes to vision and dextairity were a factor in buying this 1/16 kit. Now that I've taken the plunge I find I really like larger scale. The big problem will be display space.
Changing to Russian rank is a cool idea. I even got 2 more stars when I did it. I'll keep this rank till I finish the model, which means I may never change back. :-)
Have you painted the engine yet? I started in the fighting compartment and haven't got to the engine yet.
Chuck
sgirty
Visit this Community
Ohio, United States
Joined: February 12, 2003
KitMaker: 1,315 posts
Armorama: 0 posts
Posted: Friday, June 25, 2004 - 04:44 AM UTC
Hi, Yes, I have the engine/fan/gearbox/brakes all done. That's where I ran into the trouble of changing the wiring after the motor was all finished. But I did have some old phone line and the yellow wire inside it was just perfect for the plug wires. I had several pieces on the engine that either came off or broke off while I was changing this, but all went back together with glue and some reinforcement wire super glued inside a couple of them here and there, which, in the end, tended to make those parts stronger anyway.

Also have the inside panels--D1through4--done and weathered. Luckily I found some white auto primer at the local Pet Boys store--under the name of Varsity-- and it gives a really nice finish color. Then all the panels really need is just some detail painting here and there, adding of some little pieces that I can detail paint better if they are off the panel, a seal with Dullcote, and weather. So far I've used a wash of Van Dyck Brown for the general wash and Burnt Sienna for some here-and-there rust stains. Not bad. Although I'm sure some wethering chalks will be needed after it's all together, which is going to be some time down the way.

I really like that white color inside, as it tends to really show off the weathering effects you can put in there.
And I don't think there is such a thing as over-weathering, esp. on a Russian vehicle.

Yes, I don't know where this thing is going to go either. Although I did find some various sizes of plastic storage boxes over to Wal-Mart the other day that just may do the trick, if not for this particular vehicle then for some of the smaller 1/35 kits I've built, which, in turn, will allow some space in my cabinet for the T-34. Something like this is really my only option. And they will also be stong enough for the cats to lay on top of too, without damaging the models inside. No worse enemy to an open and unprotected model than a cat.

Take care, Sgirty
jejack2
Visit this Community
Maryland, United States
Joined: April 09, 2002
KitMaker: 322 posts
Armorama: 0 posts
Posted: Friday, June 25, 2004 - 12:57 PM UTC
Yeah, problems with the plastic parts for the brakes!! I tried heating them in hot water (sorta worked) but after they cooled I realized I put em on wrong. They broke when I took em off. Now I get to go buy a sheet of brass, and makes rivets/bolt heads all weekend to fix it!! Wish me luck!
seyahmit
Visit this Community
Missouri, United States
Joined: March 14, 2004
KitMaker: 51 posts
Armorama: 0 posts
Posted: Saturday, June 26, 2004 - 03:44 AM UTC
I broke one of the brake pieces also. But I was lucky enough that it broke at the bottom of the drum and will not be seen when the gear box is installed.

I have most of the white parts primed and hope to shoot the interior white today. I also hope to have some more pics uploaded this weekend.
cfbush2000
Visit this Community
North Dakota, United States
Joined: December 01, 2001
KitMaker: 1,796 posts
Armorama: 1,207 posts
Posted: Saturday, June 26, 2004 - 06:05 AM UTC
Man! I'm not looking forward to those break pieces guys. I need to get off my butt and shoot the white parts and interior today. I have some ref pics showing the engine compartment as a green color and the front floor a red color. Still trying to decide what to do there.
Chuck
jejack2
Visit this Community
Maryland, United States
Joined: April 09, 2002
KitMaker: 322 posts
Armorama: 0 posts
Posted: Saturday, June 26, 2004 - 08:27 AM UTC
Well, after I managed to break the brakes, I cut the end peices off, and used a strip (same size only little thinner) of sheet styrene to replace the part. Bends much easier!! Now I just have to put the rivets/bolt heads on! After that the engine compartment is done (save for the radiators) Almost time to move up front!!
Will post some more pics soon!!

P.S. This is almost as fun (if not as fun) as a group build! Enough of us are doing it, very cool!!
cfbush2000
Visit this Community
North Dakota, United States
Joined: December 01, 2001
KitMaker: 1,796 posts
Armorama: 1,207 posts
Posted: Saturday, June 26, 2004 - 12:03 PM UTC
I'm looking forward to seeing your pics Jason.
Yep, this is a blast.
Chuck
majorproblem
Visit this Community
England - West Midlands, United Kingdom
Joined: June 27, 2004
KitMaker: 132 posts
Armorama: 0 posts
Posted: Sunday, June 27, 2004 - 05:57 AM UTC
Hi,
I am new here but have found some 1/16 russian tanker figures.
I also have the Trumpeter 1/16 T-34/76 1942 version ordered and have been searching frantically for 1/16 russian figures, which are few and far between.

http://www.japanesearmorking.com/jak3.htm


seyahmit
Visit this Community
Missouri, United States
Joined: March 14, 2004
KitMaker: 51 posts
Armorama: 0 posts
Posted: Sunday, June 27, 2004 - 06:05 AM UTC
Here are some pics of what I have done so far. I sprayed the interior white. I still have a lot of detail painting to do. I also did some dry-fitting to see how things will look.


More pics can be seen in my members gallery or My Website