Armor/AFV: Large Scale
1/16 and Larger Armor Modeling
Hosted by Darren Baker
Amazing T-34 model
cfbush2000
Visit this Community
North Dakota, United States
Joined: December 01, 2001
KitMaker: 1,796 posts
Armorama: 1,207 posts
Posted: Saturday, July 24, 2004 - 01:41 PM UTC

Quoted Text

When I spoke to him 3 weeks ago he was going out to buy the model. Later he wrote that he was going to create a driver for the kit. If that happens I bet we also see some new arms for the existing figures that make them more "tank friendly ".

BTW. Hello I am a lurker who has stuck his head out . I have yet to start my "42" yet. I am finishing up a "40" dragon kit in 1/35 scale.

Later
John


Thanks for the info John. Let us know if you hear any more. And welcome to Armorama. Post some pics when you get the "40" done. I'm working on the "43", slowly, but some of the guys are moving right along.
Chuck
sgirty
Visit this Community
Ohio, United States
Joined: February 12, 2003
KitMaker: 1,315 posts
Armorama: 0 posts
Posted: Saturday, July 24, 2004 - 10:15 PM UTC
Hi Folks, Took my T-34 up to the local hobby shop yesterday and had several favorable comments on it. In fact the owner what's to clear some space and put it on display. So I'm flattered. Anyway, I did go ahead and order the /42 kit. A moment of weakness? Maybe, but I knew that sooner of later I was going to have to have that particular kit in order to make some of the exterior changes I've seen in some of the photos of this particular model year. And I have also been rather anxious to do some of the modifications to the engine, gas tanks, and other such details to the inside as well that you fine modelers are adding to your kits. Thanks for the inspiration there. And besides, the 'boss' said it was okay to get it. H---, can't pass that up!

Hopefully it will be in here in a week or so before I have a little operation on my foot to remove a pesky nerve bundle that I've been fighting for the last couple of years or so. That's going to slow me down for a few weeks, but I told the doctor that as long as I can hobble out to the garage and work on my models and little things like that I'll be a happy camper for that period of time.

Anybody out there have any idea where the internal gas tanks were filled up from the outside of these T-34s? Either I'm missing the obvious, which does seem to happen at least once a day, or they are under something or other. Just curious here. I know these places are quite prominent on the Shermans and the various German machines, so they should be on this one as well, I'd think.

Thanks and take care, Sgirty
majorproblem
Visit this Community
England - West Midlands, United Kingdom
Joined: June 27, 2004
KitMaker: 132 posts
Armorama: 0 posts
Posted: Saturday, July 24, 2004 - 11:27 PM UTC
Hi all,
Sgirty, thanks for the heads up about the powders, I went into a hobby shop over the weekend and purchased about 5 of the MIG powders,... now about to experiment with them, I also nearly had a moment of weakness and purchased the 43 version they had sitting on their shelf!!...but the boss would have spanked me, but is allowing me to get it in about a month :-)
I also placed my order for the resin Tank crew, I have some seated legs ready for manipulation for the driver, so will let you know how I get on with the figures when they arrive.
When I spoke to Ted about 6 weeks ago, he said he had in the past started a seated driver, etc but was too busy to finish them, now he is supposed to have picked up his kit this Saturday, lets hope he finds the time to carry on sculpting the seated figures!

The filling points for the gas and water tanks are underneath the rear deck mantlets, all the diamond shaped fittings with 2 bolts in them, also 4, 1 on each corner of the "turret ring" deck.
The kit does come with 2 redundant pieces on sprue U , I was thinking about opening one up and having gas spilling from it, but dont know if I will?

Forgot I was out all weekend, so no finished interior yet dont want to rush this, so pics will appear in the not too distant future
Carl
majorproblem
Visit this Community
England - West Midlands, United Kingdom
Joined: June 27, 2004
KitMaker: 132 posts
Armorama: 0 posts
Posted: Sunday, July 25, 2004 - 10:07 PM UTC
Well guys, the 85's are out now in Germany by the looks of things.
http://cgi.ebay.co.uk/ws/eBayISAPI.dll?ViewItem&item=3737650882

http://cgi.ebay.co.uk/ws/eBayISAPI.dll?ViewItem&category=13298&item=3738260578&rd=1&ssPageName=WD2V

http://cgi.ebay.co.uk/ws/eBayISAPI.dll?ViewItem&category=13298&item=3738260237
majorproblem
Visit this Community
England - West Midlands, United Kingdom
Joined: June 27, 2004
KitMaker: 132 posts
Armorama: 0 posts
Posted: Wednesday, July 28, 2004 - 09:09 PM UTC
Blimey, no ones posted for days!!
Just thought I'd let you guys know that I have had a response direct from Trumpeter in China concerning ordering seperate sprues, i.e. steel wheels, etc.
They have said that they are quite happy to provide anything required, but due to high shipping costs from china (?..eh?..didn't know they were high!) that they would advise contacting the main distributor for your country first, then if they cannot supply, Trumpeter are happy to directly.

Good news I thought

Carl
sgirty
Visit this Community
Ohio, United States
Joined: February 12, 2003
KitMaker: 1,315 posts
Armorama: 0 posts
Posted: Wednesday, July 28, 2004 - 09:20 PM UTC
Hi, majorproblem,

Glad to hear that there are extra sets of plastic available for this model. You just never know when they may be needed. Can't imagine what the shipping costs on that would be. Very illogical. Hopefully they are, along with others, very busy on making some 'extras' to go along with these kits. Soviet weapons, extra mg drums, tools, etc. Things like that. It would be really nice.

Am waiting to go up this week end to the local shop to see of my /42 is in so I will have something to work on. Been working on Dragon's 1/35 scale 1941 till that time. Just for something to do. Haven't heard anything yet on the /85s being around here in the mid-west, but all in good time, all in good time.

Take care. Sgirty
panamadan
Visit this Community
Minnesota, United States
Joined: July 20, 2004
KitMaker: 1,513 posts
Armorama: 1,449 posts
Posted: Friday, July 30, 2004 - 10:20 PM UTC
Carl, how did you come out with he ammo rack between the front seats? I'm working on the racks in the turret now. Dan
majorproblem
Visit this Community
England - West Midlands, United Kingdom
Joined: June 27, 2004
KitMaker: 132 posts
Armorama: 0 posts
Posted: Saturday, July 31, 2004 - 07:56 PM UTC
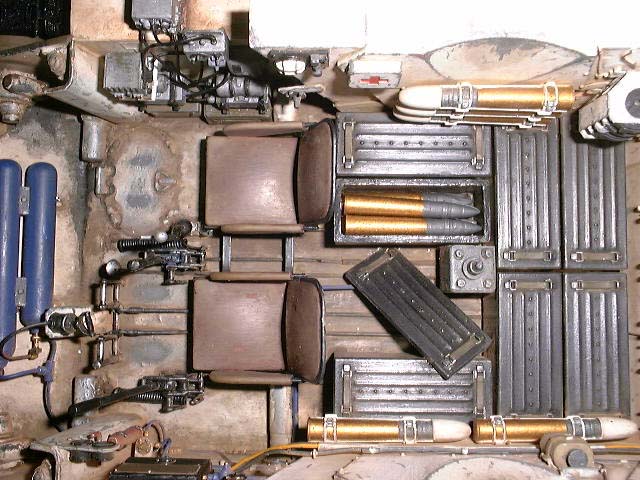
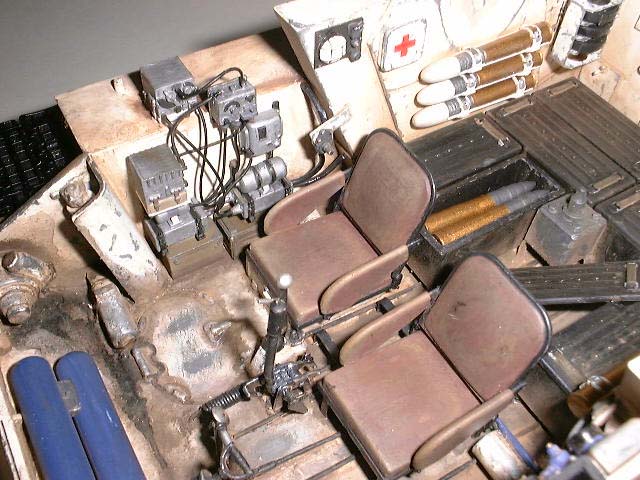
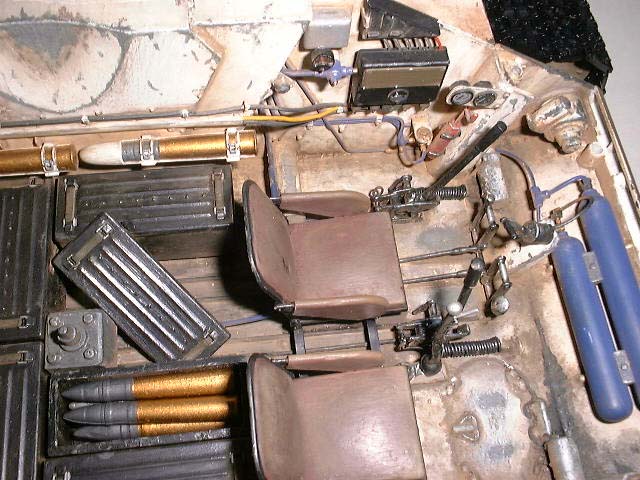
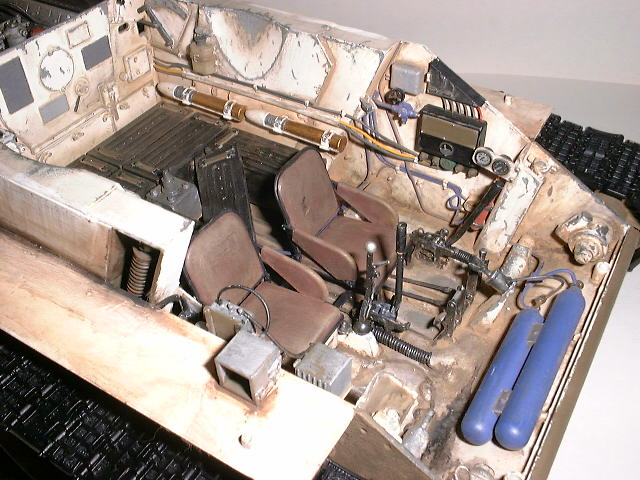
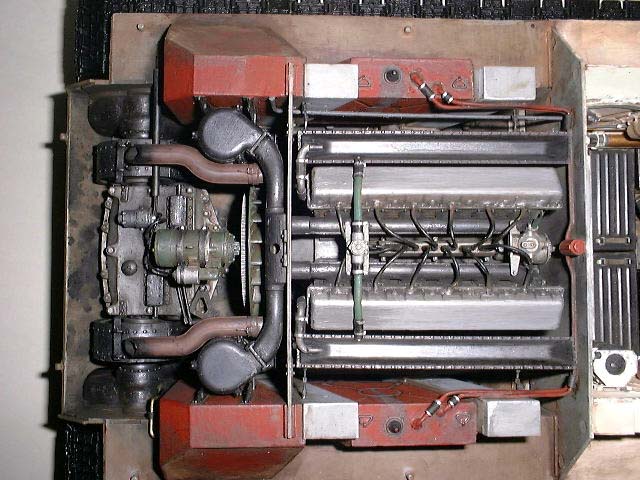
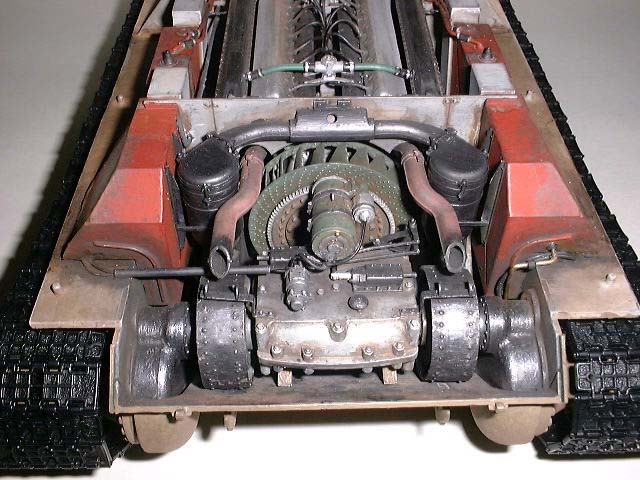
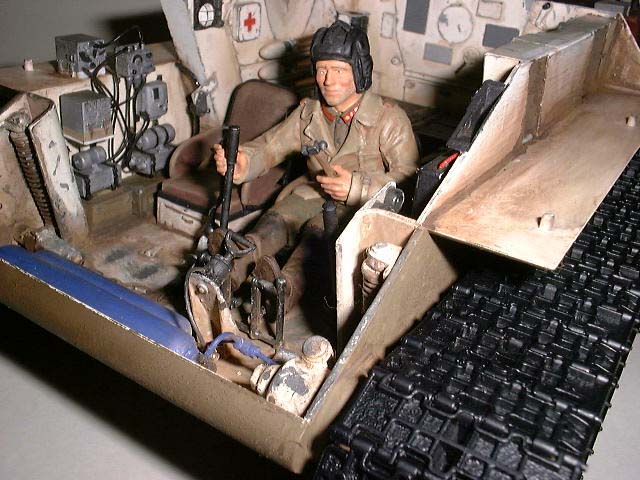
Hi Guys, finally got my interior finished so thought I'd show you some pics, hope you like I got a bit carried away with making it look like its used and abused but I'm fairly happy with the result.
I wont go into details regarding all the mods I've done, however, if your interested, look in my gallery, the pics have a small explanation of mods made.

Dan, I just could not get the MG rack to fit between the seats without moving the seats wider apart, which is something I did not want to do, so I had to give up with it and leave it out!....The mounts are there though :-)

I got the resin tank figures on Friday, should have a pic up of the driver in his seat by the end of today.
I must say the quality of sculpting, casting and resin is all very very good, IMHO maybe even better than Verlinden.
However, the poses do not lend themselves to fit in the 42 version at all! ....so some heavy mod work for the driver has been done, will attack the commander once the turret is finished and I can bring myself to taking the knife once again to an expensive figure


Carl
barron
Visit this Community
Virginia, United States
Joined: December 01, 2001
KitMaker: 666 posts
Armorama: 598 posts
Posted: Saturday, July 31, 2004 - 08:29 PM UTC
That interior is outstanding. Great detail and weathering.
sgirty
Visit this Community
Ohio, United States
Joined: February 12, 2003
KitMaker: 1,315 posts
Armorama: 0 posts
Posted: Saturday, July 31, 2004 - 08:32 PM UTC
Hi, majorproblem: let me be the first to commend you on a job that is most outstanding in detail and workmanship!!!!! An excellent model all the way around.

I especially like how you wired up the radio area there. Very, very nice. And the plumbing for the compression tanks and such. Not to mention the gas tanks and their plumbing too. And great weathering ! Makes mine look rather shabby.

Just picked up you're /42 yesterday afternoon and am looking forward to trying my hand at some of the modifications you've added to your model there. If I can do them half as good as you did I will be more than satisfied with it.

Am going to try to do the outside of this one something like the model shown in Osprey's modeling manual on the T-34s No. 16. They have a real nice one starting on page 16 that I would like to try to re-create as best I can. Plus I want to try to add some additional armor plating to the front and turret sides as I've seen in a couple of pictures in the Squadron/signal book-"T-34 in Action."

Have you, or anybody you know of seen the book "T-34- Mythical Weapon" by Robert Michulec yet? I see Air Connection is listing it as a comming thing and I was just wondering if anybody over in your area over there has come across it yet? It looks like it might be worth getting if I can find some feed-back from anybody who has actually seen it.

Anyway, again congratulations there and am looking forward to seeing you fine workings on the exterior as you move along.

Take care, Sgirty
SpiritsEye
Visit this Community
Singapore / 新加坡
Joined: May 09, 2004
KitMaker: 1,041 posts
Armorama: 533 posts
Posted: Sunday, August 01, 2004 - 12:58 AM UTC
great job on the interior!

for a moment i thought i was looking at the REAL thing

keep us posted!
majorproblem
Visit this Community
England - West Midlands, United Kingdom
Joined: June 27, 2004
KitMaker: 132 posts
Armorama: 0 posts
Posted: Sunday, August 01, 2004 - 03:55 AM UTC
Hi,
Thank you guys for the very kind comments

Sgirty, I was thinking the same about your model!!...i.e. if mine ended up half as good as yours I'd be well happy

I intend doing my model in the green and brown autum colour scheme as I have never seen a model done to date in this scheme and I have plenty of picture references for it......just think it will make a novel change, my 43 and 85 versions can go all green :-)

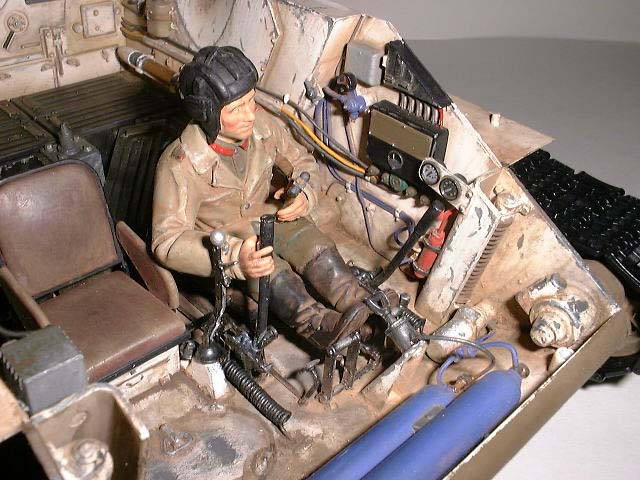
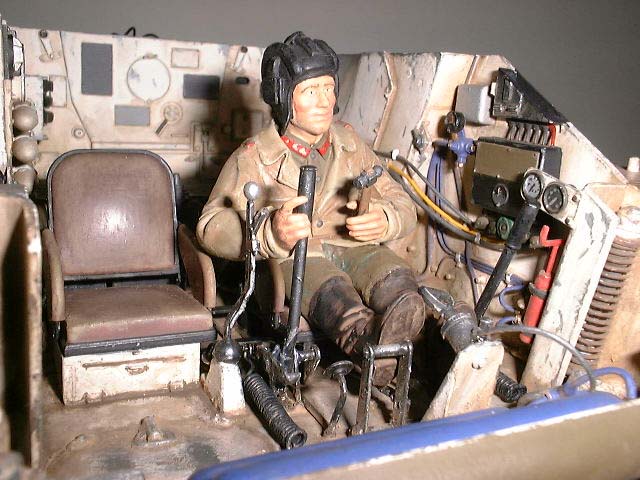
Have attached pics of my remodelled driver, hell of a lot of work and had to turn him into midget monkey boy to fit him in, but I don't think he looks too bad proportionally now hes in there.
I put the hammer in his hand because I have read that a great deal of the time they had to hammer the controls as they were so stiff:-)


Hope you like.

P.s. Sgirty, I have not heard of the book, I am trying to ring someone who has lent me many books on the T-34 (I also have my own) to see if he knows anything.
One book which he has lent to me is all in russian, but fantastic pictures!...My keyboard does not do russian text, so I couldnt type the name of it! :-)

Carl
cfbush2000
Visit this Community
North Dakota, United States
Joined: December 01, 2001
KitMaker: 1,796 posts
Armorama: 1,207 posts
Posted: Sunday, August 01, 2004 - 04:59 AM UTC
Carl,
Outstanding! I like the hammer. Nice touch.
What color did you paint the floor. It is very close to a pic I have.

NEWS: I found a brass barrel. http://brassbarrels.com

I don't know if this has been posted or not.

Chuck
sgirty
Visit this Community
Ohio, United States
Joined: February 12, 2003
KitMaker: 1,315 posts
Armorama: 0 posts
Posted: Sunday, August 01, 2004 - 06:43 AM UTC
Hi, majorproblem: I think your 'monkey boy' fits really well in there. Looks really good. Yes, it seems that I've also heard someplace that hammers were used by the crews to help in them steer the tank and shift its gears. Leave it to the Russians to come up with the simple. "If it dont fit, force it." Ha, ha.

Spent the afternoon drilling little bitty holes in the various engine parts to accept the various wirings for the fuel lines and such on the /42. Have about half of them done now.

I saw on the advertisement for that book on the Air connection site where it looked like there was a 'line' running from the bottom of the shifter around and towards the front of the vehicle. Heard somewhere that the compression tanks up front helped in the shifting of the trans. and was wondering if maybe this 'line' was for that. I assume the extra bit of line you have going back across to the trans. is for that very thing. Is this correct?

Yes, your two-tone paint plan sounds like it will be really nice. They have one on the front cover of Squadon's book and it stands out very nicely, compared to the drab overall green.

The owner of the hobby shop said he was getting one of the /85s to try himself and is going to add those 'bedsprings' to the side of his to represent some of the vehicles in Berlin. Now that would be impressive. Have also seen pictures of these vehicles running around minus a road wheel with the tracks having quite a pronounced sag in this missing area as well. I wonder if the plastic 'axles' of this model in any way represents the axles of the real vehicle? An interesting idea nonetheless.

I see by your latest pics that you have painted in those two dials by the driver . Very impressive work! Is that a spring laying on the floor between the seats? Was this in the kit or is this something you added on your own? Just curious.

Got to love that radio wiring there. Just great!

Take care, Sgirty
majorproblem
Visit this Community
England - West Midlands, United Kingdom
Joined: June 27, 2004
KitMaker: 132 posts
Armorama: 0 posts
Posted: Sunday, August 01, 2004 - 07:35 AM UTC
Thanks again guys
Chuck, I painted the floor,...er..white!
Well, it was to start with honest!...then just about every kind of brown, wash, mottling, spilling and dusting, then a bit of dry brushing for the worn feet areas in front of the seats.

Sgirty, I really do not know is the honest answer regarding the co2 line!
From the many pictures I have looked at, it does appear to be the line and is how I've modelled it, but could be wrong.
I also noticed that the suspension arm pivot points run much further inside the hull than in the Trumpeter version, so adjusted them accordingly where they are seen inside (this is the part that the co2 line runs partly along behind the drivers seat).
I would hope the Trumpeter suspension arms are the same as the real life ones.

The 2 springs attached to the driver control sticks are made from piano wire, nearly took my eyes out 4 times when it kept springing back when winding them!!
Then once I drilled them in place, I realised they have a small L section mount!...DOH!...not to mention I put the foot pedals in backwards!! ...u werent supposed to notice that!
All learning experience for the next 1 to be better :-)
cfbush2000
Visit this Community
North Dakota, United States
Joined: December 01, 2001
KitMaker: 1,796 posts
Armorama: 1,207 posts
Posted: Tuesday, August 10, 2004 - 11:19 AM UTC
Wow!
Did we all burn out? I guess I did, but my brass barrel arrived today, so I may start working on it again.
How's everyone else doing?

Chuck
majorproblem
Visit this Community
England - West Midlands, United Kingdom
Joined: June 27, 2004
KitMaker: 132 posts
Armorama: 0 posts
Posted: Wednesday, August 11, 2004 - 12:50 AM UTC
I was wondering the same thing?!
I am still in the middle of doing the exterior, so no more pics until its all finished. Theres just soooo much to it, I cant believe how long it is taking....certainly good value for money.

I have been wondering if anyone has done their interior turret colour correctly by painting it gloss white rather than matt?....There is no way I was going to attempt painting it gloss, but it would be good to see pictures of anyone who has done so....er...of the turret not of them!

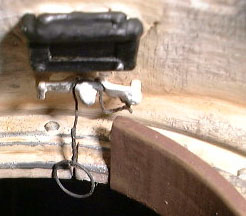
The only new pic I have is of a small mod for the wire fixing for the pistol port below:


It was interesting to see someone had entered one of these in the IPMS Nats

http://www.ipmsslc.com/photo/displayimage.php?album=64&pos=444

Carl
Hisham
Visit this Community
Al Qahirah, Egypt / لعربية
Joined: July 23, 2004
KitMaker: 6,856 posts
Armorama: 6,363 posts
Posted: Wednesday, August 11, 2004 - 02:07 AM UTC
Luckymodel.com sells them for $69.99 plus $41.85 air shipping to the US.. a total of $111.84. How come your paying $160 for them?

http://www.luckymodel.com/default.aspx?item_no=TP00903

StukeSowle
Visit this Community
Washington, United States
Joined: November 08, 2002
KitMaker: 599 posts
Armorama: 357 posts
Posted: Wednesday, August 11, 2004 - 05:30 AM UTC
Woah, thanks for the link. If you are really patient, you can go with surface mail and get it for under a $100!
jejack2
Visit this Community
Maryland, United States
Joined: April 09, 2002
KitMaker: 322 posts
Armorama: 0 posts
Posted: Wednesday, August 11, 2004 - 07:54 AM UTC
Wow, not even halfway done with my '42 and just picked up my 34/85 on Monday! now I have 2 to build. Great pics of the interior guys, I'm trying to scratch a little more detail for mine also. Will post some pics as soon as I'm able! Keep em coming!
sgirty
Visit this Community
Ohio, United States
Joined: February 12, 2003
KitMaker: 1,315 posts
Armorama: 0 posts
Posted: Wednesday, August 11, 2004 - 08:54 AM UTC
Hi Folks, Thanks majorproblem for that picture on the inside viewing port in the turret of your /42. Looks really good.

Does anybody out there know about how to do any extra wiring on the eletrical unit --S26/29-- pieces up on the turret wall there? Just curious here, as I've seen no reference pics on this piece.

Just finished putting a shot of Dullcote on the engine and flywheel of the /42 kit today. Went ahead and added as much wiring as I could to this thing. Most of it from photos and a tad bit of Shep Paine's good old "gizmology" here as well. The other day I added some .010" plastic sheet strips to the outside of one of the turret wall pieces for that added touch of 'extra armor plate.' Now just waiting for some Milliput to come in to try my hand at those 'weld lines.'

Found a roll of 18 gauge cooper wire to make the new grab handles that I've seen on the outside of some of the photos of the /42s as well. There's hardly any of these included in the kit of the /42 except for the 4 small ones on the engine deck.

It's all coming along rather slowly. Anybody found out just exactly what is the differences between the two /85 kits coming out are?

Take care everybody and continued good success on your kits. Sgirty
panamadan
Visit this Community
Minnesota, United States
Joined: July 20, 2004
KitMaker: 1,513 posts
Armorama: 1,449 posts
Posted: Wednesday, August 11, 2004 - 11:29 AM UTC
I believe that one has a two-piece TC hatch, and a bulge for the electric turret motor. Dan
majorproblem
Visit this Community
England - West Midlands, United Kingdom
Joined: June 27, 2004
KitMaker: 132 posts
Armorama: 0 posts
Posted: Thursday, August 12, 2004 - 02:56 AM UTC
SGIRTY, try http://afvinteriors.hobbyvista.com/t34/t34b.html

Does anyone with the 85 version know if you can get the turret without the traverse motor bulge and single piece comanders hatch. i.e. Mickey Mouse ears, or is the only way of getting the flat turret version by having to have the split commanders hatch?

Carl
cfbush2000
Visit this Community
North Dakota, United States
Joined: December 01, 2001
KitMaker: 1,796 posts
Armorama: 1,207 posts
Posted: Friday, August 13, 2004 - 01:06 AM UTC

Quoted Text

I have been wondering if anyone has done their interior turret colour correctly by painting it gloss white rather than matt?....


I haven't got to that yet, but my plan is to paint it flat white, them give it a couple of coats of Future to get the gloss. I agree,I have no interest in trying to spray gloss white.

Chuck
panamadan
Visit this Community
Minnesota, United States
Joined: July 20, 2004
KitMaker: 1,513 posts
Armorama: 1,449 posts
Posted: Friday, August 13, 2004 - 04:25 AM UTC
How about satin white?