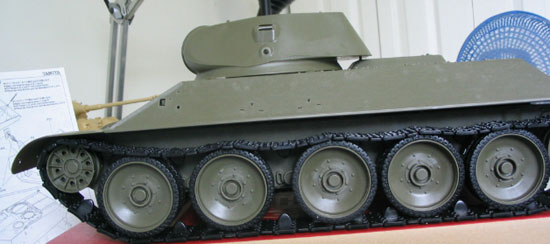
Armor/AFV: Large Scale
1/16 and Larger Armor Modeling
Hosted by Darren Baker
Amazing T-34 model
sgirty
Visit this Community
Ohio, United States
Joined: February 12, 2003
KitMaker: 1,315 posts
Armorama: 0 posts
Posted: Sunday, June 27, 2004 - 06:42 AM UTC
Hi, seyahmit. Some fime workmanship there. Looks like it's all starting to come together for you. It seems the more a person does to this kit the bigger it tends to become. Or maybe this is just me.

I painted the inside of mine a primer white yesterday and am just now starting to glue in the forward two inside panels, connecting up their springs to the axles on the other side of the hull. Also have started to clean, paint and install all the little other items located in the front compartment as well. I really wanted to slap those batteries in right off the bat, but figured I had better wait to make sure I have enough 'elbow room' to get all those little parts in the front first.

Hopefully, once the 'front' of it is done, I can go ahead and put in the engine, trans. and other side panels for the last time. So far I've had them in and out several times and haven't broken anything yet.

Have the radiators hooked onto the rear two side panels as well, so hopefully all this will fit together, just one more time. Ha, ha!

I'm thinking the real 'key' to this model is going to be in the weathering department, esp. on the inside. Since there's so much size to this thing, weathering may take on a whole new aspect here , as compared to 1/35. Unfortunately, this is something I haven't had all that much experience with, other than some oil washes and light dry-brushings.

Am thinking about getting some of those weathering powders and giving them a try on a couple of the outsides of the Dragon 1/35 T-34s first to see how they do and how to work with them before trying them inside the biggy here.This is going to take some planning and practice to get it to have a 'lived-in' look.

I've found just by lightly washing the 4 side panels with Van Dyck Brown oil, that no matter what kind of weathering a person puts inside, it is ALL going to stand out like a big brass band, what with that white base to just about everything. But in a way this may be good, as it won't take too much of any kind of weathering technique to really make a big difference in the general overall looks in there.

A person could make and stuff in some blankets and bed rolls in some 'blank' spots if they had a mind to. Wonder if the old method of rolled, tied, and painted tissue paper for this would look okay, scale wise here?

Take care and good luck, Sgirty
E23C
Visit this Community
Ontario, Canada
Joined: January 23, 2002
KitMaker: 238 posts
Armorama: 142 posts
Posted: Monday, June 28, 2004 - 04:00 PM UTC
Well after reading all the posts from you guys building the big T-34, I went and ordered the T-34 1943 I realised this will be the ultimate T-34 kit so i might as well get it since I am a bit of a T-34 "Nut" and do like building them in 1/35th,might as well build one in a scale where I can see all the parts!

Have a good one

Mark
VenomOrca
Visit this Community
Illinois, United States
Joined: June 20, 2003
KitMaker: 209 posts
Armorama: 169 posts
Posted: Monday, June 28, 2004 - 09:17 PM UTC
Greetings all...

Excellent thread by the way..


I have a few questions here.

What did Trumpeter leave out of the kit?, as in not being practical to put in the model.

Im guessing some of the wiring is not there, but how about ammo racks for the 76 shells in the back of the turret. Did they keep shells there? And are those black boxes in the hull floor batteries or shell boxes?

Please excuse my noob-ness here, but im currently building one of these beauties and would like to put as much detail as i can into the thing...like wiring. Can anyone offer me some tips and advice?

I have never tackled anything this big before, but i want to turn this thing into a gem...not that it isnt already.
MrMox
Visit this Community
Aarhus, Denmark
Joined: July 18, 2003
KitMaker: 3,377 posts
Armorama: 1,088 posts
Posted: Monday, June 28, 2004 - 10:11 PM UTC
On the early models - 40-43 - the rounds was stored in the hull on the floor in black/dark gray ammoboxes.

The turrets was way too small for anything but some MG-mags.

sgirty
Visit this Community
Ohio, United States
Joined: February 12, 2003
KitMaker: 1,315 posts
Armorama: 0 posts
Posted: Monday, June 28, 2004 - 10:28 PM UTC
Hi, VernomOrca: I'm sure there are many, many small details that are left out of the kit. If they had added everything they found on the real one they took this kit from , the prices would have been well over $500, maybe close to $1,000. And that's not practical from a manufacturer's viewpoint. So they chose what's the most outstanding features and let it go at that.

I was under the impression that the black boxes on the floor were batteries, but at the moment I can't really find anything that says they are such or ammo boxes. Seems like ammo boxes would be the most logical choice here, as there are only those 5 rounds on the front inner panels provided, plus 2 seperate rounds. I'll go with ammo boxes.

I see there is an after-market maker who already has an aluminum barrel out for this kit, so I would have to bet that it won't be too long before we're going to see a big PE set from either Aber or Eduard for this model(s). Maybe even a super detail set much like what Aber made for Tamiya's 1/16 sclae Tiger. And who knows what else as time goes along.

The inside of the turret in back has nothing but mg racks in the kit. Hopefully somebody will run across some diagrams hidden in some remote place with some detail photos of the interior of one of the machines and shoot them out across the Net. But until then I'd say if you want to add extra wiring or other such details here and there you'll have to use a little of Shep Paine's 'gizmology.' Although I'd have to say that the interior as it stands now is pretty darn 'busy'
in there. Maybe an additional bedrool or blanket in one or two places would pretty much fill things up.

Good luck and take care, Sgirty
seyahmit
Visit this Community
Missouri, United States
Joined: March 14, 2004
KitMaker: 51 posts
Armorama: 0 posts
Posted: Tuesday, June 29, 2004 - 12:38 AM UTC
The boxes on the floor are ammo boxes. AFV Interiors has some good pics of the boxes and ready rounds stored on the walls.

http://afvinteriors.hobbyvista.com/t34/t34a.html

majorproblem
Visit this Community
England - West Midlands, United Kingdom
Joined: June 27, 2004
KitMaker: 132 posts
Armorama: 0 posts
Posted: Tuesday, June 29, 2004 - 03:41 AM UTC
Apparantly the ammo boxes on the floor were covered by a rubber floor mat, which was rolled back or up to access the boxes.
It might by a nice idea to try to include this rolled back, with an ammo box lid open displaying more ammo?!

Got my 1942 model today, WOW!!
Most impressed, although a couple of points struck my attention.
1 some of the plastic seems quite rubbery, such as the turret top pannel. 2 very disapointed that the main turret hatch is only glueable in open or closed positions, it would have been a good feature to have this hatch working.
I got the 1942 version as the turret hatch is so large, it displays more of the interior when open, so a working hatch would have been a cool feature.

Other than that, I'm well impressed overall.
This will be my first model in around 3 years, so am now trying to remember how I used to do everything!!
TankCarl
Visit this Community
Rhode Island, United States
Joined: May 10, 2002
KitMaker: 3,581 posts
Armorama: 2,782 posts
Posted: Tuesday, June 29, 2004 - 03:54 AM UTC
Those photos of the driver's compartment are very helpful.I am surprised they used compressed air to start the diesel engine.So,1 detail to add would be the compressor near the pedals.and then plumbing back towards the engine area.
Aitch
Visit this Community
England - South West, United Kingdom
Joined: April 19, 2002
KitMaker: 138 posts
Armorama: 0 posts
Posted: Tuesday, June 29, 2004 - 04:46 AM UTC
Using compressed air to start a vehicle makes good sense in Russia. A diesel will start in any temperature where the fuel is liquid enough to go through the injectors - diesel will turn into candle wax at round minus 30 degrees centigrade or so...
The compressed air will turn the engine at any temp where the block isn't cold welded - and get the injectors going, the glow plugs are dynamo powered so everything will crank up and run.
With a battery there's always a danger that there won't be enough volts to turn the engine for long enough
One thing that a lot of Russians did carry in winter was an old helmet and a bottle of petrol.
Put a small amount of petrol in the upturned helmet, together with a mess tin of water - throw in a match - engine thawed out enough to start and enough warm water for a shave. :-)
jejack2
Visit this Community
Maryland, United States
Joined: April 09, 2002
KitMaker: 322 posts
Armorama: 0 posts
Posted: Tuesday, June 29, 2004 - 06:29 AM UTC
Still haven't had a chance to upload any pics yet. But, I did get around to "mocking" up the suspension/roadwheels/tracks, and I must say those were the easiest Indy-link tracks I have ever built!! I don't care much that they aren't perfectly accurate (cuz they clip/snap together) but I am willing to sacrifice that little detail to have nice working indy-links!! Hopefully I can get some pics up tonight!
Plasticbattle
#003
Visit this Community
Donegal, Ireland
Joined: May 14, 2002
KitMaker: 9,763 posts
Armorama: 7,444 posts
Posted: Tuesday, June 29, 2004 - 10:05 AM UTC

Quoted Text

I'm thinking the real 'key' to this model is going to be in the weathering department


Totally agree and after seeing the model displayed on missing links yesterday ... the proof is in the pudding as they say. Take a look at this interior with some excellent wiring. If anybodies not sold yet, this will definately push them into buying it.

Chris Löffelmann“s 34/76
cfbush2000
Visit this Community
North Dakota, United States
Joined: December 01, 2001
KitMaker: 1,796 posts
Armorama: 1,207 posts
Posted: Wednesday, June 30, 2004 - 01:32 AM UTC
MG Ammo racks

Has anyone done these yet? Last night I started fitting the parts to the first one. How would you do this, CA glue or solder? If solder, do you need to use flux on the pe?
Thanks
Chuck
sgirty
Visit this Community
Ohio, United States
Joined: February 12, 2003
KitMaker: 1,315 posts
Armorama: 0 posts
Posted: Wednesday, June 30, 2004 - 02:07 AM UTC
Hi, I definitely agree here Plasticbattle. These photos will surely add to the sales potential of this kit. Except for the wiring on the engine, radio equipment, and 'plumbing' for the air tanks up front, everything else it included in the kit.

cfbush2000: The only mg rack I've put together so far is the one that goes on the side panel by the machine gunner's position. It went together very easily with CA. And stayed together during the weathering process I've done on it so far. Plus adding some of the mg magazines inside would tend to 'reinforce' them as well. But sodder would surely make the bonding of these items stronger.

Think it would be just a personal call here, one way or the other.

I have a question on painting the tracks. I've heard that some modelers paint these black first before starting their weathering process.

About the only way I've done tracks before is by giving them a good spraying of red auto primer and then start weathering. But I was wondering if the 'black' to start with may not be a better way to go, esp. with this scale and all? Just wondering what others experiences here have been.

Thanks and take care, Sgirty
cfbush2000
Visit this Community
North Dakota, United States
Joined: December 01, 2001
KitMaker: 1,796 posts
Armorama: 1,207 posts
Posted: Wednesday, June 30, 2004 - 02:34 AM UTC

Quoted Text


I have a question on painting the tracks. I've heard that some modelers paint these black first before starting their weathering process.


I just posted 3 pics of the tracks on a 1:1 T-34 ARV (I'm planning one in 1:35). These tracks are grey. You'll also notice the waffle pattern tracks tended to collect the dirt/gravel/ect that they went thru in the track pattern.


The other two are in my gallery.
Chuck
husky1943
Visit this Community
Florida, United States
Joined: March 17, 2004
KitMaker: 1,305 posts
Armorama: 591 posts
Posted: Wednesday, June 30, 2004 - 09:08 AM UTC
Ciao,
I notice that Squadron is carrying both the 76's (1942 and 1943.) Both for 150.97 USD.
Ciao for now
Rob
animal
Visit this Community
Joined: December 15, 2002
KitMaker: 4,503 posts
Armorama: 3,159 posts
Posted: Wednesday, June 30, 2004 - 10:53 AM UTC
The photos and reviews that I have seen here makes it very tempting to want to build this kit. I love all the detail shown and I think that even a non armor builder could have a great time with these kits. Thanks for sharing all teh info. This is a very interesting forum.
jejack2
Visit this Community
Maryland, United States
Joined: April 09, 2002
KitMaker: 322 posts
Armorama: 0 posts
Posted: Wednesday, June 30, 2004 - 11:51 AM UTC
Anyone building this reached the point of glueing the "adjustable" idler arm on? The instructions say to use 36 of each link per side. Tried this, but the tracks are WAY too saggy, no matter where you put the idler arm. So I removed 2 of the links (one of each) and put the idler arm in a position to generate the "correct" amount of sag to the tracks. Now (after having installed the front fender) my tank looks funny, too much space between the front idler wheel and the front of the fender. I tried cutting off the idler arm and glueing it back on in a different position, but still couldn't get the "recommended" 36 (of each) links to work. So I glued it back in the original position, and it still looks kind of "off". Anyone else having this problem? I'll try to upload a pic with the fender in place, tomorrow.
cfbush2000
Visit this Community
North Dakota, United States
Joined: December 01, 2001
KitMaker: 1,796 posts
Armorama: 1,207 posts
Posted: Wednesday, June 30, 2004 - 12:39 PM UTC
I'm not there yet Jason. I'm interested to see your picture.
Chuck
cfbush2000
Visit this Community
North Dakota, United States
Joined: December 01, 2001
KitMaker: 1,796 posts
Armorama: 1,207 posts
Posted: Wednesday, June 30, 2004 - 12:42 PM UTC

Quoted Text

The photos and reviews that I have seen here makes it very tempting to want to build this kit. I love all the detail shown and I think that even a non armor builder could have a great time with these kits. Thanks for sharing all teh info. This is a very interesting forum.


Hey Animal!

Grab a kit and join us. We won't tell any of the softskin guys, heck, I'm one myself.

With your scratchbuilding skills you could really trick this thing out.
This kit is a great build, we're having a blast. Come on, you know you want to.

Chuck
sgirty
Visit this Community
Ohio, United States
Joined: February 12, 2003
KitMaker: 1,315 posts
Armorama: 0 posts
Posted: Wednesday, June 30, 2004 - 01:41 PM UTC
HI, jejack2. I had just mounted my roadwheels tonight to mine. I swore and be damed that I wouldn't do this till I had the inside totally done and weathered, but temptation got the better of me. Ha, ha! Just had to see what this thing looked like with the wheels on it sooner than I originally thought I wanted to. Hope the model gods do not take offense.

After I read your post I went out and tried the tracks and idler on this kit and sure enough, I had to remove one complete link to get the proper sag, and this with the idler adjusted out to the max. extension allowed.

Went ahead and put the hull top on and attached the front fender just to see what you are talking about here and I agree, that fender does tend to stand out there a fair amount beyond the idler/track and hull nose pieces.

So I spent some time glancing through some of the books I have on this vehicle and I get the impression that some of these rounded fenders did tend stick out farther on some tanks than others. Can't say if this was because of the track adjustment on the particular vehicle pictured or may some factories tended to make their fenders naturally longer than others did. I'm guessing a combination of both of these factors.

I'm thinking about doing a bit of 'damage' to the ones on this model anyway, and if they stick out a little too much for your taste, you could bend or tear them up a bit here and there to 'collapse' this distance down to something you like better. Or remove them completely to show off that track. Just a suggestion, for what it's worth.

Good luck and take care, Sgirty
jejack2
Visit this Community
Maryland, United States
Joined: April 09, 2002
KitMaker: 322 posts
Armorama: 0 posts
Posted: Thursday, July 01, 2004 - 01:37 AM UTC
Yeah, that's what I was considering Sgirty, leaving the fenders off. I have a book of WWII Russian Tanks, and most of the pics of the T34s have no front fenders. Just trying to figure out how to fill the holes (for the fenders) without ruining the cast job on the hull. Back to work!!!
sgirty
Visit this Community
Ohio, United States
Joined: February 12, 2003
KitMaker: 1,315 posts
Armorama: 0 posts
Posted: Thursday, July 01, 2004 - 01:57 AM UTC
Hi. Just an idea here, but if you're considering leaving off the fenders altogether, you could just cut off that little section that has the bolts on it and put this on the vehicle, that way you won't have to worry about filling in those holes, except for that little slot down on the front of the vehicle. In fact you could just cut the whole fender straight across and still have that little section of the fender left on where the tow shackles go as well, plus those two little bolt details there.

I've noticed in Squadron's 'T-34 in Action' book that there are all kinds of pictures on how these front fenders are torn and mashed up, so a little experimenting with them could pay off quite handsomely for the added 'damage' effect in this area, even if you decide to leave just one on.

Godd luck and take care, Sgirty
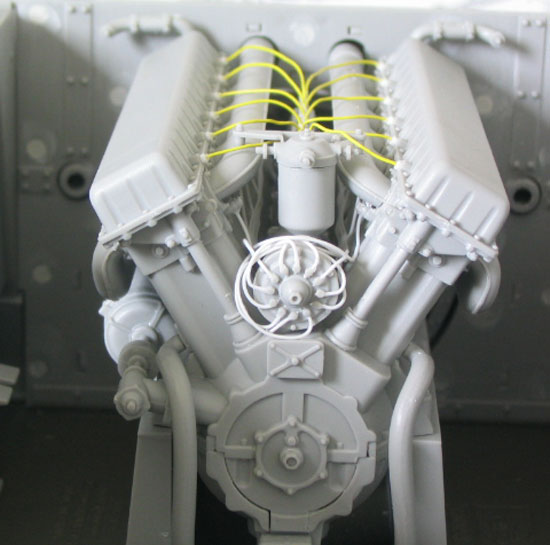
majorproblem
Visit this Community
England - West Midlands, United Kingdom
Joined: June 27, 2004
KitMaker: 132 posts
Armorama: 0 posts
Posted: Thursday, July 01, 2004 - 04:18 AM UTC
Come on guys, lets see some more pics of works in progress ppllleeaassee!!

I too had intended to leave off one front fender and bend the other....after reading the last few posts, I have dry fitted the fender and front idler in all positions it could go, and it didn't seem to far inside the fender to me?

I have started my build with the main gun and hope to get a few pics up within the next week (time allowing!)
A couple of points I have found.(1942 model)
1. If you want your gun to move up and down, a fair amount of the teeth on the elevation wheel cog need to be trimmed off, otherwise the gun will be stuck fast in the cog teeth.
I have trimmed these down only on the cog wheel (attached to the turret) and not on the semi circular piece (piece attached to the gun), this now allows a nice "click" into position on any elevation.
2. I have decided to not glue the main barrel to the runner, this now allows recoil action if desired.
After having so many 1/16 1/15 full R/C models, I tend to like things to work, its a bit of a personal pet hate having to have things glued into position if they are supposed to move.
I also intend to make working hinges for the turret hatch, although I fear they will not be correct to scale, I would rather it works.(artistic licence! )
I just do not understand why Trumpeter made the drivers hatch to work, yet not the turret hatch?!!

It may seem I am nit-picking and I probably am, however, although the kit does have floors, (including poor fit of some parts) its still HELL OF A LOT OF KIT FOR YOUR MONEY and nothing a modeller with a bit of experience could not handle or correct.

I will certainly be tempted to buy the 1943 version after this one!

Carl
jejack2
Visit this Community
Maryland, United States
Joined: April 09, 2002
KitMaker: 322 posts
Armorama: 0 posts
Posted: Thursday, July 01, 2004 - 05:52 AM UTC
Well at long last, some of the pics I promised (5 in all, formatted for the web so they shouldn't take long to dnld)


sgirty
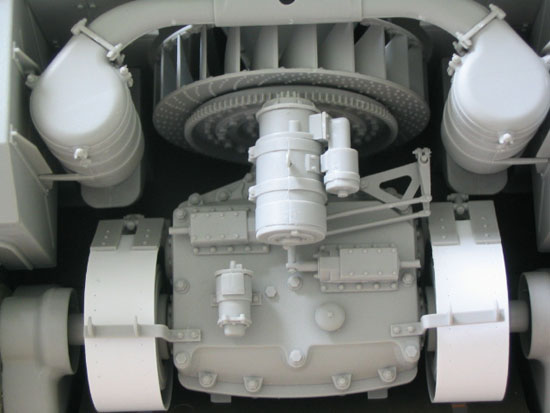
Visit this Community
Ohio, United States
Joined: February 12, 2003
KitMaker: 1,315 posts
Armorama: 0 posts
Posted: Thursday, July 01, 2004 - 11:49 PM UTC
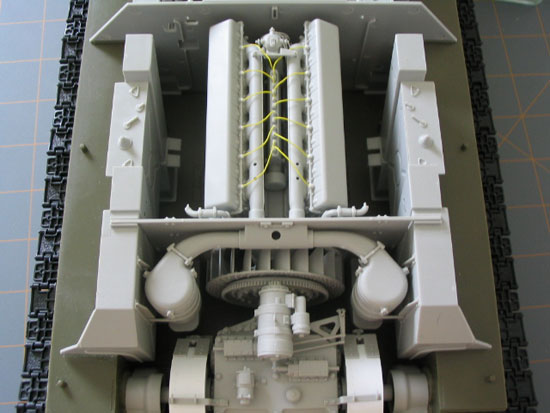
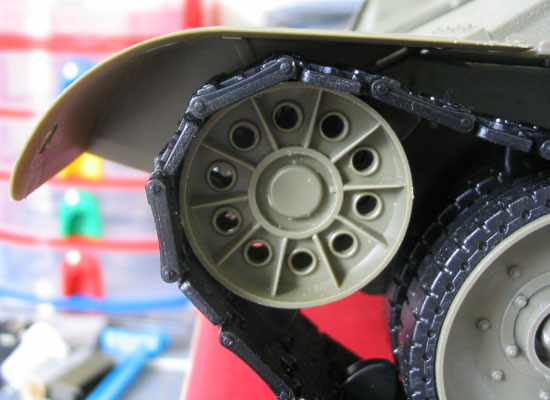
Hi, Okay guys, I've been fooling around this this d--- mahcine for 2 days, on and off, trying to figure out how to put photos in it and I did get 3 in my gallery of this vehicle. I don't know HOW I did it and my never be able to do it again.

Take care, Sgirty