Gauteng, South Africa
Joined: December 14, 2006
KitMaker: 181 posts
Armorama: 159 posts
Posted: Wednesday, March 14, 2007 - 09:08 PM UTC
looking good there hey...
i've got a JGSDF Light armoured vehicle that i've just started painting.
there is still a lot of weathering to be done, and ofcourse the figures need to be painted.
i need advice though, when i do the dusting on the vehicle, must i put the Decals on before i do the first coat or after.(because i'm going to do atleast 4 or 5 coats of dusts, and i'm worried it will cover up the decals too much.

Virginia, United States
Joined: May 09, 2006
KitMaker: 1,349 posts
Armorama: 1,267 posts
Posted: Thursday, March 15, 2007 - 01:48 AM UTC
Wouldn't dust cover the decals too? Just do it like the real thing, paint and decals, then wear and tear, then environmental dust/mud etc...

On the bench:
Cyber Hobby Ferdinand (88 campaign)
1/350th Dragon USS Ticonderoga
Eduard 1/48 F6F-3 Hellcat

#041
Kobenhavn, Denmark
Joined: July 20, 2006
KitMaker: 10,069 posts
Armorama: 4,677 posts
Posted: Thursday, March 15, 2007 - 02:25 PM UTC
@Gijs: Thanks for the comment

Quoted Text
i need advice though, when i do the dusting on the vehicle, must i put the Decals on before i do the first coat or after.(because i'm going to do atleast 4 or 5 coats of dusts, and i'm worried it will cover up the decals too much. 
I would basicly finish the vehicle with all details and decals before you start weathering. As already said dust would cover the markings to the same extent as the rest of the vehicle.
Campaign'oholic - 252+ campaigns completed
Virginia, United States
Joined: July 17, 2006
KitMaker: 1,558 posts
Armorama: 1,159 posts
Posted: Sunday, March 18, 2007 - 06:36 AM UTC
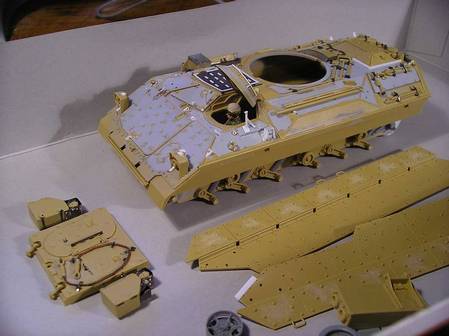
Well, I finally got some time this weekend to work on my M113A3. Here are some in-progress pics of it.


I still haven't decided if I want the commander's hatch open or closed. There is no interior, but I like the way the track looks with an open hatch. What do you guys think--should I leave it open despite it having nothing to show on the inside except bare plastic?
I'm also not sure if I want to use the side stowage racks I scratchbuilt for this kit. They look good (you can check them out
here ), but they may hide the paint scheme I wanted to use (showing the standard green color on the hull where the side skirts were removed). Again, what do you guys think? Boy, I guess I'm very indecisive about this build...


#041
Kobenhavn, Denmark
Joined: July 20, 2006
KitMaker: 10,069 posts
Armorama: 4,677 posts
Posted: Sunday, March 18, 2007 - 01:00 PM UTC
Hi Lucas
Looking good so far. You have a very nice clean build there. Dont you ever get glue on your fingers

:-) :-)
Regarding the commanders hatch - maybe a commander figure would solve the problem? You could have the hatch open and not show of the bare interior. Alternatively you could just paint everything black inside and the (lack of) interior will not really be visible. However, I suggest a commanders figure.
Regarding the stowage rails for the side - I would go for them. They look cool and add a "busy" feeling to the kit if you fill them up with stowage like water, camo netting, bags, personal kit etc. But it is of course your call

Thanks for sharing and look forward to see more.

Campaign'oholic - 252+ campaigns completed
Gauteng, South Africa
Joined: December 14, 2006
KitMaker: 181 posts
Armorama: 159 posts
Posted: Monday, March 19, 2007 - 01:33 AM UTC
wellthis is how far i've come with the model and the diorama.
the LAV still needs a lot of weatering.the figures need their arms and heads, as well as thier camo scheme.
the walls aren't painted yet, and the base texture is still coming.
the setting is on an intersection outside a school or a park.
this project is far from finished, but i want to know what you guys think?


Queensland, Australia
Joined: April 15, 2006
KitMaker: 915 posts
Armorama: 797 posts
Posted: Monday, March 19, 2007 - 04:08 AM UTC
Hey Chris,
Thats coming along nicely .
The dio is well laid out .
What have you got planned for the ground work ?
Are you doing a sealed road ? and ,,,, what are you going to use for the
sealed road
Cheers
Michael


Virginia, United States
Joined: July 17, 2006
KitMaker: 1,558 posts
Armorama: 1,159 posts
Posted: Monday, March 19, 2007 - 07:07 AM UTC
Hey Chris, I like the layout of your dio, but I'm not too sure about the figure you have sitting on the roof of the LAV. It looks a bit too relaxed given the rest of the scene. You may want to have him looking through binoculars or otherwise being somewhat alert to make him blend in better.
Quoted Text
Looking good so far. You have a very nice clean build there. Dont you ever get glue on your fingers
Thanks, Jesper! I've gotten good at fixing my many mistakes. When you make as many as I do, you get a lot of practice...

The one I'm still trying to work around is having placed the side skirt panels on. Now I'm not sure how I'm going to put the sprockets and idlers on, and work on the indy-link track with those panels getting in the way!

Gauteng, South Africa
Joined: December 14, 2006
KitMaker: 181 posts
Armorama: 159 posts
Posted: Monday, March 19, 2007 - 07:56 AM UTC
hi guys...
michael, for the groundwork, i was thinking of making it a T-junction, with maybe 2 or 1 barricade on the left of the road(closet to the wall) havent decided yet.i'm going to use sandig paper to make the tarmac, and i'll just give it a light dusting to make it look old, etc...
on the inside of the wall, i'm going to put a sandy/rocky terrain(the terrain you would usually find in the desert) and maybe put in a palm tree or a swing, to show that they are outside a school or park.something like that.
Lucas, about that figure, my initial idea was to make it on with a radio or something(i also thought of putting binoculars with him as you said) and also putting a map on his lap or next to him.
i'll let you guys know how it go's....
England - East Anglia, United Kingdom
Joined: October 09, 2005
KitMaker: 2,556 posts
Armorama: 2,199 posts
Posted: Monday, March 19, 2007 - 05:42 PM UTC
Chris- I like the scene, it looks promising! I have to say I agree with Lucas on the seated figure on the roof, I suspect he would be too easier sniper target, maybe try converting one of the standing figures to reading a map on the bonet and leave the driver buttoned up. As to the layout of the rest of the figures, whether or not this is entirely true I cant say, but they migth be positioned closer to areas of cover as oppose to being more exposed, e.g the guy at the front of the vehicle may be positioned closer to the wall pillar for more cover, at the moment the front is being covered by the gunner in the turret, I suspect the standing figure would want to cover the side and would use the wall for greater cover.
You could also consider adding a couple of Iraqi civilians, or an American infantry man to mix up the figures a little. I have a great pic of a LAV with its crew out snd 2 JGSDF troopers doing a photograph with a US Soldier, Blast Models US Infantry 1 would be ideal for such a scene.
'As all else failed we raised our fists and weapons,
Not born as soldiers, but driven to the end'
Virginia, United States
Joined: July 17, 2006
KitMaker: 1,558 posts
Armorama: 1,159 posts
Posted: Wednesday, March 21, 2007 - 06:13 AM UTC
Jesper--I think I'll go ahead and give the commander's figure a shot. I probably won't do so in time for the campaign, but who knows?
I'm still thinking about the side stowage racks. Every day I change my mind on that one.


#041
Kobenhavn, Denmark
Joined: July 20, 2006
KitMaker: 10,069 posts
Armorama: 4,677 posts
Posted: Wednesday, March 21, 2007 - 12:03 PM UTC
Quoted Text
Jesper--I think I'll go ahead and give the commander's figure a shot. I probably won't do so in time for the campaign, but who knows?
Good choice, a commanders figure will solve your problem nicely.

Quoted Text
I'm still thinking about the side stowage racks. Every day I change my mind on that one. 
Yeah, difficult one, but it boils down to how much stowage you want to add. A "clean" vehicle or a "lived in" vehicle.
Campaign'oholic - 252+ campaigns completed
England - East Anglia, United Kingdom
Joined: October 09, 2005
KitMaker: 2,556 posts
Armorama: 2,199 posts
Posted: Wednesday, March 21, 2007 - 05:59 PM UTC
Add the stowage racks!! They look spot on and would look very good on your model. Check out some pictures on Frapr or prime portal of 3ID M113's, they ahve the racks packed full of stowage and look pretty good. For a commander figure you might be interested in the Hobby fan figs for this model. Whilst they are a little pricey, they do a lovely set of tank driver figures(2 figs) and one is standing in the turret cocking the M2, would be ideal for this model.
'As all else failed we raised our fists and weapons,
Not born as soldiers, but driven to the end'
Gauteng, South Africa
Joined: December 14, 2006
KitMaker: 181 posts
Armorama: 159 posts
Posted: Thursday, March 22, 2007 - 06:58 PM UTC
hey rob, thanks for the ideas.
about the driver figure...after what you told me what you think, i thought of putting the driver figure against the wall busy talking or drinking some water, behind the vehicle? what do you think?
i'll post some pictures of my diorama base soon....

a bit off topic now, does anyone have good reference pictures of strykers in iraq? and do the people in humvees wear seat belts when going into any combat zone?
Queensland, Australia
Joined: April 15, 2006
KitMaker: 915 posts
Armorama: 797 posts
Posted: Friday, March 23, 2007 - 04:14 PM UTC
This is where I am upto now .

I just finished the M2A2 afv club track and I was surprised the track did not come apart.
It was a very tedious job with 90 links each side but there was no need for glue .
With a surplus of 14 spare links .very well detailed .I found a little flash on 4 links out of the 180 , hey ,they look better than vinyl track
The track reminded me of Modelkasten .
I'll get some photo's of the tracklinks done in the next few days .
Cheers
Michael
England - East Anglia, United Kingdom
Joined: October 09, 2005
KitMaker: 2,556 posts
Armorama: 2,199 posts
Posted: Friday, March 23, 2007 - 05:22 PM UTC
Michael-Thats spot on!! Love it, the details are superb and it looks to be really good. My M2A2 is still sat on my desk, you have inspired me to take it up again-lots of work and effort though, I scrated the interior

Are you going to rebuild the rear of the TOW launcher, what you have there is the old launcher, the new one is totaly different and does need redoing-only the rear, where to rockets go in!
'As all else failed we raised our fists and weapons,
Not born as soldiers, but driven to the end'
Queensland, Australia
Joined: April 15, 2006
KitMaker: 915 posts
Armorama: 797 posts
Posted: Friday, March 23, 2007 - 06:07 PM UTC
Thanks Rob,
Rob,I almost went the same way about scratchbuilding the interior to the later design as well.
I went to your photos and saw the huge amout of work you have done and was on the verge of going the all out .
The Bradley will be in the street as troop support .Based on the idea I have on where its going to sit on the dio when I'm finished I want to have the ramp up and the rear door closed .
My first priority when I get to the turret is to have 2 figures placed correctly in the hatches before I do any superdetailing .
I'm working on nemrod figures with warrior heads for the commander and gunner
They just need to be worked with the correct placement within the turret.
Yes, your right about the Tow launcher .
Its a single handle in the middle of the launcher.
The eduard etch gives you the older 80-90's style .
I'm going to scratchbuild one out of metal rod .
Thanks for the feedback.
The build image looks better in the OIF gallery.
Like I said I'll try and get better photos of the track and the
detailed work in the next few days .
Cheers
Michael
Virginia, United States
Joined: July 17, 2006
KitMaker: 1,558 posts
Armorama: 1,159 posts
Posted: Friday, March 23, 2007 - 06:20 PM UTC
That is one very nice looking M2A2 build, Michael. Can't wait to see it finished!

Queensland, Australia
Joined: April 15, 2006
KitMaker: 915 posts
Armorama: 797 posts
Posted: Friday, March 23, 2007 - 06:42 PM UTC
thanks Lucas.
I'll be giving progress photo's as I go with the remainder of the build.
I need all the help I can get get to complete this one .
Cheers
Michael

California, United States
Joined: April 01, 2002
KitMaker: 4,287 posts
Armorama: 1,867 posts
Posted: Thursday, March 29, 2007 - 09:10 PM UTC
Quoted Text
I've started work on the base for my diorama.
Its to be a basic street with a burnt out car upon it.
My question is:
Is there any photographs out there that show a street in iraq much like this one.

I can't tell much about the street & pavement from this. So i need your helps.
Atrain, from what I recall of my time in Al-Fallujah, the roads are pretty much crap. Lots of cracks, pot holes and not very well maintained. The highways were pretty good, but in town they were very bad. Same conditions in Ar-Ramadi where I also spent a fair amount of time. Hope this helps. "Q"

"Don't fear the night, fear what hunts at night"
New Jersey, United States
Joined: October 10, 2003
KitMaker: 783 posts
Armorama: 637 posts
Posted: Friday, March 30, 2007 - 01:57 AM UTC
Well, Ive finally gathered everything I need for my build for the campaign. I screwed up back in February and started building an M113A3 for this campaign, only to have someone tell me it started on March 1st! Doh!

So, I figured in the interest keeping to the rules, Id just build another one. Anyway, this will be my entry. I will be using an old Tamiya M113 ACAV kit along with Eduard photo etch, some sheet styrene, and some left over bits (like the exterior fuel tanks) from an Academy M113A2 kit to complete the build. Almost forgot, the M113 in this picture is still under construction and unarmed. Mine will be a completed model with weaponry.

Gary


#041
Kobenhavn, Denmark
Joined: July 20, 2006
KitMaker: 10,069 posts
Armorama: 4,677 posts
Posted: Sunday, April 01, 2007 - 02:55 PM UTC
Gary, that will be a really nice build and look stunning when finished. I assume the extra side armour will be painted?
Campaign'oholic - 252+ campaigns completed
New Jersey, United States
Joined: October 10, 2003
KitMaker: 783 posts
Armorama: 637 posts
Posted: Sunday, April 01, 2007 - 09:39 PM UTC
Yeah, Im gonna paint the added armor to match the track. I would paint it rusty like it is in that picture, but honestly, I cant seem to paint rust very believable. Ive seen a couple of guys here use real metal and rust it, and that looks great, but I am more experienced with plastic, so I will just use that and paint it sand. Also, there will be a .50 in the turret and two M240's out the side. At the moment, I am working on the interior and the spall liners. I should have some update pics in a week or so. Catch yas later!
Gary

Virginia, United States
Joined: July 17, 2006
KitMaker: 1,558 posts
Armorama: 1,159 posts
Posted: Monday, April 02, 2007 - 06:34 AM UTC
Quoted Text
Yeah, Im gonna paint the added armor to match the track. I would paint it rusty like it is in that picture, but honestly, I cant seem to paint rust very believable. Ive seen a couple of guys here use real metal and rust it, and that looks great, but I am more experienced with plastic, so I will just use that and paint it sand. Also, there will be a .50 in the turret and two M240's out the side. At the moment, I am working on the interior and the spall liners. I should have some update pics in a week or so. Catch yas later!
Gary 
That sounds like an interesting bucket, Gary. I look forward to seeing the pics!

Noord-Brabant, Netherlands
Joined: May 25, 2006
KitMaker: 291 posts
Armorama: 288 posts
Posted: Monday, April 02, 2007 - 12:53 PM UTC
great idea's everyone

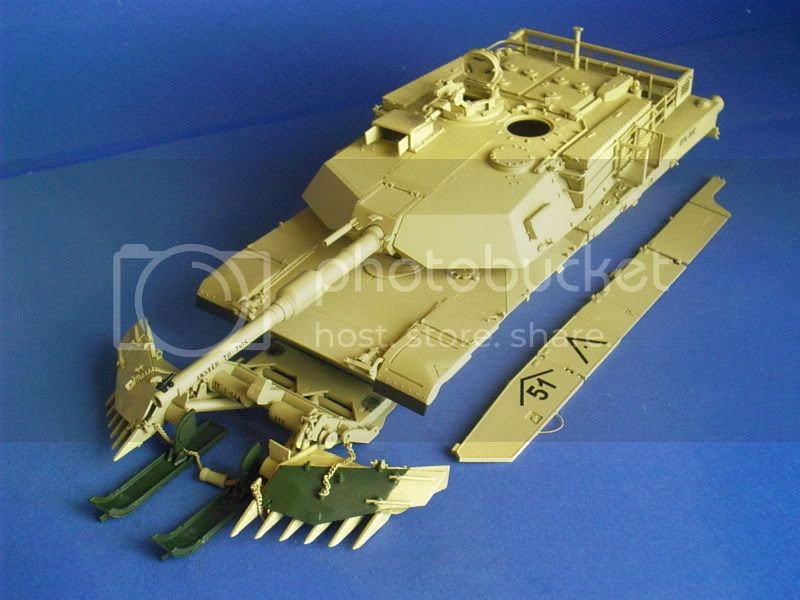
for my proces i painted it and added a gloss coate and added the decals still one to go the red stripe on the barrel, also the color turned a little darker trough the gloss coate than i hoped but i'll be fix this

,Gijs


