

1⁄35Got'cha Covered
Stone Work
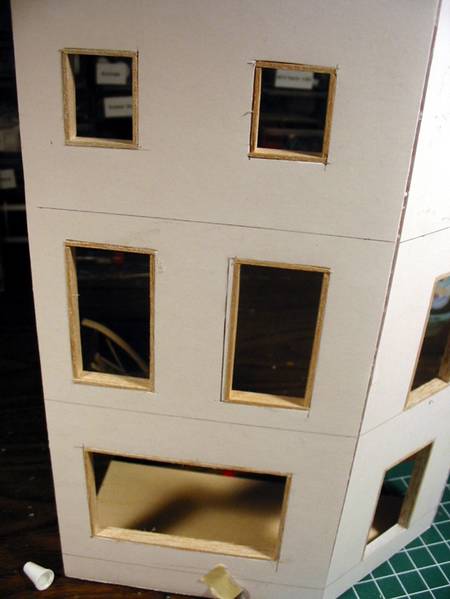
During my planning stage I decided it would be easiest to apply details first. With the thickness of the cork and the stone detail it would have been too thick if I applied the stone on top of the cork. This makes the construction easier because it breaks the walls into small working areas and provides borders to build up to. The stonework detail will be fairly thin and protrude only a small amount. This means I needed something I could work with in thin strips. I like to use bakable clay for this type of work. It is easy to work with during the molding stage, it's clean, and it produces a nice texture when done. The big kicker for me is it's inexpensive and easily found. You can get this at a hobby shops, craft shops, department stores. There are various brands that you can get; Sculpy is the one I typically find.
I used an old bathroom/kitchen tile as a working surface. The tile needs to be smooth and hard and large enough to work and roll out your largest piece. I used two coffee stir sticks and a non-textured hobby knife handle for tools. You could use a glass, rolling pin, or piece of dowelling to roll out the clay. For the long pieces I would roll out a 'blob' of clay like a snake, then put it between the stir sticks and roll it flat. This type of clay is nice to work with in that you can just add more and rub it together to create a bond. The flat pieces were easy enough, simply get a rough size and cut the edges to create a nice clean line. This type of clay can be cut and sanded after it its baked. However, once baked it becomes a bit brittle. It is easier and recommended to cut it and shape it as close to the end result as possible before baking. So shape and cut the flat pieces. The corner stone that wraps around the corner of the building posed a challenge. In a previous project I used this clay for this type of detail and I decided to use a one-piece 'wrap around' element. This was difficult because forming a 'tight' 90-degree corner was not easy to do. Secondly, once a corner was formed, it was hard to retain the shape during baking. Kitchen foil baking molds were "Okay" but were difficult to use. With that experience under my belt I decided to use a two-part method for this diorama. I planned on making two flat pieces with a crisp edge on each. After baking I would glue them to the building, then fill in the gap with household spackle.
I created a number of flat pieces all using the same rolling technique. Each piece differed in length and height, all the same thickness. I place all these on a piece of kitchen foil then into the oven and baked them based on the instructions on the package. Be careful, when transferring the piece to the foil, do not bend or alter the shape. Once it bakes you can't modify the shape very well. Be careful of fingerprints, excess 'blobs', etc. The cleaner the piece is before you bake it the better the results are when you apply it to the building. After it's baked and cooled I test fit each piece. There will usually be some small adjustments in shaping the edges and getting a good fit. I had a decision to make at this point. I did not etch in rock seams before baking. This is easier to do after baking. With a two-piece corner detail I had to decide if I would etch the stone seams 'in place' or off the building.
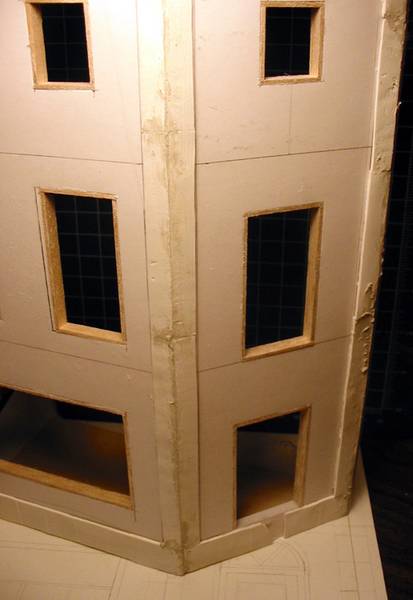
I chose to etch them "on" the building. I did this because it would allow me to have nicely matched seams. Etching all the parts was done with a steel ruler and a pointed etching tool. Be careful, this type of clay is brittle. It is best to etch lightly and repeatedly drag the tool over the line to get more depth. If there are uneven surfaces, be more careful, these parts break easily.
After the etching is done I used a two-part resin to glue the parts to the building. I selected two part resin over white glue or CA because of the diss-similar surfaces of the clay and foam board. After the glue dried it was time to unify all the parts. I did this with the same household spackle. I filled in all the gaps with spackle, let it dry then sanded it flush. On the corner detail I etched the seam lines into the spackle to unify the stones. The spackle may shrink while it dries so you may need to repeat this step until you have a nice even flush finish.
Now with all the stone detail in place and the sub areas done its time for cork.
During my planning stage I decided it would be easiest to apply details first. With the thickness of the cork and the stone detail it would have been too thick if I applied the stone on top of the cork. This makes the construction easier because it breaks the walls into small working areas and provides borders to build up to. The stonework detail will be fairly thin and protrude only a small amount. This means I needed something I could work with in thin strips. I like to use bakable clay for this type of work. It is easy to work with during the molding stage, it's clean, and it produces a nice texture when done. The big kicker for me is it's inexpensive and easily found. You can get this at a hobby shops, craft shops, department stores. There are various brands that you can get; Sculpy is the one I typically find.
I used an old bathroom/kitchen tile as a working surface. The tile needs to be smooth and hard and large enough to work and roll out your largest piece. I used two coffee stir sticks and a non-textured hobby knife handle for tools. You could use a glass, rolling pin, or piece of dowelling to roll out the clay. For the long pieces I would roll out a 'blob' of clay like a snake, then put it between the stir sticks and roll it flat. This type of clay is nice to work with in that you can just add more and rub it together to create a bond. The flat pieces were easy enough, simply get a rough size and cut the edges to create a nice clean line. This type of clay can be cut and sanded after it its baked. However, once baked it becomes a bit brittle. It is easier and recommended to cut it and shape it as close to the end result as possible before baking. So shape and cut the flat pieces. The corner stone that wraps around the corner of the building posed a challenge. In a previous project I used this clay for this type of detail and I decided to use a one-piece 'wrap around' element. This was difficult because forming a 'tight' 90-degree corner was not easy to do. Secondly, once a corner was formed, it was hard to retain the shape during baking. Kitchen foil baking molds were "Okay" but were difficult to use. With that experience under my belt I decided to use a two-part method for this diorama. I planned on making two flat pieces with a crisp edge on each. After baking I would glue them to the building, then fill in the gap with household spackle.
I created a number of flat pieces all using the same rolling technique. Each piece differed in length and height, all the same thickness. I place all these on a piece of kitchen foil then into the oven and baked them based on the instructions on the package. Be careful, when transferring the piece to the foil, do not bend or alter the shape. Once it bakes you can't modify the shape very well. Be careful of fingerprints, excess 'blobs', etc. The cleaner the piece is before you bake it the better the results are when you apply it to the building. After it's baked and cooled I test fit each piece. There will usually be some small adjustments in shaping the edges and getting a good fit. I had a decision to make at this point. I did not etch in rock seams before baking. This is easier to do after baking. With a two-piece corner detail I had to decide if I would etch the stone seams 'in place' or off the building.
I chose to etch them "on" the building. I did this because it would allow me to have nicely matched seams. Etching all the parts was done with a steel ruler and a pointed etching tool. Be careful, this type of clay is brittle. It is best to etch lightly and repeatedly drag the tool over the line to get more depth. If there are uneven surfaces, be more careful, these parts break easily.
After the etching is done I used a two-part resin to glue the parts to the building. I selected two part resin over white glue or CA because of the diss-similar surfaces of the clay and foam board. After the glue dried it was time to unify all the parts. I did this with the same household spackle. I filled in all the gaps with spackle, let it dry then sanded it flush. On the corner detail I etched the seam lines into the spackle to unify the stones. The spackle may shrink while it dries so you may need to repeat this step until you have a nice even flush finish.
Now with all the stone detail in place and the sub areas done its time for cork.
About the Author


FROM: NORTH CAROLINA, UNITED STATES
I modeled when I was a teenager. College, family and work stopped me for a while. Then I picked it back up after about 12 years off. My main focus is dioramas. I like the complete artistic method of story telling. Dioramas involve so many aspects of modeling and I enjoy getting involved in the ...
Copyright ©2021 by Scott Lodder. Images and/or videos also by copyright holder unless otherwise noted. The views and opinions expressed herein are solely the views and opinions of the authors and/or contributors to this Web site and do not necessarily represent the views and/or opinions of Armorama, KitMaker Network, or Silver Star Enterrpises. All rights reserved. Originally published on: 2005-10-22 00:00:00. Unique Reads: 39489

WEB HOSTING BY


Copyright ©2021 Armorama and Kitmaker Network, a subsidiary of Silver Star Enterprises
All Rights Reserved. Please read our Conditions of Use and Privacy Policy.
All Rights Reserved. Please read our Conditions of Use and Privacy Policy.