

1⁄35Got'cha Covered
Cork
When you buy cork try to get the smallest particles of cork as possible. Get the tightest looking pattern too. This will yield the best quality individual bricks with nice even sides. Tight particles also reduce the number of gaps in any of the bricks.
I found I had two choices, match the bricks on my house to exactly 1/35th scale or mirror the average size of bricks in the Verlinden set I was using for the canal walls. The Verlinden bricks were not exactly 1/35th scale (not even 1/32 scale). With the idea of retaining visual continuity I went with the average size from the canal wall. I compared the two alternatives and knew that the canal wall bricks were larger (in scale) than a house brick. I was Okay with that and got a measurement of roughly 3mmx9mm. The next step was to cut bricks. I had a roll of cork that I purchased at a local department store. During the research phase I found out that cork sheets are actually a large sheet of small cork pieces pressed together. It is very similar to MDF/wafer boards in the house building industry. So when you are shopping for cork products you should look for the tightest packing/compressing. The gaps between the small pieces should be as small as possible. The individual particles should be small too. This will all lead to a nice clean cut with nicely shaped pieces. These tips are universal across cork uses, bricks, stones, blocks etc.
With an acceptable sheet of cork I proceeded to take the measurements (3x9) and transfer the 3mm thickness to the cork sheet. I marked a small 'tick' on either end of the sheet. I placed a metal ruler down on each 'tick' and used a SHARP hobby knife to cut along the ruler. It is very important to use a sharp blade. Cork has a tendency to stretch when put under pressure. A sharp blade will cut, not stretch the material. If you use a dull blade your bricks may come out miss-sharpen. With a sharp blade I cut a long strip 3mm wide from the sheet. Then I placed the strip on my self-healing hobby matt and cut each individual brick free using the matts printed measurements. I cut a lot of them; I roughly estimated how many I would need by placing the sheet over the foam board. I cut extras because I can always use free bricks for the next diorama.
Assembly
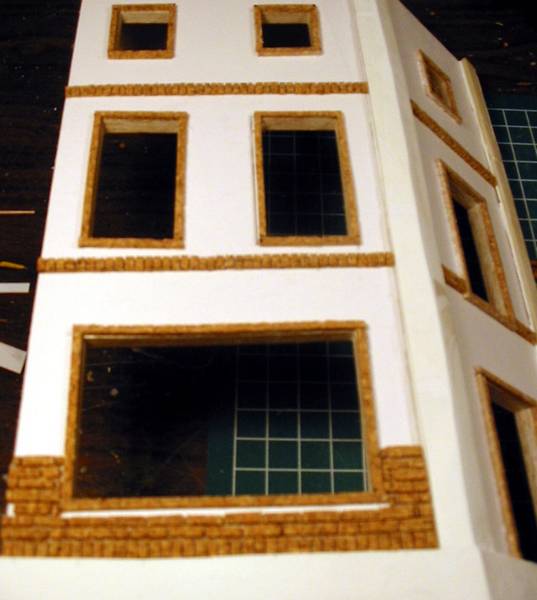
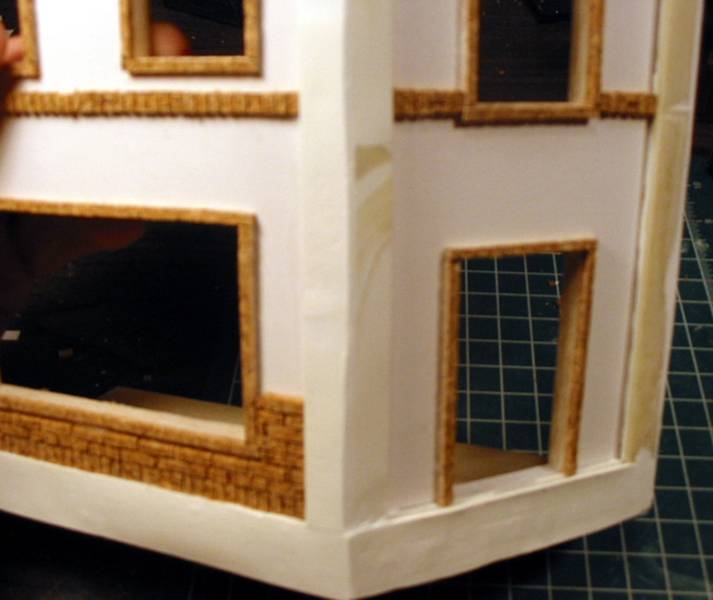
The most important thing to do at this point is to have a solid square straight base/start line. All the rows of bricks are going to start from here. Draw a straight line as the starting line. On my building I was going to have a bottom edge detail of a row of stones. The bricks would go up from there. Your project may be different; there may be an angled street, or a groundwork detail. Take these items into consideration when marking your base line. You will also notice that I went ahead and framed each window with cork strips. My plan called for a stone frame on the outside of each window. The frame would hide any brickwork; this guided me to simply avoiding the need to have nice detail at the windows edge. It was very easy to frame with long strips and set off each window.
I chose to use white glue on this building. You can use whatever glue you are most comfortable with. I know others use a one-part resin tube glue successfully. I designed a special brick detail at the top of the first floor. My plan involved simply turning the bricks 90 degrees to establish a 'level'. I went ahead and assembled this detail now so I had solid control of the line I glued the bricks to. I had no surrounding intrusions into the area. I had a nice square guideline to glue against. This ensured that the second story of bricks would start off square, thus reducing the cascade affect.
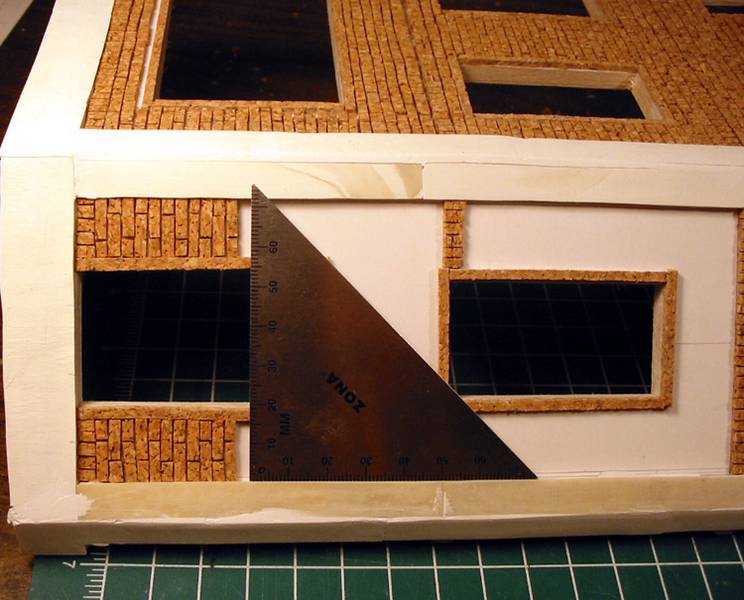
The method I used was to put a peanut sized blob of white glue on a plastic plate. Then I picked up a brick with a pair of tweezers, dipped it in the glue and placed it along the base line. I repeated this along the base line. I took note to use varying shapes and sizes of bricks (even though they are all roughly 3x9mm there was some variation). As you can see in the images I would spot check my line to make sure it was straight. I used a metal triangle set along a square line to show how well the brick row lines up.
After the first line was down. I cut one brick in half to force an offset for the next row. Study any brick wall and the mortar line is not straight up, it is a step or zig zag pattern. The half brick forces this. I glued it down about 1mm above the first row of bricks to allow for adding mortar later. I repeated this process in a sectional method. I always spot-checked the distances between bricks and rows and I made sure my rows were straight. noteremember that any small shift will grow exponentially as you add more rows of bricks. Take your time and go slowly. The introduction of smaller work areas decreases this cascade affect.
When you buy cork try to get the smallest particles of cork as possible. Get the tightest looking pattern too. This will yield the best quality individual bricks with nice even sides. Tight particles also reduce the number of gaps in any of the bricks.
I found I had two choices, match the bricks on my house to exactly 1/35th scale or mirror the average size of bricks in the Verlinden set I was using for the canal walls. The Verlinden bricks were not exactly 1/35th scale (not even 1/32 scale). With the idea of retaining visual continuity I went with the average size from the canal wall. I compared the two alternatives and knew that the canal wall bricks were larger (in scale) than a house brick. I was Okay with that and got a measurement of roughly 3mmx9mm. The next step was to cut bricks. I had a roll of cork that I purchased at a local department store. During the research phase I found out that cork sheets are actually a large sheet of small cork pieces pressed together. It is very similar to MDF/wafer boards in the house building industry. So when you are shopping for cork products you should look for the tightest packing/compressing. The gaps between the small pieces should be as small as possible. The individual particles should be small too. This will all lead to a nice clean cut with nicely shaped pieces. These tips are universal across cork uses, bricks, stones, blocks etc.
With an acceptable sheet of cork I proceeded to take the measurements (3x9) and transfer the 3mm thickness to the cork sheet. I marked a small 'tick' on either end of the sheet. I placed a metal ruler down on each 'tick' and used a SHARP hobby knife to cut along the ruler. It is very important to use a sharp blade. Cork has a tendency to stretch when put under pressure. A sharp blade will cut, not stretch the material. If you use a dull blade your bricks may come out miss-sharpen. With a sharp blade I cut a long strip 3mm wide from the sheet. Then I placed the strip on my self-healing hobby matt and cut each individual brick free using the matts printed measurements. I cut a lot of them; I roughly estimated how many I would need by placing the sheet over the foam board. I cut extras because I can always use free bricks for the next diorama.
Assembly
The most important thing to do at this point is to have a solid square straight base/start line. All the rows of bricks are going to start from here. Draw a straight line as the starting line. On my building I was going to have a bottom edge detail of a row of stones. The bricks would go up from there. Your project may be different; there may be an angled street, or a groundwork detail. Take these items into consideration when marking your base line. You will also notice that I went ahead and framed each window with cork strips. My plan called for a stone frame on the outside of each window. The frame would hide any brickwork; this guided me to simply avoiding the need to have nice detail at the windows edge. It was very easy to frame with long strips and set off each window.
I chose to use white glue on this building. You can use whatever glue you are most comfortable with. I know others use a one-part resin tube glue successfully. I designed a special brick detail at the top of the first floor. My plan involved simply turning the bricks 90 degrees to establish a 'level'. I went ahead and assembled this detail now so I had solid control of the line I glued the bricks to. I had no surrounding intrusions into the area. I had a nice square guideline to glue against. This ensured that the second story of bricks would start off square, thus reducing the cascade affect.
The method I used was to put a peanut sized blob of white glue on a plastic plate. Then I picked up a brick with a pair of tweezers, dipped it in the glue and placed it along the base line. I repeated this along the base line. I took note to use varying shapes and sizes of bricks (even though they are all roughly 3x9mm there was some variation). As you can see in the images I would spot check my line to make sure it was straight. I used a metal triangle set along a square line to show how well the brick row lines up.
After the first line was down. I cut one brick in half to force an offset for the next row. Study any brick wall and the mortar line is not straight up, it is a step or zig zag pattern. The half brick forces this. I glued it down about 1mm above the first row of bricks to allow for adding mortar later. I repeated this process in a sectional method. I always spot-checked the distances between bricks and rows and I made sure my rows were straight. noteremember that any small shift will grow exponentially as you add more rows of bricks. Take your time and go slowly. The introduction of smaller work areas decreases this cascade affect.

About the Author


FROM: NORTH CAROLINA, UNITED STATES
I modeled when I was a teenager. College, family and work stopped me for a while. Then I picked it back up after about 12 years off. My main focus is dioramas. I like the complete artistic method of story telling. Dioramas involve so many aspects of modeling and I enjoy getting involved in the ...
Copyright ©2021 by Scott Lodder. Images and/or videos also by copyright holder unless otherwise noted. The views and opinions expressed herein are solely the views and opinions of the authors and/or contributors to this Web site and do not necessarily represent the views and/or opinions of Armorama, KitMaker Network, or Silver Star Enterrpises. All rights reserved. Originally published on: 2005-10-22 00:00:00. Unique Reads: 39489

WEB HOSTING BY


Copyright ©2021 Armorama and Kitmaker Network, a subsidiary of Silver Star Enterprises
All Rights Reserved. Please read our Conditions of Use and Privacy Policy.
All Rights Reserved. Please read our Conditions of Use and Privacy Policy.