

1⁄35Got'cha Covered
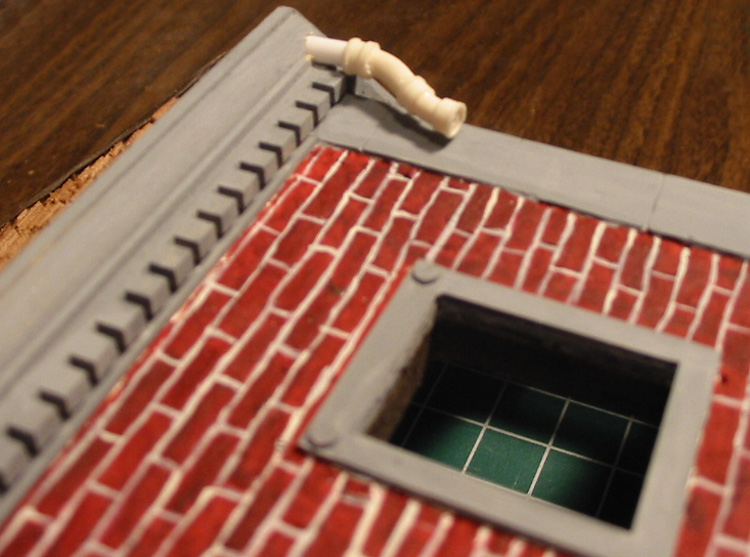
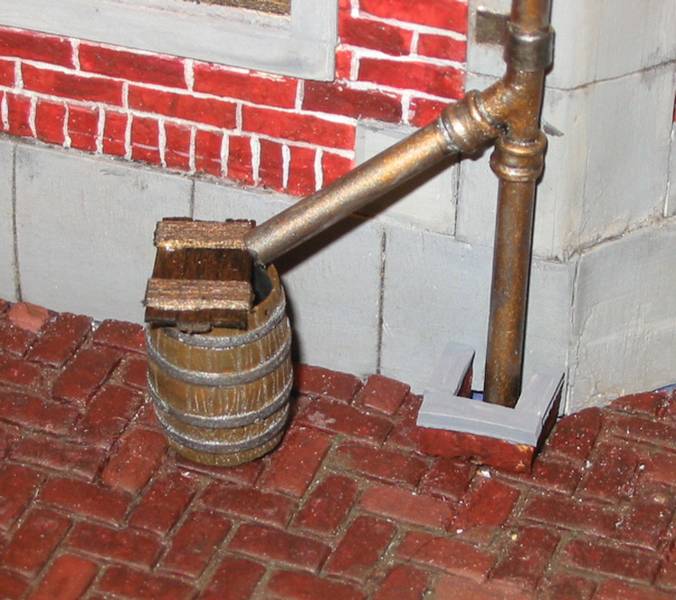
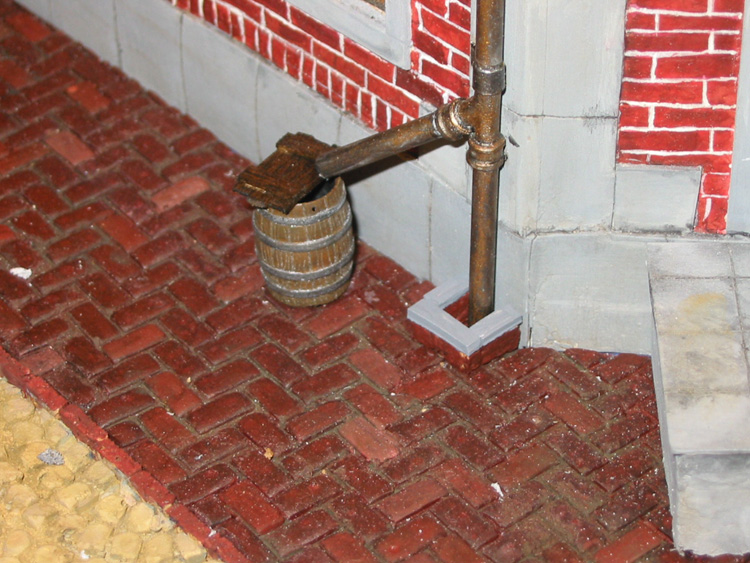
Drain Pipe
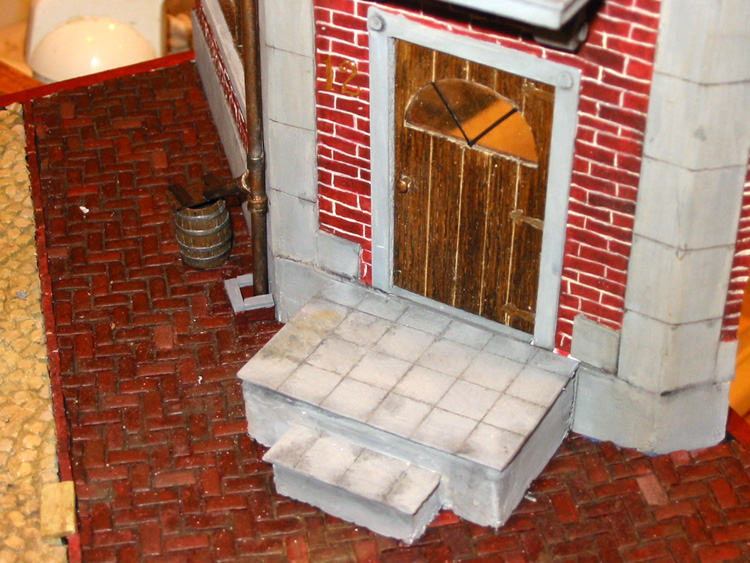
The drainpipe detail is a 135th Construction Battalion AM kit. A review of this can be found here:review . The review covers a great deal of the construction details. The pipe was assembled with no 'instructions', just fit and glue style. I used CA to glue the pieces together and to connect the straps to the building. I used foil as connector straps by wrapping the pipe and leaving a bit extra. The bottom of the pipe was simply cut level on the straight section, and I planned on using a bit of artistic license and a bit of rural habit by putting a barrel to trap rainwater at the bottom of an angle piece. I painted the pipe with a base of black and damp brushed brass over it to give it a worn streaked look. The bottom stone detail was made with sculpy and cork. The angle section was hollowed out a bit with a pin vice.
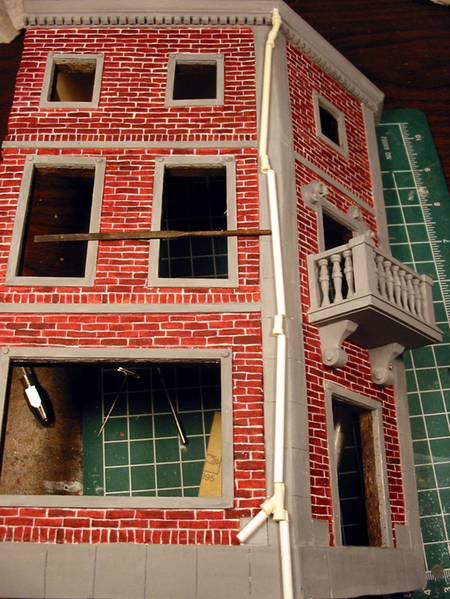
Balcony
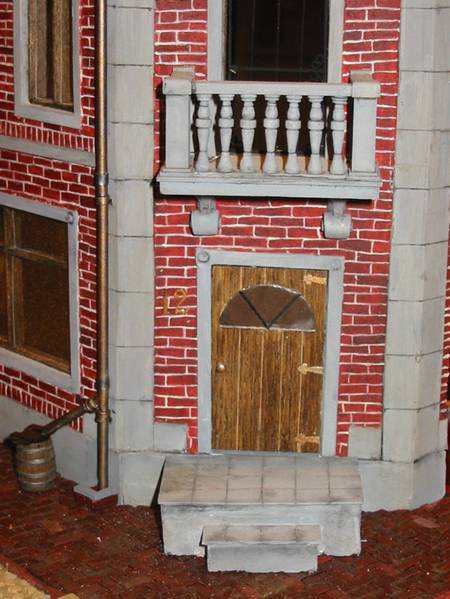
The balcony was a fun part to build. It too was a 135th Construction Battalion AM kit. A review of this can be found here: review. The review covers a great deal of the construction details. I used two-part epoxy to adhere the balcony to the building because of the weight of kit. I used Folkart paint to paint it and that went very easily. I included this as part of the building when applying washes.
Extras
The door is a piece of basswood. I used a rotary tool with a cut off wheel to get the basic shape for the window. I used a razor saw and files to finish the corners. I used the window hole as a template to cut out a piece of clear styrene 'glass'. I used two pieces of strip styrene as extra molding on the window. I stained the door with household stain. Then I used an al to etch in door panels. I used some left over bits of lead foil for the hinges. I drew the first one and cut it out. I then used it as a template for the remaining hinge. The doorknob came from a metal pin cut down to size and ground to shape.
The sculpting under the balcony inspired the ornamental details on the rest of the building. The bigger ones on the door corners are made from sculpy clay rolled flat in an oval shape. Then I rolled the oval into a loose tube. The oval shape forces the angled shape. I baked the rolls at 250 degrees for 20 minutes. Once hard and cool I cut them in half and then adjusted the size so they didn't stick out away from the building too much.
The second floor French door was a fun bit of modeling. I wanted an open airy door so I planed some type of wrought iron French style door. My first attempts were all 100% strip styrene. I did not like this because the very thin strips needed for the interior of the door was very difficult to use. I altered the design and went with a round strip style. I cut three short strips out of strip styrene for the horizontal frame. I placed them on top of each other and measured where I wanted the vertical pieces to go. I then drilled down through all three pieces at once so that the holes all lined up. I then cut the side frames and glued the outside frame together. I used guitar strings for the vertical pieces. I cut them to length and threaded them through the outside frame then through the middle frame. Once these were in and the glue dried I started the detailing. I used a few bits of styrene and bent wire for the handle. The corner details are just hobby wire bent around a pair of round pliers. I had to make about 10 of these before I got a consistent batch. Once it was all glued together I painted it with flat black.
The steps were made out of a piece of styrofoam. I carved it into the basic shape with the step attached. I sized two pieces of sheet styrene as the stepping-stones. Before gluing them on I etched the seam lines with an awl (etching tool). Because of the porous nature of the styrofoam I used two part epoxy for a strong bond. Once attached and dry I added spackle to the sides.
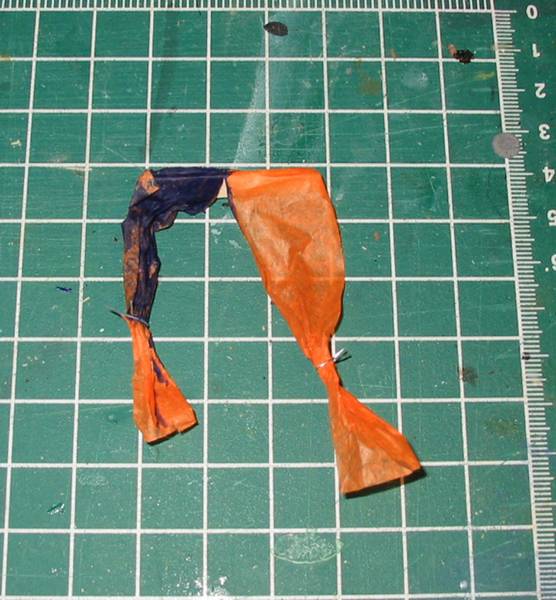
With so many windows, especially second story ones, I need curtains. If there was just the retail establishment I could have gotten away without curtains. The second floor beckoned for them. I made mine with milliput. I tried using tea bags and tissue paper but I wasnt satisfied with the results. They werent natural at all (the orange tissue paper is an image of them :( ). Since I was planning one sided viewing, I didnt need to worry about thickness or the backside of the curtains. This helped push me to a milliput solution. I rolled out a grape size blob of each part of milliput. Once flat I cut it into sheets the size of the windows. I took each sheet and gently molded it into the shape of curtains that are pulled back in various ways. Once the curtains were hard I painted them simple colors, I wasnt looking for a dramatic statement in the windows and the inside of the windows wasnt my focus. I wanted color, but no detail; I didnt want to draw people in the windows. They wouldnt find much if they did go in. The tiebacks are just foil cut to size and thickness. I glued them on with CA and painted them a complementary color. I glued the curtains on with epoxy or white glue.
Building Washing
With the building built and painted it was time for washing. I mixed a light/thin burnt umber wash and gave a full filter wash all over the entire building. Once the first wash was dry I gauged where extra was needed. Usually you want more wash in corners and creases and where shadows would be. With buildings you need to consider where nature would have left extra streaks or add extra wash where dirt would not get washed away by rain. I added some under windowpanes and gutters. I then mixed up varying shades of black/burnt umber wash and applied it with a thin brush in specific locations also know as a pin wash. I made sure I had a nice wash on the stone details and on the balcony. On the roof I focused more on filters of burnt umber and a few pin washes of black.
The drainpipe detail is a 135th Construction Battalion AM kit. A review of this can be found here:review . The review covers a great deal of the construction details. The pipe was assembled with no 'instructions', just fit and glue style. I used CA to glue the pieces together and to connect the straps to the building. I used foil as connector straps by wrapping the pipe and leaving a bit extra. The bottom of the pipe was simply cut level on the straight section, and I planned on using a bit of artistic license and a bit of rural habit by putting a barrel to trap rainwater at the bottom of an angle piece. I painted the pipe with a base of black and damp brushed brass over it to give it a worn streaked look. The bottom stone detail was made with sculpy and cork. The angle section was hollowed out a bit with a pin vice.
Balcony
The balcony was a fun part to build. It too was a 135th Construction Battalion AM kit. A review of this can be found here: review. The review covers a great deal of the construction details. I used two-part epoxy to adhere the balcony to the building because of the weight of kit. I used Folkart paint to paint it and that went very easily. I included this as part of the building when applying washes.
Extras
The door is a piece of basswood. I used a rotary tool with a cut off wheel to get the basic shape for the window. I used a razor saw and files to finish the corners. I used the window hole as a template to cut out a piece of clear styrene 'glass'. I used two pieces of strip styrene as extra molding on the window. I stained the door with household stain. Then I used an al to etch in door panels. I used some left over bits of lead foil for the hinges. I drew the first one and cut it out. I then used it as a template for the remaining hinge. The doorknob came from a metal pin cut down to size and ground to shape.
The sculpting under the balcony inspired the ornamental details on the rest of the building. The bigger ones on the door corners are made from sculpy clay rolled flat in an oval shape. Then I rolled the oval into a loose tube. The oval shape forces the angled shape. I baked the rolls at 250 degrees for 20 minutes. Once hard and cool I cut them in half and then adjusted the size so they didn't stick out away from the building too much.
The second floor French door was a fun bit of modeling. I wanted an open airy door so I planed some type of wrought iron French style door. My first attempts were all 100% strip styrene. I did not like this because the very thin strips needed for the interior of the door was very difficult to use. I altered the design and went with a round strip style. I cut three short strips out of strip styrene for the horizontal frame. I placed them on top of each other and measured where I wanted the vertical pieces to go. I then drilled down through all three pieces at once so that the holes all lined up. I then cut the side frames and glued the outside frame together. I used guitar strings for the vertical pieces. I cut them to length and threaded them through the outside frame then through the middle frame. Once these were in and the glue dried I started the detailing. I used a few bits of styrene and bent wire for the handle. The corner details are just hobby wire bent around a pair of round pliers. I had to make about 10 of these before I got a consistent batch. Once it was all glued together I painted it with flat black.
The steps were made out of a piece of styrofoam. I carved it into the basic shape with the step attached. I sized two pieces of sheet styrene as the stepping-stones. Before gluing them on I etched the seam lines with an awl (etching tool). Because of the porous nature of the styrofoam I used two part epoxy for a strong bond. Once attached and dry I added spackle to the sides.
With so many windows, especially second story ones, I need curtains. If there was just the retail establishment I could have gotten away without curtains. The second floor beckoned for them. I made mine with milliput. I tried using tea bags and tissue paper but I wasnt satisfied with the results. They werent natural at all (the orange tissue paper is an image of them :( ). Since I was planning one sided viewing, I didnt need to worry about thickness or the backside of the curtains. This helped push me to a milliput solution. I rolled out a grape size blob of each part of milliput. Once flat I cut it into sheets the size of the windows. I took each sheet and gently molded it into the shape of curtains that are pulled back in various ways. Once the curtains were hard I painted them simple colors, I wasnt looking for a dramatic statement in the windows and the inside of the windows wasnt my focus. I wanted color, but no detail; I didnt want to draw people in the windows. They wouldnt find much if they did go in. The tiebacks are just foil cut to size and thickness. I glued them on with CA and painted them a complementary color. I glued the curtains on with epoxy or white glue.
Building Washing
With the building built and painted it was time for washing. I mixed a light/thin burnt umber wash and gave a full filter wash all over the entire building. Once the first wash was dry I gauged where extra was needed. Usually you want more wash in corners and creases and where shadows would be. With buildings you need to consider where nature would have left extra streaks or add extra wash where dirt would not get washed away by rain. I added some under windowpanes and gutters. I then mixed up varying shades of black/burnt umber wash and applied it with a thin brush in specific locations also know as a pin wash. I made sure I had a nice wash on the stone details and on the balcony. On the roof I focused more on filters of burnt umber and a few pin washes of black.

About the Author


FROM: NORTH CAROLINA, UNITED STATES
I modeled when I was a teenager. College, family and work stopped me for a while. Then I picked it back up after about 12 years off. My main focus is dioramas. I like the complete artistic method of story telling. Dioramas involve so many aspects of modeling and I enjoy getting involved in the ...
Copyright ©2021 by Scott Lodder. Images and/or videos also by copyright holder unless otherwise noted. The views and opinions expressed herein are solely the views and opinions of the authors and/or contributors to this Web site and do not necessarily represent the views and/or opinions of Armorama, KitMaker Network, or Silver Star Enterrpises. All rights reserved. Originally published on: 2005-10-22 00:00:00. Unique Reads: 39489

WEB HOSTING BY


Copyright ©2021 Armorama and Kitmaker Network, a subsidiary of Silver Star Enterprises
All Rights Reserved. Please read our Conditions of Use and Privacy Policy.
All Rights Reserved. Please read our Conditions of Use and Privacy Policy.