

1⁄35Got'cha Covered
Roof
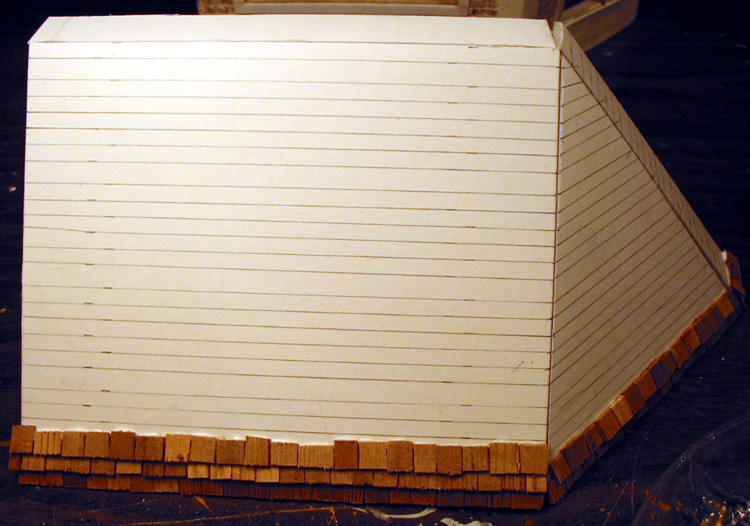
The roof was a challenge because of the odd angles at the corners. This was planned as an intact roof, so I couldn't rely on battle damage in key spots to avoid good architecture. During the planning I found that there were a number of roofs made of shingles with a flat top that ended at a heavily detailed gutter. This design suited my corner need. I planned to use the foam board as my roof backing material. Not seeing the backside I did not need to worry about interior beam structures or attic detail. Roof angles can be tricky and I didn't want to waste foam board. I used regular paper and cut out templates to help this process. The roof would be two flat rectangular pieces joined with a triangular corner face piece. These would be topped off with a small rectangular flat roof piece. Once I got the template pieces made, I traced them on the foam board and cut out the end pieces. One thing you must remember, the foam boards thickness needed to be considered. Once you cut it at an angle the thickness increases. It's just like the frontal armor of the AFV that you're building for this diorama. As you angle the piece it gets thicker. This thickness creates a challenge in connecting the corner pieces together. Repeated test fitting of the four roof pieces with the building was necessary. The better the fit between building and roof the easier your project will go and the better the end result. I used white glue to glue the pieces together and let it dry.
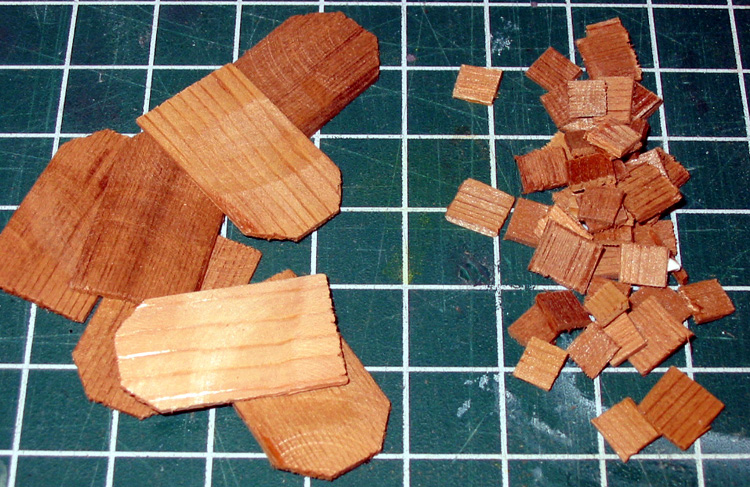
As the roof dried I started making shingles, lots of shingles. My base resource was actual cedar dollhouse shingles. I was given a bag of these that my father got at a craft store from the dollhouse section. They are too thick and too large to use without modification. The thickness was fixed by breaking out a sander and sanding down each shingle. I sanded both sides to give it a uniform texture. The size was nice because I could get four shingles out of each piece with three cuts. I marked my sawing box with two measurements to make cutting easier. I didn't have to measure each piece. I just laid the piece in the cutting box up to the measurement and cut. In past projects I found that it is easier to cut across the grain first is best. The extra size of the piece makes the 'cross grain' cut easier. If the 'with grain' cut is made first the shingle tends to fall apart as the cross grain cut is made. By the time the shingles were cut, the roof was dry. As with the bricks a good base line is critical. When I decided to cut the shingles I was making the decision on how far apart the rows of shingles would be placed. You need to have overlap on the shingles so the base line could be no farther apart than the smallest shingle. The subsequent shingle lines are also subject to this restriction. I drew on a number of shingles lines to help guide me along adding the shingles. I used white glue and put a blob on a plastic plate. I picked each shingle up dipped an end in the glue then positioned it on the roof. I made sure to use varying sizes and widths to give visual interest and variety.
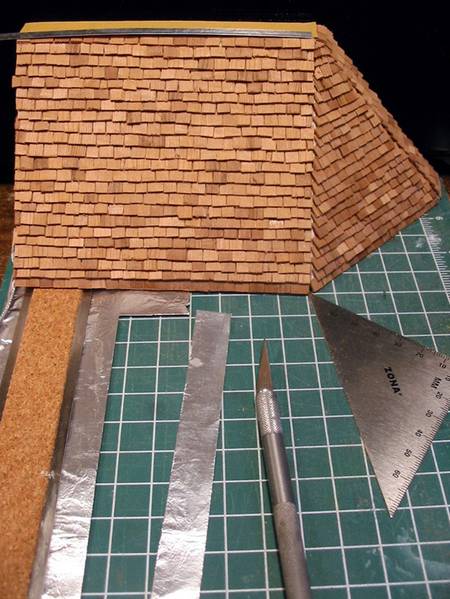
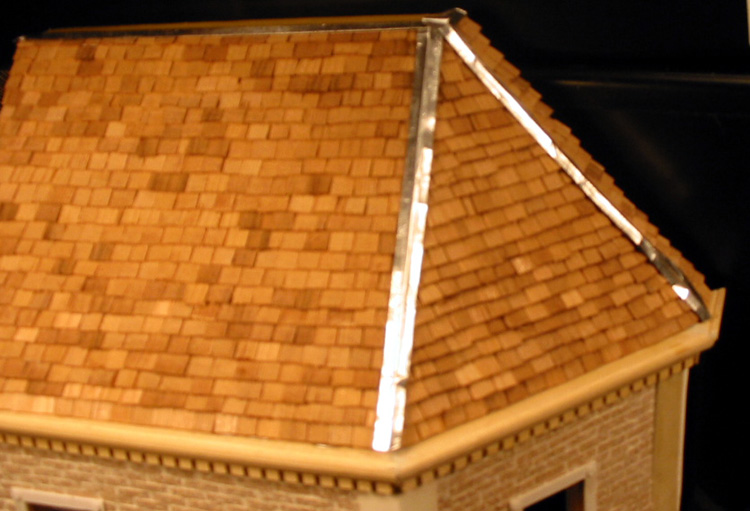
I used variety and size differences as I moved from row to row; this helped provide an offset so that no two shingle seams were the same. As with the bricks, shingles have a zig zag stair step pattern. At the corner I had to use an exacto to cut a corner off the last shingle. This helped make an easy full transition around the corner. My research showed that the large seams at the main corners should be covered with flashing (metal seam covers). This helped me at the corners; I didn't have to have a great match because the seam would be covered.
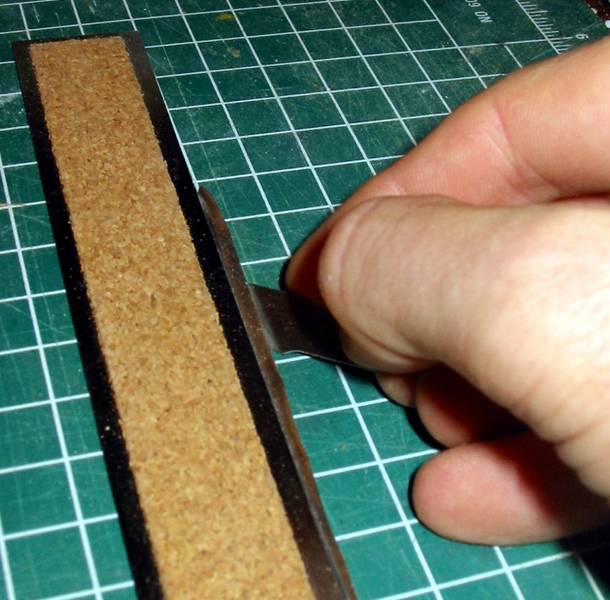
The flashing was simply a piece of household kitchen foil, cut to length. You can see in the images how I made a nice straight crease. I cut the foil to shape. Then I marked the center at the top and bottom. I then marked half of each half creating quarters. At these points I placed a metal ruler at the quarter marks and then gently slid a hobby knife under the edge at an angle. I folded over the outside edges back into the middle. This made a two-ply piece with very uniform edges. I then put the ruler on the center marks and put the knife under edge at an angle. This lifted the edge and made a crease. I glued it in place with white glue.
The flat roof covering was a piece of fine grit sand paper. I cut it to size and glued it with white glue. Once the roof assembly was done I glued it to the wall section with white glue.
The roof was a challenge because of the odd angles at the corners. This was planned as an intact roof, so I couldn't rely on battle damage in key spots to avoid good architecture. During the planning I found that there were a number of roofs made of shingles with a flat top that ended at a heavily detailed gutter. This design suited my corner need. I planned to use the foam board as my roof backing material. Not seeing the backside I did not need to worry about interior beam structures or attic detail. Roof angles can be tricky and I didn't want to waste foam board. I used regular paper and cut out templates to help this process. The roof would be two flat rectangular pieces joined with a triangular corner face piece. These would be topped off with a small rectangular flat roof piece. Once I got the template pieces made, I traced them on the foam board and cut out the end pieces. One thing you must remember, the foam boards thickness needed to be considered. Once you cut it at an angle the thickness increases. It's just like the frontal armor of the AFV that you're building for this diorama. As you angle the piece it gets thicker. This thickness creates a challenge in connecting the corner pieces together. Repeated test fitting of the four roof pieces with the building was necessary. The better the fit between building and roof the easier your project will go and the better the end result. I used white glue to glue the pieces together and let it dry.
As the roof dried I started making shingles, lots of shingles. My base resource was actual cedar dollhouse shingles. I was given a bag of these that my father got at a craft store from the dollhouse section. They are too thick and too large to use without modification. The thickness was fixed by breaking out a sander and sanding down each shingle. I sanded both sides to give it a uniform texture. The size was nice because I could get four shingles out of each piece with three cuts. I marked my sawing box with two measurements to make cutting easier. I didn't have to measure each piece. I just laid the piece in the cutting box up to the measurement and cut. In past projects I found that it is easier to cut across the grain first is best. The extra size of the piece makes the 'cross grain' cut easier. If the 'with grain' cut is made first the shingle tends to fall apart as the cross grain cut is made. By the time the shingles were cut, the roof was dry. As with the bricks a good base line is critical. When I decided to cut the shingles I was making the decision on how far apart the rows of shingles would be placed. You need to have overlap on the shingles so the base line could be no farther apart than the smallest shingle. The subsequent shingle lines are also subject to this restriction. I drew on a number of shingles lines to help guide me along adding the shingles. I used white glue and put a blob on a plastic plate. I picked each shingle up dipped an end in the glue then positioned it on the roof. I made sure to use varying sizes and widths to give visual interest and variety.
I used variety and size differences as I moved from row to row; this helped provide an offset so that no two shingle seams were the same. As with the bricks, shingles have a zig zag stair step pattern. At the corner I had to use an exacto to cut a corner off the last shingle. This helped make an easy full transition around the corner. My research showed that the large seams at the main corners should be covered with flashing (metal seam covers). This helped me at the corners; I didn't have to have a great match because the seam would be covered.
The flashing was simply a piece of household kitchen foil, cut to length. You can see in the images how I made a nice straight crease. I cut the foil to shape. Then I marked the center at the top and bottom. I then marked half of each half creating quarters. At these points I placed a metal ruler at the quarter marks and then gently slid a hobby knife under the edge at an angle. I folded over the outside edges back into the middle. This made a two-ply piece with very uniform edges. I then put the ruler on the center marks and put the knife under edge at an angle. This lifted the edge and made a crease. I glued it in place with white glue.
The flat roof covering was a piece of fine grit sand paper. I cut it to size and glued it with white glue. Once the roof assembly was done I glued it to the wall section with white glue.

About the Author


FROM: NORTH CAROLINA, UNITED STATES
I modeled when I was a teenager. College, family and work stopped me for a while. Then I picked it back up after about 12 years off. My main focus is dioramas. I like the complete artistic method of story telling. Dioramas involve so many aspects of modeling and I enjoy getting involved in the ...
Copyright ©2021 by Scott Lodder. Images and/or videos also by copyright holder unless otherwise noted. The views and opinions expressed herein are solely the views and opinions of the authors and/or contributors to this Web site and do not necessarily represent the views and/or opinions of Armorama, KitMaker Network, or Silver Star Enterrpises. All rights reserved. Originally published on: 2005-10-22 00:00:00. Unique Reads: 39489

WEB HOSTING BY


Copyright ©2021 Armorama and Kitmaker Network, a subsidiary of Silver Star Enterprises
All Rights Reserved. Please read our Conditions of Use and Privacy Policy.
All Rights Reserved. Please read our Conditions of Use and Privacy Policy.