

Яusso-Soviэt Forum: Cold War Soviet Armor
For discussions related to cold war era Russo-Soviet armor.
For discussions related to cold war era Russo-Soviet armor.
Hosted by Jacques Duquette
Tamiya T-55A with CMK resin interior kit
Removed by original poster on 05/13/19 - 20:35:29 (GMT).

Spiderfrommars

Joined: July 13, 2010
KitMaker: 3,845 posts
Armorama: 3,543 posts
Posted: Sunday, June 05, 2011 - 05:19 AM UTC
Quoted Text
A perfect picture to demonstrate the turret shamfer on the bottom edge and the little vent hole on the bottom edge,
Thx
 Yeah!
Yeah!here http://dishmodels.ru/wshow.htm?p=1511
You can find the rest
cheers
Removed by original poster on 05/13/19 - 20:35:40 (GMT).

stephane

Joined: October 10, 2005
KitMaker: 432 posts
Armorama: 429 posts
Posted: Sunday, June 05, 2011 - 06:49 AM UTC
Sorry Matthew but the T55 don't have T72 sprockets but T55 sprockets with a new ring equiped with T72 style teeth (i hopes you understood what i means).
Spiderfrommars
Joined: July 13, 2010
KitMaker: 3,845 posts
Armorama: 3,543 posts
Posted: Sunday, June 05, 2011 - 07:51 AM UTC
Quoted Text
Sorry Matthew but the T55 don't have T72 sprockets but T55 sprockets with a new ring equiped with T72 style teeth (i hopes you understood what i means).


https://armorama.kitmaker.net/forums/175043&page=1
http://www.network54.com/Forum/47209/thread/1164253428/1164509948/T55%27s+with+T72+tracks+question%2C+specifically+the+drive+sprocket....
Removed by original poster on 05/13/19 - 20:35:54 (GMT).
Removed by original poster on 05/13/19 - 20:36:09 (GMT).
guni-kid

Joined: July 21, 2007
KitMaker: 521 posts
Armorama: 514 posts

Posted: Sunday, June 05, 2011 - 09:49 PM UTC
Quoted Text
Yes that's it Marian!
here a little walkaround of it
https://picasaweb.google.com/polar123tank/T55_Poznan_Cytadela#
Is it perhaps yours?
Nope, this is not my walkaround, my own pics of it are not published (so far). I just recognized the tank itself on the pic an thought, it must be the Poznan one... and so it was

To the sprockets: its not only the ring in the middle as stated here: the T-72 sprockets have 14 teeth as have the updated T-55 tanks. The older ("original" -> I just don't have the right identification number at hand) T-55 tracks demand the older 13 teeth sprockets... the funny thing is: there is yet another track-style buzzing around, looking like T-72 tracks but only 500mm wide and with 13-teeth sprockets... used mostly on the heavy artillery tractors AT-T and its variants. See my feature of the BAT-M:
https://armorama.kitmaker.net//features/1857
Spiderfrommars
Joined: July 13, 2010
KitMaker: 3,845 posts
Armorama: 3,543 posts
Posted: Sunday, June 05, 2011 - 10:09 PM UTC
T-55 13 teeth sprocket

T-55 14 teeth sprocket

t-72 sprocket

If I were Matthew I'd use the t-72 sprocket wheel. After all although it would be a flaw, sprocket wheels are very similar
Furthermore as far as i know, there are no separated t-55 14 teeth sprocket wheels on sale
T-55 14 teeth sprocket
t-72 sprocket
If I were Matthew I'd use the t-72 sprocket wheel. After all although it would be a flaw, sprocket wheels are very similar
Furthermore as far as i know, there are no separated t-55 14 teeth sprocket wheels on sale
Removed by original poster on 05/13/19 - 20:36:31 (GMT).
jointhepit

Joined: May 14, 2006
KitMaker: 3,829 posts
Armorama: 881 posts
Posted: Monday, June 06, 2011 - 01:30 AM UTC
how the h did i miss this post?
great work Karkov, I have same kits and will use your sweat swearing and tears for my benifit
keep up the great work!
great work Karkov, I have same kits and will use your sweat swearing and tears for my benifit
keep up the great work!

Removed by original poster on 05/13/19 - 20:37:08 (GMT).
Removed by original poster on 05/13/19 - 20:37:28 (GMT).
Spiderfrommars
Joined: July 13, 2010
KitMaker: 3,845 posts
Armorama: 3,543 posts
Posted: Monday, June 06, 2011 - 05:56 AM UTC

Well Matthew as far as i know the gun mantlet is the same for all the versions.
Different are the bolted plates (behind the gun mantlet) which join the fabric cover to the turret
Russian:

Czech (equal to the russian one)
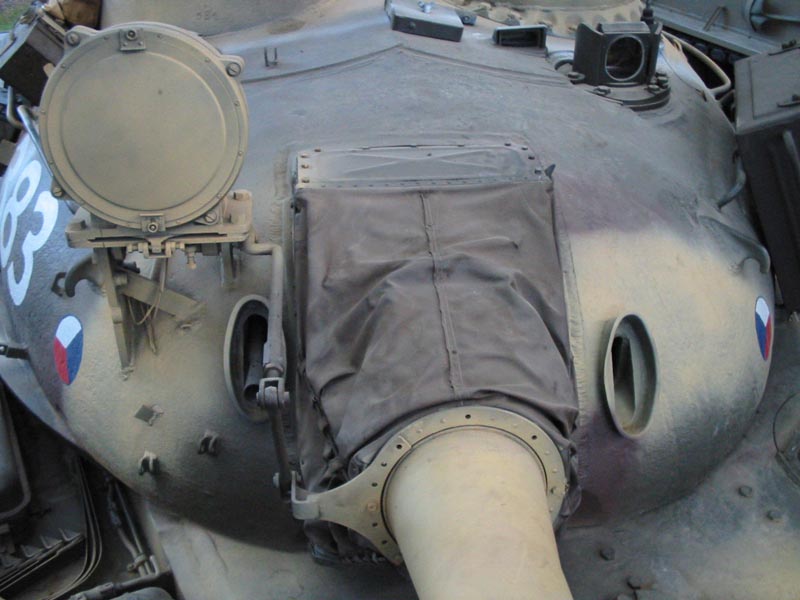
Polish

Quoted Text
And thx for all your usefull unfo and pictures btw
I'm very glad to help you
cheers
Removed by original poster on 05/13/19 - 20:37:55 (GMT).
Removed by original poster on 05/13/19 - 20:38:14 (GMT).
Spiderfrommars
Joined: July 13, 2010
KitMaker: 3,845 posts
Armorama: 3,543 posts
Posted: Monday, June 06, 2011 - 11:00 AM UTC
Quoted Text
With a ripped dust cover, not sure yet though, depends on time
It would be great Matthew
Quoted Text
Made a start on the lamp guards,
The Tamiya ones are over scale, and not very nice, big lumpy bar at the bottom with the light mounts on it, the lights should I think on all T-55's mount sideways, bolted to the uprights.
I simply bent some brass rod to shape using the kit part as a pattern, then glued them on with SG and baking powder.
Well done! I didn't do that improvement on my T-55 and I'm quite sorry. Although in my opinion tamiya lamp frame isn't so bad and spite of I narrowed the tubes with sandpaper and blades, it still looks too thick.
On my next T-55 model i'll do it for sure
Congrats and thanks for sharing your build
PS
Quoted Text
...then glued them on with SG and baking powder.
I haven't known. Could baking powder + ca glue make the bond stronger than the one made only with super glue?
I'd like to know how you can do it
Cheers
Kharkov
Joined: April 09, 2011
KitMaker: 181 posts
Armorama: 175 posts
KitMaker: 181 posts
Armorama: 175 posts
Posted: Tuesday, June 07, 2011 - 01:04 AM UTC
Spiderfrommars
Joined: July 13, 2010
KitMaker: 3,845 posts
Armorama: 3,543 posts
Posted: Tuesday, June 07, 2011 - 04:59 AM UTC
I've known the mixture between ca glue and baking soda but I haven't known your tip with baking powder.
If it make stronger bonds and set the Ca glue as concrete It will be very useful for me who i have always some problem with ca glue
Thanks a milion!, i'll try for sure
If it make stronger bonds and set the Ca glue as concrete It will be very useful for me who i have always some problem with ca glue
Thanks a milion!, i'll try for sure

junglejim

Joined: February 18, 2003
KitMaker: 1,728 posts
Armorama: 1,629 posts

Posted: Tuesday, June 07, 2011 - 05:15 AM UTC
You might want to re-think the CA/baking soda/powder combination. Some aircraft modellers report a chemical reaction later on (couple years) from the sodium that causes a problem (oozing joints,destruction of finish). Use an inert filler like micro-balloons.
Jim
Jim
Kharkov
Joined: April 09, 2011
KitMaker: 181 posts
Armorama: 175 posts
KitMaker: 181 posts
Armorama: 175 posts
Posted: Tuesday, June 07, 2011 - 05:26 AM UTC
Kharkov
Joined: April 09, 2011
KitMaker: 181 posts
Armorama: 175 posts
KitMaker: 181 posts
Armorama: 175 posts
Posted: Tuesday, June 07, 2011 - 07:19 AM UTC
Kharkov
Joined: April 09, 2011
KitMaker: 181 posts
Armorama: 175 posts
KitMaker: 181 posts
Armorama: 175 posts
Posted: Tuesday, June 07, 2011 - 12:11 PM UTC
Spiderfrommars
Joined: July 13, 2010
KitMaker: 3,845 posts
Armorama: 3,543 posts
Posted: Tuesday, June 07, 2011 - 06:02 PM UTC
You and yor "fliyng tweezers" have done a stunning work Matthew. Maybe the real ones have a cruder construction than yours, but anyway incredibly nice in my opinion


Now if you still have a bit of patience you could add the electrical duct on the rear of them


Regarding the baking powder tip, I've found on internet some treads about a putty done with ca glue and talcum powder. Have you ever tried?
Outstanding work so far. I can't wait to see it finished
cheers and thanks again for sharing
Now if you still have a bit of patience you could add the electrical duct on the rear of them
Regarding the baking powder tip, I've found on internet some treads about a putty done with ca glue and talcum powder. Have you ever tried?
Outstanding work so far. I can't wait to see it finished
cheers and thanks again for sharing
Kharkov
Joined: April 09, 2011
KitMaker: 181 posts
Armorama: 175 posts
KitMaker: 181 posts
Armorama: 175 posts
Posted: Wednesday, June 08, 2011 - 12:16 AM UTC
 |

WEB HOSTING BY


Copyright ©2021 Armorama and Kitmaker Network, a subsidiary of Silver Star Enterprises
All Rights Reserved. Please read our Conditions of Use and Privacy Policy.
All Rights Reserved. Please read our Conditions of Use and Privacy Policy.