Campaigns
Where Armorama group builds can be discussed, organized, and updates posted.
The Great War 11-11-11 (official thread)
jjasmine
Visit this Community
Connecticut, United States
Joined: January 16, 2011
KitMaker: 112 posts
Armorama: 33 posts
Posted: Thursday, December 22, 2011 - 05:44 PM UTC

Quoted Text

Hello Jeffrey,
From the few color/colorized photo's I have, they seem to be a either brown, green or gray. It depends on which country and service that vehicle was used by.
If you can tell me what country and service you will be building your model for, I think I can get a color for you.
Cheers,
Bruce


Hi Bruce,

I did find a few color photos to use as a reference. I am planning on making this a British vehicle and was going to paint it an olive green color. I would love to hear any suggestions you have and would also love to see any photos depicting unit id painted on the vehicle as well.

Thanks much for your help.
grayghost666
#021
Joined: August 02, 2007
KitMaker: 2,458 posts
Armorama: 656 posts
Posted: Thursday, December 22, 2011 - 09:42 PM UTC
Hello Jeffrey,
The books in questions are too big to scan, each are 3 feet by 5 feet by 2 1/2 feet and my scanner is only about 8 inches, but I can tell you what each country used what color:
England:
R.N. Gray
R.A. Khaki
R.F.C. Gray or Bluish/Gray
France:
All Services Bluish/Gray
Italy:
All Services Gray
Austro-Hungarian:
All Services Gray or Brown
Germany:
All Services Gray
Russia:
All Services Gray or Khaki
U.S.A.
All Services Gray or Olive Green ( I found it in a book by John Keegan )
This also carries over to armored vehicles later on in 1917-1918 as far as I can tell.

I have given the staff X-Mass off for 3 weeks that started this last Monday with pay. So I will be handling all request for any info till then.

Cheers,
Bruce
jjasmine
Visit this Community
Connecticut, United States
Joined: January 16, 2011
KitMaker: 112 posts
Armorama: 33 posts
Posted: Friday, December 23, 2011 - 06:49 AM UTC
Thanks for that, Bruce. I will be painting the vehicle in Khaki instead of Olive Green, I think I have some Khaki paint on the workbench somewhere.
jjasmine
Visit this Community
Connecticut, United States
Joined: January 16, 2011
KitMaker: 112 posts
Armorama: 33 posts
Posted: Friday, December 23, 2011 - 11:56 AM UTC
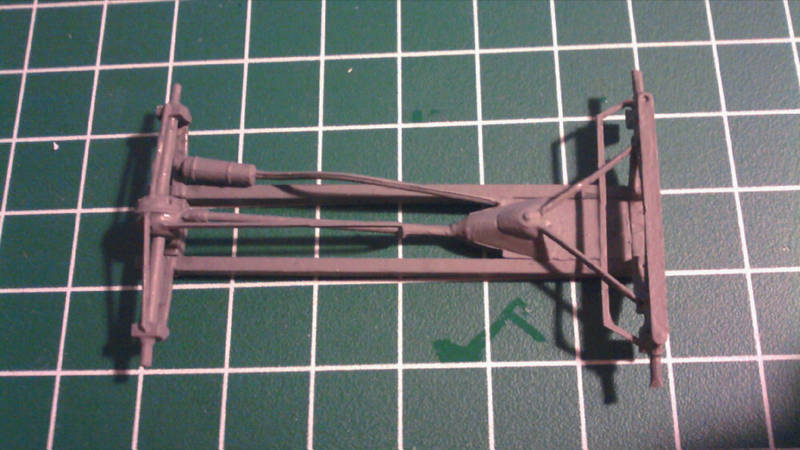
Finished the undercarriage and drive train on my Model T. The quality of the kit is not the best and many of the small parts were broken on the sprue and needed repair. The fit was also poor and I spent a lot of time sanding to get things to go together. Despite the problems, I am satisfied with how it looks so far.


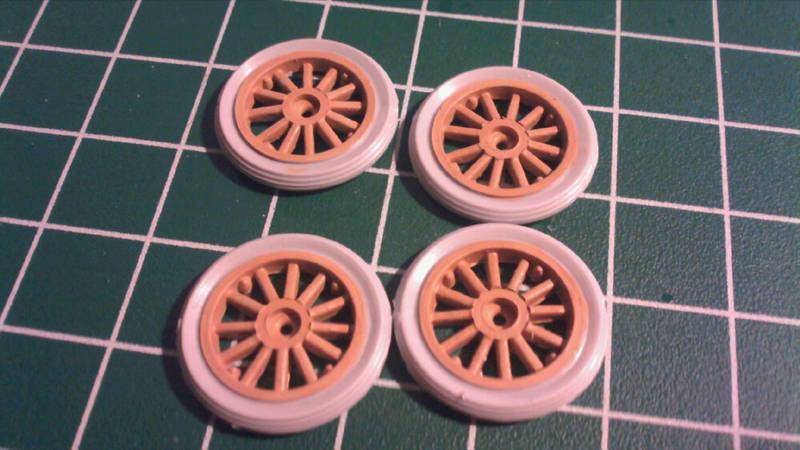
I'm hoping things look level and true once I get the wheels and body on, but I am expecting to have to do some more extra work to get the fit I want. I painted the wheels in a base coat of wood, I will go over them with khaki and leave some streaks of the wood color showing to simulate paint flaking from the wheels.

vonHengest
Visit this Community
Texas, United States
Joined: June 29, 2010
KitMaker: 5,854 posts
Armorama: 4,817 posts
Posted: Friday, December 23, 2011 - 02:40 PM UTC
Nice to see your progress Jeffrey, it looks like the frame pieces lined up together well. I'm hoping that the body structure doesn't give you as much trouble.
RedDuster
Visit this Community
England - South East, United Kingdom
Joined: March 01, 2010
KitMaker: 7,078 posts
Armorama: 248 posts
Posted: Monday, December 26, 2011 - 06:09 AM UTC
Slow but steady progress, the anti fouling has been masked & painted, and a number of smaller components spryed on the "sprue" or "wafer"


Boiler room vents have been added to the funnel casings, along with cable reels and winches etc to maindeck.


next job will be the funnels and their stays, then the 12pdr guns on the maindeck followed by the boat racks, which are on the etched fret

Si
Frigate
Visit this Community
West Virginia, United States
Joined: April 22, 2006
KitMaker: 500 posts
Armorama: 50 posts
Posted: Monday, December 26, 2011 - 09:02 AM UTC
Gentlemen,
Well, I'm running more than a little behind with my campaign work. But the WWI campaign is near and dear to the heart. So I've finally decided on my entry - the SPAD VII. Normally I build in the smaller scales, (1/144th and 1/72nd) but those scales are starting to get a slight bit difficult. So I've decided to take the plunge with a Roden 1/32 scale. I managed to get the etched sheet for it along with the Pheon decal sheet.

It will definitely not be a quick build. I just plain decided to take my time and do the best job I can with this one. At present, I'm leaning towards French markings, but we'll see.

I'm presently finishing up my entry for the Vietnam campaign, so when that is completed, I'll post the pics of the kit, etc. for a start on this one. At least we have enough time to sit back and just enjoy the build. See ya later, folks...
ianclasper
Visit this Community
Washington, United States
Joined: September 02, 2009
KitMaker: 227 posts
Armorama: 141 posts
Posted: Tuesday, December 27, 2011 - 06:17 PM UTC
Here is my entry and yes I do know what I am letting myself in for !

IMG_6048.jpg

I intend to build a Male Mk V, scratch building new sponsons instead of the hybrid Mk I / IV things in the kit. If that does not work out, I will build a Female MK V as these kit sponsons are OK.

IMG_6037.jpg

Model Cellar Productions make some real nice replacement tracks. Each link is modeled in two pieces that are glued together. The links then clip to one another to form the tracks.

IMG_6039.jpg

Here is one of the sprues and a stretch of assembled track, showing upper and lower detail.

Ian
Railmen2000
Visit this Community
California, United States
Joined: February 17, 2007
KitMaker: 87 posts
Armorama: 65 posts
Posted: Thursday, December 29, 2011 - 10:04 AM UTC
Simon: great work on the ship. I have a couple of resin ship kits, but am hesitant to start them. Seeing your build will get me going on one of them.
Meanwhile, for this campaign, I made some progress on the MG08 for my scene. The Bandai kit is very simplified, so I changed and added some bits to make it more representable. For such a small gun, it still had quit a few injection points that needed to be filled and/or sanded. Here it is next to the instructions showing 4 parts to be assembled:

Here is a close up showing some of the bits I changed and added:

It still is not 100% accurate, but for 1/48 scale I am satisfied. Next up will be working on the trench and then the crew.
Jim
vonHengest
Visit this Community
Texas, United States
Joined: June 29, 2010
KitMaker: 5,854 posts
Armorama: 4,817 posts
Posted: Thursday, December 29, 2011 - 02:18 PM UTC
Si: Looking good, nice job on cutting the thin resin parts out!

Bruce: Those are good kits and I truly hope you enjoy your build once you're ready to pursue it. Taking your time with it is the right approach.

Ian: I really like those tracks, I really don't like those kits. There's not much of a choice out there for us though so we make do, and it's always a welcome sight to see good AM parts reach the market. I've thought about picking up a set of those as well as some of the other Model Cellar products. Did you purchase yours directly? I haven't really been able to talk to anybody who's interacted with them before.

Jim: Those guns have to be tiny in 1/48! It's great to see the extra work you're putting into it. Building and upgrading these older kits is part of what this campaign is all about
minas-ithil
#110
Visit this Community
Florida, United States
Joined: September 20, 2005
KitMaker: 248 posts
Armorama: 224 posts
Posted: Friday, December 30, 2011 - 03:15 AM UTC
ianclasper -
The Mk V Hermaphrodite, nice. Good to see more WWI armor showing up. I am glad to hear that the Model Cellar tracks were nice to work with and they look pretty good too. I am planning on using them on my MkIV Male, that I will start after the New Year.

Happy New Year,

Stephen (Minas-Ithil)
AlanL
Visit this Community
England - East Anglia, United Kingdom
Joined: August 12, 2005
KitMaker: 14,499 posts
Armorama: 11,675 posts
Posted: Friday, December 30, 2011 - 03:30 AM UTC
Hi Jeffrey,

Nice work, looking forward to developments. I just expanded my range of vehicles by adding the Model T Ford and MMGS as possible builds. I'd like to do the Rolls Royce as a Lawrence of Arabia type vehicle and the other two Fords in NWE.

Al


ianclasper
Visit this Community
Washington, United States
Joined: September 02, 2009
KitMaker: 227 posts
Armorama: 141 posts
Posted: Friday, December 30, 2011 - 08:33 AM UTC

Quoted Text

Ian: I really like those tracks, I really don't like those kits. There's not much of a choice out there for us though so we make do, and it's always a welcome sight to see good AM parts reach the market. I've thought about picking up a set of those as well as some of the other Model Cellar products. Did you purchase yours directly? I haven't really been able to talk to anybody who's interacted with them before.


I bought the tracks direct from Model Cellar:

http://modelcellar.com/

It says the tracks are for the MK IV however they are good for all versions MK I thru MK V, the MK V was designed to be fitted with 26inch tracks, however most went into service with 20inch tracks as in this kit.

As for the Emhar kit, it is a real Pile of @#$% however with some careful work it will build into something that actually looks like a MK V, same goes for the MKIV. Other than scratch build, there is little else can be done in 1/35

Here are some WIP shots:

Initial Build, I narrowed the track structure so that the Model Celler tracks would ride correctly, I removed about 1mm from the width. I used Evergreen Angle to provide re-enforcing for the corners and mounting pads for the sides. The Emhar plastic is soft, the joints are poorly defined which results in poor bonds. The Evergreen makes the joint much more stable and stronger.

IMG_6036.jpg

Sides Attached
IMG_6035.jpg

Dry Fit of Tracks
IMG_6041.jpg

Next - Sponson Rebuild.
AlanL
Visit this Community
England - East Anglia, United Kingdom
Joined: August 12, 2005
KitMaker: 14,499 posts
Armorama: 11,675 posts
Posted: Sunday, January 01, 2012 - 03:28 AM UTC
Hi Jeffery,

As far as I can tell you'll need to remove the 4 nodules from inside the wheel rims.

http://www.mtfca.com/gallery/year/1915.htm

Al
vonHengest
Visit this Community
Texas, United States
Joined: June 29, 2010
KitMaker: 5,854 posts
Armorama: 4,817 posts
Posted: Monday, January 02, 2012 - 06:34 PM UTC
I think that last bit of info was meant for Jeffrey?

Regardless, Al is correct as far as I can tell. All of the wartime photos of Model T chassis using the wood spoked wheels are devoid of the 4 bumps. Kind of a curiosity as to why they are on the kit in the first place as the civilian models didn't have them either...

Check these links out:
http://modelt.org/discus/messages/2/12174.html?1264121447
http://www.mtfca.com/discus/messages/118802/170598.html?1289871997
http://views-from-north-cecil.blogspot.com/2011_07_01_archive.html Look at the firetruck.

The best thought I can offer is that they are a crude representation of the mounting points for the tires or multi-piece rim.
JackG
Visit this Community
Ontario, Canada
Joined: May 28, 2006
KitMaker: 172 posts
Armorama: 122 posts
Posted: Monday, January 02, 2012 - 08:14 PM UTC
Here's a couple more links on the Ford:

http://www.landships.freeservers.com/tford_patrol_car.htm
http://www.mtfca.com/books/ford_times.htm

regards,
Jack
RedDuster
Visit this Community
England - South East, United Kingdom
Joined: March 01, 2010
KitMaker: 7,078 posts
Armorama: 248 posts
Posted: Monday, January 02, 2012 - 10:26 PM UTC
Jim - Jeremy, thanks for the kind words. nice to see other interesting projects coming on as well.

This Kit has very few vices, one being there is no privision for the mounting points for the funnel stays. Looking at the few close up pics of the area, there were two rails going round the funnel at the appropriate heights, there were replicated by scribing round the funnel and attaching and fitting copper wire.


the funnels were then misted light grey from a rattle can, and attached


and finally the steam pipes added from plastic rod.


a siren platform & ladders are to be added to the fwd funnel then, painted & rigged.

More soon.

Si
AlanL
Visit this Community
England - East Anglia, United Kingdom
Joined: August 12, 2005
KitMaker: 14,499 posts
Armorama: 11,675 posts
Posted: Monday, January 02, 2012 - 11:56 PM UTC

Quoted Text

I think that last bit of info was meant for Jeffrey?

Regardless, Al is correct as far as I can tell. All of the wartime photos of Model T chassis using the wood spoked wheels are devoid of the 4 bumps. Kind of a curiosity as to why they are on the kit in the first place as the civilian models didn't have them either...

Check these links out:
http://modelt.org/discus/messages/2/12174.html?1264121447
http://www.mtfca.com/discus/messages/118802/170598.html?1289871997
http://views-from-north-cecil.blogspot.com/2011_07_01_archive.html Look at the firetruck.

The best thought I can offer is that they are a crude representation of the mounting points for the tires or multi-piece rim.


Hi Jeremy,

Yes, meant for Jeffery. Thanks also for the Links.

Jack same detail on the links - thanks.

Al
ianclasper
Visit this Community
Washington, United States
Joined: September 02, 2009
KitMaker: 227 posts
Armorama: 141 posts
Posted: Wednesday, January 04, 2012 - 07:38 AM UTC
A little more progress on my MK V

This time the Sponsons:
One the left is one from a Male from a MK IV kit (same as the MK V)
One the right is my modified one from the MK V kit

There are two real problems with this part of the model:

1. The most notable is that that rear door panel, the Emhar model is perpendicular to the hull side, in reality , it should be angled.

IMG_6060.jpg

IMG_6062.jpg


2. Not as obvious is the angle of the chamfer along the base of the sponson. Looking at photos, this looked to be too steep, so as I was carving this part up, I decided to replace that panel.

IMG_6063.jpg

Here is a side view with the sponson in position, I have repositioned the machine gun mount, filling the hole and creating a new "porthole" using evergreen tube. I have added the lower door vent (white styrene) however have still to add new pistol ports (Airwaves MK IV detail set), new Rivet Lines (Archer) and cut a new vision slot on the side. My aim is to make a model that "Looks Right" which is the best that can be expected from this kit without scratch building most of it.

The only differences I have spotted between a MK IV Male Sponson and a MK V is a couple of rivet lines on the front. When I build a Male MK IV , I will do the same conversion to its sponsons. The Osprey Vanguard book on the MK V even shows a photo of a MK V with a MK IV sponson.

IMG_6067.jpg

IMG_6076.jpg

IMG_6072.jpg

The next step is the Un-ditching rails, the kit has the supports however lacks the rails - Evergreen Angle to the Rescue !


Ian
Murdo
Visit this Community
Scotland, United Kingdom
Joined: May 25, 2005
KitMaker: 2,218 posts
Armorama: 1,050 posts
Posted: Wednesday, January 04, 2012 - 07:50 AM UTC
Very nice Ian and Si... Some lovely work starting to appear here!

nico37
Visit this Community
Indre-et-Loire, France
Joined: May 23, 2011
KitMaker: 651 posts
Armorama: 126 posts
Posted: Thursday, January 05, 2012 - 12:06 AM UTC
Hi all and happy new year !

There's a lot of very very good works here ! And a lot of different subjects, that's great !

Here is mine.
I planed first to scratch build a french Schneider but i changed my mind because i will have not the time for this (i enlisted in to many campaigns....shame on me...).
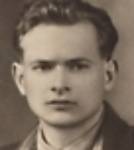
So i'm going to sculpt a figure of a french pilot who called Maurice Boyau. I decided this after seeing a picture if him in a magazine dedicated to military planes.
A little bit of History:
Maurice Boyau was a rugbyman (XV rugby), 6 times in the national french team and he was one time french champion.
During the war he first fought in infantry and joined air army in 1915; he winned 35 officials air victories .
He continued to play rugby during the war in the army team and missed two times in front of the ......New-zealand army team !
He was shot to death in september of 1918.
The city of Dax (south west of France), where he played rugby before the war gave his name to the local stadium.

So here is the begining of the sculting:


That's all, any kind of comment is welcomed
Cheers
nico
RedDuster
Visit this Community
England - South East, United Kingdom
Joined: March 01, 2010
KitMaker: 7,078 posts
Armorama: 248 posts
Posted: Thursday, January 05, 2012 - 12:30 AM UTC
Thanks Murdo,

Nico - very informative pics on the sculpting process, and great looking figure, will follow with much interest.

Si
Tailor
Visit this Community
Nordrhein-Westfalen, Germany
Joined: May 26, 2008
KitMaker: 1,168 posts
Armorama: 256 posts
Posted: Thursday, January 05, 2012 - 12:44 AM UTC
Beautiful work, Nico!
I always envy the abilities of the figure modellers espcially the ones who build their own figures. Sculpting totally escapes me! What kind of clay/dough do you use?


Ian-
Great to see someone taking good care of this classic. This will be a good reference for the day I dare touch the Emhars in my stash!

Si-
Good work - as always!


Jeremy-
Would HMS Dreadnought qualify as a subject? She didn't put her mark in fighting, but she definitely sparked the race to the war, by giving inferior sea powers /(such as Germany) the chance to challenge Britain pre-dominance.
Just wondering?

Cheers,
Guido
nico37
Visit this Community
Indre-et-Loire, France
Joined: May 23, 2011
KitMaker: 651 posts
Armorama: 126 posts
Posted: Thursday, January 05, 2012 - 02:57 AM UTC
Thanks a lot Simon and Guido.

@ Guido: i used Milliput epoxy (yellow) on metallic wire for the skeletton, and when it has dried enough (24 hours later without need to be warm) i used Super Sculpey (pink) which need to be warm to dry.
I'll try to warm it only when it is finish, but until now i couldn't and warmed my figs in several steps to save fresh parts....will see if i resist !

cheers
nico
captnenglish
Visit this Community
California, United States
Joined: May 20, 2008
KitMaker: 1,184 posts
Armorama: 770 posts
Posted: Thursday, January 05, 2012 - 03:44 AM UTC
I'm a little on the slow side sometimes; if I wanted to enter this kit, is that ok?
http://www.redlancers.com/displaypic.asp?item=26592&hot= or is this stricly a vehicle/dio campaign? Either way I'm good and I will be knocking this bust out I just wanted to know.