Campaigns
Where Armorama group builds can be discussed, organized, and updates posted.
The Great War 11-11-11 (official thread)
AlanL
Visit this Community
England - East Anglia, United Kingdom
Joined: August 12, 2005
KitMaker: 14,499 posts
Armorama: 11,675 posts
Posted: Sunday, January 15, 2012 - 08:28 AM UTC
Hi Jeffery,

Figure is looking good.

Hi Murdo,

Terrific stuff, I love it.

Al
RedDuster
Visit this Community
England - South East, United Kingdom
Joined: March 01, 2010
KitMaker: 7,078 posts
Armorama: 248 posts
Posted: Sunday, January 15, 2012 - 10:12 PM UTC
Murdo, Great work on the Whippit interior, looking forward to seeing more on that.

Quite an amount of progress on the Kent over the weekend.

Firstly the basic Funnel stays were completed & painted, the base colour is a dirty white, to represnt the white lead & tallow coating applied to standing wire rigging (once all the stays are added yhis will be dirtied down with a black / rusty wash). Also deck supports have been added for the overhang on deck abeam of the fwd funnel on the port side. these are lengths of 10though brass rod fitted fitted into holes pre drilled in the deck below. In this pic the have not been cut length. Also the conning tower / lower fwd superstructure has been assembed & test fitted.


The two decks port and starboud abeam of the fwd funnel have been added (after the deck supports on the port side were cut to length & painted.) and the boat racks added.


The remainder of the funnel stays were added next.


The fwd supperstructure has been painted and ralings added.


The Fwd fed superstructure and the walkway connecting the fo'c's'le to the after superstructer have been added. The walkway fits onto rebates in the boat racks, and i was pleasently supprised as the accuracy of the fit.


Final job done over the weekend was to start prep on the wheelhouse & bridge. Again the kit component came with sold bulwarks, these were removed, as on the real ship this area just had railings covered with canvas dodgers. (I did contemplate scratchbuilding this area, as the wheelhouse has quite large windows. However I decided against so far. will see how this looks painted & railed and maybe reconsider.

more soon

Si

RedDuster
Visit this Community
England - South East, United Kingdom
Joined: March 01, 2010
KitMaker: 7,078 posts
Armorama: 248 posts
Posted: Sunday, January 15, 2012 - 10:16 PM UTC
Whoops forgot to add ths pic of the wheelhouse / bridge & that P/E doors from an old fret were also added.


Si
ianclasper
Visit this Community
Washington, United States
Joined: September 02, 2009
KitMaker: 227 posts
Armorama: 141 posts
Posted: Sunday, January 22, 2012 - 12:04 PM UTC
I have been battling with the next stage of the MK V, that being the ditch beam rails. I am now at a stage that I am happy with the results and am ready to move on to the stage of the build. Following are my photos of this rather tricky part of the build. The Emhar represents a post war MK V, many lost the rails leaving only the supports. I scratch built the rest from Evergreen .100 angle. This may be a little on the large side, however the impression certainly works with my eyes ! The rails on the MK V wander in all directions which made fabrication a pain, add to this that LH and RH are symmetrical just to add to the pain ! The MK IV is a lot simpler and the Emhar kit does include crude rails which could be used as patterns.


LEFT 3/4 FWD
IMG_6200.jpg

LEFT 3/4 REAR
IMG_6201.jpg

FRONT
IMG_6202.jpg

REAR
IMG_6204.jpg

FRONT - LOOKING DOWN
IMG_6207.jpg

REAR - LOOKING DOWN
IMG_6205.jpg

CLOSEUP OF REAR
IMG_6208.jpg

Next - Rivets and other details
captnenglish
Visit this Community
California, United States
Joined: May 20, 2008
KitMaker: 1,184 posts
Armorama: 770 posts
Posted: Sunday, January 22, 2012 - 12:22 PM UTC
I'm going to be starting my entry this week as it finally arrived
vonHengest
Visit this Community
Texas, United States
Joined: June 29, 2010
KitMaker: 5,854 posts
Armorama: 4,817 posts
Posted: Sunday, January 22, 2012 - 03:08 PM UTC
Si: I did not realize that you were making a waterline model, are you going to be creating a base for her? Your detailing is looking great!

Ian: Keep us posted on your progress, that beast is looking great!

Matthew: Great, Can't wait!
nico37
Visit this Community
Indre-et-Loire, France
Joined: May 23, 2011
KitMaker: 651 posts
Armorama: 126 posts
Posted: Sunday, January 22, 2012 - 08:00 PM UTC
Hi,

thanks Stephen for the additinals details and for the photo, i didn't have this one.I don't know if the photo which i use for my sculp is free of rights (taken in a magazine and no found on the web) so i did not post a scan of it here...

Simon: i don't know a lot about warships but you do a great great work on yours ! I really like the way it goes, congrats and i will look forward.

Ian: you'ra absolutely right to be happy with the result, you done a good scratch work, the base kit is well enhanced like that !

Here is a little update for the work on the jacket:


Cheers
nico
RedDuster
Visit this Community
England - South East, United Kingdom
Joined: March 01, 2010
KitMaker: 7,078 posts
Armorama: 248 posts
Posted: Sunday, January 22, 2012 - 11:06 PM UTC
Nico, Thanks for your kind words, Your sculpting is impressive, will be following closely.

Jeremy, Yes I will be putting the Kent on a water base. (Frankly there are so many fragile bits (Gun Barrels, Bridge wings, davits etc) sticking out past the side of the hull it is needed. Will be the old tinfoil method. Which will the next job, simple & effective.

Right on with another fairly good dose of progress over the weekend.

Well started with a minor setback whilst painting the funnel stays, caught some of the stays with thwe brush and bent them, so they had to be replaced. No big shakes, just mildly anoying.


Next I added the Vents and Capstains to the Fo'c'sle & Quarterdeck.


The raised walkway had it'r railings added as did the area of the after superstructure that was covered by a canvas dodger.


The canvas dodger was simulated using watered PVA glue gently applied to railings to ceate a film.


I have also stared painting the ship's boats. As trhe ship was not repainted, I decided that the boats would not have been either, so I am retaining the pre war scheme, including the upper most strake of the hull of the pulling being either red or green to signify which side of the ship it was carried on. The lower hulls of the pulling boats will be black & the steam launches anti fouling red.


The etch cross braces that support the bridge we added next, dropping very neatly into place.


Finally an overall view of where she stands at the moment. I have also sone a basic paint job on the bridge, needs a bit of tidying up before railings / dodgers are added, along with all the bits & peices of detail.


next job, on the base, (nest weekend I hope)

Si
Murdo
Visit this Community
Scotland, United Kingdom
Joined: May 25, 2005
KitMaker: 2,218 posts
Armorama: 1,050 posts
Posted: Monday, January 23, 2012 - 06:33 AM UTC
Excellent work guys, some really cracking models appearing here!


vonHengest
Visit this Community
Texas, United States
Joined: June 29, 2010
KitMaker: 5,854 posts
Armorama: 4,817 posts
Posted: Monday, January 23, 2012 - 05:43 PM UTC
Nico: I don't know if you're aware of this, but your figure sculpting is improving still.

Si: I love the fine details, but as you pointed out they are very fragile and it's part of why I am hesitant to build ships. We're really enjoying your progress photos, and i would like to see similar photos of your foil method for creating the base. I have yet to create an ocean base and would like to see your technique in progress.
Buckeye198
Visit this Community
Ohio, United States
Joined: May 02, 2010
KitMaker: 596 posts
Armorama: 265 posts
Posted: Monday, January 23, 2012 - 06:00 PM UTC
Simon, I'm looking forward to seeing how that base turns out too...I've got one halfway done for the Marine Corps Campaign, but I could definitely use some master-advice
RedDuster
Visit this Community
England - South East, United Kingdom
Joined: March 01, 2010
KitMaker: 7,078 posts
Armorama: 248 posts
Posted: Monday, January 23, 2012 - 09:31 PM UTC
Jeremy - Robby

Thanks for the comments guys. Will post progress pics of the base as it comes along. Hope to get started on it at the weekend.

Si
captnenglish
Visit this Community
California, United States
Joined: May 20, 2008
KitMaker: 1,184 posts
Armorama: 770 posts
Posted: Wednesday, January 25, 2012 - 10:35 AM UTC
Here's my started entry w/today's date
vonHengest
Visit this Community
Texas, United States
Joined: June 29, 2010
KitMaker: 5,854 posts
Armorama: 4,817 posts
Posted: Wednesday, January 25, 2012 - 12:01 PM UTC


When you post an image from the Kitmaker gallery, click the small link button next to the source code. A new line of code will appear under the original code, this is what you want to paste here. You don't need to use the img function when you do this.

Looks like a nice bust!
captnenglish
Visit this Community
California, United States
Joined: May 20, 2008
KitMaker: 1,184 posts
Armorama: 770 posts
Posted: Wednesday, January 25, 2012 - 04:59 PM UTC

Quoted Text


When you post an image from the Kitmaker gallery, click the small link button next to the source code. A new line of code will appear under the original code, this is what you want to paste here. You don't need to use the img function when you do this.

Looks like a nice bust!


I'm an historian (by education at least), not an engneer! Thanks for posting this for me. Not shown in the pic is the helmet and some details to be added later. I began painting today and will try to post more pics.
AlanL
Visit this Community
England - East Anglia, United Kingdom
Joined: August 12, 2005
KitMaker: 14,499 posts
Armorama: 11,675 posts
Posted: Wednesday, January 25, 2012 - 07:51 PM UTC
Hi Simon, Nichilas and Ian,

nice progress guys.

Cheers

Al
AlanL
Visit this Community
England - East Anglia, United Kingdom
Joined: August 12, 2005
KitMaker: 14,499 posts
Armorama: 11,675 posts
Posted: Saturday, January 28, 2012 - 01:25 AM UTC
Hio folks,

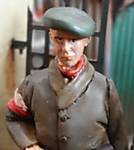
Spent a few hours trawelling the net for WW1 Tommies and came across this chap from Warriors:


What do you think? Is that a leather jerkin and if so would it be appropriate? They are supposed to have a Lewis Gunner to but I can find a pic.

Cheers

Al

PS: Has anyone any thoughts about 54mm figures against 1/35 scale vehicles? Tommies War have some excellent figures but I'm concerned they might dwarf the vehicles!

A
Tailor
Visit this Community
Nordrhein-Westfalen, Germany
Joined: May 26, 2008
KitMaker: 1,168 posts
Armorama: 256 posts
Posted: Saturday, January 28, 2012 - 02:28 AM UTC

Quoted Text

...

PS: Has anyone any thoughts about 54mm figures against 1/35 scale vehicles? Tommies War have some excellent figures but I'm concerned they might dwarf the vehicles!

A


Some chaps are taller than others...
I think it's not illegal to use a 54mm figure, but it depends a bit on the pose of the figure in question.
Cheers,
Guido
JackG
Visit this Community
Ontario, Canada
Joined: May 28, 2006
KitMaker: 172 posts
Armorama: 122 posts
Posted: Saturday, January 28, 2012 - 02:56 AM UTC
According to Wikipedia the leather jerkin was issued to troops for cold weather protection.


Regarding 54mm scale - just as in 1/35, you will find some discrepancies in height ratios amongst the many manufacturers/sculptors. Given the subject matter, one really hasn't much choice but to use the slightly larger scale as only ICM and Masterclub produce 1/35.

The difference in scale when posed with a vehicle will likely be worse the smaller the vehicle, such as a Model T Ford.
Might help to have the 54mm figure standing lower than the vehicle, such as sinking in mud or in a bomb crater.

regards,
Jack

AlanL
Visit this Community
England - East Anglia, United Kingdom
Joined: August 12, 2005
KitMaker: 14,499 posts
Armorama: 11,675 posts
Posted: Saturday, January 28, 2012 - 06:23 AM UTC
Hi Jack, and Guido,

Thanks for the thoughts.

Al
Tailor
Visit this Community
Nordrhein-Westfalen, Germany
Joined: May 26, 2008
KitMaker: 1,168 posts
Armorama: 256 posts
Posted: Saturday, January 28, 2012 - 09:25 PM UTC
For those who have yet to see these superb figures:

http://www.tommyswar.com/#!

Cheers,
Guido
Barbarossa
Visit this Community
United Kingdom
Joined: August 25, 2005
KitMaker: 216 posts
Armorama: 215 posts
Posted: Sunday, January 29, 2012 - 01:17 AM UTC
Hey Guys,

Great to see the progress of everyone else on this campaign, nice to see something different using the World War 1 genre. Those figures at 'Tommys War' are superb......makes my figure painting look & feel very inferior.....

It's been a month or so since I updated my progress, so here's afew new pics. The Allies side of the book is more or less finished now, just need to add some more equipment & of course the ICM figures.


Once the whole trench had been given a basic airbrush, started picking out the detail. The 'wood' was firstly painted light pink, before it was given an oil wash with burnt sienna. The sandbags were painted khaki, corrugated iron & barbed wire metalics & oils. Added some ammo boxes & sapper tools & the rats are from Plus Models. Drybrushed the ground & dusted with pigments.


About to start on the German side now, hoping to get that done in the next couple of weeks......'hope'
Thanks for looking, would love to hear any comments or words of advice to make any improvements,


Thanks for now,
SIMON.
JackG
Visit this Community
Ontario, Canada
Joined: May 28, 2006
KitMaker: 172 posts
Armorama: 122 posts
Posted: Sunday, January 29, 2012 - 01:43 AM UTC
Simon, that book is looking amazing.

If I were to nitpick anything, it would be the section that has the walkway over the trench (second last photo). The groundwork appears to be hanging over the edges which seems to defy gravity.
Historically I'm not sure how the engineers or what not would approach this - chicken wire maybe or a plank to keep the dirt in place?

regards,
Jack
AlanL
Visit this Community
England - East Anglia, United Kingdom
Joined: August 12, 2005
KitMaker: 14,499 posts
Armorama: 11,675 posts
Posted: Sunday, January 29, 2012 - 02:39 AM UTC
Hi Simon,

Nice work, this is looking good. The wire cutters look a bit big, well to me anyway. Glad to see some rats and I like the sleeping Tommy.

Great stuff find progress.

Al
vonHengest
Visit this Community
Texas, United States
Joined: June 29, 2010
KitMaker: 5,854 posts
Armorama: 4,817 posts
Posted: Sunday, January 29, 2012 - 03:58 PM UTC
Guido: Quit tempting me with awesome stuff! Nah, keep it coming

Simon: I just can't believe how fun your project is! Regarding the critiques: @ Jack's= I believe that I see wooden beams bridging the span under the area that he mentioned, is this correct? @ Al's= he is right about those wire cutters being quite large. That being said however, I have often used very large wire cutters similar in size to the pair you have in your diorama. I'm not familiar with what would be available from that vintage so if you feel they are too large we can try to dig up some references for you.
One thing that I would consider is depicting some mud or puddles in one or both of the trenches as water had a habit of making a mess of things down there.