Featherlight Tanks Campaign
Namabiiru
 Associate Editor
#399
Rhode Island, United States
Joined: March 05, 2014
KitMaker: 2,888 posts
Armorama: 1,920 posts
Posted: Tuesday, June 10, 2014 - 08:21 PM UTC
Well, for better or worse, here he is: my little PzIc with scratched vent louvers, smoke projectors, storage bins, headlamps, and straps for the jerry cans and jack block. I threw in the towel on the tow cables--just could not get what I wanted out of them.
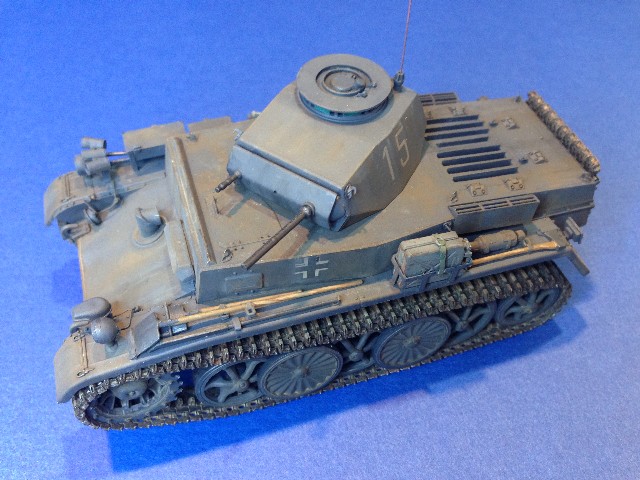
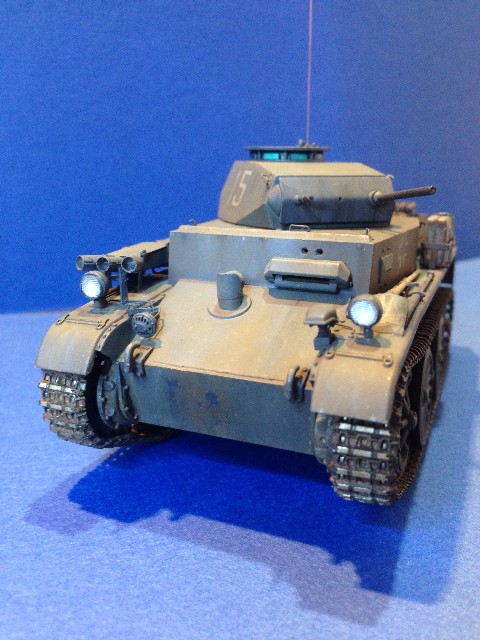
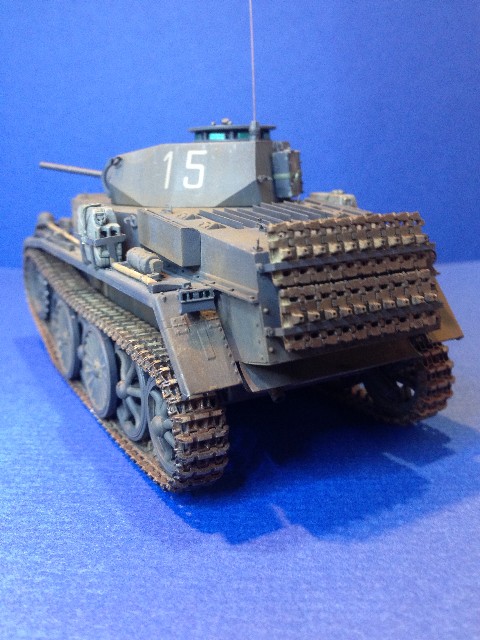
As usual, my ambition exceeded my abilities when it came to weathering

, but it's passable by my standards--was aiming for a used, but not abused, look and I think I'm close.
Ready to receive the slings and arrows of this august assembly.


Lisboa, Portugal
Joined: March 04, 2008
KitMaker: 5,386 posts
Armorama: 4,727 posts
Posted: Wednesday, June 11, 2014 - 02:38 AM UTC
Nice job Mark !
I think it looks good.
Active Builds: 0
Active Campaigns: 0
Namabiiru
 Associate Editor
#399
Rhode Island, United States
Joined: March 05, 2014
KitMaker: 2,888 posts
Armorama: 1,920 posts
Posted: Wednesday, June 11, 2014 - 10:20 AM UTC
Thanks for the kind words, John. You, Bob, and Raul will be pleased to note that I went with the kit barrel, and if I hadn't been forced to reduce the resolution on the photos you would see the nicely drilled vent holes and muzzle.


#152
Texas, United States
Joined: December 07, 2002
KitMaker: 487 posts
Armorama: 441 posts
Posted: Wednesday, June 11, 2014 - 10:37 AM UTC
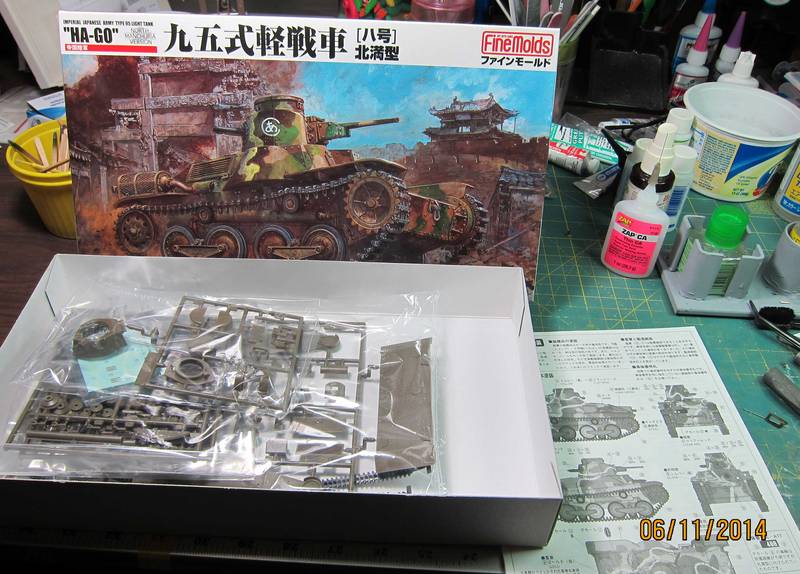
Does the Finemolds FM-18 IJA Type 95 Light Tank HA-GO qualify for the campaign?
Tom
Long time modeller. Starting when I was a teenager, then I found out about girls and college and work and kids. But now that I have one girl, no school, no work and the kids are grown, I'm back to full time modelling. My prime area of interest is armor, b
New Jersey, United States
Joined: July 25, 2006
KitMaker: 1,139 posts
Armorama: 946 posts
Posted: Wednesday, June 11, 2014 - 03:30 PM UTC
Mark, good job. You hit the mark on your desired weathering goal.been in the field for a few days, not half the war.
Some more progress on my M41. i drilled out the head lights to fill with Crystal Clear its better then painting them silver. Nearly ready to paint.


More work to follow. I think the AFV kit might have been the better choice, too late now.
Tom
"ALLONS" 11TH ACR BLACKHORSE
"Death Before Dismount"
19K40/ Dino Rider 19F10
Lisboa, Portugal
Joined: March 04, 2008
KitMaker: 5,386 posts
Armorama: 4,727 posts
Posted: Wednesday, June 11, 2014 - 11:42 PM UTC
Quoted Text
Does the Finemolds FM-18 IJA Type 95 Light Tank HA-GO qualify for the campaign?
Tom
yes Tom
Active Builds: 0
Active Campaigns: 0
New York, United States
Joined: May 27, 2013
KitMaker: 2,210 posts
Armorama: 1,712 posts
Posted: Thursday, June 12, 2014 - 12:51 AM UTC
I finished the hull, mostly, just need to get a new part to replace one I broke. Although I might be able to scratch it out of copper wire. And I'm nearly finished with the turret. I do have everything ready for painting. I also started work on the tracks. I'm going to put together half runs, paint them and connect them. Just need to take some pictures now.
I do some 3D design work. Message me for more info on what I'm doing or have done. Inquire about a product catalog.

#152
Texas, United States
Joined: December 07, 2002
KitMaker: 487 posts
Armorama: 441 posts
Posted: Thursday, June 12, 2014 - 04:08 AM UTC
Quoted Text
Quoted Text
Does the Finemolds FM-18 IJA Type 95 Light Tank HA-GO qualify for the campaign?
Tom
yes Tom
Good news!
Here is my start up photo.
Tom
Long time modeller. Starting when I was a teenager, then I found out about girls and college and work and kids. But now that I have one girl, no school, no work and the kids are grown, I'm back to full time modelling. My prime area of interest is armor, b
New York, United States
Joined: May 27, 2013
KitMaker: 2,210 posts
Armorama: 1,712 posts
Posted: Friday, June 13, 2014 - 04:46 PM UTC
Looks like a pretty good kit you got there.
I do some 3D design work. Message me for more info on what I'm doing or have done. Inquire about a product catalog.
New York, United States
Joined: May 27, 2013
KitMaker: 2,210 posts
Armorama: 1,712 posts
Posted: Saturday, June 14, 2014 - 11:14 AM UTC
I do some 3D design work. Message me for more info on what I'm doing or have done. Inquire about a product catalog.
Noord-Holland, Netherlands
Joined: January 27, 2014
KitMaker: 200 posts
Armorama: 95 posts
Posted: Sunday, June 15, 2014 - 09:31 AM UTC
My participation in this light weight class of fighting veciels is again an clasic item out of the pile that is long overdue to be turned into somthing,.. well we see what it's going to be.
And i wil use the Azimut T-60 update set (also old,..)


and some progress


Lego, building blocks for life
New York, United States
Joined: November 30, 2012
KitMaker: 105 posts
Armorama: 87 posts
Posted: Sunday, June 15, 2014 - 11:59 AM UTC
Here’s my entry: Academy’s 1/35 Panzer 35(t). I’ll be building it as a pre-WWII Slovak LT vz 35 from the March 1939 Hungarian-Slovak war.
I’m planning to build it pretty much OOB, although that could change as I get into the actual build. I’ll be using the Bison East European LT vz 45 decal set and a camo mask by J’s Work.
While in Prague last month, I visited the Žižkov Army Museum, which had a large (maybe 1/25 scale) model of a Czech LT vz 35. Color photos of camo 35’s seem pretty hard to come by, so I’ll use this as my main reference for the paint. The Slovak LT vz 35’s were “liberated” from the Czechs when Slovakia declared ndependence in 1939, so the camouflage is essentially the same as the Czech tanks.
After getting the Bison decal set, I realized I could probably make my own stencils for the Slovak marking and paint them on. I still might go that route, as I’ve gotten used to using stencils on my armor models where possible and really don’t like working with decals anymore. But then again, I might just get lazy and use the decals.


--
localhost: $ make install | not war
Namabiiru
 Associate Editor
#399
Rhode Island, United States
Joined: March 05, 2014
KitMaker: 2,888 posts
Armorama: 1,920 posts
Posted: Friday, June 20, 2014 - 12:04 AM UTC
Can someone explain how I can go about moving my photos into the campaign gallery?
I'm either dumber than the average kitmaker, or there is something wrong with my account. Or both?

New York, United States
Joined: May 27, 2013
KitMaker: 2,210 posts
Armorama: 1,712 posts
Posted: Saturday, June 21, 2014 - 03:48 AM UTC
I couldn't tell you. I honestly forgot how. I'll figure it out by the time I have to post up the picture for my M41. I'm almost finished with it

.
I do some 3D design work. Message me for more info on what I'm doing or have done. Inquire about a product catalog.
New Jersey, United States
Joined: July 25, 2006
KitMaker: 1,139 posts
Armorama: 946 posts
Posted: Tuesday, June 24, 2014 - 05:59 AM UTC
My M41 is now ready to paint. The Skybow kit went together pretty well. I just added photo etched chains to the gas caps.

Tom
"ALLONS" 11TH ACR BLACKHORSE
"Death Before Dismount"
19K40/ Dino Rider 19F10
New York, United States
Joined: May 27, 2013
KitMaker: 2,210 posts
Armorama: 1,712 posts
Posted: Wednesday, July 02, 2014 - 04:27 PM UTC
I'm almost finished with my M41. Just have to paint the tracks and then I'll be done.
I do some 3D design work. Message me for more info on what I'm doing or have done. Inquire about a product catalog.
Lisboa, Portugal
Joined: March 04, 2008
KitMaker: 5,386 posts
Armorama: 4,727 posts
Posted: Sunday, July 06, 2014 - 06:39 AM UTC
Working on the wheels of the little Panzer

Active Builds: 0
Active Campaigns: 0
New York, United States
Joined: March 08, 2010
KitMaker: 3,662 posts
Armorama: 3,078 posts
Posted: Sunday, July 06, 2014 - 11:51 AM UTC
Hi Guys i have been lurking in the background but this campaign is next up on my start list so I figured I would post my start up photo

havent decided yet whether to make it French or captured German colors

Active Campaigns on the bench:
Operation Fall Gelb - Pz.Kpfw. IV Ausf. C
Engineering the Future - M-26 Recovery Vehicle
115 Campaigns completed
Noord-Holland, Netherlands
Joined: January 27, 2014
KitMaker: 200 posts
Armorama: 95 posts
Posted: Thursday, July 10, 2014 - 10:00 AM UTC
Small update from my sovjet mini tank

General idea whats it going to be

And first layer of paint after primer

Lego, building blocks for life
tatbaqui
 News Writer
#040
Metro Manila, Philippines
Joined: May 06, 2007
KitMaker: 2,713 posts
Armorama: 2,451 posts
Posted: Thursday, July 10, 2014 - 11:12 AM UTC
Indeed a nice on Jan -- I like it. Cheers, Tat
Namabiiru
 Associate Editor
#399
Rhode Island, United States
Joined: March 05, 2014
KitMaker: 2,888 posts
Armorama: 1,920 posts
Posted: Thursday, July 10, 2014 - 11:21 AM UTC
Jan,
Did you paint the tracks on the tank, or do the wheels pop off? Very nice looking results either way.

Louisiana, United States
Joined: March 06, 2010
KitMaker: 3,128 posts
Armorama: 2,959 posts
Posted: Friday, July 11, 2014 - 06:07 PM UTC
Jan
All VERY cool-looking! I love it - maybe have to try one of these small Sov tank kits out - T-70, T-80, or...
There is one thing which I think you want to change in your interesting build and scenario... that broken track with the reversed loop! I doubt that this could or would happen when a track broke - I think that if the tank was moving forward, the sprocket would be dragging the track forward from the roller, and if backing up, that track would likely either run on over the roller and drop down into the road wheels, or push end-first under the roller and down to the roadies? Either route would lead to some other "arrangement than you now have. Just suggesting a change - it looks pretty odd, to me!
Bob

Noord-Holland, Netherlands
Joined: January 27, 2014
KitMaker: 200 posts
Armorama: 95 posts
Posted: Friday, July 11, 2014 - 07:31 PM UTC
Quoted Text
Jan
All VERY cool-looking! I love it - maybe have to try one of these small Sov tank kits out - T-70, T-80, or...
There is one thing which I think you want to change in your interesting build and scenario... that broken track with the reversed loop! I doubt that this could or would happen when a track broke - I think that if the tank was moving forward, the sprocket would be dragging the track forward from the roller, and if backing up, that track would likely either run on over the roller and drop down into the road wheels, or push end-first under the roller and down to the roadies? Either route would lead to some other "arrangement than you now have. Just suggesting a change - it looks pretty odd, to me!
Bob 
Hi Bob,
Thanks. You are right it looks odd, the itnted was to create a scene that showed that the driver had reversed and turned to fast, although the commander said not to and now he needs to repair the damage. I thought that the tight fast turn in reverse would create so much tension on the tracks that it could potentially break at the front idler and with that damage the fender. If all goes as planned the rear it will be in a ditch.
Quoted Text
Did you paint the tracks on the tank, or do the wheels pop off? Very nice looking results either way.
Hi Mark,
With this build I needed to glue everything to the tank, the tracks and the resin road wheels constantly broke off while fiddling with it,.. I tried though. So now it's a bit of a struggle to get everything painted

Thanks
Lego, building blocks for life
Nova Scotia, Canada
Joined: September 13, 2005
KitMaker: 96 posts
Armorama: 96 posts
Posted: Monday, July 14, 2014 - 11:20 AM UTC
I am in with a Canadian Stuart VI.

Eric
tatbaqui
 News Writer
#040
Metro Manila, Philippines
Joined: May 06, 2007
KitMaker: 2,713 posts
Armorama: 2,451 posts
Posted: Monday, July 14, 2014 - 10:24 PM UTC
Hello,
Been a while since my last update. The turret looked too bare so I thought of putting in some rivet detail:
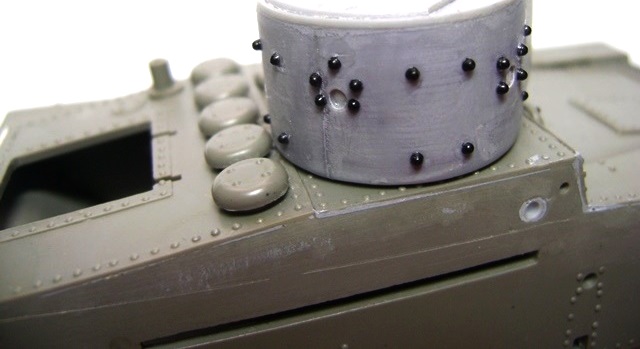
It seems my discarded-hairbrush-bristle technique doesn't go well with the overall look.

Ordered some of those Bronco round nuts but it still looked off when compared with the ones moulded on the hull.

After much search and deliberation I finally settled in cutting out bits from a 1/16 MG42 ammo belt:
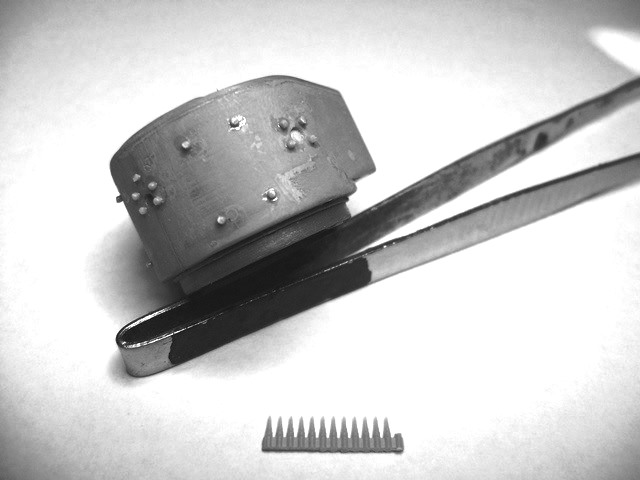
Not exactly the same, but it sure looks better than the previous pimply turret. Maybe a bit more sanding work needed:
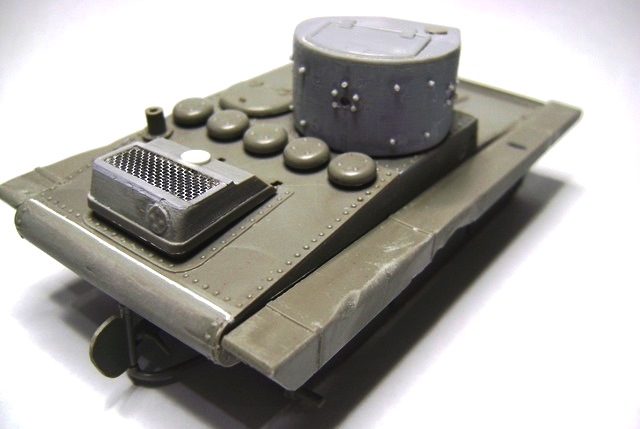
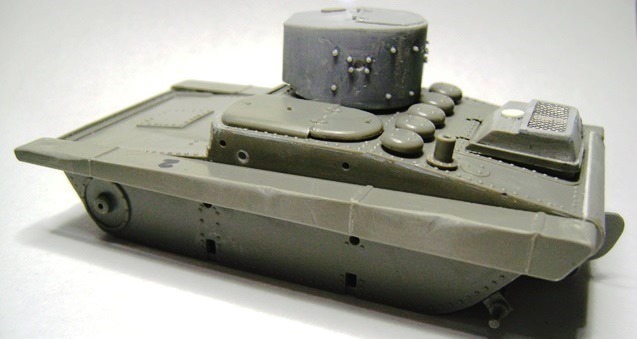
As for the other bits -- I got the mesh from a strainer courtesy of the kitchen. Bending and forming tin sheets is still something I need to learn, so for now I just applied the dents directly.
More to come (I hope)

Cheers,
Tat


 , but it's passable by my standards--was aiming for a used, but not abused, look and I think I'm close.


 , but it's passable by my standards--was aiming for a used, but not abused, look and I think I'm close.








 .
.


