Wisconsin, United States
Joined: July 30, 2013
KitMaker: 584 posts
Armorama: 525 posts
Posted: Wednesday, September 16, 2015 - 07:03 AM UTC
Florida, United States
Joined: November 23, 2012
KitMaker: 1,277 posts
Armorama: 1,254 posts
Posted: Wednesday, September 16, 2015 - 07:30 PM UTC
Minor update of the AML 90...
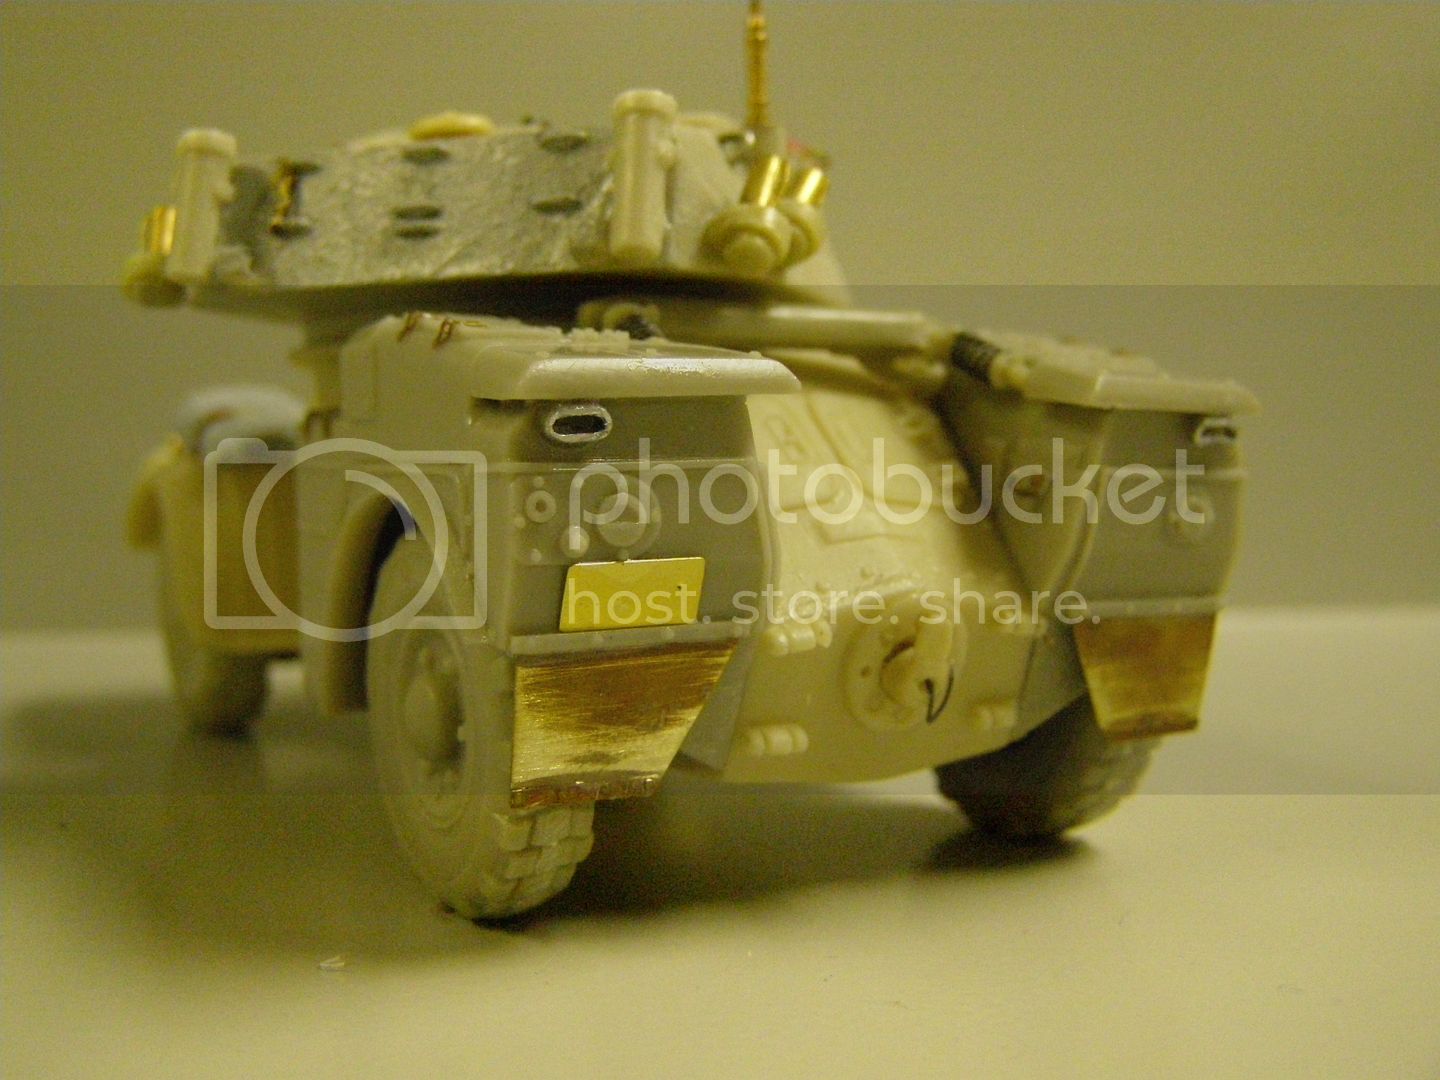
Final placement/attachment of the tools. Application of a brass PE license plate backing and shackle pins. Headlight housings on. Aftermarket fire extinguisher to right fender.

Application of PE brass hinges to stowage compartments.

Buildup of PSP track using Evergreen strip on top, in between, and on the back side, for shimming and spacing...then capped off with Grandt Line Bolts.

General view of rear...featuring the kit PE brass sheet mud flaps. Shackle pin of brass rod. Exhaust is 'crushed' aluminum tubing. Another view of the stowage compartment hinges, etc.

IPMS number 506
AMPS number 711
Lower Austria, Austria
Joined: November 02, 2007
KitMaker: 633 posts
Armorama: 599 posts
Posted: Wednesday, September 16, 2015 - 08:29 PM UTC
Excellent job on your AML-90 John.
All the details on the resin body makes it a great model.
Cheers
Walter
Vietnam
Joined: May 07, 2006
KitMaker: 416 posts
Armorama: 312 posts
Posted: Tuesday, September 29, 2015 - 01:04 PM UTC
Well done with Leopard 2, G.Houle. I like the UN white colour on it.
I also like the AML-90, just think about painting it, John.
I'm shortening my time with the Trumpeter kit.


Regards,
K.
Lower Austria, Austria
Joined: November 02, 2007
KitMaker: 633 posts
Armorama: 599 posts
Posted: Thursday, October 01, 2015 - 10:48 AM UTC
Nice paintjob on the interior Mr.K.
Cheers
Walter
New York, United States
Joined: March 08, 2010
KitMaker: 3,662 posts
Armorama: 3,078 posts
Posted: Friday, October 02, 2015 - 05:42 PM UTC
Im running late to this party any chance there will be an extension before I get started


Active Campaigns on the bench:
Operation Fall Gelb - Pz.Kpfw. IV Ausf. C
Engineering the Future - M-26 Recovery Vehicle
115 Campaigns completed
New York, United States
Joined: March 08, 2010
KitMaker: 3,662 posts
Armorama: 3,078 posts
Posted: Friday, October 02, 2015 - 07:31 PM UTC
I have this Trumpy kit that come with UN markings

I dont really build modern era Armor but picked this up to contribute here

Active Campaigns on the bench:
Operation Fall Gelb - Pz.Kpfw. IV Ausf. C
Engineering the Future - M-26 Recovery Vehicle
115 Campaigns completed
Quebec, Canada
Joined: January 12, 2004
KitMaker: 274 posts
Armorama: 159 posts
Posted: Friday, October 02, 2015 - 11:41 PM UTC
Hi guys,
I haven't worked on this one in some time! So here is an update on my Leclerc UNIFIL. This campaign is almost over and I don't want to miss it!
Assembly is over, primer as well and the underlaying 3 color camo has been applied (for the chipping process that is planned for the white final color).
The white and first chipping step has been done and I took pictures of where it's at right now. The next step is to chip with a sponge and other tools to finalize the chips. Then, detail painting can begin and the real weathering process will follow! :-)


See you later! Any constructive comments are more than welcome, as usual!
Cheers,
Chrisitan
On the workbench:
M1117 - HB Leo 2A6M Can - RM LAV-III - Meng AMX-30B2 - Takom Leopard C2 MEXAS - Strv 103B and FM Boba Fett Slave-1 (taking forever to finish)
France
Joined: February 20, 2012
KitMaker: 1,932 posts
Armorama: 1,907 posts
Posted: Saturday, October 03, 2015 - 01:01 AM UTC
MrK, great interior paint.
Sal, Welcome to this campaign.
roteck nice worn effect on your parts of your tank.
Quebec, Canada
Joined: January 12, 2004
KitMaker: 274 posts
Armorama: 159 posts
Posted: Saturday, October 03, 2015 - 05:24 PM UTC
Quoted Text
roteck nice worn effect on your parts of your tank.
@Alex: Thank you for your compliment.
I realised last night that the skirts are whiter then the upper hull, so this will get fixed today most likely. Details painting is almost done as well as the decaling.
When I painted the white, I painted the MG cradle white as well since I didn't have a single picture of a Leclerc with it still mounted. Yesterday, I was able to find a picture and it looks like it is painted green. Can any of my French friends confirm that please?

Merci à l'avance!
Christian
On the workbench:
M1117 - HB Leo 2A6M Can - RM LAV-III - Meng AMX-30B2 - Takom Leopard C2 MEXAS - Strv 103B and FM Boba Fett Slave-1 (taking forever to finish)
France
Joined: February 20, 2012
KitMaker: 1,932 posts
Armorama: 1,907 posts
Posted: Saturday, October 03, 2015 - 07:15 PM UTC
Quoted Text
Quoted Text
roteck nice worn effect on your parts of your tank.
@Alex: Thank you for your compliment.
I realised last night that the skirts are whiter then the upper hull, so this will get fixed today most likely. Details painting is almost done as well as the decaling.
When I painted the white, I painted the MG cradle white as well since I didn't have a single picture of a Leclerc with it still mounted. Yesterday, I was able to find a picture and it looks like it is painted green. Can any of my French friends confirm that please? 
Merci à l'avance!
Christian
It seems there are two options for the color of the MG cradle. Nato green or white.
Like on those pics from "modélisme militaire moderne" website
http://olivier.carneau.free.fr/Quebec, Canada
Joined: January 12, 2004
KitMaker: 274 posts
Armorama: 159 posts
Posted: Sunday, October 04, 2015 - 06:32 PM UTC
Thanks for the info Alex, I went and repainted the white cradle for a green colored one, it does brake the monotonous paint scheme a bit.
Cheers,
Christian
On the workbench:
M1117 - HB Leo 2A6M Can - RM LAV-III - Meng AMX-30B2 - Takom Leopard C2 MEXAS - Strv 103B and FM Boba Fett Slave-1 (taking forever to finish)
France
Joined: February 20, 2012
KitMaker: 1,932 posts
Armorama: 1,907 posts
Posted: Saturday, October 10, 2015 - 09:11 PM UTC
Some very nice built there.
Some progress on my fennek:


antislip surfaces are delimited (except on the little hatch on the left, done with pieces of sand paper) but without the rough effect. I've done it with this product:

A test fit with a M2 ammo box in the rack.
And, surprise this PE part is too big.


New York, United States
Joined: March 08, 2010
KitMaker: 3,662 posts
Armorama: 3,078 posts
Posted: Wednesday, October 14, 2015 - 05:55 AM UTC
Some Progress

The majority of the build is completed and it got its 1st coat of UN White tonight so Im hopeful i will finish by the deadline


Active Campaigns on the bench:
Operation Fall Gelb - Pz.Kpfw. IV Ausf. C
Engineering the Future - M-26 Recovery Vehicle
115 Campaigns completed
Quebec, Canada
Joined: January 12, 2004
KitMaker: 274 posts
Armorama: 159 posts
Posted: Friday, October 16, 2015 - 06:42 PM UTC
On the workbench:
M1117 - HB Leo 2A6M Can - RM LAV-III - Meng AMX-30B2 - Takom Leopard C2 MEXAS - Strv 103B and FM Boba Fett Slave-1 (taking forever to finish)
Quebec, Canada
Joined: January 12, 2004
KitMaker: 274 posts
Armorama: 159 posts
Posted: Friday, October 16, 2015 - 06:53 PM UTC
@Sal: Good luck, I'm interested in seeing your build finished! :-)
On the workbench:
M1117 - HB Leo 2A6M Can - RM LAV-III - Meng AMX-30B2 - Takom Leopard C2 MEXAS - Strv 103B and FM Boba Fett Slave-1 (taking forever to finish)
Lower Austria, Austria
Joined: November 02, 2007
KitMaker: 633 posts
Armorama: 599 posts
Posted: Friday, October 16, 2015 - 09:39 PM UTC
Nice weathering on your Leclerc Christian! Well done.
Congrats for finishing your build.
Cheers
Walter
Correze, France
Joined: June 10, 2004
KitMaker: 5,329 posts
Armorama: 5,204 posts
Posted: Friday, October 16, 2015 - 10:09 PM UTC
Nice Leclerc Christian,
just a couple of points if you don't mind: you should paint the antenna bases green.
The canvas cover at the base of the gun was white if memory serves.
The interior of the exhaust should be black.
The head of the green "bottle" on the front right fender is copper/gold.
The vertical schnorchel tube should be black too, just like the horizontal one.
HTH
Olivier
Visit my site Click the banner
"La reine des batailles, j'ai nommé l'infanterie"
Napoléon
Quebec, Canada
Joined: January 12, 2004
KitMaker: 274 posts
Armorama: 159 posts
Posted: Saturday, October 17, 2015 - 02:40 AM UTC
@Walter: Thanks for your compliment.
@Olivier: Merci Olivier pour tes infos! I will modify my build for some but not all. The canvas, I have seen a few with a flaked effect and I was going to reproduce it but... I forgot! The vertical snorkel tube I didn't know about! I'll do the antennas, green bottle handle and exhaust!
Cheers,
Christian
Quoted Text
Nice Leclerc Christian,
just a couple of points if you don't mind: you should paint the antenna bases green.
The canvas cover at the base of the gun was white if memory serves.
The interior of the exhaust should be black.
The head of the green "bottle" on the front right fender is copper/gold.
The vertical schnorchel tube should be black too, just like the horizontal one.
HTH
Olivier
On the workbench:
M1117 - HB Leo 2A6M Can - RM LAV-III - Meng AMX-30B2 - Takom Leopard C2 MEXAS - Strv 103B and FM Boba Fett Slave-1 (taking forever to finish)
Ontario, Canada
Joined: August 05, 2003
KitMaker: 1,698 posts
Armorama: 1,563 posts
Posted: Sunday, October 18, 2015 - 06:53 AM UTC
Great stuff! The optics did turn out nice indeed. I really like how you've scraped back the mud to reveal the white paint, that is especially well done!
Why plan when you can react?
England - East Anglia, United Kingdom
Joined: May 02, 2015
KitMaker: 102 posts
Armorama: 90 posts
Posted: Tuesday, October 20, 2015 - 12:06 AM UTC
Here's my Leclerc 1/72 by Revell - being resprayed in Lebanon.
Work in progress

LEGIO PATRIA NOSTRA
Www.ipmsswidnica.pl
Quebec, Canada
Joined: January 12, 2004
KitMaker: 274 posts
Armorama: 159 posts
Posted: Tuesday, October 20, 2015 - 12:45 AM UTC
@Graeme: thanks man for your comments! The scrapes were easy to do... just the hairspray technique between coats of mud.

On the workbench:
M1117 - HB Leo 2A6M Can - RM LAV-III - Meng AMX-30B2 - Takom Leopard C2 MEXAS - Strv 103B and FM Boba Fett Slave-1 (taking forever to finish)
New York, United States
Joined: March 08, 2010
KitMaker: 3,662 posts
Armorama: 3,078 posts
Posted: Saturday, October 24, 2015 - 09:54 PM UTC
Active Campaigns on the bench:
Operation Fall Gelb - Pz.Kpfw. IV Ausf. C
Engineering the Future - M-26 Recovery Vehicle
115 Campaigns completed
Quebec, Canada
Joined: January 12, 2004
KitMaker: 274 posts
Armorama: 159 posts
Posted: Sunday, October 25, 2015 - 07:33 PM UTC
Quoted Text
Ok final week here and Im just about ready for some weathering
- snip -
I should make it by the deadline 
Looking good man, looking good!
On the workbench:
M1117 - HB Leo 2A6M Can - RM LAV-III - Meng AMX-30B2 - Takom Leopard C2 MEXAS - Strv 103B and FM Boba Fett Slave-1 (taking forever to finish)
Florida, United States
Joined: November 23, 2012
KitMaker: 1,277 posts
Armorama: 1,254 posts
Posted: Sunday, October 25, 2015 - 07:57 PM UTC
My AMX 90...which I think is ready for paint! I just have to hold back and quit tinkering with PE!
The latest: finally added the PSP track secured with PE leather straps/buckles...same for the tarp on the left fender, the fire extinguisher on the right fender and the steps near the right hand hull hatch. Added PE rear cable holders and lower engine plug, as well. Grandt Line bolts finishes off the top of the turret. Other accouterments (ammo cans, etc.,) come later when paint is complete.
Hopefully I make to completion by the campaign deadline, but that is in doubt...getting ready for a move into a new house.


IPMS number 506
AMPS number 711


