Oh, that does look nice....great job.
Can I suggest just a bit more dirt or chipping on the steps built into the side door. Would be realistic and make them pop out a bit more.
Hosted by Richard S.
Unfinished Business 2015
35th-scale

Joined: November 21, 2007
KitMaker: 3,212 posts
Armorama: 2,807 posts

Posted: Tuesday, September 29, 2015 - 12:33 PM UTC
Giovanni1508

Joined: April 17, 2014
KitMaker: 652 posts
Armorama: 600 posts

Posted: Tuesday, September 29, 2015 - 02:17 PM UTC
Dear All,
Today I happily join your team for this great ''Unfinished Business 2015'' Campaign, having failed to complete my baby for ''Wurf and friends'' Campaign.
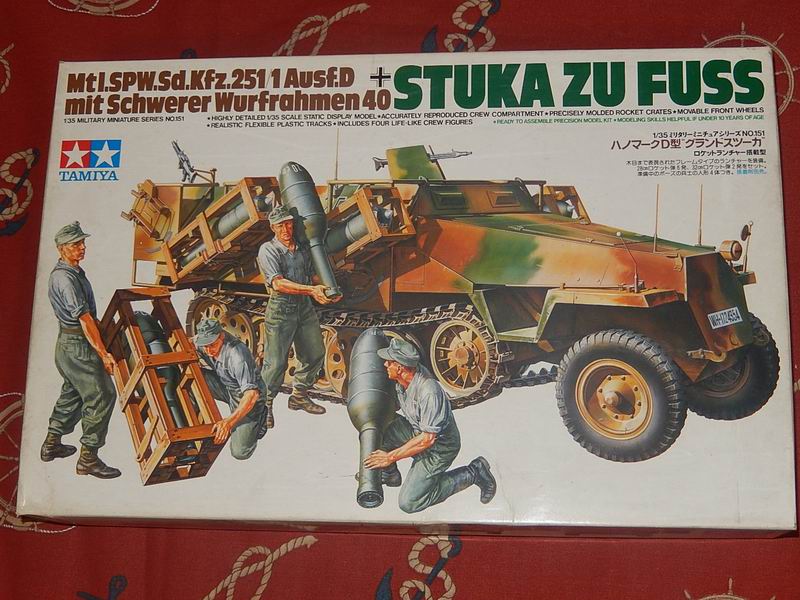
My kit is the 1:35 Tamiya sd.kfz.251/1 with rocket launchers Stuka zu Fuss

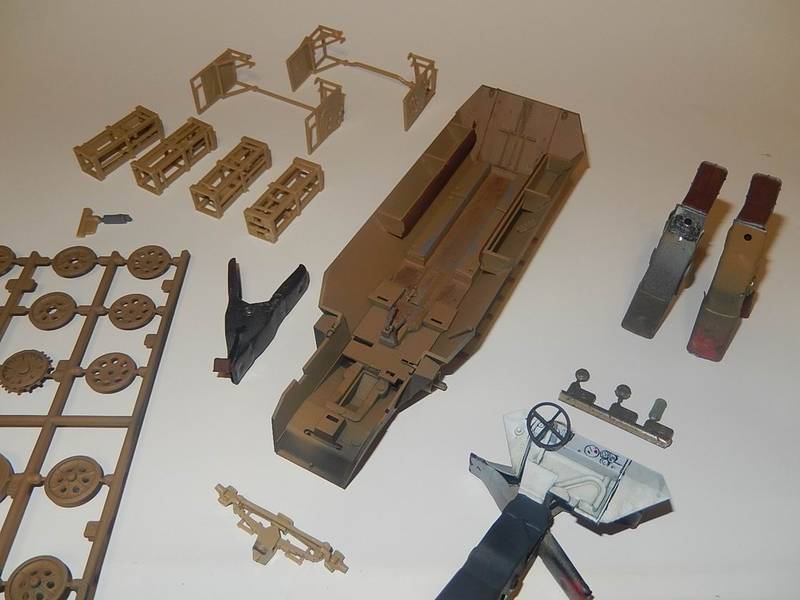
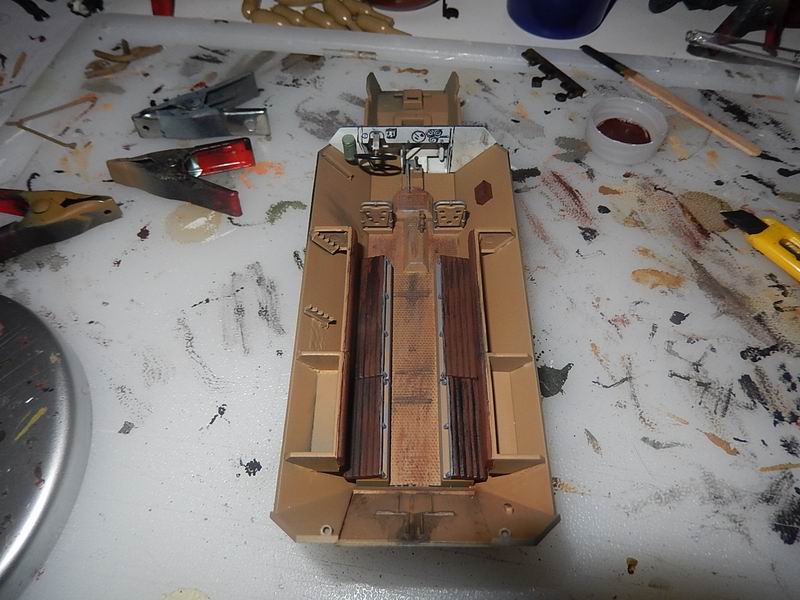
After several days, the lower hull and interiors were almost finished


But I didn't worked on it for two weeks and I've lost the deadline, so now we are here to finish the unfinished...
Cheers
Today I happily join your team for this great ''Unfinished Business 2015'' Campaign, having failed to complete my baby for ''Wurf and friends'' Campaign.
My kit is the 1:35 Tamiya sd.kfz.251/1 with rocket launchers Stuka zu Fuss
After several
 days, the lower hull and interiors were almost finished
But I didn't worked on it for two weeks and I've lost the deadline, so now we are here to finish the unfinished...
Cheers
MLD

Joined: July 21, 2002
KitMaker: 3,569 posts
Armorama: 2,070 posts

Posted: Tuesday, September 29, 2015 - 05:14 PM UTC
Giovani,
Welcome to the campiagn, best yet, if you don't get it done for this one, there will be another!
Nice build so far, I've for a few of those 'did not make the deadline' kits here as well.
Your build reminds me I have one of these to finish as well.
How are you planning on painting the wooden rocket crates?
I am hoping for a mix of older and newer on mine, but can't find an effect I like.

MLD

Joined: July 21, 2002
KitMaker: 3,569 posts
Armorama: 2,070 posts

Posted: Tuesday, September 29, 2015 - 05:49 PM UTC
Hyder,
nice finish on the helo.
Do the blades fold from the kit, or did you have to modify the build?
Did you mask or freehand the leading edges of the rotor blades? Very crisp.
nice finish on the helo.
Do the blades fold from the kit, or did you have to modify the build?
Did you mask or freehand the leading edges of the rotor blades? Very crisp.
Twentecable

Joined: September 13, 2003
KitMaker: 339 posts
Armorama: 31 posts

Posted: Wednesday, September 30, 2015 - 01:48 AM UTC
Gongrats with your medal. Nice looking former Queen :-)
Twentecable

Joined: September 13, 2003
KitMaker: 339 posts
Armorama: 31 posts

Posted: Wednesday, September 30, 2015 - 01:49 AM UTC
Nice looking interior... did you paint the dials yourself?
ejhammer

Joined: June 10, 2008
KitMaker: 230 posts
Armorama: 34 posts

Posted: Wednesday, September 30, 2015 - 10:53 PM UTC
WOW, it’s been April since my last post. Summer, heart problems, a bit of travel, illness, man did the time fly. Feeling better now and gonna try to get caught up.
Finished up the flattie back in May, so here goes.
The rudder


The stand ( like a crib I saw in Manistee MI)

Some rigging stuff


The finished boat


This one is done. Is there anything I need to do to qualify for the award?
On to another project.
EJ
Finished up the flattie back in May, so here goes.
The rudder


The stand ( like a crib I saw in Manistee MI)

Some rigging stuff


The finished boat


This one is done. Is there anything I need to do to qualify for the award?
On to another project.
EJ
naimbrain

Joined: March 15, 2010
KitMaker: 123 posts
Armorama: 118 posts

Posted: Thursday, October 01, 2015 - 06:34 PM UTC
Greetings fellow guardians of the unfinished masses. I've just signed up so I'll introduce myself as per standard AA protocol... "My name is John and I am a shelf-queen stasher" (everyone nod and then look down in shared embarrassment).
It's been a few years since I took part in a campaign so apologies in advance if I'm a bit rusty posting photos etc.
As an initial trial I'll try posting an old image that I took for a previous "Get 'er done" campaign This photo is years old so it's not a 'before' submission for this campaign, however a large number of those shelf queens from yesteryear are still candidates for this campaign...

Cool! The photo post worked, next up I need to remind myself how to upload to photo bucket then I'll get shots of the first couple of 'queens' posted.
In the meantime, congrats to all on your work so far! I'm really interested/impressed with the flatty build as I've also had one on the shelf for a few years (but won't be building here as I'm aiming to finish projects rather than start new ones (as if anyone would do that!)
Cheers,
John
It's been a few years since I took part in a campaign so apologies in advance if I'm a bit rusty posting photos etc.
As an initial trial I'll try posting an old image that I took for a previous "Get 'er done" campaign This photo is years old so it's not a 'before' submission for this campaign, however a large number of those shelf queens from yesteryear are still candidates for this campaign...

Cool! The photo post worked, next up I need to remind myself how to upload to photo bucket then I'll get shots of the first couple of 'queens' posted.
In the meantime, congrats to all on your work so far! I'm really interested/impressed with the flatty build as I've also had one on the shelf for a few years (but won't be building here as I'm aiming to finish projects rather than start new ones (as if anyone would do that!)
Cheers,
John
ejhammer

Joined: June 10, 2008
KitMaker: 230 posts
Armorama: 34 posts

Posted: Thursday, October 01, 2015 - 07:22 PM UTC
Quoted Text
In the meantime, congrats to all on your work so far! I'm really interested/impressed with the flatty build as I've also had one on the shelf for a few years (but won't be building here as I'm aiming to finish projects rather than start new ones (as if anyone would do that!)
Cheers,
John
Thanks John. It was an interesting build. Wood kits are much like complete scratchbuilding. A pile of somewhat preformed wood and bits, just waiting to be attached together until it looks like a boat.


EJ
naimbrain

Joined: March 15, 2010
KitMaker: 123 posts
Armorama: 118 posts

Posted: Thursday, October 01, 2015 - 08:39 PM UTC
Okay, after much photobucket frustration here are my initial entry photos:

;
1/76 Fujimi (ESCI re-release) of GMC M12:

Not Much work left on this one (I should've enlisted a week ago when it looked more like this...

...another old photo for previous campaign)
Tracks need painting, couple of spade hooks to add and general weathering.
1/76 Matchbox Jagdpanzer IV L/70:

Needs tracks painting, decals, general details/tools painted and weathering. And once again there's a previous campaign photo reflecting it's state about a week ago...

...and hey, let's not forget painting the display base. Though pretty basic they have such personal nostalgia value that I love them!!
Finally, straying from my usual braille scale, Tamiya 1/35 Chieftain Mk.5:


This one stalled after an attempt to airbrush a camo pattern (I was still using enamels back then, and I've still not mastered airbrushing). I#m going to hand paint instead. I don't have a date verified 'before' photo, but the M12 is in the background from the same photo shoot, are you guys happy to trust me on this one?
I'm in a bit of a finish off frenzy at the moment so hopefully these builds are the first of many.
Cheers,
John

;
1/76 Fujimi (ESCI re-release) of GMC M12:

Not Much work left on this one (I should've enlisted a week ago when it looked more like this...

...another old photo for previous campaign)
Tracks need painting, couple of spade hooks to add and general weathering.
1/76 Matchbox Jagdpanzer IV L/70:

Needs tracks painting, decals, general details/tools painted and weathering. And once again there's a previous campaign photo reflecting it's state about a week ago...

...and hey, let's not forget painting the display base. Though pretty basic they have such personal nostalgia value that I love them!!
Finally, straying from my usual braille scale, Tamiya 1/35 Chieftain Mk.5:


This one stalled after an attempt to airbrush a camo pattern (I was still using enamels back then, and I've still not mastered airbrushing). I#m going to hand paint instead. I don't have a date verified 'before' photo, but the M12 is in the background from the same photo shoot, are you guys happy to trust me on this one?
I'm in a bit of a finish off frenzy at the moment so hopefully these builds are the first of many.
Cheers,
John
naimbrain

Joined: March 15, 2010
KitMaker: 123 posts
Armorama: 118 posts

Posted: Thursday, October 01, 2015 - 08:48 PM UTC
Just noticed that both the M12 and L/70 feature in that old 'unfished masses' photo... it figures!!

SpaceXhydro

Joined: March 13, 2015
KitMaker: 418 posts
Armorama: 235 posts

Posted: Friday, October 02, 2015 - 03:57 PM UTC
MLD

Joined: July 21, 2002
KitMaker: 3,569 posts
Armorama: 2,070 posts

Posted: Friday, October 02, 2015 - 06:45 PM UTC
Hi John! Welcome to the meeting. Have a cookie and some lousy coffee and stay a while. You've found the right place.
Hyder, the torpedoes add just the right amount of color and visual interest to really set off the build. ASW helos are not my cup of tea, I'm an attack helicopters guy, but that looks great. Maybe I oughta get out that Ka29 from my stash...
Hyder, the torpedoes add just the right amount of color and visual interest to really set off the build. ASW helos are not my cup of tea, I'm an attack helicopters guy, but that looks great. Maybe I oughta get out that Ka29 from my stash...
ejhammer

Joined: June 10, 2008
KitMaker: 230 posts
Armorama: 34 posts

Posted: Friday, October 02, 2015 - 09:15 PM UTC
MLD

Joined: July 21, 2002
KitMaker: 3,569 posts
Armorama: 2,070 posts

Posted: Sunday, October 04, 2015 - 07:07 AM UTC
still not having ant luck getting photos into the gallery.
I can get into the gallery, but cannot upload.
I thought the glitch was fixed??
I can get into the gallery, but cannot upload.
I thought the glitch was fixed??
Twentecable

Joined: September 13, 2003
KitMaker: 339 posts
Armorama: 31 posts

Posted: Sunday, October 04, 2015 - 10:04 PM UTC
Nice Boat Eugene !
gr TC
gr TC
Twentecable

Joined: September 13, 2003
KitMaker: 339 posts
Armorama: 31 posts

Posted: Sunday, October 04, 2015 - 10:04 PM UTC
Quoted Text
Hope you all liked my build.

I like it :-). I am wondering though did you use some weathering techniques?
gr TC
MLD

Joined: July 21, 2002
KitMaker: 3,569 posts
Armorama: 2,070 posts

Posted: Sunday, October 04, 2015 - 11:59 PM UTC
Eugene,
Nice boat!
I guess the float test is the final proof you got it 'right'
Nice boat!
I guess the float test is the final proof you got it 'right'
35th-scale

Joined: November 21, 2007
KitMaker: 3,212 posts
Armorama: 2,807 posts

Posted: Monday, October 05, 2015 - 12:44 AM UTC
Nice job on the boat EJ.....looks great and definitly different.
Keeping with a nautical theme: welcome aboard Naimbrain....you certainly have enough to choose from. Be sure to finish at least one!
Hyder, that whirlybird looks stunning!
Right, I better go look into the gallery issues....
Keeping with a nautical theme: welcome aboard Naimbrain....you certainly have enough to choose from. Be sure to finish at least one!
Hyder, that whirlybird looks stunning!
Right, I better go look into the gallery issues....
naimbrain

Joined: March 15, 2010
KitMaker: 123 posts
Armorama: 118 posts

Posted: Monday, October 05, 2015 - 10:57 PM UTC
Quoted Text
Hyder, that whirlybird looks stunning!
Seconded - fantastic build, congrats!!
Quoted Text
Naimbrain....you certainly have enough to choose from. Be sure to finish at least one!
As my shelf queens massively out-number my finished builds, point taken!! (no comment re my un-started kits - you can guess!) To that end here's some progress shots:

This is my first real try with Citadel's Typhus Corrosion/Rust combo. It looks worse in the photo, but clearly needs some refinement.

Schurzen looks a bit wonky on this side, hey lucky it came lose this morning!! Decals are in place and I've started on weathering. Apologies for the rather washed out photos, they were taken on my old mobile at the end of a long day. I'm going to add some more stains/streaks/scratches, paint the tools and then move on to painting the base. Hope to finish by the weekend.
Cheers chaps!
John
naimbrain

Joined: March 15, 2010
KitMaker: 123 posts
Armorama: 118 posts

Posted: Friday, October 09, 2015 - 02:47 AM UTC
roteck

Joined: January 12, 2004
KitMaker: 274 posts
Armorama: 159 posts

Posted: Sunday, October 18, 2015 - 08:51 PM UTC
MLD

Joined: July 21, 2002
KitMaker: 3,569 posts
Armorama: 2,070 posts

Posted: Sunday, October 18, 2015 - 09:55 PM UTC
Christian,
The slat armor looks good. How fiddly was the assembly? Was it difficult to support as the glue dried?
Mike
The slat armor looks good. How fiddly was the assembly? Was it difficult to support as the glue dried?
Mike
35th-scale

Joined: November 21, 2007
KitMaker: 3,212 posts
Armorama: 2,807 posts

Posted: Monday, October 19, 2015 - 01:05 PM UTC
Looks good to me Christian. I know the slat can't have been easy even in plastic.
roteck

Joined: January 12, 2004
KitMaker: 274 posts
Armorama: 159 posts

Posted: Tuesday, October 20, 2015 - 12:51 AM UTC
@Mike: Thanks for your comments Mike. Slats were VERY fiddly but quite sturdy! I finished the build of the AFVk before attaching them since I didn't want to damage them during the painting and subsequent weathering stages. With hindsight, this may have been a mistake! I superglued them and the glue job isn't very good (my bad!). I do have another one to do but with the barracuda armor and I might glue them during construction instead this time around.
@Sean: Thanks for the compliments!
@Sean: Thanks for the compliments!
 |


