Armor/AFV: British Armor
Discuss all types of British Armor of all eras.
Hosted by Darren Baker
Tamiya Challenger 1
cheswickthecat
Visit this Community
Washington, United States
Joined: October 13, 2007
KitMaker: 212 posts
Armorama: 208 posts
Posted: Sunday, October 04, 2015 - 07:30 AM UTC
This is really coming along nicely. Been very good reading as I follow your progress.
Terry
Dannyd
Visit this Community
England - North West, United Kingdom
Joined: March 27, 2007
KitMaker: 803 posts
Armorama: 793 posts
Posted: Sunday, October 04, 2015 - 02:06 PM UTC
Thank you Terry,

More work on the turret crew, still in the rouging out stage
and both require a lot more work yet but it gives you an idea.


Cheers for now

Dan
Dannyd
Visit this Community
England - North West, United Kingdom
Joined: March 27, 2007
KitMaker: 803 posts
Armorama: 793 posts
Posted: Sunday, October 04, 2015 - 09:31 PM UTC
Crew now primed, loader has had the CPU removed
and will get a standard Clansman pressle unit with lead to his headset.


The mic's and leads will get added after painting.


Dan
Kresimir
Visit this Community
Croatia Hrvatska
Joined: March 07, 2011
KitMaker: 19 posts
Armorama: 16 posts
Posted: Monday, October 05, 2015 - 02:13 PM UTC
Excellent build m8... can't wait to see next step... keep up!!
PaulBrickles
Visit this Community
England - East Anglia, United Kingdom
Joined: April 14, 2015
KitMaker: 188 posts
Armorama: 173 posts
Posted: Monday, October 05, 2015 - 02:27 PM UTC
Lovely Stuff!!!

Dannyd
Visit this Community
England - North West, United Kingdom
Joined: March 27, 2007
KitMaker: 803 posts
Armorama: 793 posts
Posted: Monday, October 05, 2015 - 03:29 PM UTC
Thank you chaps,

So more work on the figures, Commanders Pressle unit now removed from the loader and I've scratched a normal Clansman pressle unit for him. some post primer clean up but these Verlinden figures are very good and don't really require much.


Revised stowage, going to fill the long wire basket with oil and personal kit, this is more in keeping with a friends tank that he was loader on. Call sign board added to the basket.


Enjoy

Dan
Kresimir
Visit this Community
Croatia Hrvatska
Joined: March 07, 2011
KitMaker: 19 posts
Armorama: 16 posts
Posted: Monday, October 05, 2015 - 05:50 PM UTC
simply amazing.. I'm learning a lot. THX m8.
Dannyd
Visit this Community
England - North West, United Kingdom
Joined: March 27, 2007
KitMaker: 803 posts
Armorama: 793 posts
Posted: Monday, October 05, 2015 - 08:48 PM UTC

Quoted Text

simply amazing.. I'm learning a lot. THX m8.


Thanks buddy :-)

Both ratchet straps now done, Commanders CPU Lead added, and I've been working on the crew stowage for the new bin.


I have a few more bits n bobs to add to the bin yet.

Probably this will be the final stowed kit.


Dan
Dannyd
Visit this Community
England - North West, United Kingdom
Joined: March 27, 2007
KitMaker: 803 posts
Armorama: 793 posts
Posted: Tuesday, October 06, 2015 - 06:47 PM UTC
Pioneer tools added along with the brackets.


Regards

Dan
leonhzy
Visit this Community
Shanghai, China / 简体
Joined: August 12, 2013
KitMaker: 88 posts
Armorama: 87 posts
Posted: Tuesday, October 06, 2015 - 06:56 PM UTC
wow, cant wait to see its getting painted and weathered!
Kresimir
Visit this Community
Croatia Hrvatska
Joined: March 07, 2011
KitMaker: 19 posts
Armorama: 16 posts
Posted: Tuesday, October 06, 2015 - 10:54 PM UTC
nice update. Those tools are looking great. Keep on!
bdwight
Visit this Community
Virginia, United States
Joined: March 21, 2015
KitMaker: 13 posts
Armorama: 7 posts
Posted: Wednesday, October 07, 2015 - 12:30 AM UTC
Great work Dan! I have been following this build along with your last two and really appreciate all the little bits of info I've picked up.
Can you recommend a reference that has good images of tank crew uniforms along with the radio sets?
Anto992
Visit this Community
Ireland
Joined: June 11, 2012
KitMaker: 227 posts
Armorama: 212 posts
Posted: Wednesday, October 07, 2015 - 12:44 AM UTC
Dan,

its getting better and better every time I look, the crew are very nice too (summer look) I was wondering what colour green you will be using on it.....
Dannyd
Visit this Community
England - North West, United Kingdom
Joined: March 27, 2007
KitMaker: 803 posts
Armorama: 793 posts
Posted: Wednesday, October 07, 2015 - 12:46 PM UTC
Thank you chaps for the kind remarks,

So to answer your questions,

The green is custom mix of Tamiya paints, Nato green XF-67, RAF Dark Green 2 XF-81 and olive Green XF-58. I also add some Buff XF-57 to mix to lighten it up. I think this is quite close to the real deal.
The real paint is called " Paint Brushing Green Olive Matt IRR Reflective " if anyone wants to know, you could also get if you were lucky "Paint Spraying" and of course it came in black as well.

Most of the paint I used was the brushing type and we used to thin it with what ever was to hand so I wouldn't get too hung up on the Hue/shade, it also faded really badly to an almost grey green colour. Common thinners that we would use were kero and Petrol and as you can imagine that played a part in the final tone and how matt the finish was.

Radios, for the period that the Challenger and later Chieftains were in service it was Clansman as the system being used. The VRC 353 (VHF) was the common radio in use across the whole Army. they were found in Landrovers up to MBTs. I trained on and used these in every environment possible, so they were my bread and butter.

Picture below is a full HF and VHF fit in my old AFV436,
two radio's on the bottom shelf are VRC353's and the one unit on the top shelf is VRC321(HF) with the antenna tuning unit next to it. Antennas used on the vehicle were 2m whips for the VHF and up to a 4m whip for the HF set, we had other ground based antennas but I wont talk about these as most people will not model them.


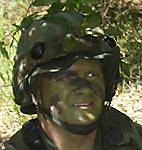
Clothing based up on my time for armoured crews was nothing really special, we had our issued "normal"(1157) DPM clothing and the unit issue was a set of olive green coveralls, a crewguard helmet and headset and if you were lucky a tanksuit in green which was just a waterproof wet of coveralls that used to make you sweat so much it was better just to get wet. Sometimes you might get a DPM parka but these once wet they stayed wet.

Tank crews would of been the same I would imagine but replace green coveralls with black if you were RTR,
I know that in the late 1990's we started getting issued DPM Goretex tank suits which had fleece linings, a real nice bit of kit but they never came in big quantities so most of the Sqn seniors had them and not the drivers or commanders.

This picture was taken in 1993 on Salisbury plain, pretty much standard issued kit all be it very muddy, so no special kit, Frightening on how young I look.


I hope this helps

Dan
Dannyd
Visit this Community
England - North West, United Kingdom
Joined: March 27, 2007
KitMaker: 803 posts
Armorama: 793 posts
Posted: Wednesday, October 07, 2015 - 02:19 PM UTC
Crowbar added to the rear deck and started on the wing mirror
arms.


More later guys

Dan

Dannyd
Visit this Community
England - North West, United Kingdom
Joined: March 27, 2007
KitMaker: 803 posts
Armorama: 793 posts
Posted: Wednesday, October 07, 2015 - 08:02 PM UTC
First recovery rope attached with the brackets


Cheers

Dan
bdwight
Visit this Community
Virginia, United States
Joined: March 21, 2015
KitMaker: 13 posts
Armorama: 7 posts
Posted: Wednesday, October 07, 2015 - 09:39 PM UTC
Thanks Dan
WXerock
#450
Visit this Community
California, United States
Joined: July 19, 2015
KitMaker: 672 posts
Armorama: 668 posts
Posted: Thursday, October 08, 2015 - 02:55 AM UTC
Dan, watching your progress step by step is great. You are a master at using styrene. The result of all that you have done is turning into quite a fantastic build. Looking at work like this is what brought me back into the hobby after many, many years!

Eric
Dannyd
Visit this Community
England - North West, United Kingdom
Joined: March 27, 2007
KitMaker: 803 posts
Armorama: 793 posts
Posted: Thursday, October 08, 2015 - 03:58 PM UTC
Thank you so much for the kind words guys,

Well construction almost complete now only a few small PE parts to add and most of those are ones that I've knocked off during the build. The next set of pictures will be the paint phase. please enjoy.


Cheers for now

Dan
Kresimir
Visit this Community
Croatia Hrvatska
Joined: March 07, 2011
KitMaker: 19 posts
Armorama: 16 posts
Posted: Friday, October 09, 2015 - 06:39 PM UTC
this looks amazing... Cant wait for those "Painting pictures!"
DKeu8726
Visit this Community
Denmark
Joined: December 24, 2011
KitMaker: 36 posts
Armorama: 31 posts
Posted: Friday, October 09, 2015 - 09:32 PM UTC
Hi
I hav a question.
After i hav look at many fotos of Challenger tanks,on the net.
Why hav som Challenger a gun,by the side of the main gun.and som dont.
Dannyd
Visit this Community
England - North West, United Kingdom
Joined: March 27, 2007
KitMaker: 803 posts
Armorama: 793 posts
Posted: Saturday, October 10, 2015 - 12:53 AM UTC

Quoted Text

Hi
I hav a question.
After i hav look at many fotos of Challenger tanks,on the net.
Why hav som Challenger a gun,by the side of the main gun.and som dont.


Sorry fella, I'm not sure what you mean, the challenger had a coax 7.62mm machine gun and the commander had GPMG on a mount on the cupola.
Nothing visible next too the main gun. I might have missunderstood your question, so please feel free to explain more.

Dan
DKeu8726
Visit this Community
Denmark
Joined: December 24, 2011
KitMaker: 36 posts
Armorama: 31 posts
Posted: Saturday, October 10, 2015 - 01:58 AM UTC
Hi
I hav found to photos to explain my qustion
but i hav no ide how to get them on this page.
corsutton
Visit this Community
Oklahoma, United States
Joined: June 17, 2005
KitMaker: 544 posts
Armorama: 511 posts
Posted: Saturday, October 10, 2015 - 02:37 AM UTC
I believe Sune højlund Pedersen is talking about the coax guns. The Chally 2's have them mounted to the right, as you face them, and the Chally 1's, I believe, is hidden in the slot above the main gun, offset to the right. Both have them, one is prominently shown and one is hidden inside the armor.

I may be way off here, I am no expert, I am just throwing what I know about these things.
DKeu8726
Visit this Community
Denmark
Joined: December 24, 2011
KitMaker: 36 posts
Armorama: 31 posts
Posted: Saturday, October 10, 2015 - 03:01 AM UTC
Hi Cory
Thanks for your explanation,to my qustion