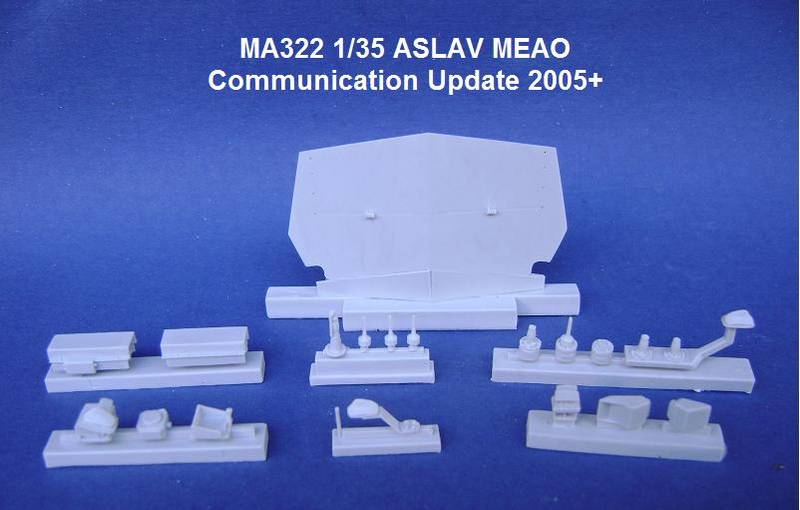
Now then doesn't that look sweet. I ordered mine already so I look forward to the box full of resin. I see some nice new antennas, GPS and the MA322 set will be a welcome addition as well. Do the prop guards come with it?
I know what I'll be spending 2009 doing.
Are you painting or making decals for the box, that's a lot of masking.
Regards
Bill
Hosted by Darren Baker
Australian LAV (ASLAV) (Renamed Topic)

Boggie

Joined: December 08, 2005
KitMaker: 1,370 posts
Armorama: 1,331 posts

Posted: Wednesday, January 07, 2009 - 01:07 AM UTC
jasmils

Joined: December 23, 2003
KitMaker: 1,016 posts
Armorama: 745 posts

Posted: Wednesday, January 07, 2009 - 02:03 AM UTC
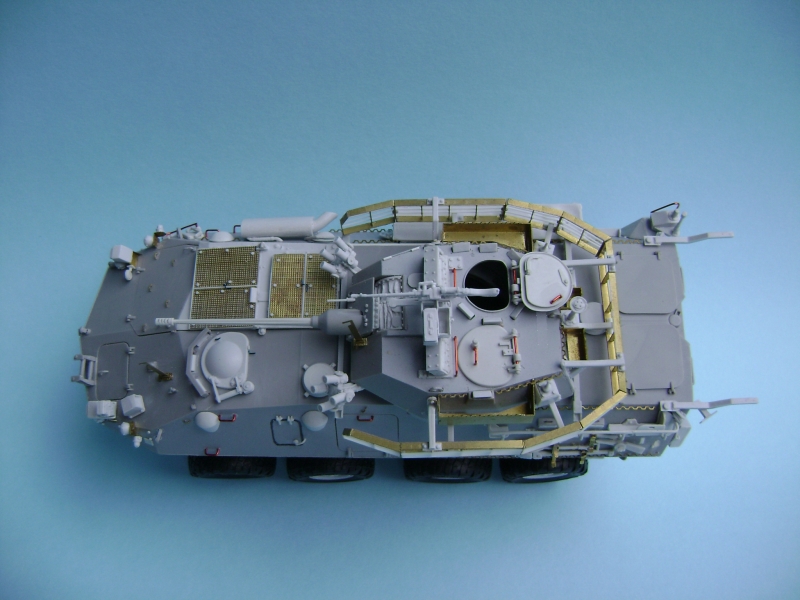
Thanks for the reply Bill. No the kit does not come with the prop guards as these are removed for the Bar Armour as are the head light clusters. However the cam net basket is in the kit as a cast item.
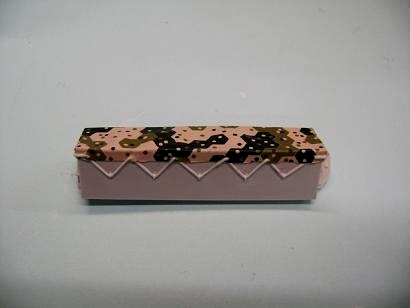
The tool bin has a decal added to it. At this stage it wont be coming out as a product.
What is not shown in the photo's here is the wiring for the head light cluster. It is in the instructions.
Cheers Jason
One more view.
The tool bin has a decal added to it. At this stage it wont be coming out as a product.
What is not shown in the photo's here is the wiring for the head light cluster. It is in the instructions.
Cheers Jason
One more view.


Boggie

Joined: December 08, 2005
KitMaker: 1,370 posts
Armorama: 1,331 posts

Posted: Wednesday, January 07, 2009 - 02:31 AM UTC
Jason
Yes I noticed that any ASLAV 25 or PC that has or had the bar armour had all their brush guards removed, no worries. You decal look promising too and will be welcome for the Bushmaster spare wheel covers if you develop it for sale ;o)
Excellent work, great to see it finally out and for sale.
Regards
Bill
DAR

Joined: April 27, 2002
KitMaker: 250 posts
Armorama: 188 posts

Posted: Wednesday, January 07, 2009 - 07:45 AM UTC
Quoted Text
Well its HERE!!!!!!!!!!
And about bloody time, if I do say so myself.
MA125 ASLAV-25 Phase III
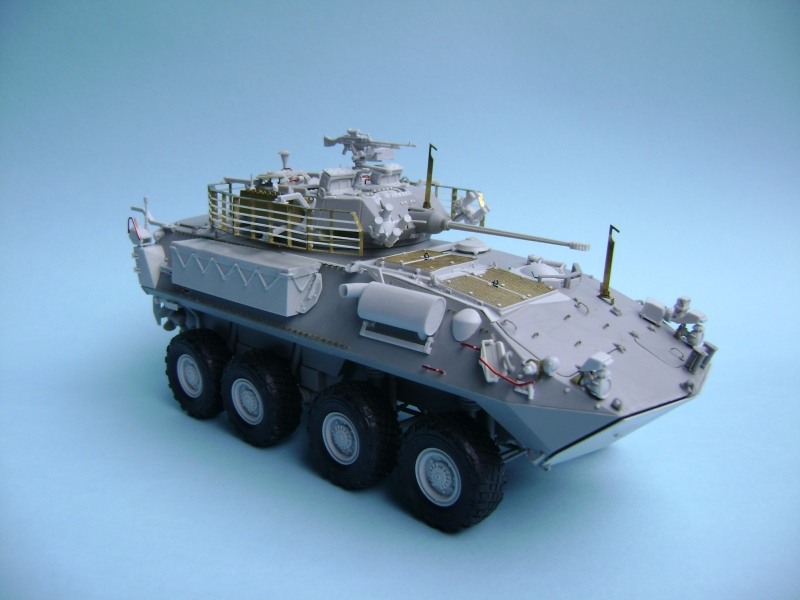
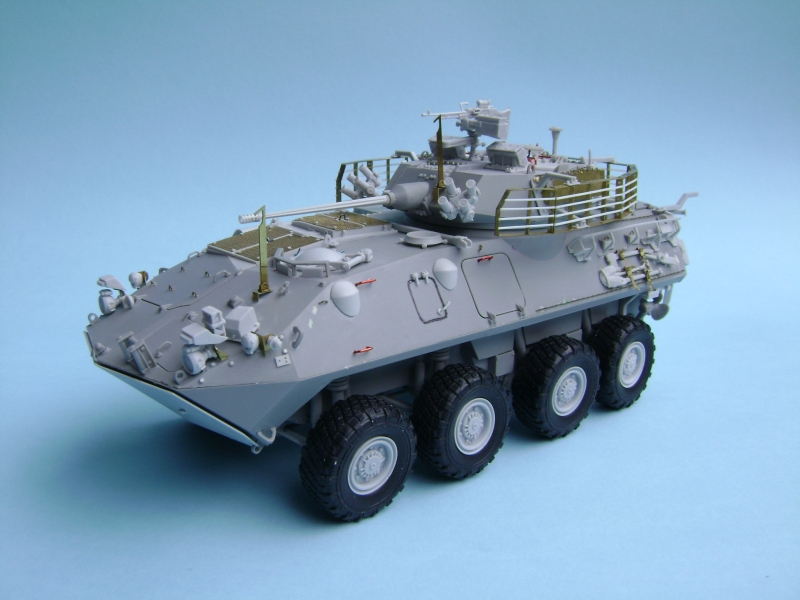
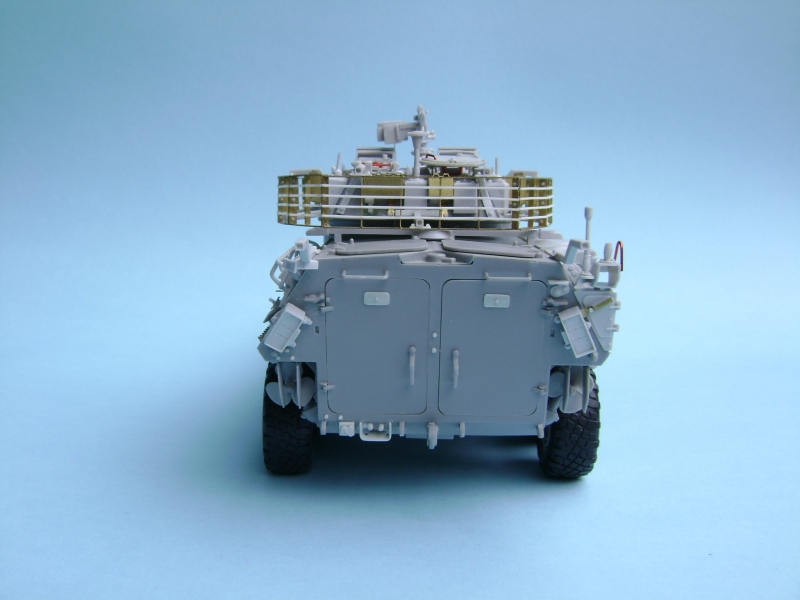
MA125 With MA322
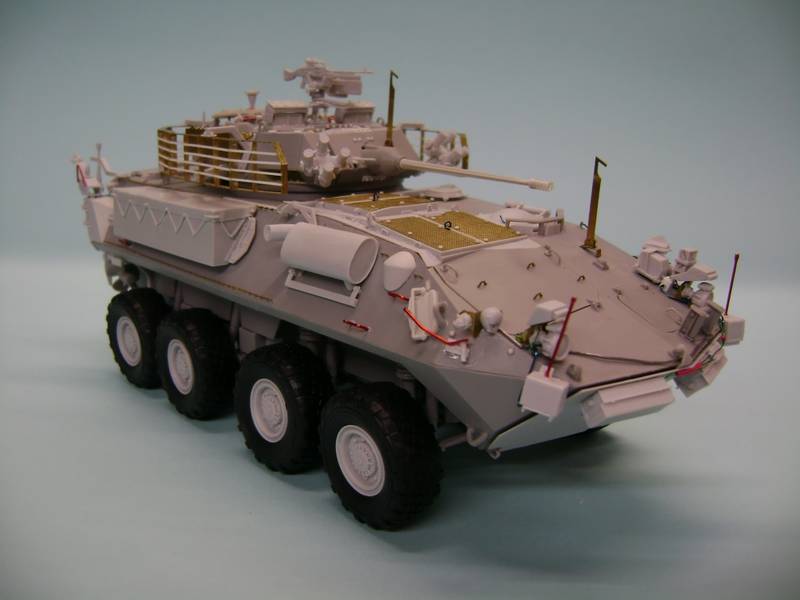
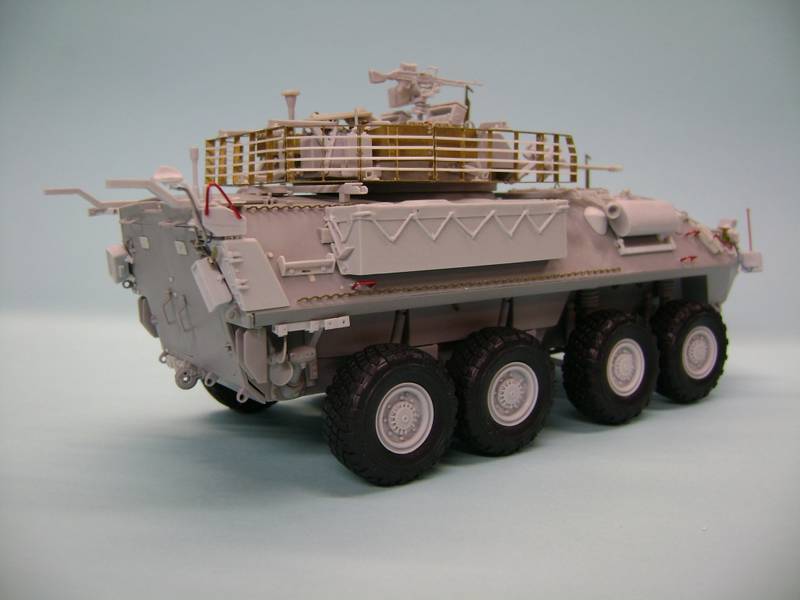
And something I have been working on for myself.
That's looking very good Jason, nice work. I'd better starting saving up the shrapnel.
If I wanted to build an Oz based Phase3 ASLAV would I just have to leave off the bar armour (and not bother with set MA322)?
jasmils

Joined: December 23, 2003
KitMaker: 1,016 posts
Armorama: 745 posts

Posted: Wednesday, January 07, 2009 - 08:17 AM UTC
G'day Dave,
Thanks for the kind words.
MA125 is just for Iraq from 2004-2005. We dont have any plans at this stage of doing a Phase III (ie with turret baskets and all of the guards etc). Looks like Trumpeter will have one soon, so there's not much use in us doing it. And besides they can cast turret baskets better than we could.
Some parts of MA322 can be used with the Type II (PC) from 2003 and even earlier (check your reference) but the majority of the parts are for all types from 2005 onwards.
Cheers Jason


DAR

Joined: April 27, 2002
KitMaker: 250 posts
Armorama: 188 posts

Posted: Wednesday, January 07, 2009 - 11:20 AM UTC
Cheers Jason.
RomeoKilo

Joined: December 03, 2007
KitMaker: 160 posts
Armorama: 155 posts

Posted: Wednesday, January 07, 2009 - 02:17 PM UTC
Well. I have a hard on.
Looks fantastic mate. When does it start shipping??
Looks fantastic mate. When does it start shipping??

ppawlak1

Joined: March 14, 2006
KitMaker: 1,973 posts
Armorama: 1,843 posts

Posted: Wednesday, January 07, 2009 - 02:24 PM UTC
Fantastic news Jase !
Thanks for the "heads up".... that is a great kit
Hopefully I can finish my '25' soon
This beast:


Cheers
Paul
Thanks for the "heads up".... that is a great kit

Hopefully I can finish my '25' soon

This beast:


Cheers
Paul

bison126

Joined: June 10, 2004
KitMaker: 5,329 posts
Armorama: 5,204 posts

Posted: Wednesday, January 07, 2009 - 06:59 PM UTC
Your model is definitely a must have. It's amazing to see how many variants the LAV family counts ! I guess I'll have to get the Concord book about it as I feel a bit lost among them.
WayneB

Joined: July 22, 2008
KitMaker: 141 posts
Armorama: 130 posts

Posted: Thursday, January 08, 2009 - 06:28 AM UTC
Jason,
The 25 looks great mate. Congratulations on getting there. It’s a cool kit. The 25 is definitely on my to do list.
An inspired solution to the camouflage on the stowage bin canvas cover. You definitely should market the stuff. I have designs on one day doing a Unimog or even figuring out how to do a Landrover. The Australian Camouflaged decal would be very helpful indeed.
W

ppawlak1

Joined: March 14, 2006
KitMaker: 1,973 posts
Armorama: 1,843 posts

Posted: Friday, January 09, 2009 - 12:49 AM UTC
Quoted Text
Paul, I just rechecked the colour formula and it is like this
Tan XF15 75 parts, XF52 15 parts and XF 2 10 parts
Green XF 58 75 parts XF 8 20 parts and XF 15 5 parts
Nato Black
Hope this helps
Regards
Bill
Bill can you please recheck your Green mix ?
I've just tried that mix on the underbelly and lower hull of my Leopard and it seems a little too green for my liking (less Olive than I'd like),
Your pictures of your PC look spot on though !
Cheers
Paul

Boggie

Joined: December 08, 2005
KitMaker: 1,370 posts
Armorama: 1,331 posts

Posted: Friday, January 09, 2009 - 12:57 AM UTC
Paul
The only three colours I used for the green was Tamiya Olive Green mixed with Tamiya Lemon Yellow with a little Tamiya flesh to tone it down. The paint was painted over the Tan mixture, I don't know if that would change the colour though other than the contrast between the tan and the green.
What colour are you getting?
Bill

Boggie

Joined: December 08, 2005
KitMaker: 1,370 posts
Armorama: 1,331 posts

Posted: Friday, January 09, 2009 - 09:26 AM UTC
I've been busy with this project and I thought I'd share my progress. I will remove all the temporary straps and replace them with some Eduard PE ones and this vehicle needs about 6 ratchet strap which I will add once I get either Cory's or the ones from the LeClerc Eduard set. I took some liberties with the blue foam pads which I have never seen in any pictures on ASLAV's but I like the way they make the eye move around the model. This is a combination of a number of vehicles that I found various things on that interested me like the brass catch bag on the back of the RWS, some vehicles had them other didn't.
Constructive comment are always welcome.
Thanks for looking
Bill


Oops wheel off the ground!


Constructive comment are always welcome.
Thanks for looking
Bill


Oops wheel off the ground!


jasmils

Joined: December 23, 2003
KitMaker: 1,016 posts
Armorama: 745 posts

Posted: Friday, January 09, 2009 - 11:30 AM UTC
Very, very, very impressive Bill.
I suppose I should get stuck into mine.
Cheers Jason
I suppose I should get stuck into mine.
Cheers Jason

ppawlak1

Joined: March 14, 2006
KitMaker: 1,973 posts
Armorama: 1,843 posts

Posted: Friday, January 09, 2009 - 12:10 PM UTC
Quoted Text
Paul
The only three colours I used for the green was Tamiya Olive Green mixed with Tamiya Lemon Yellow with a little Tamiya flesh to tone it down. The paint was painted over the Tan mixture, I don't know if that would change the colour though other than the contrast between the tan and the green.
What colour are you getting?
Bill
Thanks Bill. Are you sure the %'s are correct ?
Your PC looks awesome - well done

Cheers
Paul

Boggie

Joined: December 08, 2005
KitMaker: 1,370 posts
Armorama: 1,331 posts

Posted: Friday, January 09, 2009 - 01:22 PM UTC
Quoted Text
BTW Bill: your XF62 above doesn't look quite right - it looks 'reddy' NOT a Deep 'Olive Drab' like mine - is that the correct color ? It might pay to recheck that vial of paint.
I didn't get the same result when I mixed XF62 with XF15 either. I used 3 parts Olive drab to 1 part XF15 and got a much lighter Olive Drab.
Paul we had some problem with colours before as well didn't we?
You are going to have to experiment by adding enough F8 to the XF 58 to get a very yellow olive green and then add tiny amounts of F8 until you think it looks good. What I did was to make a draw down on the page in the Tankograd book of the colour I finally decided was the "correct" green for me and kept adding tiny bits until I got it. Drying time make a difference as well so use a hair dried while doing the tests. When I got mine right I made an entire spare paint jar full so I'd have some left for those unexpected matches ( a new ASALV 25).
Sorry I can't be of more help. "slowly slowly catch your monkey"
Jason Thanks very much, thanks for all your help along the way.
Regards
Bill

ppawlak1

Joined: March 14, 2006
KitMaker: 1,973 posts
Armorama: 1,843 posts

Posted: Friday, January 09, 2009 - 01:34 PM UTC
Quoted Text
Sorry I can't be of more help. "slowly slowly catch your monkey"
Jason Thanks very much, thanks for all your help along the way.
Regards
Bill
Thanks Bill.
I'll do what you did and add some more yellow and test it a few times. The lighting makes a difference too IMO.
Cheers
Paul

Boggie

Joined: December 08, 2005
KitMaker: 1,370 posts
Armorama: 1,331 posts

Posted: Friday, January 09, 2009 - 01:47 PM UTC
Lighting plays a big part. If the vehicle is to be displayed in fluorescent lights mix in fluorescent lights.I do a lot of ink mixing in my work and that helps.
Please let us in on your final formula.
Have you got your ASLAV 25 bits yet, I am anxious to see your build.
Regards
Bill
Please let us in on your final formula.
Have you got your ASLAV 25 bits yet, I am anxious to see your build.
Regards
Bill

ppawlak1

Joined: March 14, 2006
KitMaker: 1,973 posts
Armorama: 1,843 posts

Posted: Friday, January 09, 2009 - 02:05 PM UTC
Quoted Text
Lighting plays a big part. If the vehicle is to be displayed in fluorescent lights mix in fluorescent lights.I do a lot of ink mixing in my work and that helps.
Please let us in on your final formula.
Have you got your ASLAV 25 bits yet, I am anxious to see your build.
Regards
Bill
I'll try some mixes tonight. My color looks better today in the daylight (rather than flourescent lights). The paint looked quite olive wet, but has 'greened' up once dry. I think it's just a case of more yellow.
I think I should get the MH bits soon Bill. I think they're just about 'cast'.
Once I finished my 'What if?' Leo 'AS2' (same Aussie Camo colors BTW) I'll get back into the '25'. I think it'll be a couple of weeks before then.
What else will you be doing to your PC ?
I love it BTW

Cheers
Paul

ppawlak1

Joined: March 14, 2006
KitMaker: 1,973 posts
Armorama: 1,843 posts

Posted: Friday, January 09, 2009 - 04:23 PM UTC
Quoted Text
Please let us in on your final formula.
I'm going to settle on 70 % XF58 (Olive Green) and 30 % XF3 (Flat Yellow) after tests Bill. It's a nice Olive color on my test sample and on the lower hull and Dozer blade on the Leo. (reminds me of Eucalyptus 'Gum' tree leaves).
XF3 is a tiny bit lighter than X8 (which is a gloss).
I'm even debating as to whether I should use a 60 / 40 mix. The '25' will be dusty so I think a shade darker will be better (70 / 30).
I can aways lay down a darker shade if I'm not happy.
BTW: Once I put it through my Air Brush onto the pre existing base coat (Green) instead of the Tamiya undercoat, it does seem quite a bit more 'Olive'.
Edit: I'm interested in hearing the steps you used on your PC weathering Bill. It's fantastic.
 !!
!!Can you bullet point and describe the steps you took and what you 'used' during your 'down and dirty' stage please Bill ?
Cheers
Paul

ppawlak1

Joined: March 14, 2006
KitMaker: 1,973 posts
Armorama: 1,843 posts

Posted: Friday, January 09, 2009 - 09:47 PM UTC
I've had time to review my paint swatches again Bill & boy does the lighting make a huge difference !!
There is no more daylight, and the flouro lights have taken over the lighting in the house......
My Mix above now looks very Green again, and my original 'mix' XF62 (Olive Drab) 60 % and XF60 (Dark Yellow) 40 % looks correct !!
I'm going to compare those two colors again tomorrow in the daylight
I understand that the dust will change everything, but the lighting has a bigger effect than I thought !!
This green will be the end of me
Paul
There is no more daylight, and the flouro lights have taken over the lighting in the house......
My Mix above now looks very Green again, and my original 'mix' XF62 (Olive Drab) 60 % and XF60 (Dark Yellow) 40 % looks correct !!
I'm going to compare those two colors again tomorrow in the daylight

I understand that the dust will change everything, but the lighting has a bigger effect than I thought !!
This green will be the end of me

Paul
WayneB

Joined: July 22, 2008
KitMaker: 141 posts
Armorama: 130 posts

Posted: Saturday, January 10, 2009 - 01:46 AM UTC
Bill looks good mate. Really good. Nice weathering
W
W

Boggie

Joined: December 08, 2005
KitMaker: 1,370 posts
Armorama: 1,331 posts

Posted: Saturday, January 10, 2009 - 01:54 AM UTC
Paul
To tell you the truth I followed the Mig method from the beginning to the end. It is my first time using this method and I must say it really helps. I bought the two DVD's and reviewed them many times during the stages of weathering. I had always been inspired by Graeme Davidson's builds and read with interest his method which is very close to the Mig method, he also inspired me to raise my personal bar on taking photographs of my models (thanks Graeme).
As you know it is a hard thing to start slathering globs of acrylic resin mud and sand all over the model after it has been so carefully painted. I used a lot of artists pastels in the past and silver and graphite pencil but that was about it. The chipping section really helped me to break down the subtle task of an effective chip (see the roller fair head for the winch below).
I started dusting with the dry dust but I wanted the dust to remain on the vertical surface of things like the rear spare tire and boxes that would collect as one drove along dusty roads. I started using the solvent saturated dust pigments and applied them carefully. Once dried I was amazed at how real it looked and after I fooled around and blew the look a few times I began to get better at judging how much to apply. I read on here some where that dust tends to settle into places differently when being vibrated by a machine and driven at high speed during wind storms. If nothing else it really opened my eyes to what was around me in real life. I noticed construction trucks and vehicles that worked on dusty roads.
My advise to you is to buy the DVD's and at least consider what is in them. I was stuck in my usual rut and needed shaking up, the Mig DVD's made me reconsider my methods and even if you choose to ignore the bulk of it you may take a little with you.
Now the filters really have me confused..................................
Regards
Bill


Boggie

Joined: December 08, 2005
KitMaker: 1,370 posts
Armorama: 1,331 posts

Posted: Saturday, January 10, 2009 - 01:57 AM UTC
Wayne
Not too much dust for you? I was considerate of your concerns about over doing it with the weathering. I must say a little dust really changes the colours.
Thanks for your comments
Bill
Not too much dust for you? I was considerate of your concerns about over doing it with the weathering. I must say a little dust really changes the colours.
Thanks for your comments
Bill

DAR

Joined: April 27, 2002
KitMaker: 250 posts
Armorama: 188 posts

Posted: Saturday, January 10, 2009 - 02:13 AM UTC
Lovely build Bill, well done.
 |


