Armor/AFV: Modern Armor
Modern armor in general.
Hosted by Darren Baker
Australian LAV (ASLAV) (Renamed Topic)
Boggie
Visit this Community
Newfoundland, Canada
Joined: December 08, 2005
KitMaker: 1,370 posts
Armorama: 1,331 posts
Posted: Thursday, June 19, 2008 - 01:03 PM UTC
Ray
Real good of you to go through all this trouble, it really helps define differences. I will have to study all this so I am better able to see the differences. What a great Osprey publication, Modern Australian Armour.
As for the angle of the small wall behind the commanders hatch there seems to be a slight dimensional difference between the two and so makes me wonder if the angle is the same or not, have a look.
guset
small guset
These builds could be years apart and to changing specs.
Thanks again for your care in putting this together,
Regards
Bill
RomeoKilo
Visit this Community
Victoria, Australia
Joined: December 03, 2007
KitMaker: 160 posts
Armorama: 155 posts
Posted: Thursday, June 19, 2008 - 07:37 PM UTC
Yep not sure mate. I think if there is a difference it must be tiny, or it may look different because the Bison has that small step on the edge of the upper hull.
Boggie
Visit this Community
Newfoundland, Canada
Joined: December 08, 2005
KitMaker: 1,370 posts
Armorama: 1,331 posts
Posted: Friday, June 20, 2008 - 02:54 AM UTC
Ray
When John shows me the Bison plans from General Motors I'll find this thread and let you know. I think that step in the side of the Bison does contribute to an illusion, you're right. And the fact that one shot is looking slightly down and the other slightly up doesn't help either. Perhaps some one that has a Bison and/or a ASLAV PC in their back yard could measure the angle for us?
I look forward to my pile of Mouse House resin.
Thanks for your help Ray.
Bill
aussieLAVs
Visit this Community
Victoria, Australia
Joined: March 03, 2006
KitMaker: 10 posts
Armorama: 8 posts
Posted: Saturday, July 05, 2008 - 04:13 PM UTC
Greetings all,
I haven't posted much in the past (don't get much opportunity to do so), but couldn't pass the chance to clear up some confusion about the Phase 2 & 3 ASLAVs.

For people thinking of building a PC, the only concern you should have is the time frame you want the vehicle to represent (ie. Timor, pre-2002, etc), as ALL Ph2 ASLAVs were retrofitted to Ph3 standard during 2003-04.

As such, there are no Ph2 vehicles in service - all are maintained under the Ph3 banner.
The differences between a "standardised Ph2" and a current Ph3 are minimal and probably not worth the effort in the smaller scales.
All Type II vehicles (PC, Comd, etc) in Aust are fitted with a Platt designed commanders mount, which replaced the Diemarco mount.
The only Diemarco mounts left fitted to vehicles (in Aust) will be the ones mounting RWS, which are to be replaced with the SEAL mount soon.

Any differences between T-1 vehicles (Commanders Sight, spare wheel carriers, etc) will be that those vehicles have not yet been modified. This is the biggest area I see people getting confused, as modifying the fleet can sometimes take 2 years to complete.

William,
in regards to the area behind the C/C I will check our vehicle at work and measure that plate for you.

Cheers

Brett
Boggie
Visit this Community
Newfoundland, Canada
Joined: December 08, 2005
KitMaker: 1,370 posts
Armorama: 1,331 posts
Posted: Sunday, July 06, 2008 - 01:21 AM UTC
Brett
Thanks for wading in.I did a search for Diemarco mount but nothing resembling a mount showed. Is it a semi circular rail that the gun mount attaches to?Like this?
Photobucket
or is it the one shown in some of the images in this thread, the ASLAV PC ambulance in Ray's posting above for instance?
The Platt Mounts like this
Photobucket
Photobucket
Or this unknown to me
Photobucket

Quoted Text

Any differences between T-1 vehicles (Commanders Sight, spare wheel carriers, etc) will be that those vehicles have not yet been modified. This is the biggest area I see people getting confused, as modifying the fleet can sometimes take 2 years to complete.


So when you say the wheel mount are you referring to the (non PC) one currently being sold by Mouse House, the one that swings out to the side or another?
Photobucket
Many thanks for these clarifications and I'd appreciate the measurements of the wall behind the commanders cupola, thankyou.
Regards
Bill
aussieLAVs
Visit this Community
Victoria, Australia
Joined: March 03, 2006
KitMaker: 10 posts
Armorama: 8 posts
Posted: Sunday, July 06, 2008 - 11:46 PM UTC
Bill,
Glad to be of assistance.

The fourth photo of the weapon mounts is the Diemarco I referred to. It was purely used for the Ph 2 vehicles and as many have described, was used to mount the first versions of the RWS onto the Type 2 vehicles (PC, Comd).

Due to this weapon being considered "offensive" in nature it was not fitted to the Ambulance vehicles deployed overseas and at this stage is not planned to be fitted.
I have attached a photo of the Diemarco Mount modified for the RWS weapon, hope it helps.

The spare wheel carrier I referred to is the one fitted to Type 1 cars, at this stage there is no other approved bracket for carrying spare wheels on the other Types.

Here are the measurements I promised, please excuse the quality of the drawing, my paintshop skills leave a lot to be desired!

Hopefully this image works out okay, been a while!!

If I can be of further assistance, just yell, but I don't get on too often, unfortunately.
Cheers
Brett


aussieLAVs
Visit this Community
Victoria, Australia
Joined: March 03, 2006
KitMaker: 10 posts
Armorama: 8 posts
Posted: Sunday, July 06, 2008 - 11:47 PM UTC
Bill,
Forgot to mention the drawing is in millimeters.
Brett
Boggie
Visit this Community
Newfoundland, Canada
Joined: December 08, 2005
KitMaker: 1,370 posts
Armorama: 1,331 posts
Posted: Monday, July 07, 2008 - 12:40 AM UTC
Brett
I appreciate your help with this, I had never even noticed the Diemarco mount before you mentioned it. So the RWS sits just out of the picture frame to the left is that right? A lot of kit to be supported by that. Thank for the actual drawing of the knee wall behind the CC, this is the first time I have seen a diagram of that very angle, now if I could get one of my Canadian countrymen to do the same for a Bison I could see if in fact the ASLAV PC and the Bison still share similar architecture.
Do you have access to the Fitter and Recovery versions that are currently in the field? If you do could you snap some pics of the crane/mount of the fitter and the rear stabilizers on the Recovery. I have some pics but nothing really specifically detailed enough to see how they are constructed.
Again many thanks for your help.
Regards
Bill
Removed by original poster on 07/07/08 - 12:21:29 (GMT).
Boggie
Visit this Community
Newfoundland, Canada
Joined: December 08, 2005
KitMaker: 1,370 posts
Armorama: 1,331 posts
Posted: Monday, July 07, 2008 - 06:10 AM UTC
I just received my ASLAV PC conversion set from Mouse House. I looked through all the bags and found nothing broken. The casting was thoughtful, clean and crisp. Thoughtful because the resin blocks are along the handles (for example) of the fuel cans not the bases where there is detail seen in the racks. The thick walled body is free of exterior bubbles, crisp and clean as well. I really appreciate the detailed and readable instructions which number where things are to go with a photo example of the real thing. It would be fun to do a real review of the sets and the associated sets like the various RWS mounts which come separately.
Brett
Interestingly the mount for the RWS included with this conversion is the Diemarco mount, if I'm not mistaken.
Very nice work Mouse House
Bill
RomeoKilo
Visit this Community
Victoria, Australia
Joined: December 03, 2007
KitMaker: 160 posts
Armorama: 155 posts
Posted: Tuesday, July 08, 2008 - 02:22 PM UTC
This is my first shot at a resin conversion and im very impressed with the mouse house gear as well.

DAR
Visit this Community
United Kingdom
Joined: April 27, 2002
KitMaker: 250 posts
Armorama: 188 posts
Posted: Tuesday, July 08, 2008 - 08:11 PM UTC
Bloody hell that was quick Ray!
Nice build mate.
Boggie
Visit this Community
Newfoundland, Canada
Joined: December 08, 2005
KitMaker: 1,370 posts
Armorama: 1,331 posts
Posted: Tuesday, July 08, 2008 - 11:49 PM UTC
Ray
"Ray the Rocket" man that was fast! It looks very nice. Yesterday I cut the Trump upper hull, cut out and installed the engine grills and lopped off the shock knobs. I am enjoying this build as well, lots of dry fit, back and forthing trying to interpret the instructions. Any speed bumps you may want to warn us about long the way?
Can't wait to see the paint on. I'm interested to hear about your mixing the colours.
Great work
Bill
RomeoKilo
Visit this Community
Victoria, Australia
Joined: December 03, 2007
KitMaker: 160 posts
Armorama: 155 posts
Posted: Wednesday, July 09, 2008 - 04:07 PM UTC
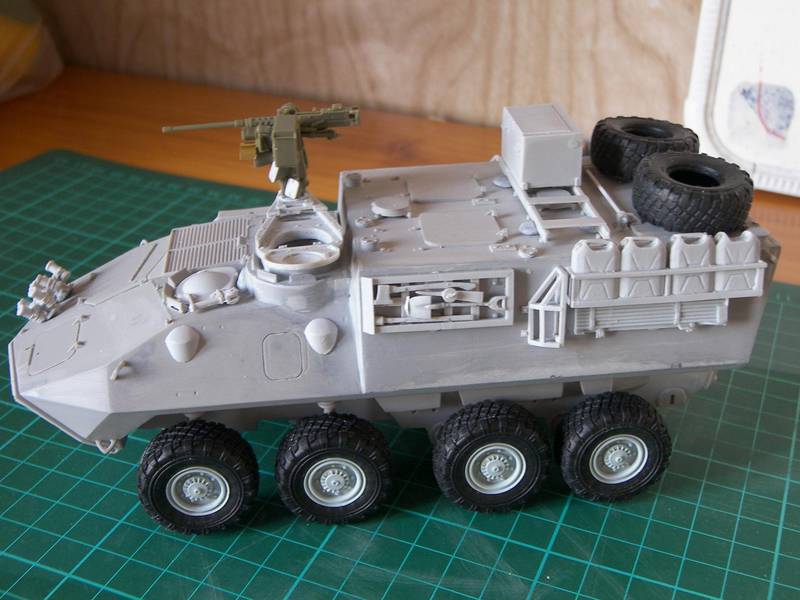
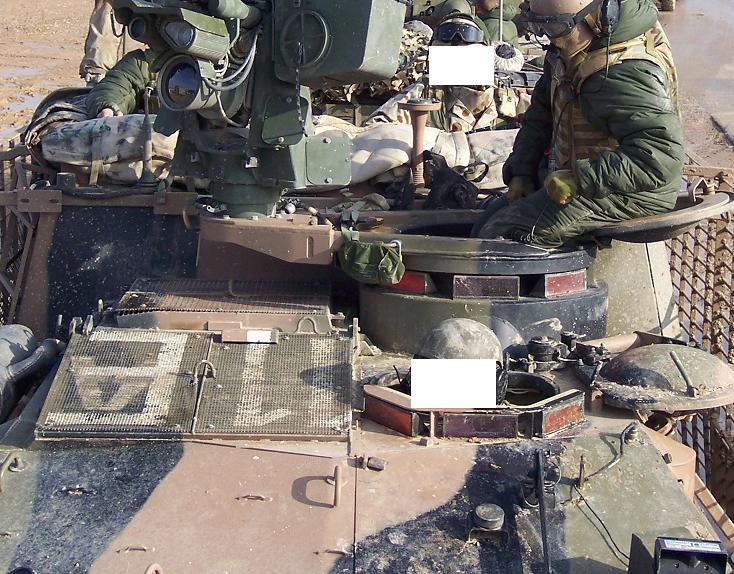
Only hit one speed bump, and that was the commanders cupola. I should point out that my doner kit was the Trumpeter LAV-C2 not the LAV-25, so that may have something to do with it as i had to remove the existing cupola before fitting the MH one, which may have altered the dimensions of the hull by a few mm.

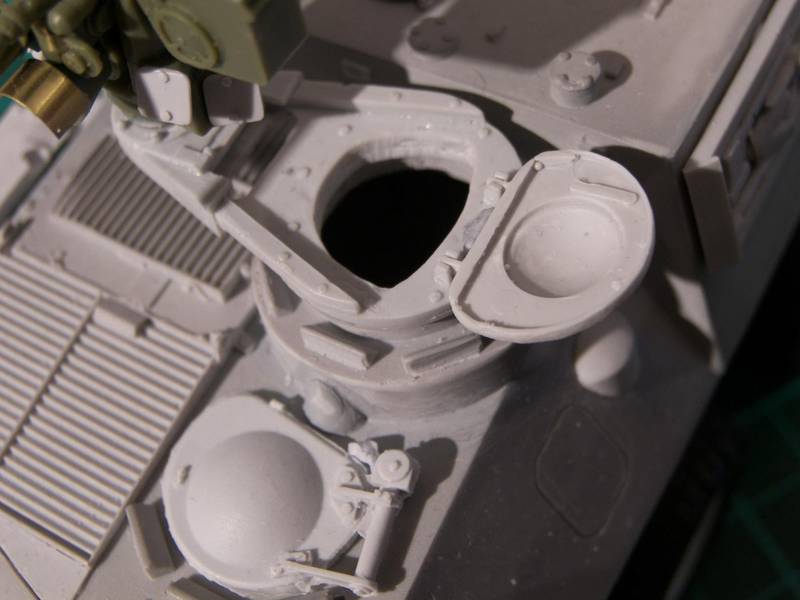
I attached the engine deck and then found that the cupola was too large to fit. I thinned it as much as i could but ended up cutting a step into it so it actually sits slightly on top of the engine deck (see photo). Its not really noticable from most angles as the RWS mount covers this small error. Just make sure you trial and fit it before glueing the deck down!! Also, the periscopes are cast as smaller than the drivers, when they should be the same size. The ring has to be filed down and shortened as well so the mount sits just higher than the scopes. (Will do... only blue tacked at the moment)


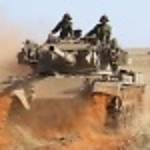
Ive also noticed that the Diemarco mount radius is too small, so im considering scratching my own. You can see from the photos in Bretts post that the swing mount pretty much overhangs the Commanders periscopes. Compare that photo to this...


The rear hull went on great, i cut out the ribbing inside to make it a bit lighter and allow some flex in it when attaching to the lower hull.

Also ensure that you dry fit the exhaust before you glue on the suspension bumps onto the hull. Im going to have to remove one and adjust it a mm or so.

I do really reccomend the Mouse House kit, definatly the best ASLAV gear on the market, and they will be getting more out of my wallet in the future.

As for paint, to tell you the truth thats why im making this kit so quick. Its the test bed for my two ASLAV-25's (see other thread). Im a newbie and painting is where i choke. Got a new airbrush to try out as well.

Oh and another thing, If you choose to mount the roof stowage box, spin the bracket around 180 degrees and mount it on the right hand side. Its in the photos in the instructions as on the left, but the first thing most crews do is move it so the Commander can see behind the car without having to stand up on his hatch! And most cars in the MEAO have it removed altogether.
Boggie
Visit this Community
Newfoundland, Canada
Joined: December 08, 2005
KitMaker: 1,370 posts
Armorama: 1,331 posts
Posted: Thursday, July 10, 2008 - 12:21 AM UTC
Ray
Thanks for the heads up. I'll have a look at the CC today to see how it all fits and the exhaust as well, I have my shock bumps on already as well. When I got to the engine grill I thought the instructions said to remove the surface detail of the original grill, but I soon discovered it meant cut it completely out of the body! My rear ramp went on very nicely as well.

Quoted Text

Oh and another thing, If you choose to mount the roof stowage box, spin the bracket around 180 degrees and mount it on the right hand side. Its in the photos in the instructions as on the left, but the first thing most crews do is move it so the Commander can see behind the car without having to stand up on his hatch! And most cars in the MEAO have it removed altogether.


This kind of insight really helps a model to come alive, thanks for this tip and I'll check over my photos as well.
I'd like to build another ASLAV as well,the 25 or perhaps the Recovery or the Fitters, that should slow this process down a bit.
What conversions kits (Mouse House) are you using for your ASLAV 25? I will check out your builds there (where??) as well, you are a an enthusiastic builder for sure.
Keep us posted.
Bill
HKCW
Visit this Community
Hong Kong S.A.R. / 繁體
Joined: October 23, 2005
KitMaker: 17 posts
Armorama: 14 posts
Posted: Thursday, July 10, 2008 - 05:50 AM UTC
Dear All,

Nice work and thanks for the valuble information. I have been doing the measurement and cleaning the parts immediately receiving the conversion kits from MH.

I also think of using the C2 for many reasons, i.e. newer tyres, but need another set from MH to chnage the hubs! With the removal of the commander cupola from the C2, I was guessing there should be a small space between the new hull and the new commander cupola. After all, the ASLAV is different from the USMC LAV, right? It is now confirmed and thanks for the head-ups.

This forums really helps and inspirit other modellers, like me!

Thanks again for all the good works and I cannot wait to see more postings, at the mean time keeping modelling.

Regards,

Alan
Boggie
Visit this Community
Newfoundland, Canada
Joined: December 08, 2005
KitMaker: 1,370 posts
Armorama: 1,331 posts
Posted: Thursday, July 10, 2008 - 09:42 AM UTC
I did some checking and the commanders cupola overhangs on mine as well and I started from the Lav 25. Here is the product shot from Mouse House and you can see clearly that this over hang is apparent here as well.
Photobucket
On the real thing these are the only pics I could find of this relationship. The best being the above close up by Brett.
Photobucket
Photobucket
and the muffler orientation
Photobucket
Any body know if there is an overlap for certain?
Regards
Bill
RomeoKilo
Visit this Community
Victoria, Australia
Joined: December 03, 2007
KitMaker: 160 posts
Armorama: 155 posts
Posted: Thursday, July 10, 2008 - 04:00 PM UTC
Im 100% sure that there is no overlap on ASLAV. The entire piece can be unbolted and lifted out.


And boggie, here is my ASLAV 25 WIP. Im not sure how to link it...

https://armorama.kitmaker.net/forums/116228&page=1
Boggie
Visit this Community
Newfoundland, Canada
Joined: December 08, 2005
KitMaker: 1,370 posts
Armorama: 1,331 posts
Posted: Friday, July 11, 2008 - 12:47 AM UTC
Ray
I think you are right about the clearance. What would you do next time trim back the CC or the engine grill frame?
Very nice picture too, shows it like it is. Thanks for the link, your work is fabulous. Anybody watching this thread check it out.
https://armorama.kitmaker.net/forums/116228&page=1 I was about to ask where you bought the resin that you did use and the answers are in your post on the ASLAV 25's. Any idea when Mouse House will be releasing the Phase 3?
Keep up the great work.
Bill
Boggie
Visit this Community
Newfoundland, Canada
Joined: December 08, 2005
KitMaker: 1,370 posts
Armorama: 1,331 posts
Posted: Friday, July 11, 2008 - 09:15 AM UTC
Antipodean military members
I have not seen any Aussie kit bags for sale. For hanging on the Bushmaster and ASLAV's could I modify Alice packs to suit, or is there another option?
Thought you'd be people to ask.
Bill
DAR
Visit this Community
United Kingdom
Joined: April 27, 2002
KitMaker: 250 posts
Armorama: 188 posts
Posted: Friday, July 11, 2008 - 10:18 AM UTC

Quoted Text

Antipodean military members
I have not seen any Aussie kit bags for sale. For hanging on the Bushmaster and ASLAV's could I modify Alice packs to suit, or is there another option?
Thought you'd be people to ask.
Bill


These are the only ones that I know of :
http://www.vichobbycentre.com.au/shop/index.php?act=viewProd&productId=309


Boggie
Visit this Community
Newfoundland, Canada
Joined: December 08, 2005
KitMaker: 1,370 posts
Armorama: 1,331 posts
Posted: Friday, July 11, 2008 - 12:59 PM UTC
Dar
Thanks for that, I figured some one would know if they existed, have you seen them in person? Seems like a market void or an opportunity....
When I bought my ASLAV APC from Mouse House I also bought the Seal Solution or Spider mount for the RWS. Mose House contacted me to say that they were creating a master for the proper Commanders Cupola for the Phase 3, Seal Solution RWS, which replaces the Diemaro that come standard in the resin conversion. Here is a picture of the initial master under construction.
Photobucket
Thanks John
Bill
RomeoKilo
Visit this Community
Victoria, Australia
Joined: December 03, 2007
KitMaker: 160 posts
Armorama: 155 posts
Posted: Saturday, July 12, 2008 - 10:37 PM UTC

Quoted Text

Ray
What would you do next time trim back the CC or the engine grill frame?


Mate i think its the cupola thats the problem. I havnt done measurements, but to the eye the engine deck is spot on.

You can get Aussie Packs through Mouse House as well. Im just going to change the buckles on some alice packs with photetch and paint them in DPCU or DPDU pattern. Lots of aussies use lots of different packs and webbing so it should be fine.
Boggie
Visit this Community
Newfoundland, Canada
Joined: December 08, 2005
KitMaker: 1,370 posts
Armorama: 1,331 posts
Posted: Sunday, July 13, 2008 - 02:45 AM UTC
Ray
Looking at your build up and your details of the Diemarco mount and the cupola it looks as though either the Diemarco mount is too small a diameter where it attaches to the cupola or the cupola is too large a diameter. In one photograph above the vision posts are clearly completely covered by the Diemarco mount. It would stand to reason that if you think the engine grills are the correct size then the cupola is over sized and/or the Diemarco mount is too small in diameter.
I hadn't seen the Mouse House packs but will look for them now.
Thanks
Bill
Boggie
Visit this Community
Newfoundland, Canada
Joined: December 08, 2005
KitMaker: 1,370 posts
Armorama: 1,331 posts
Posted: Thursday, July 17, 2008 - 05:48 AM UTC
I have bitten the bullet and rebuilt the Commanders Cupola for the Mouse House resin conversion so it now fits in the proper space. This got me involved with scratching the vision blocks. Looking for a template I looked at the Mouse House ones on the resin piece, the ones on the donor LAV 25 kit and the ones on the Trump LAV C2, they are all different sizes, especially the tiny ones on the Trump C2 drivers cupola.
Does anyone know if the vision blocks are the same size on the ASLAV APC or do they differ in size? The pictures on this thread (and other pictures I have) make them look very uniform and similar in size.
Does anyone have any tips on making these tiny things from scratch?
Thanks for the help.
Bill