Armor/AFV: Modern Armor
Modern armor in general.
Hosted by Darren Baker
Australian LAV (ASLAV) (Renamed Topic)
RomeoKilo
Visit this Community
Victoria, Australia
Joined: December 03, 2007
KitMaker: 160 posts
Armorama: 155 posts
Posted: Sunday, August 17, 2008 - 11:34 PM UTC
Wow. Looking awesome mate.

Mine has actually gone backwards, as i decided to hack the cupola off and fix it. Im all scratched out on the gun car at the moment, but ill get around to it eventually. I might just get the MH corrected one when i finalise my massive order of thier new stuff soon. I also removed some water jerrys to replace them with fuel ones, and in the process destroyed one of the brackets. More scratching!! And im strugging with the exhaust cover as well.

As for yours, looking fantastic, almost a shame to paint it. I can only hope mine comes out looking half as good.

Dont forget to add the bump on the front of the cupola, and to remove the two bumps on the left hand side of the drivers hole. They are the hinges for the US style hatch, not there on ASLAV. Have you trial fitted the pioneer tools to the mounting bracket? I had to do some major modifying to get them to fit in the correct place, mostly on the shovel.

Also, absolutely nothing wrong how you have it but i know you like the little things. Most crews will mount the stowage box where you have it now, but spin it around so the latch is facing rear and the hinge forward. So if you forget to latch it, the airflow over the car will hold the lid down. The other way, the air will force the lid open and you lose its contents at 110kph on the freeway.

Good pick on the mirrors too. Both sides are mounted in the exact same way. On Phase 2 they are identical opposites, but on Phase 3 the Right hand side one has a longer stalk as is seen in your ASLAV-F photo . And most of them are removed when in the field anyway, as they seem to be in the perfect position for every single tree in Australia to miss the brush guards and smash them off.

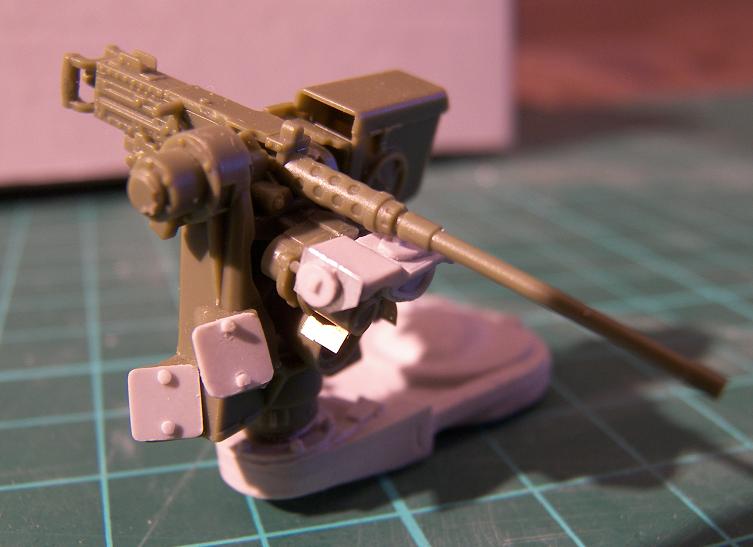
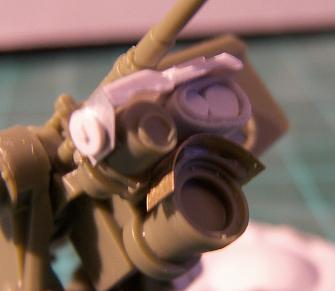
Did you modify your RWS in any way? After checking some photos, I sliced about 1/3 of the width of the kit PE shroud off, and also shortened the resin LRF Shroud and added a piece on the end of it, as this is where the daysight cover is stowed when the RWS is turned on.

Boggie
Visit this Community
Newfoundland, Canada
Joined: December 08, 2005
KitMaker: 1,370 posts
Armorama: 1,331 posts
Posted: Monday, August 18, 2008 - 12:45 AM UTC
Ray
Good eyes you have, thanks for the observations. I contemplated removing one or two of the water cans on the back but couldn't find the proper gas cans. I find the resin very soft and once past the surface very aerated. I cut the straps off the rear cans and replaced them with PE ones and spent an hour filling holes.
The RWS was a tangly affair. Like you the ref photos show a much shortened shade on the main optics but I left mine alone thinking that AFV knew better than me. When I put the Mouse House range finder on the hood for it didn't fit down snug enough and it now blocks the microphone looking device on the side of the MG, your looks the part. I may have to revisit that issue.
The pioneer tools. When I started cleaning them up there were so many air bubbles that the shovel had more bubbles than resin and I had to think long and hard about binning it for the Stryker ones. The MH one looks more like the Aussie ones though so I rebuilt it but replaced the axe and the pick head and handle with the AFV ones. I have only test fitted the axe and I see what you mean.....it may not look like an axe when I'm done.
I'll see if I can snap off the PE from the box and flip it around, it is those details that make it for me, the devil is in the details. I have made screens to cover the engine grills and lead smoke popper caps with chains that will go on once primed and painted.
I look forward to painting and weathering but I'm not satisfied with my understanding of the colours. In some photos the tan looks pink and in others (Tankograd) they look less pink????
I look forward to your next photos of both the APC and the 25.
Thanks for taking the time.
Bill
jasmils
Visit this Community
Queensland, Australia
Joined: December 23, 2003
KitMaker: 1,016 posts
Armorama: 745 posts
Posted: Monday, August 18, 2008 - 01:52 PM UTC
G'day Bill,
The PIII mirror guard is in the Phase III PC upgrage kit coming out.

Cheers Jason
Boggie
Visit this Community
Newfoundland, Canada
Joined: December 08, 2005
KitMaker: 1,370 posts
Armorama: 1,331 posts
Posted: Tuesday, August 19, 2008 - 12:00 AM UTC
Jason
I look forward to this Phase 3 set, I may have to build another then now that I've done all this research.
Thanks
Bill
Boggie
Visit this Community
Newfoundland, Canada
Joined: December 08, 2005
KitMaker: 1,370 posts
Armorama: 1,331 posts
Posted: Thursday, August 21, 2008 - 06:53 AM UTC
An update. A lot of the sub assemblies are stuck on with conservators wax so placement will look wonky. I liked the X wing antenna and the other GPS One beside it so I scratched most of these as well the rest of the antenna bases scattered around the roof. I'm finding it tricky to replicate the thick antenna seen on the ASLAVs, stretched sprew doesn't seem to work out. The Sun Shade over the range finder seems too proud still, don't quite know what to do with that. The 50 cal in this pic will be replaced by a Tasca 50.
My second Mouse House order came in so I have the spare tires and the foot locker. I have a stretcher from Maple Leaf Models, some ammo cans,water bottles, MRE's and hopefully a generator and tow bar to make up the stowage.
Ray I switched the big box around so the lid won't fly open at speed, this was a considerable dis assembly but happy it worked out.
All cables will be done after the paint. The next pictures will hopefully be primed and ready for paint, I await my Vallejo paint/primer order from Elm City Hobbies.
Any comments appreciated, thanks for looking.
Bill
shade too high,parafilm covered confetti,two new antenne
Sudzonic
Visit this Community
Scotland, United Kingdom
Joined: December 07, 2007
KitMaker: 2,096 posts
Armorama: 1,983 posts
Posted: Thursday, August 21, 2008 - 07:05 AM UTC
boggie you have done it agian.
RomeoKilo
Visit this Community
Victoria, Australia
Joined: December 03, 2007
KitMaker: 160 posts
Armorama: 155 posts
Posted: Thursday, August 21, 2008 - 05:29 PM UTC
Awesome work mate. Looks fantastic. Nice touch with the second RWS bin as well.

Cant wait to see it painted. I am eager to hear your thoughts on colors.
Boggie
Visit this Community
Newfoundland, Canada
Joined: December 08, 2005
KitMaker: 1,370 posts
Armorama: 1,331 posts
Posted: Friday, August 22, 2008 - 06:47 AM UTC
Ray
Thanks for the help along the way. I have a couple of photos of ASLAV PC's with a tray of RWS cases and thought it looked unique.
Photobucket
Have you noticed the T handle on the sides of the RWS bins and on the side of the RWS frame itself, I'm wondering if they are for some spring loading device to loading the belt ammunition, any thoughts?
Thanks for the encouragement.
Regards
Bill
Photobucket
Photobucket
RomeoKilo
Visit this Community
Victoria, Australia
Joined: December 03, 2007
KitMaker: 160 posts
Armorama: 155 posts
Posted: Friday, August 22, 2008 - 02:07 PM UTC
The first pic is not actually part of the RWS or the mount at all. Its a forgotten .50cal cleaning rod!

The second pic is the elevation travel lock. When engaged it stops the mount freely elevating when the RWS is switched off and in transit.
Boggie
Visit this Community
Newfoundland, Canada
Joined: December 08, 2005
KitMaker: 1,370 posts
Armorama: 1,331 posts
Posted: Saturday, August 23, 2008 - 09:35 AM UTC
Ray thanks for identifying these for me, I'll add that to the AFV RWS.
I wonder can I ask you to help me identify some of the antenna without breaching any OPSEC. I'm trying to install number of these types of antenna along with the appropriate mounts. I realize that the antenna indicates specific coms kit so I want to only include what might be appropriate. I thought I could just dip into my Pro Art Models com set but not so simple.
Photobucket
The X antenna, is this for satellite communication?
The mushroom shaped antenna found on a lot of ASLAVs, is that GPS? And often there will be a tube of sort taped to the shaft, any idea what thats for?
Photobucket
Interesting black and white pucks atop a complicated framework, any ideas? I had never seen this before anywhere, probably top secret. The rear arrow points to one that I have seen a few times on Aussie cars and on Candian Lav's and the front arrow indicates an antenna I have seen on Aussie cars as well.
Photobucket
Photobucket
This is the one that I see most often and it hold a very robust multi-part antenna that looks like it should bend from the base(?) when lashed down?
Photobucket
This is your photo and this type of antenna base seems common on ASLAV's both APC as well as 25's.
And lastly
Photobucket
Is this some type of inline filter to keep signal cleaner? I don't often see these attached.
Any help that you can offer would help me outfit my project.
Many thanks
Bill


RomeoKilo
Visit this Community
Victoria, Australia
Joined: December 03, 2007
KitMaker: 160 posts
Armorama: 155 posts
Posted: Saturday, August 23, 2008 - 03:24 PM UTC
Pic 1. Mushroom antenna is the GPS and the tube is sometimes there on PC's to give the commander somewhere to display gunnery flags.

Pic 2. No Idea.

Pic 3. An old HF antennae mount without the antennae in place.

Pic 4 and 5. Standard Aussie antennae. Most cars have at least 2. Correct, bends at the base if lashed down.

Last one I think is just a clip so a Chemical Light can be put in it for night ID. However most just tape the Chem LIght to the antennae.

iamsu7
Vendor
TRUMPETER
Visit this Community
Anhui, China / 简体
Joined: July 22, 2008
KitMaker: 354 posts
Armorama: 339 posts
Posted: Saturday, August 23, 2008 - 07:19 PM UTC
WHAT'S THIS?
ppawlak1
Visit this Community
Victoria, Australia
Joined: March 14, 2006
KitMaker: 1,973 posts
Armorama: 1,843 posts
Posted: Saturday, August 23, 2008 - 07:33 PM UTC
G'day Guys

This is a great thread !

I've been looking for info on Aussie ASLAV's and here it is.....a goldmine

The Trumpter LAV 25 PIRANHA is on the way and I'll be ordering the Mouse conversion bits as soon as that kit arrives.

At this stage I'm not sure whether to do a Phase II or III. But I'll definately do a PIII APC if I do one a little later.

When are the PIII bits going to be available ?

Best wishes

Paul
LeoCmdr
Visit this Community
Alberta, Canada
Joined: January 19, 2005
KitMaker: 4,085 posts
Armorama: 3,917 posts
Posted: Saturday, August 23, 2008 - 07:58 PM UTC

Quoted Text

WHAT'S THIS?


You should know best what it is with you working for Trumpeter......I would think that is the master in progress for the Trumpeter ASLAV 25.
ppawlak1
Visit this Community
Victoria, Australia
Joined: March 14, 2006
KitMaker: 1,973 posts
Armorama: 1,843 posts
Posted: Saturday, August 23, 2008 - 08:27 PM UTC
What the ............ ?

More info....need more info.

When is this being released ??
Boggie
Visit this Community
Newfoundland, Canada
Joined: December 08, 2005
KitMaker: 1,370 posts
Armorama: 1,331 posts
Posted: Sunday, August 24, 2008 - 12:59 AM UTC
Ray
Thanks very much for your help, I like the tube for gunnery flags..;o)
On some of the more recent ASLAV 25's and APC's I've seen an extension bracket being used on the rear right of the vehicle to allow for yet MORE antenna.
Photobucket
and a rear view for detail junkies. How many GPS antenna does one vehicle need?
Photobucket
I notised that the propeller cages have been removed, perhaps not needed with the bar armour package?
GAOYUE
Now that's interesting news. The model looks very much developed with styrene parts cast in the same grey plastic as the Lav 25. Does this mean (as Gary and Jason so astutely points out) this is something to think about or something to actually build?
A bit disconcerting for Mouse House who have pioneered the Australian ASLAV genre. Still I think they'll be safe with the ASLAV APC conversions. Perhaps they might venture into some bar armour for all these ASLAV's to be produced? It looks like we'll still need the Mouse House etch fret for all the continuous tie downs since Trumpeter continues to ignore this detail in all their Lav's.
Thanks to all for making this an informative thread.
Bill


jasmils
Visit this Community
Queensland, Australia
Joined: December 23, 2003
KitMaker: 1,016 posts
Armorama: 745 posts
Posted: Sunday, August 24, 2008 - 03:58 AM UTC
G'day Bill,
Re AMU's

Pic 2, 1st arrow, ACV AMU splitter, 2nd arrow, dont ask. Cause you wont get told.

Last Pic, IR strobe?? Ray????


Quoted Text

I notised that the propeller cages have been removed, perhaps not needed with the bar armour package?


Yep your correct.


Quoted Text

On some of the more recent ASLAV 25's and APC's I've seen an extension bracket being used on the rear right of the vehicle to allow for yet MORE antenna.


Ya can never have enough comm's but can only have so many AMU places. The one you have pointed to is for the PC only.

Cheers Jason
Boggie
Visit this Community
Newfoundland, Canada
Joined: December 08, 2005
KitMaker: 1,370 posts
Armorama: 1,331 posts
Posted: Sunday, August 24, 2008 - 04:39 AM UTC
Jason
Good of you to chime in. Here is a closer look at the IR Strobe (?)
Photobucket

ACV and AMU nomenclature please.

Are these large antenna like things Dukes like the US employ?
Photobucket
Thanks Jason


Boggie
Visit this Community
Newfoundland, Canada
Joined: December 08, 2005
KitMaker: 1,370 posts
Armorama: 1,331 posts
Posted: Tuesday, August 26, 2008 - 07:53 AM UTC
Update
Have been working on the Yanmar 2500 diesel generator. This will be stowed on top of the ASLAV APC.
It's small.
Photobucket
Photobucket
Now to paint and see if I can figure out how Ray made those great decals.
Thanks for looking
Bill
RomeoKilo
Visit this Community
Victoria, Australia
Joined: December 03, 2007
KitMaker: 160 posts
Armorama: 155 posts
Posted: Thursday, August 28, 2008 - 11:47 AM UTC
That Generator looks awesome mate. Is it scratched?

On the closer look that is definatly an IR strobe.

And no not duke, they are just dissassembled clark masts.

Yours is beginning to look like a Command car rather than a PC with the amount of antenna, the storage box and specifically the generator. Or it could be one of the PC's attached to a headquaters element.

Ive test fitted and printed out the decals i emailed you on mine and ive found they are a little oversized. If you are not going to be up to the decaling stage within a few weeks and are willing to wait, ill correct them and ill also add some vehicle names and callsigns to suit some command cars for you.
Boggie
Visit this Community
Newfoundland, Canada
Joined: December 08, 2005
KitMaker: 1,370 posts
Armorama: 1,331 posts
Posted: Thursday, August 28, 2008 - 12:11 PM UTC
Ray
Good to hear from you and to have your observations. By the sounds of things you have painted yours already and moved on to decals? I'll gladly wait for you to re jig the sheet and thanks for including some for my car as well. I didn't intend anything by adding all the antenna just thought it would add lots of interest up top. The generator is all scratched and I have it primed and I'll paint it tomorrow. Frenchy found lots of detailed CAD drawings and more pictures so I will probably make another, more accurate version, we'll see once it's altogether.
I'll take some shots of the primed vehicle tomorrow, now to match paint colours. Is the tan really got a pinkness to it in real life? More like a flesh colour than tan?? I have Tamiya, Model Master and I'm just getting into Vallejo which I find very nice but it makes colour mixing difficult.
To make decals for the generator could I just shrink photos of the logos and shrink them to scale? I have both white and clear decal paper in honor of your decal sheet ready to go.
How are all yours coming along, any photos?
Regards
Bill
RomeoKilo
Visit this Community
Victoria, Australia
Joined: December 03, 2007
KitMaker: 160 posts
Armorama: 155 posts
Posted: Thursday, August 28, 2008 - 05:50 PM UTC
Nah mate I definatly havnt started painting yet. Mine is still a naked hull missing a commanders cupola. I printed out a set of decals on decal paper while i was doing some for my gun cars and fitted them on the unpainted hull to check for size and to see if the ink would run (which it didnt). Unfortunatly I didnt take any photos (party because i wasnt happy with them).

If I were you I'd download the free trial of adobe illustrator (thats what i use) and use that for your generator decals. Its pretty easy to use once you read a few online tutorials and it lets you scale the images to be printed down to the a tenth of a millimeter. Thats pretty much just what i do, design the decals then sit there with my model and a ruler and work out the appropriate sizes.

And i have used some photos to create decals using the same program to good effect. I just did some awesome playboy centrefolds to hang up in the rear of one of my gun cars. I even went and bought the issue that was actually hanging in the rear of the real aslav to scan. All in the name of accuracy af course....


CMOT
Staff MemberEditor-in-Chief
ARMORAMA
Visit this Community
England - South West, United Kingdom
Joined: May 14, 2006
KitMaker: 10,954 posts
Armorama: 8,571 posts
Posted: Thursday, August 28, 2008 - 06:27 PM UTC
Would anyone who has participated in this thread object to me turning it into a feature when its run its course? Also do I need to be concerned about copyright on any of the images used working on the theory that no one objects?
ppawlak1
Visit this Community
Victoria, Australia
Joined: March 14, 2006
KitMaker: 1,973 posts
Armorama: 1,843 posts
Posted: Thursday, August 28, 2008 - 09:28 PM UTC

Quoted Text


I'll take some shots of the primed vehicle tomorrow, now to match paint colours. Is the tan really got a pinkness to it in real life? More like a flesh colour than tan?? I have Tamiya, Model Master and I'm just getting into Vallejo which I find very nice but it makes colour mixing difficult.


Bill I've just got the Trumpter Kit and I'm waiting on the Conversion kit from MH and the Trumpeter rubber XML Tyres to arrive.

In the mean time I've done a bit of research on the 3 color camo colors, and what the best fit as far as Tamiya acrylics go (which I prefer to use). I've used "Paint Assistant "software to match the 'Standard' full scale colors (as defined on the MH website).

See here:

http://www.mheaust.com.au/Aust/Research/Camo/OZCAM2.htm

And I've come up with the following matches.

Camo Green (Lusterless Olive Drab) = no real match, but Tamiya XF-5 or XF-58 are close @ about 98% they may need a little Dark Yellow to match - not sure yet.

Camo Brown = XF-52 = 100% match to full scale

Camo Black = XF-1 = 100% match to full scale

Now the Brown & Green will need to be lightened for scale - maybe with XF-60 Dark Yellow, but I'm not sure of the amount.

I'll need to do some experimenting to find how these colors look on a kit - I may try them on an old panzer to find the right mixes.

BTW: If anyone here has the right mixes or colors (off the shelf - Tamiya preferably ) I'd love to know what they are.

Cheers

Paul