

Wayne
Check this out for modifying the front end of your ASLAV. Just scroll down and you'll see how Mark Minnis does it.
http://www.network54.com/Forum/169232/thread/1202738101/The+AVGP+Craze+continues
Bill
Hosted by Darren Baker
Australian LAV (ASLAV) (Renamed Topic)

Boggie

Joined: December 08, 2005
KitMaker: 1,370 posts
Armorama: 1,331 posts

Posted: Wednesday, July 23, 2008 - 04:42 AM UTC

Boggie
Joined: December 08, 2005
KitMaker: 1,370 posts
Armorama: 1,331 posts
Posted: Sunday, July 27, 2008 - 11:12 AM UTC
Anyone have any formulas for mixing the Aussie ASLAV colours in Testor's MM or Tamiya acrylics?
Is the pink colour really pink or tan in person?
Thanks
Bill
Is the pink colour really pink or tan in person?
Thanks
Bill
Austmouse

Joined: February 11, 2008
KitMaker: 104 posts
Armorama: 98 posts
Posted: Sunday, July 27, 2008 - 11:55 AM UTC
Boggie
the official colours are:
a. Camouflage Green - Olive Drab Lustreless. Reference 7650/ADE(M) 146-1/1, November 1967;
b. Camouflage Brown - US Federal Standard 595a 30219;
c. Black - US Federal Standard 595a 37038
I am told that the green is very close to FS34082. You should be able to find these in Testors.
John M
Boggie
Joined: December 08, 2005
KitMaker: 1,370 posts
Armorama: 1,331 posts
Posted: Sunday, July 27, 2008 - 01:15 PM UTC
John
Thanks for that, did you ever get that colour reference for your Bulldog?
Bill
Thanks for that, did you ever get that colour reference for your Bulldog?
Bill
Boggie
Joined: December 08, 2005
KitMaker: 1,370 posts
Armorama: 1,331 posts
Posted: Wednesday, July 30, 2008 - 05:45 AM UTC
Has anyone tried to paint modern Australian Armour with Vallejo paints. When I match up John's numbers to the recommended FS number the colours aren't even close. I went to the Vallejo site and down loaded their pdf colour charts.
http://www.acrylicosvallejo.com/
Camo Green FS34082 is Reflective Green Vallejo 890
Camo Brown FS30219 is Tan Earth Vallejo 874
Black FS37038 is Vallejo 950 Black
Have a look and you'll see what I mean.
Any suggestions greatly appreciated.
Also
Does anyone know how much of the upper deck of the raised rear section of the ASLAV APC is coated with anti slip?
Thanks again
Bill
PS

front anti slip

RomeoKilo
Joined: December 03, 2007
KitMaker: 160 posts
Armorama: 155 posts
Posted: Wednesday, July 30, 2008 - 04:00 PM UTC
Wow mate you up to painting already? You have overtaken me, mine is on hold for a while. Is that a photo of yours on the bench? How did you go at attaching the exhaust?
As for the anti slip, the entire top deck is covered, incuding the hatches and the upper surface (but not sides) of the vent fans. Unlike US vehicles where there is a 'frame' around antislip panels, ASLAV is anti slip right up to the edges. If you understand what i mean...
As for the anti slip, the entire top deck is covered, incuding the hatches and the upper surface (but not sides) of the vent fans. Unlike US vehicles where there is a 'frame' around antislip panels, ASLAV is anti slip right up to the edges. If you understand what i mean...
Boggie
Joined: December 08, 2005
KitMaker: 1,370 posts
Armorama: 1,331 posts
Posted: Wednesday, July 30, 2008 - 11:38 PM UTC
Ray
Yes that's where I'm at with my build. I have all the sub assemblies done as well and my new commanders cupola but didn't attach it until after the anti slip. I cut the resin shield and bush guard off the MH resin piece and shortened the bush guard and enlarged the upper shield both with brass sheet. As you know the real upper shield is attached by bolts that keep the muffler from touching the body and that's what I did and the muffler shield and bush guard fit. The Mouse House one is way too low in the photo and the shield won't attach in the correct location, it needs to be as high and higher at some places, as the hull topsides.
That is good news about the rear deck anti slip and I understand what you mean by the framing, kind of like masked edges around everything.
There are a few mystery bits on my PE sheet. They look like small rectangles with holes at one end and another adjustable hatch securing piece for (I'm assuming) the large rear roof hatch door but I no references for it and don't know where it goes, any ideas?
There is also a piece of resin which looks to be part of the front trim vaine but I can't seem to figure out where it goes.
I continue to enjoy this Mouse House conversion now if I can figure out the colours..........
Thanks for the interest, I have subscribed to your builds and often refer to them for inspiration and details.
Bill
Boggie
Joined: December 08, 2005
KitMaker: 1,370 posts
Armorama: 1,331 posts
Posted: Sunday, August 03, 2008 - 03:30 AM UTC
Small update.
It is very hard to find pictures about the upper hull of the ASLAV APC unless you served on one, I haven't. Thanks to John and Jason at Mouse House for answering my many questions. I figure this surface will be full of equipment but still it's nice to have it right. On the photo below I have numbered one through four of observations and questions I still have.
#1, anyone know about the arrangement of the antennas for a "usual" APC. In particular the ones in this photo.
#2 antenna was answered by Dan Hay over here
http://www.network54.com/Forum/169232/message/1217744030/Is+this+it-
if the Australian use it the same way as the Canadians use it on their LAV III's.
#3 I noticed that quite a few ASLAV APC's have their rear vision ports welded over, is this universal of some mod from vehicles in action?
#4 I noticed another row of continuous tie downs here behind the rear hatch, I wish I had some left over to add this detail to mine.

I'm ready for the next stage.


Thanks for looking and comments are always welcome please.
Bill
It is very hard to find pictures about the upper hull of the ASLAV APC unless you served on one, I haven't. Thanks to John and Jason at Mouse House for answering my many questions. I figure this surface will be full of equipment but still it's nice to have it right. On the photo below I have numbered one through four of observations and questions I still have.
#1, anyone know about the arrangement of the antennas for a "usual" APC. In particular the ones in this photo.
#2 antenna was answered by Dan Hay over here
http://www.network54.com/Forum/169232/message/1217744030/Is+this+it-
if the Australian use it the same way as the Canadians use it on their LAV III's.
#3 I noticed that quite a few ASLAV APC's have their rear vision ports welded over, is this universal of some mod from vehicles in action?
#4 I noticed another row of continuous tie downs here behind the rear hatch, I wish I had some left over to add this detail to mine.

I'm ready for the next stage.

Thanks for looking and comments are always welcome please.
Bill

Sudzonic

Joined: December 07, 2007
KitMaker: 2,096 posts
Armorama: 1,983 posts

Posted: Sunday, August 03, 2008 - 06:52 AM UTC
 looks like you've done it again boggie.
DAR

Joined: April 27, 2002
KitMaker: 250 posts
Armorama: 188 posts

Posted: Sunday, August 03, 2008 - 08:19 AM UTC
Great work Bill.
Boggie
Joined: December 08, 2005
KitMaker: 1,370 posts
Armorama: 1,331 posts
Posted: Sunday, August 03, 2008 - 11:26 AM UTC
Scott and David
Thanks for keeping in touch.
I was about to replace on of the rear water cans with a gas can but do you think I have a NATO gas can in all my stuff...British, lots of US, Canadian but NATO, not a one.
Good fun, I'm enjoying this.
Cheers
Bill
Thanks for keeping in touch.
I was about to replace on of the rear water cans with a gas can but do you think I have a NATO gas can in all my stuff...British, lots of US, Canadian but NATO, not a one.
Good fun, I'm enjoying this.
Cheers
Bill

jasmils
Joined: December 23, 2003
KitMaker: 1,016 posts
Armorama: 745 posts

Posted: Sunday, August 03, 2008 - 02:28 PM UTC
G'day Bill,
#1. 2 x Ant's (the one you have pointed to) and 1 x the ant to the left of the one you have pointed out. Note, the number of ant's will denote how many radios on board and this can change all the time.
#2 Yep Digital Compass
#3 Denotes that spall lines have been installed
#4 Got me on that one. I've never noticed it before.
#5 Dragon WW2 German jerry cans are just about the exact same pattern. Just putty out all the German text.
#6 GPS up fromt.
Cheers Jason
Boggie
Joined: December 08, 2005
KitMaker: 1,370 posts
Armorama: 1,331 posts
Posted: Sunday, August 03, 2008 - 02:43 PM UTC
Jason
Many thanks for this, now I can move on. I even got numbers 5 and 6, one of which I remember seeing on resin update you're working on.
Regards
Bill
Many thanks for this, now I can move on. I even got numbers 5 and 6, one of which I remember seeing on resin update you're working on.
Regards
Bill
RomeoKilo
Joined: December 03, 2007
KitMaker: 160 posts
Armorama: 155 posts
Posted: Sunday, August 03, 2008 - 04:34 PM UTC
Wow mate looking awesome. You have motivated me to get stuck into mine again.
Question. Whats the black stuff you used to mask the edges of the hatches?
Also, for your info the upper surface of the vent fan covers are anti slip coated as well.
Question. Whats the black stuff you used to mask the edges of the hatches?
Also, for your info the upper surface of the vent fan covers are anti slip coated as well.
Boggie
Joined: December 08, 2005
KitMaker: 1,370 posts
Armorama: 1,331 posts
Posted: Sunday, August 03, 2008 - 11:52 PM UTC
Ray
Thanks for the kind words. The black tape I used to mask the curves is electrical tape cut very thin. That is the only tape that I had that would make those tight corners and even then it wasn't perfect. I'm sure there is some kind of pin striping tape that would do this better and I am on the look out for future projects.
I didn't paint the tops of the vents because I was told that any of the objects protruding from the roof weren't anti slipped, you wouldn't have pictures would you? It would be easy to correct at this stage, thanks for the heads up.
What I really need to know now is how and where to attach the third quarter round PE which is to keep the large rear hatch open at various angles like the front two hatches. If you have installed that could you post a picture of your build please or if you have a picture showing it in real life that would be good as well.
The devil is in the details.
Regards
Bill
RomeoKilo
Joined: December 03, 2007
KitMaker: 160 posts
Armorama: 155 posts
Posted: Monday, August 04, 2008 - 04:06 AM UTC
Ask and you shall recieve mate.
You can see the rear hatch hold open piece at the bottom of this photo.
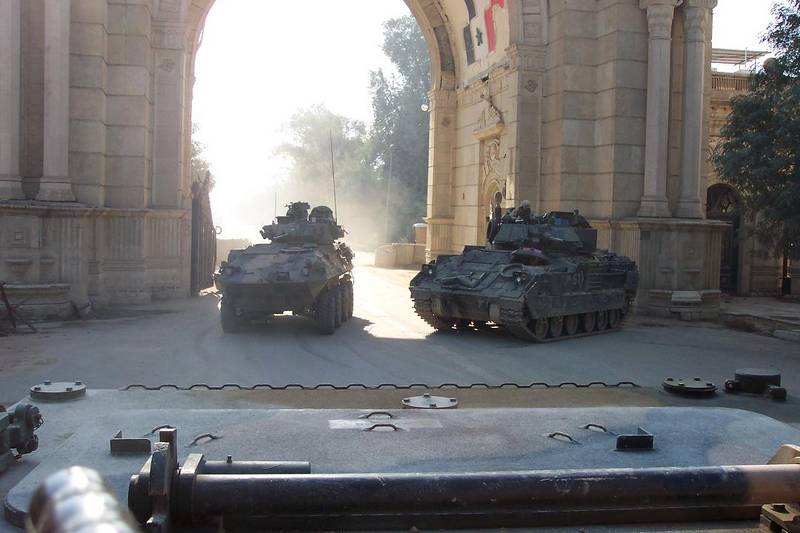
Another one showing the hold open piece and the vent fan. You cant really make out the antislip on the top of the vent fan cover, but trust me its there.

Another vent van pic showing the anti slip. Its the forward one on a gun car but its the same part as used on a PC.
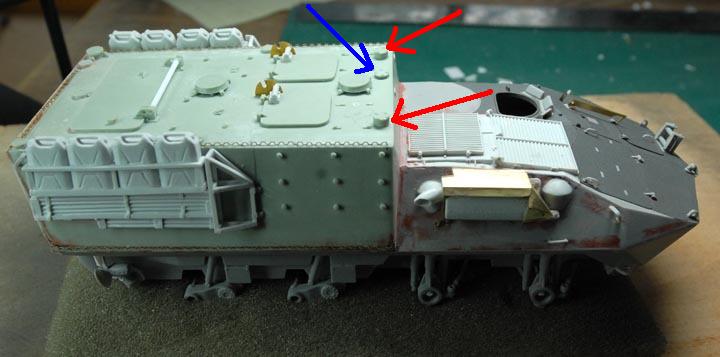
Oh and while i was looking for those photos for you i realised something else. (Hope you dont mind me using your photo). The two front antenna mounts are moulded for a Phase 3. If you are making a Phase 2, the tall ones (red arrows) need to be filed down to blanking plate height, the same height as the others (blue arrow).
You can see the rear hatch hold open piece at the bottom of this photo.
Another one showing the hold open piece and the vent fan. You cant really make out the antislip on the top of the vent fan cover, but trust me its there.
Another vent van pic showing the anti slip. Its the forward one on a gun car but its the same part as used on a PC.
Oh and while i was looking for those photos for you i realised something else. (Hope you dont mind me using your photo). The two front antenna mounts are moulded for a Phase 3. If you are making a Phase 2, the tall ones (red arrows) need to be filed down to blanking plate height, the same height as the others (blue arrow).
Boggie
Joined: December 08, 2005
KitMaker: 1,370 posts
Armorama: 1,331 posts
Posted: Monday, August 04, 2008 - 06:49 AM UTC
Ray
Wow new pictures! These are excellent, I understand where the hold open device is to be installed now. Interesting view of the poppers, I didn't know that the grenades were not covered by the rubber tops and blown off by the charge, these pictures have the smoke grenades installed with the caps chained to be re capped to store when empty correct? Good thing I saw this because I would have put my PE caps and chains on top of the resin poppers signifying that they were in the stored position right? now I won't. So when the smoke is triggered does the smoke emanate from the individual chambers or does a grenade shoot out of the tube, land on the ground and then go off?
In some close up pictures I see a cap chained or attached to the main drive lights, is that to cover the lights when one needs to travel more stealth like?

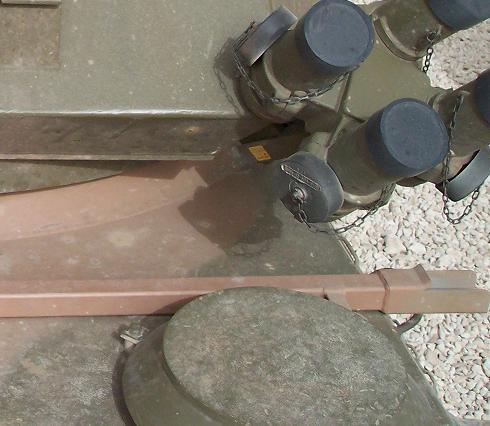
Another interesting development, if this is not OPSEC then could you explain these new lights and notice the smoke poppers appear to be capped without retaining chains or is this the actual charge?

Thanks Ray
Wow new pictures! These are excellent, I understand where the hold open device is to be installed now. Interesting view of the poppers, I didn't know that the grenades were not covered by the rubber tops and blown off by the charge, these pictures have the smoke grenades installed with the caps chained to be re capped to store when empty correct? Good thing I saw this because I would have put my PE caps and chains on top of the resin poppers signifying that they were in the stored position right? now I won't. So when the smoke is triggered does the smoke emanate from the individual chambers or does a grenade shoot out of the tube, land on the ground and then go off?
In some close up pictures I see a cap chained or attached to the main drive lights, is that to cover the lights when one needs to travel more stealth like?

Another interesting development, if this is not OPSEC then could you explain these new lights and notice the smoke poppers appear to be capped without retaining chains or is this the actual charge?

Thanks Ray
RomeoKilo
Joined: December 03, 2007
KitMaker: 160 posts
Armorama: 155 posts
Posted: Monday, August 04, 2008 - 07:22 AM UTC
The captive chain secures the rubber cover that goes over the tube when it is not loaded. When the tube is loaded the cover clips onto the outside of the tube.
The part that looks like the cover without a chain is the top of the 76mm Smoke Grenade itself. When launched the guts of it shoot out and explode in the air.
The rubber cover you see under the headlight in the second photo does not cover the light itself, its a lot smaller and it just covers the terminal if the entire headlight is removed.
The light in the third photo is an led warning light, one above each headlight. One flashes red, the opposite blue. The left one also has the siren box attached to it. Its there for moving traffic.
Boggie
Joined: December 08, 2005
KitMaker: 1,370 posts
Armorama: 1,331 posts
Posted: Monday, August 04, 2008 - 09:02 AM UTC
Ray
So you don't sleep much, or you're an early riser?
Thanks for the lesson on the smoke poppers, I always assumed they flew out because of their splayed orientation on the vehicles. I have seen ASLAV lights covered over with a bag custom for the task, a nice detail.

Have you any pictures looking back over the rear deck showing the array (disarray) of equipment and how it could be attached?
I have flipped the box as per your earlier advise, I may try building a generator and I have a stretcher and perhaps a vehicle tow bar as well as various water boxes MRE, anything else for a car on a walk about?
Great to have your input.
Thanks again
Bill
RomeoKilo
Joined: December 03, 2007
KitMaker: 160 posts
Armorama: 155 posts
Posted: Monday, August 04, 2008 - 05:01 PM UTC
It was a quiet night shift!
I looked for some photos but i dont really have any that shows anything that the other photos in this thread dont already show.
There is no set way to stow a PC. It pretty much depends on the task at hand. Generally, expect two spare tyres strapped over the rear hatch, with packs strapped on top as well. Rarely have i seen packs strapped to the sides of the hull. The tow bar will either be on the roof or can be strapped to the side cam pole brackets with a heavy duty ratchet strap.
Im adding a nice little quirk to mine, the thick strap that hold the spares down is blue with RAAF (Royal Australian Air Force) printed on it in white. "Aquired" by the driver.
Do you intend yours to be in Australia or Overseas? Phase 2 or 3? RWS?
Boggie
Joined: December 08, 2005
KitMaker: 1,370 posts
Armorama: 1,331 posts
Posted: Tuesday, August 05, 2008 - 12:41 AM UTC
Ray
I saw that RAAF stencil on the tire tie down, very nice detail. I want mine to be in service over seas, perhaps Afghanistan. I was holding out for the Phase 3 with the RWS on the Seal Solutions mount but as time goes on I may modify the Diemarco mount and have the RWS on that, so many vehicles I have pictures of are set up this way. The Diemarco mount has some dimension issues though as you pointed out, what are your plans? Any pictures of your progress?
Thanks for considering my photo request, it is nice to see new pictures and not the same old ones over and over. You know with your photos and experience, Brett's experience and Jason and John from Mouse House it might be an idea to do a book with similar characteristics to the one Miloslav's doing for the LAV 3. The problem I have found is that it is hard to understand the Phases, the variations to gun systems and stowage. Pictures and good concise text pointing things out would be a great asset for anyone interested in ASLAV's in general.
Just a thought.
Regards
Bill
Boggie
Joined: December 08, 2005
KitMaker: 1,370 posts
Armorama: 1,331 posts
Posted: Tuesday, August 05, 2008 - 02:50 AM UTC
Thanks to Jupiterblitz and his M1 thread (sorry for sealing your photo) I see some similarities between the Aussie rucksacks and the Alice packs in the new Legends M1A1 tank stowage. At first I was very unhappy when I bought the set that Legends had again seeded a new release with the same old Alice packs, still am sour about this actually, but I own them now so I'll get over it. I have enough Alice packs what with the Legends re offering and the Tamiya stuff, that I may just fill this APC up with them and seal the hatches, but that would be rash. If I cut off the front pouch and put two smaller ones in their place would they pass for the Aussie issue packs?


Anythoughts?
Bill


Anythoughts?
Bill
Boggie
Joined: December 08, 2005
KitMaker: 1,370 posts
Armorama: 1,331 posts
Posted: Sunday, August 17, 2008 - 12:26 PM UTC
Update
I'm always amazed at how slowly I progress putting on all the little details prior to primer.


All the other bits like the RWS, pioneer tools etc are ready to prime as well. If anyone sees anything in need on correction now would be a good time.
Thanks for looking.
Bill
I'm always amazed at how slowly I progress putting on all the little details prior to primer.


All the other bits like the RWS, pioneer tools etc are ready to prime as well. If anyone sees anything in need on correction now would be a good time.
Thanks for looking.
Bill
jasmils
Joined: December 23, 2003
KitMaker: 1,016 posts
Armorama: 745 posts
Posted: Sunday, August 17, 2008 - 01:00 PM UTC
Well done Bill. Very well done.
Cheers Jason
Cheers Jason
Boggie
Joined: December 08, 2005
KitMaker: 1,370 posts
Armorama: 1,331 posts
Posted: Sunday, August 17, 2008 - 01:28 PM UTC
Jason
Thanks for looking, it is your hard work too.
A quick question. The mounts for the rear view mirrors are they attached the same way on both the right and left sides? I have noticed that the non drivers side the mount can be flipped so the arm that supports the mirror is a lot longer.
Hard to see but this is what I mean

and the shorter style like seen on the driver side

And then of course some are removed altogether.
Thanks
Bill
 |

WEB HOSTING BY


Copyright ©2021 Armorama and Kitmaker Network, a subsidiary of Silver Star Enterprises
All Rights Reserved. Please read our Conditions of Use and Privacy Policy.
All Rights Reserved. Please read our Conditions of Use and Privacy Policy.