Australian LAV (ASLAV) (Renamed Topic)
Alberta, Canada
Joined: January 19, 2005
KitMaker: 4,085 posts
Armorama: 3,917 posts
Posted: Friday, February 20, 2009 - 09:12 AM UTC
Ya, they are sort of set up like roof prism binoculars....they have the head on the top and the viewing window on the bottom....and a mirror system inside.
This is an ancient version from a Sherman.....but the concept is essentially the same in modern AFVs.

"We're not the public service of Canada, we're not just another department. We are the Canadian Forces, and our job is to be able to kill people."
July 2005- General R.J. Hillier (Retired), Former Chief of the Defence Staff
Newfoundland, Canada
Joined: December 08, 2005
KitMaker: 1,370 posts
Armorama: 1,331 posts
Posted: Friday, February 20, 2009 - 09:22 AM UTC
Jason
Thanks very much for the informative answer and illustration, makes perfect sense.
Regards
Bill
Slowly, slowly catch your monkey.
Alberta, Canada
Joined: January 19, 2005
KitMaker: 4,085 posts
Armorama: 3,917 posts
Posted: Friday, February 20, 2009 - 10:33 AM UTC
The actually periscope slide up into the housing and are secured...it was interesing to see model producers actually replicate this on models such as the AFV Club M1128 MGS.
"We're not the public service of Canada, we're not just another department. We are the Canadian Forces, and our job is to be able to kill people."
July 2005- General R.J. Hillier (Retired), Former Chief of the Defence Staff
Newfoundland, Canada
Joined: December 08, 2005
KitMaker: 1,370 posts
Armorama: 1,331 posts
Posted: Saturday, February 21, 2009 - 03:23 AM UTC
Jason B
I was about to ask about the AFV offering, that is what I used when I replaced them on my ASLAV PC Commanders cupola.
Jason M
Just went through new resin conversion for the ASLAV 25 I got from MH and it is beautiful. I was shocked though to see how delicate and small the bars were for the bar armour construction, I better get new closeup glasses for this one. I really like the new instructions, great work.
Thanks to both Jason's
Bill
Slowly, slowly catch your monkey.
Queensland, Australia
Joined: December 23, 2003
KitMaker: 1,016 posts
Armorama: 745 posts
Posted: Sunday, May 17, 2009 - 11:18 PM UTC
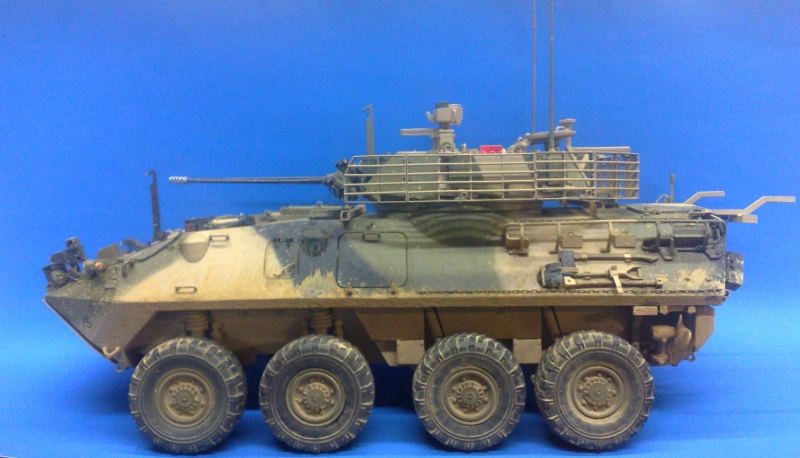
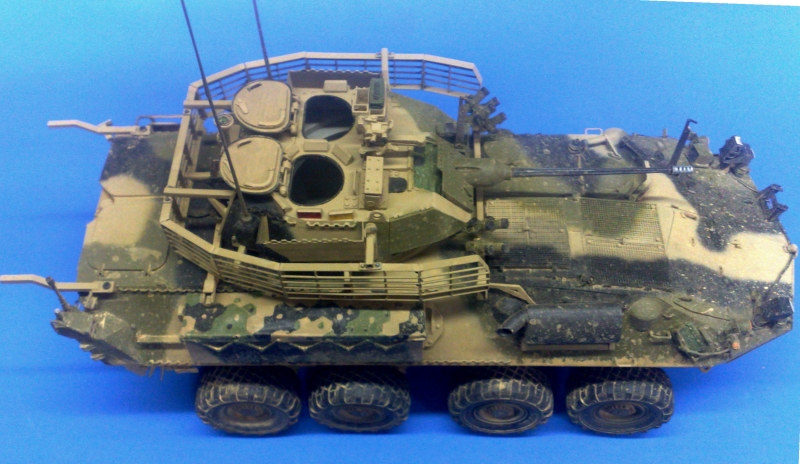
Well here she is so far. I will try to get a few better pic's tomorrow.
Any comments would be apreicated.
Cheers Jason

Arms Corps Models is closed.
Newfoundland, Canada
Joined: December 08, 2005
KitMaker: 1,370 posts
Armorama: 1,331 posts
Posted: Monday, May 18, 2009 - 04:18 AM UTC
Jason
Excellent progress and you with a new born as well!
Is anyone making an update for the interior of the the turret so the hatches could be left open without crew? Even with crew there seems to be a good view of surrounding detail that needs to be included.
One day a brave soul will try a complete bar armour bird cage for the 25, it would look very nice.
Can't wait for what you come up with next.
Regards
Bill
Slowly, slowly catch your monkey.
United Kingdom
Joined: April 27, 2002
KitMaker: 250 posts
Armorama: 188 posts
Posted: Monday, May 18, 2009 - 07:57 AM UTC
Victoria, Australia
Joined: July 22, 2008
KitMaker: 141 posts
Armorama: 130 posts
Posted: Monday, May 18, 2009 - 10:39 AM UTC
Yeah, nice work Jason. Shes a beauty!
Alberta, Canada
Joined: January 19, 2005
KitMaker: 4,085 posts
Armorama: 3,917 posts
Posted: Monday, May 18, 2009 - 06:23 PM UTC
Thanks for sharing your update....very nice work. The bar armour looks fantastic. It gives a really good sense of bulk to the entire ASLAV.
"We're not the public service of Canada, we're not just another department. We are the Canadian Forces, and our job is to be able to kill people."
July 2005- General R.J. Hillier (Retired), Former Chief of the Defence Staff
New South Wales, Australia
Joined: February 28, 2006
KitMaker: 1,605 posts
Armorama: 1,565 posts
Posted: Monday, May 18, 2009 - 06:51 PM UTC
It is a fine piece of work young Skywalker. Are you going to ACT on the weekend and per chance bringing this?
Hope to catch up if you are
Al
Queensland, Australia
Joined: January 17, 2006
KitMaker: 752 posts
Armorama: 569 posts
Posted: Monday, May 18, 2009 - 08:25 PM UTC
awesome jason! i have the usmc lav, and the aslav, so i will be working on them once i get this f-111 done!
Victoria, Australia
Joined: March 14, 2006
KitMaker: 1,973 posts
Armorama: 1,843 posts
Posted: Monday, May 18, 2009 - 08:45 PM UTC
Great work Jase !
The Bar Armor looks fantastic !!
Can't wait to see you do a crew also...
So many kit's...so little time

Cheers
Paul
OddBall: "It's a wasted trip baby. Nobody said nothing about locking horns with no Tigers"
KIlgore: " I love the smell of napalm in the morning. ...The smell, you know that gasoline smell, the whole hill. Smelled like... victory."
Queensland, Australia
Joined: December 23, 2003
KitMaker: 1,016 posts
Armorama: 745 posts
Posted: Monday, May 18, 2009 - 10:36 PM UTC
G'dat Team,
Thanks for all of the comments.
Sorry about the photo's. Again taken with the camera on my phone.
I'm calling this one done. Well at least I was until it was taken out buy a Nokia IED. Another couple of hours work for having fat fingers.
Thanks Bill for pointing a couple of parts out. As you can see they have all been fixed up.The Hull Bar Armour is still in the works. I should have a test shot sometime this week or next.
Al, yep I will be there mate. And so will the car.
Paul, the crew will done done sometime in the future. Along with the dio it will be going on.
The first photo shows the tool rack. But as you can see the phone is not such a good tool for up close work to show the decal. So I have added in the logo to show a bit better.
Cheers Jason


Arms Corps Models is closed.
England - West Midlands, United Kingdom
Joined: September 12, 2007
KitMaker: 1,548 posts
Armorama: 1,407 posts
Posted: Monday, May 18, 2009 - 11:36 PM UTC
Nice work Jason, good work on the slat armour on the turret.
Victoria, Australia
Joined: December 03, 2007
KitMaker: 160 posts
Armorama: 155 posts
Posted: Tuesday, May 19, 2009 - 02:50 PM UTC
That is very very impressive Jason.
Hard to tell it from the real thing.
Im stunned.
How did you do the tie down staps for the pioneer tools?
And the antennae look perfect! ....How?
Could you please post up a front on photo - Im keen to see how you tackled the led red and blues.
And put me on the list at number 1 for the hull bar kit. Thats going on one of mine with the full interiors for sure!! Bring on the test shots!!!
Awesome mate.
Awesome.
Removed by original poster on 06/04/09 - 23:25:28 (GMT).
Newfoundland, Canada
Joined: December 08, 2005
KitMaker: 1,370 posts
Armorama: 1,331 posts
Posted: Wednesday, August 05, 2009 - 01:12 AM UTC
New details on the ASLAV PC, nice shot.

Bill
Slowly, slowly catch your monkey.
Ontario, Canada
Joined: May 17, 2009
KitMaker: 110 posts
Armorama: 109 posts
Posted: Wednesday, August 05, 2009 - 03:51 PM UTC
Bill, excellent photo. Do you have any more current photos of ASLAV APCs? I ask because I'd like to know if it would be accurate to place the Seal Solutions Remote Weapons Station on an APC or is this only on Type 3 hulls? Jeff.
Newfoundland, Canada
Joined: December 08, 2005
KitMaker: 1,370 posts
Armorama: 1,331 posts
Posted: Thursday, August 06, 2009 - 12:41 AM UTC
Jeffrey
I got those photos yesterday from my favorite Aussie site
http://www.defence.gov.au/media/download/2009/Aug/20090805/index.htmAs for the Seal Solutions only on Phase III, I would differ you to Jason Miller who will give you the definitive answer. Since this is an old thread Jason may not subscribe to this any longer but I bet he keeps track of your thread, so I would ask the same question over there.
You have the Mouse House ASLAV book, does it say in there?
I have the MH Seal Solution conversion as well and would love to build another PC or a Fitter with it on.
Regards
Bill


Slowly, slowly catch your monkey.
Ontario, Canada
Joined: May 17, 2009
KitMaker: 110 posts
Armorama: 109 posts
Posted: Thursday, August 06, 2009 - 08:23 AM UTC
More great photos Bill, thanks. The M.B. #4 ASLAV book states that in future all APCs will be upgraded to Phase 3 standard and also receive the Seal Solutions Spider Mount for the R.W.S. I could only find a few small photos of this configuration of troops training in Australia for a SECDET rotation, none in theatre. I want to build my PC in Phase 3 configuraation w/ the spider mount and the mk. 40 grenade launcher instead of the 50 cal. but I would like a photo to build from which may be a tall order. Hopefully some of our Aussie members can steer us in the right direction. Cheers, Jeff.
Newfoundland, Canada
Joined: December 08, 2005
KitMaker: 1,370 posts
Armorama: 1,331 posts
Posted: Thursday, August 06, 2009 - 08:49 AM UTC
Jeffrey
Let me look through my photos, I know I have a few of the SEAL mounted and in country.
Hang on. In the mean time anyone else that has some feel free to contribute.
Regards
Bill
PS
I found lots, some with and without Bar, some Fitters and some APC's, take your pic.

This (lower image) was taken in 2006 in Al Muthanna Iraq according to the embedded meta data


A fitter

Another Fitter

Yet another Fitter

Home on the range


A nice pair

Another nice pair.hey wait a minute those aren't Seal Solutions!


Slowly, slowly catch your monkey.
Ontario, Canada
Joined: May 17, 2009
KitMaker: 110 posts
Armorama: 109 posts
Posted: Thursday, August 06, 2009 - 10:43 AM UTC
Wow, I didn't know NOS Octane Boost girls were a part of ASLAV vehicle kit issue from the regimental quartermaster! I will have to surf that site as it is an excellent reference source. The theme I noticed was that all of the Type 3 hulls seem to have the Seal Solutions Spider Mount and most of the Type 2 hulls have the Kongsberg RWS even though they may be upgraded to Phase 3 standard. Great photos Bill, this is without a doubt the definitive ASLAV thread for reference. I hope we have a Coyote thread of the same depth soon as well. Cheers, Jeff.
Newfoundland, Canada
Joined: December 08, 2005
KitMaker: 1,370 posts
Armorama: 1,331 posts
Posted: Thursday, August 06, 2009 - 11:38 AM UTC
Jeffrey
You are more than welcome, I know you really appreciate it. Do you think one of the two side by side ASLAV PC's (nice pair) has a 40mm grenade launched instead of the 50 or is it the angle of the barrel. The mag tin is the same as the 50, not sure what the configuration would be for the 40.
My only beef about this and every healthy large and thorough thread is that images get moved around and links are lost, too bad it couldn't be nailed down some how for future reference.
Regards
Bill
Slowly, slowly catch your monkey.
Newfoundland, Canada
Joined: December 08, 2005
KitMaker: 1,370 posts
Armorama: 1,331 posts
Posted: Thursday, August 06, 2009 - 12:02 PM UTC
On the "Nice Pair" I think they have the 50 barrel off for cleaning or replacement.

Can't tell you what mount this 40mm is on

mid frame there's one 40mm

That's all the 40's I have I'm afraid.
Regards
Bill
Slowly, slowly catch your monkey.
Queensland, Australia
Joined: December 23, 2003
KitMaker: 1,016 posts
Armorama: 745 posts
Posted: Thursday, August 06, 2009 - 12:10 PM UTC
G'day Team,
Quoted Text
Do you think one of the two side by side ASLAV PC's (nice pair) has a 40mm grenade launched instead of the 50 or is it the angle of the barrel.
looked like a 40mm, but the car is a Type III. C/C hatches give it away. Bit hard to tell from the front at times with all of the stowage.
"Can't tell you what mount this 40mm is on"
From Gelly in the back ground looking oh so serious, Diemarco Mount.
The Seal Solutions, or Spider mount was tested on a couple of PC's in the MEAO, but it was decided that just the Type III should sport it.
However, here in Australia, every car (PC) that I have seen here has it mounted but the Type III's still maintain the Mag58 flex mount.
Cheers Jason
Arms Corps Models is closed.


 A fitter


