Indiana, United States
Joined: June 10, 2005
KitMaker: 6,188 posts
Armorama: 5,960 posts
Posted: Thursday, May 03, 2012 - 07:42 AM UTC
Quoted Text
Hi,
thanks Zon, i used Humbrol Enamel N°11, with an aéro for the internal faces of the plane but with paint brushes for the other parts.
Cheers
nico
And the seatbelts are from the PE set?
They look scratchbuilt, but from what.

Anyhow, very nice and unbelievably life-like too.
~ Jeff
Ohio, United States
Joined: May 02, 2010
KitMaker: 596 posts
Armorama: 265 posts
Posted: Thursday, May 03, 2012 - 09:42 AM UTC
Quoted Text
I used MEK for the first time. Worked well applied via a medical cannula - the bit that stays in your arm after the insertion needle is removed.
I had never heard of MEK before, so a quick Google search gave me
this. Is this the same MEK as what you used? I hate to be the bearer of bad news if it is, but just as people here say that you shouldn't sacrifice your happiness for a build, I also think you shouldn't sacrifice our actual lives for it. Just a thought though

Also, that tool you described (and pictured later)...is that actual medical surplus, or did you just mention that as a description? But you say it works just as well as the capillary tubes specially built for modeling? Maybe I should get some of those...
Quoted Text
Can't wait to start painting, but God, I really hate masking canopies!!
While I miss building tremendously right now (I'm still in school...), I do NOT envy you with the task before you! Canopies are the bane of my modeling career!

Indre-et-Loire, France
Joined: May 23, 2011
KitMaker: 651 posts
Armorama: 126 posts
Posted: Thursday, May 03, 2012 - 06:27 PM UTC
Hi Jeff,
Quoted Text
And the seatbelts are from the PE set?
Absolutely, the box is well furnished in PE. There's also a "Masking" set, thanks to Eduard, i hate do it myself !
Cheers
nico
Northern Ireland, United Kingdom
Joined: April 10, 2012
KitMaker: 164 posts
Armorama: 130 posts
Posted: Thursday, May 03, 2012 - 07:50 PM UTC
Robby, yeah, i know it's nasty stuff, but readily available here, and does a great job. I am very careful - I wear a respirator, and it never gets in contact with my skin. The little tube only holds a tiny ammount as well. I even put the lid back on every time I dip. btw - I work for a medical distributor, and we often have loads of these out of date for disposal, or samples coming in. (Lots of other useful stuff too!! Hypodermic needles, tubing etc).
Pete
How soft your fields so green, can whisper tales of gore.
Maine, United States
Joined: February 11, 2011
KitMaker: 1,654 posts
Armorama: 1,565 posts
Posted: Thursday, May 03, 2012 - 09:39 PM UTC
Pete... Great idea for applying stuff.I will be trying it this week end!
Zon and Jeff S.... I remember that non-toxic stuff,and you are right,it didn't work for beans

It was the biggest reason I stopped building.There was a big national scare about kids sniffing the orange tube stuff.At the time there was no internet and all I had for transport was my bike.So I stopped building.
But.... What was the first glue I ordered when I got back into modeling about a year ago?You got it, the old Testors orange tube

I have found a use for it though,it works really well for indy link tracks.It's thick enough to hold things together from the start and drys slow enough so you have a good working time.

Model on,Jeff T.
The building lamp is lit.Build'em if you got'em.
Northern Ireland, United Kingdom
Joined: April 10, 2012
KitMaker: 164 posts
Armorama: 130 posts
Posted: Friday, May 04, 2012 - 09:09 AM UTC
Well, it wasn't turning out to be a good evening for me. I accidentally hit the edge of the meat tray I had some loose parts in and shot them off into the ether. Found all but one - a side window from the pony. I was almost going to put it aside and start another kit, but went ahead and shot a coat of primer. Went to clean the AB, and of course the needle chuck went down the sink. Arrrrrgh!!! I was able to get it back by taking off the waste trap, but by that stage I was pretty p'd off! Stuck my hand in my pocket, and by some freak of ballistics, I'll never know how it got there, found the missing piece of canopy!

How soft your fields so green, can whisper tales of gore.
United Kingdom
Joined: May 20, 2010
KitMaker: 269 posts
Armorama: 243 posts
Posted: Friday, May 04, 2012 - 09:39 AM UTC
Hi guys,
I signed up ages ago for this campaign so it's about time I joined in.
I started my build today of Hobby Boss's KV-1 1942 model 'heavy cast turret'

I must say this is a very nice kit considering the price. The details are very well defined and the fit is good. I paid £7.50 for this kit. why anyone would buy the tamiya kit (costing £20+!) over this I really wouldn't know!
I started with the basic hull construction, swing arms and wheels. Apart form some mould seams and a couple of small gaps to fill it was very straight forward.


Hope to get some more done soon

Matt
On the bench:
Trumpeter 1/16 King Tiger
Dragon 1/35 Sherman Firefly 1c
Hawaii, United States
Joined: August 27, 2006
KitMaker: 1,646 posts
Armorama: 1,557 posts
Posted: Friday, May 04, 2012 - 11:02 AM UTC
Quoted Text
Hi,
thanks Zon, i used Humbrol Enamel N°11, with an aéro for the internal faces of the plane but with paint brushes for the other parts.
Cheers
nico
Thanks for the info Nico!! -zon
"Certainty of death.
Small chance of sucess.
What are we waiting for?"
-Gimli, Return of the King.
Maine, United States
Joined: February 11, 2011
KitMaker: 1,654 posts
Armorama: 1,565 posts
Posted: Friday, May 04, 2012 - 01:21 PM UTC
Pete... Man,I hate when that happens.At least you got all your stuff back

.
Matt... Great looking kit.I have not built any Russian stuff yet,the kit does look nice,maybe I'll try it in the future.
Got my AM stuff yesterday,so hope to have some progress this week-end.Model on,Jeff T.
The building lamp is lit.Build'em if you got'em.
California, United States
Joined: September 21, 2004
KitMaker: 147 posts
Armorama: 134 posts
Posted: Saturday, May 05, 2012 - 07:38 AM UTC
Finally done with the AMPS Nats builds and back to the GB here - great work going on here guys - congratulations to all!
Here is an update on my progress on the Jumbo Sherman project. As inidcated in my earlier posts, I wanted a crisper lower hull than I could get with the TW one piece casting, so I corrected and converted the Hobby Boss parts. Here is where I am so far:


I think it was worth the effort, but let me know what you think. Next up will be putting the suspension together. I really should cast a copy of the transmission housing first, it was a lot of work.
Cheers till next time,
Konrad
PS - if you followed the last GB here you will remember this build, finally in paint


Washington, United States
Joined: January 26, 2008
KitMaker: 17 posts
Armorama: 13 posts
Posted: Saturday, May 05, 2012 - 07:59 AM UTC
Hey Konrad, leave it to you to take a kit and turn it into a scratch build. Great work so far.
I am hoping to get some model time in tonight, but right now I need to return to painting the downstairs.
Keep up the great work.
Walt Babst
aka
Luftwaffe Birdman
California, United States
Joined: September 21, 2004
KitMaker: 147 posts
Armorama: 134 posts
Posted: Saturday, May 05, 2012 - 09:15 AM UTC
Thanks Walt - sounds like you are b-u-s-y

Hopefully you can rejoin the fun soon as well

Missed you at AMPS, you would have had a blast


Konrad
United States
Joined: February 01, 2009
KitMaker: 1,233 posts
Armorama: 557 posts
Posted: Saturday, May 05, 2012 - 10:29 AM UTC
Well since the Sherman is in the books I have decided to do a plane for my second contribution for the campaign. Special Hobby 1/48th Seafire Mk. XV it is..............
Regards, Ian


It is a fact that under equal conditions, large-scale battles and whole wars are won by troops which have a strong will for victory, clear goals before them, high moral standards, and devotion to the banner under which they go into battle.
-Georgy Zhukov
United States
Joined: February 01, 2009
KitMaker: 1,233 posts
Armorama: 557 posts
Posted: Saturday, May 05, 2012 - 10:31 AM UTC
Looks great Matt!!! The KV-1 is a beast of a tank. Definitely a welcome addition to the campaign.
Regards, Ian
It is a fact that under equal conditions, large-scale battles and whole wars are won by troops which have a strong will for victory, clear goals before them, high moral standards, and devotion to the banner under which they go into battle.
-Georgy Zhukov
California, United States
Joined: June 30, 2008
KitMaker: 2,408 posts
Armorama: 2,394 posts
Posted: Saturday, May 05, 2012 - 11:23 AM UTC
Wow, a lot going on.
Pete - glad your adventure at least had a somewhat happy ending finding your parts again
Matt -those KV kits are just awesome. The tracks are the most difficult part as they usually need a little more clean up then Tamiya, but definitely do-able
Konrad - Congrats on the crab finish - you should add it to the campaign gallery as it's a hell of a conversion. The Jumbo is nice to see back on the bench.
Ian - great to have another one from you
Stockholm, Sweden
Joined: March 21, 2012
KitMaker: 26 posts
Armorama: 24 posts
Posted: Saturday, May 05, 2012 - 11:54 PM UTC
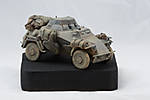
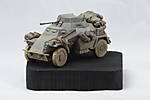
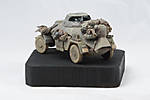
Finished! Or... err... painted and added to the campaign gallery.
Tried to go with a look like I've heard many come back from Iraq tell me about how the sand and dust makes everything look like sand after a while.
The macro lense is really unforgiving.

Of course I spotted a ton of mistakes when developing the photos. Some happy ones, some not so happy ones. But you build, paint and learn.

Indiana, United States
Joined: June 10, 2005
KitMaker: 6,188 posts
Armorama: 5,960 posts
Posted: Sunday, May 06, 2012 - 12:00 AM UTC
Quoted Text
Well since the Sherman is in the books I have decided to do a plane for my second contribution for the campaign. Special Hobby 1/48th Seafire Mk. XV it is..............
Regards, Ian
You're already finished with one Ian? Wow, nice going and nice Sherman too!
Nice stowage work there pxpxpx! It all looks perfect!
~ Jeff
United States
Joined: February 01, 2009
KitMaker: 1,233 posts
Armorama: 557 posts
Posted: Sunday, May 06, 2012 - 02:12 AM UTC
Thank you Jeff...............
Quoted Text
Quoted Text
Well since the Sherman is in the books I have decided to do a plane for my second contribution for the campaign. Special Hobby 1/48th Seafire Mk. XV it is..............
Regards, Ian
You're already finished with one Ian? Wow, nice going and nice Sherman too!
Nice stowage work there pxpxpx! It all looks perfect!
~ Jeff
It is a fact that under equal conditions, large-scale battles and whole wars are won by troops which have a strong will for victory, clear goals before them, high moral standards, and devotion to the banner under which they go into battle.
-Georgy Zhukov
California, United States
Joined: September 21, 2004
KitMaker: 147 posts
Armorama: 134 posts
Posted: Sunday, May 06, 2012 - 04:09 AM UTC
Looks great Px3

The Dust effect really gives it that long road march look.
Konrad
California, United States
Joined: June 30, 2008
KitMaker: 2,408 posts
Armorama: 2,394 posts
Posted: Sunday, May 06, 2012 - 04:25 AM UTC
Great finish px! The black dog stowage really helps that 222 kit. What paints did you use for making your base coat again? I like the final result.

Indiana, United States
Joined: June 10, 2005
KitMaker: 6,188 posts
Armorama: 5,960 posts
Posted: Sunday, May 06, 2012 - 04:32 AM UTC
Quoted Text
Great finish px! The black dog stowage really helps that 222 kit. What paints did you use for making your base coat again? I like the final result. 
So that's a Black Dog stowage set? It does look good!
I wonder if they make one for a 1/35th StuG III?
~ Jeff
United States
Joined: February 01, 2009
KitMaker: 1,233 posts
Armorama: 557 posts
Posted: Sunday, May 06, 2012 - 07:24 AM UTC
Began work on the Special Hobby Seafire MV XV today. Probably one of the best detailed kit cockpits I have seen in a model in awhile. Should have it closed up by the time the weekend is out.
Regards, Ian


It is a fact that under equal conditions, large-scale battles and whole wars are won by troops which have a strong will for victory, clear goals before them, high moral standards, and devotion to the banner under which they go into battle.
-Georgy Zhukov
Hawaii, United States
Joined: August 27, 2006
KitMaker: 1,646 posts
Armorama: 1,557 posts
Posted: Sunday, May 06, 2012 - 11:54 AM UTC
Px3: nice little build there. Love the dusted out look.
Ian: nice work on the cockpit.
Happy Modeling, -zon

"Certainty of death.
Small chance of sucess.
What are we waiting for?"
-Gimli, Return of the King.
Stockholm, Sweden
Joined: March 21, 2012
KitMaker: 26 posts
Armorama: 24 posts
Posted: Sunday, May 06, 2012 - 08:24 PM UTC
Thanks guys

The stowage is Black Dog, my only gripe is that the handles to the entrenching tools were missing. Of course I didnt notice that until too late.
Colours used is the AK Interactive Dunkelgrau set, some mixed oils and a couple pigments.
Northern Ireland, United Kingdom
Joined: April 10, 2012
KitMaker: 164 posts
Armorama: 130 posts
Posted: Monday, May 07, 2012 - 12:44 AM UTC
Lookin' forward to seeing that Seafire Ian. Looks to be a nice kit.
pxpxpx - like the 222 - I just bought the ancient (70's) 1/35 Tamiya version on ebay.
Primed, preshaded & underside painted. Can't really see the preshading in this, but it's there. Gonna have to get a new fine nozzle for my Badger 100. The tip has split.

How soft your fields so green, can whisper tales of gore.
 Anyhow, very nice and unbelievably life-like too.


