

Hi Paul,
Thanks for your comments. The best source I have found for information on the Paris Gun is "The Paris Gun" by Col. Henry W. Miller, published in 1930. I picked up a much used copy about 50 years ago, never imagining that I would ever try to build a model of that gun. Col. Miller had access to many German sources after the 1918 Armistice and cites them anonymously in his bibliography.
A more recent source, which incorporates information from the rather expensive book by Gerald Bull and Charles Murphy "Paris Kanonen - the Paris Guns (Wilhelmgeschutze) and Project HARP" is an excellent article by Roger Todd: "A Brief History of the Paris Gun" which can be found on the Landships website.
The original Dicke Berta was a 42 cm type M mortar used to bombard French and Belgian fortifications, but the name was subsequently misapplied to many large cannons, including the 38 cm Lange Max and the Wilhelmgeschutz or Paris gun.
In 1932 a WWI veteran and model builder named Emil Cherubin built a 1/1 scale wooden model of Big Bertha. I have read that Cherubin also built a 1/4 scale museum model of the Paris gun, but what happened to it, I don't know. There are many photos and even postcards of the wooden Big Bertha, but I've never seen one of the Paris gun model. Somebody must have photographs someplace, and I would love to see them. At 1/4 scale, the barrel would be 8.5 meters long.
Regards,
Dick
Hosted by Richard S.
The Great War: Dawning of a New Age

geogeezer

Joined: February 17, 2011
KitMaker: 263 posts
Armorama: 258 posts
Posted: Saturday, October 19, 2013 - 05:04 PM UTC

RedDuster

Joined: March 01, 2010
KitMaker: 7,078 posts
Armorama: 248 posts

Posted: Sunday, October 20, 2013 - 09:08 AM UTC
Great looking campaign, must have missed the kick off, but have a WW1 build planned for Scalemodelworld 2014 at Telford and this looks like the right place to blog it. It will be nautical, will let you know more after this year's Telford show in a few weeks.
Si
Si
geogeezer
Joined: February 17, 2011
KitMaker: 263 posts
Armorama: 258 posts
Posted: Sunday, October 20, 2013 - 02:58 PM UTC
Quoted Text
Great looking campaign, must have missed the kick off, but have a WW1 build planned for Scalemodelworld 2014 at Telford and this looks like the right place to blog it. It will be nautical, will let you know more after this year's Telford show in a few weeks.
Si
Hi Simon,
Glad you're in. I can think of all sorts of neat cutting edge nautical things which appeared during the Great War. The disastrous K class steam-turbine submarines, the M class subs mounting a 12 inch gun, the motor torpedo boats which launched their torpedo backwards over the transom and then had to get out of the way. Looking forward to seeing your project.
Cheers

Dick
geogeezer
Joined: February 17, 2011
KitMaker: 263 posts
Armorama: 258 posts
Posted: Sunday, October 20, 2013 - 03:05 PM UTC
Hi Peter,
The American soldier armed with a Browning Automatic Rifle in your trench scene dates it as very late in the war, since the BAR was first used in action in September, 1918.
Very nice work on the figures.
Cheers
Dick
The American soldier armed with a Browning Automatic Rifle in your trench scene dates it as very late in the war, since the BAR was first used in action in September, 1918.
Very nice work on the figures.
Cheers
Dick
noddy927

Joined: February 15, 2013
KitMaker: 1,273 posts
Armorama: 568 posts
Posted: Sunday, October 20, 2013 - 03:12 PM UTC
Thanks for the comments dick.
Pete
Pete
RedDuster
Joined: March 01, 2010
KitMaker: 7,078 posts
Armorama: 248 posts
Posted: Monday, October 21, 2013 - 06:01 AM UTC
Thank Dick,
There is lots out there, from Battleships in 350th to the Coastal motor boat in 1/35th, hence the plan to take cash and browse the trade at Telford.
Si
There is lots out there, from Battleships in 350th to the Coastal motor boat in 1/35th, hence the plan to take cash and browse the trade at Telford.
Si

AlanL

Joined: August 12, 2005
KitMaker: 14,499 posts
Armorama: 11,675 posts
Posted: Tuesday, October 22, 2013 - 08:05 AM UTC
Uploaded the Crewe Tractor to the finished builds so the pressure if off.
Al
Al
noddy927
Joined: February 15, 2013
KitMaker: 1,273 posts
Armorama: 568 posts
Posted: Tuesday, October 22, 2013 - 03:15 PM UTC
No worries Alan...Back to the somme now?
Pete
Pete
geogeezer
Joined: February 17, 2011
KitMaker: 263 posts
Armorama: 258 posts
Posted: Tuesday, October 22, 2013 - 03:40 PM UTC
Hi all  ,
,
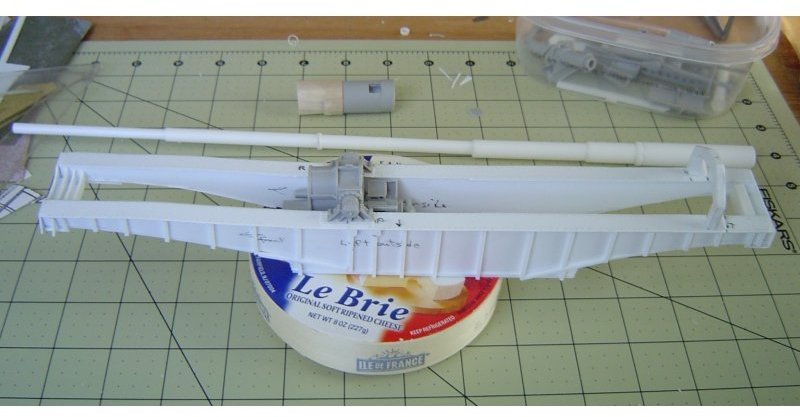
A little more progress on the Paris Gun build. I enlarged the side view drawing of the 38 cm Lange Max gun carriage to 1/72 scale, made 4 copies, then cut out the pertinent portions as templates, glued them to strips of polystyrene sheet, and cut them out, as shown in the first photo.
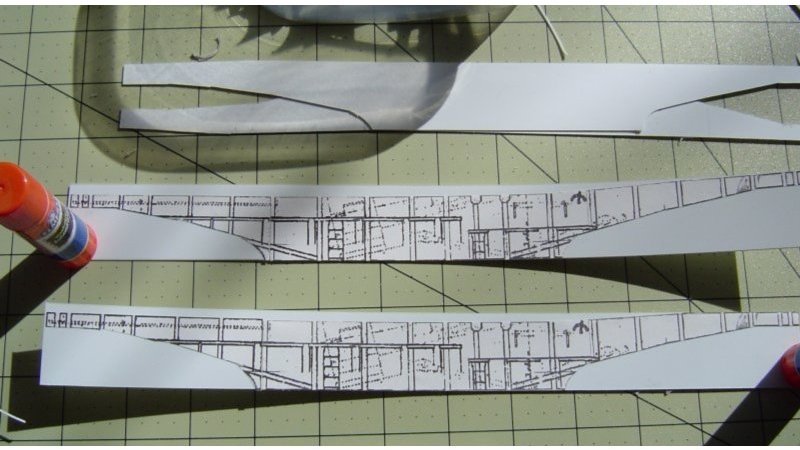
The next photos show the gun tube and the sides of the gun carriage in the process of assembly.
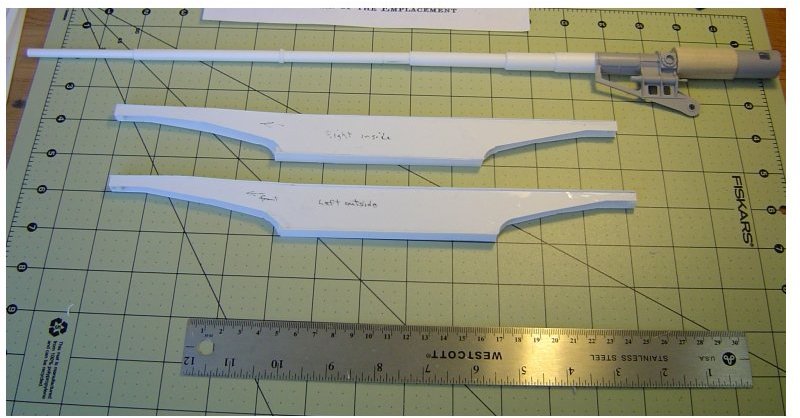
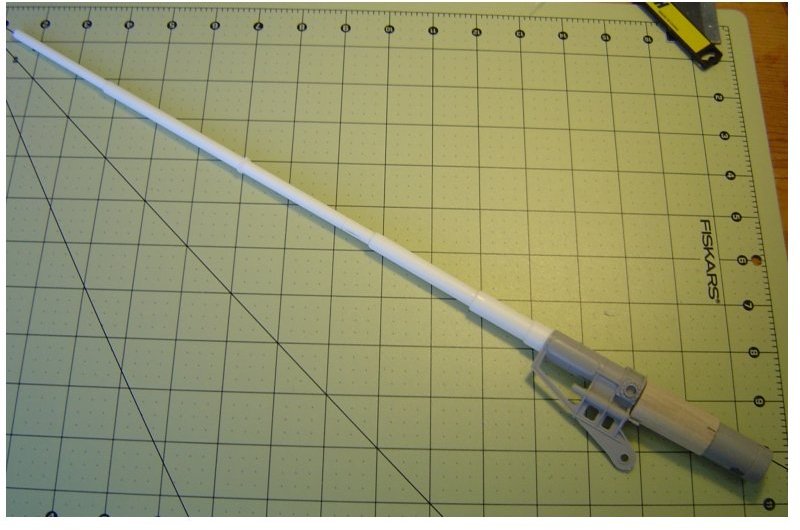
The photo below shows the gun tube dry fitted to the breech assembly. The filler piece is 0.75" hardwood dowel. Still a lot of fittings and other things to add to the breech and barrel.
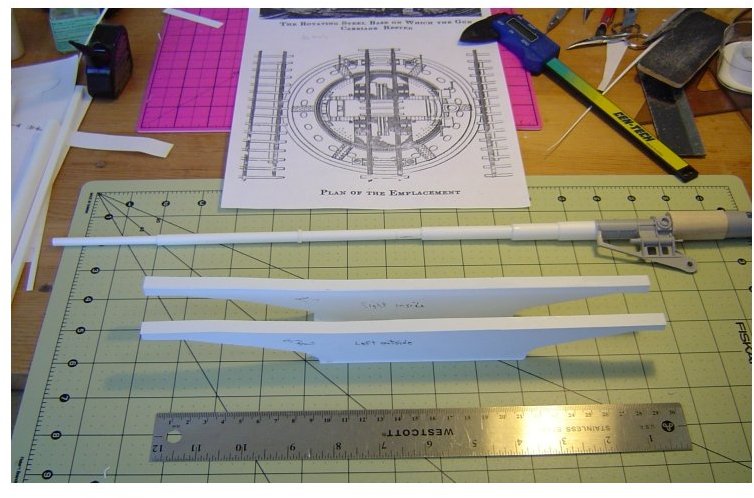
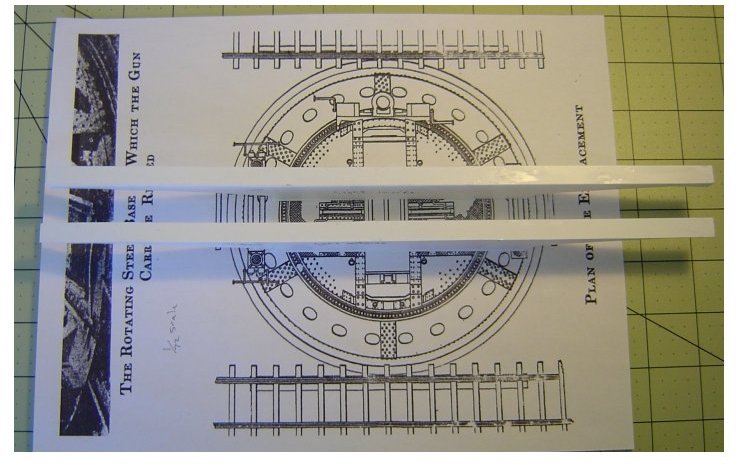
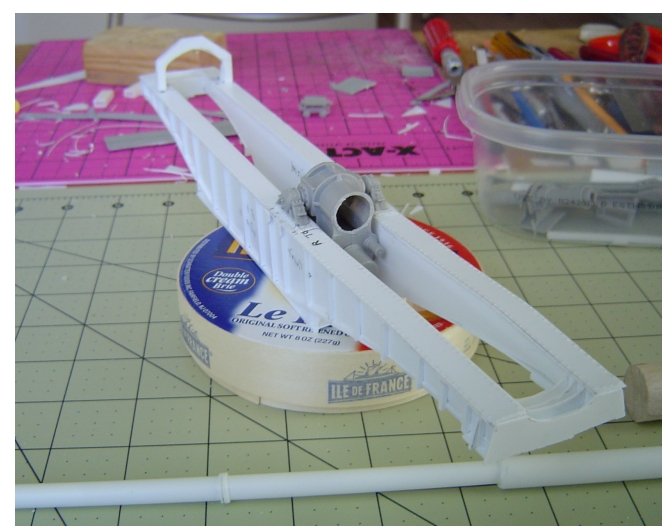
The next photo shows the carriage side pieces resting atop a 1/72 scale drawing of the base at the Beaumont gun emplacement. They are oriented as they would be when the railway carriage was rolled onto the emplacement. The carriage would then be jacked up off the railway trucks, which would be rolled away. The moveable part of the base would then be rotated 90 degrees, and the carriage would be lowered onto the base and bolted in position.
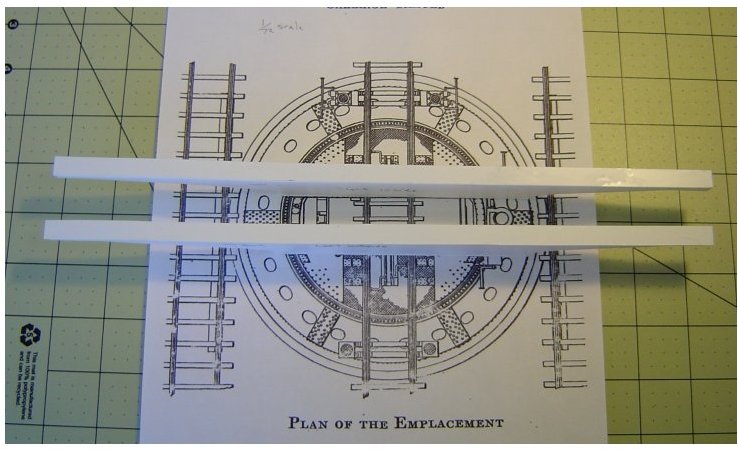
The parallel tracks on either side of the base are for the gantry crane used to lift the barrel and mount it on the carriage.
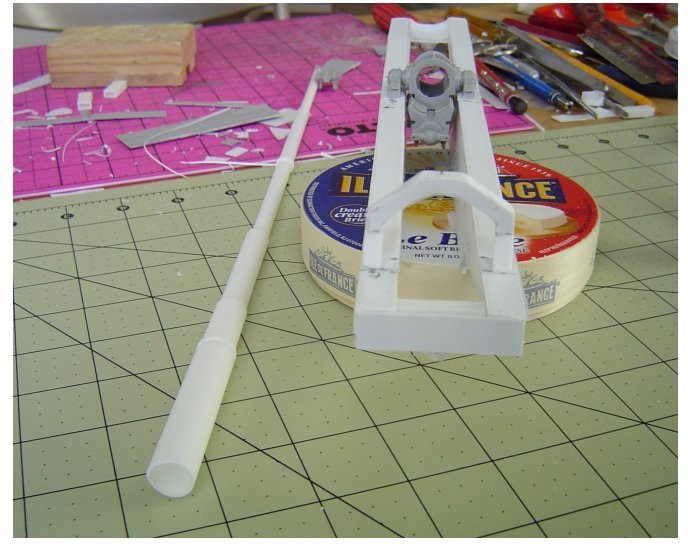
The following photo shows the carriage side pieces atop the same drawing as above, oriented as they would be after being bolted to the rotated base.
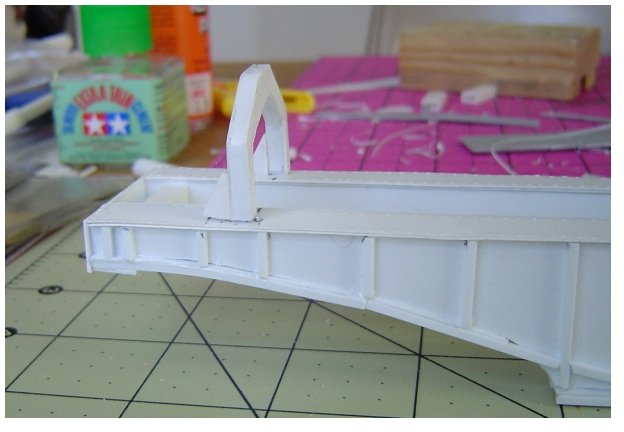
Still a very long way to go.
Cheers
Dick
,A little more progress on the Paris Gun build. I enlarged the side view drawing of the 38 cm Lange Max gun carriage to 1/72 scale, made 4 copies, then cut out the pertinent portions as templates, glued them to strips of polystyrene sheet, and cut them out, as shown in the first photo.
The next photos show the gun tube and the sides of the gun carriage in the process of assembly.
The photo below shows the gun tube dry fitted to the breech assembly. The filler piece is 0.75" hardwood dowel. Still a lot of fittings and other things to add to the breech and barrel.
The next photo shows the carriage side pieces resting atop a 1/72 scale drawing of the base at the Beaumont gun emplacement. They are oriented as they would be when the railway carriage was rolled onto the emplacement. The carriage would then be jacked up off the railway trucks, which would be rolled away. The moveable part of the base would then be rotated 90 degrees, and the carriage would be lowered onto the base and bolted in position.
The parallel tracks on either side of the base are for the gantry crane used to lift the barrel and mount it on the carriage.
The following photo shows the carriage side pieces atop the same drawing as above, oriented as they would be after being bolted to the rotated base.
Still a very long way to go.
Cheers
Dick
noddy927
Joined: February 15, 2013
KitMaker: 1,273 posts
Armorama: 568 posts
Posted: Wednesday, October 23, 2013 - 07:56 AM UTC
Wow Dick some MAJOR scratch building involved there buddy.
Pete
Pete
geogeezer
Joined: February 17, 2011
KitMaker: 263 posts
Armorama: 258 posts
Posted: Wednesday, October 23, 2013 - 03:24 PM UTC
Quoted Text
Wow Dick some MAJOR scratch building involved there buddy.
Pete
Hi Pete,
Yes, you're right. probably 90% plus scratched, but most of it is pretty straight-forward, no compound curves.
I've subdivided the build into five groups, feeling that small bites are easier to chew, namely the barrel and its appendages, the carriage, the base, the gantry crane, and finally the diorama which brings everything together. Fortunately, the end of this campaign is a long way off.
The most complex part will be the base, which requires cutting out large circles and forming partly cylindrical shapes. Fortunately, I have a good scale drawing for that and most of the dimensions. The most difficult challenge will be trying to make it rotate. The original revolved on a machined ball race holding 96 20cm steel balls. Trying to replicate that at 1/72 scale is a real problem. I can find bird shot which is close to scale but the ball race is another matter. I'm thinking of making that part out of wood so I can use my router on it. Can't use the router on plastic because it melts. If all that fails, I'll cheat and put in a hidden center pivot.
The gantry crane is another problem because I lack dimensions for it and will have to work from photos.
Challenges, challenges, challenges. That's what makes model building fun, at least some of the time.
Cheers,
Dick

nico37

Joined: May 23, 2011
KitMaker: 651 posts
Armorama: 126 posts

Posted: Wednesday, October 23, 2013 - 07:26 PM UTC
Hi all,
well, this campaign has started with good works guys !
Richard: what a huge scratch-built project !!!!!
Here is my contribution.
I'm planing to 100 % scratch build a Schneider french tank. No major curved designs (but the wheels which will be the most complicated part here...);
I found a french site with teh "How to scratch build your Schneider at 1/35 scale" (the text is in french but no need to be a french-reader to understand most of the pictures):
http://minismodels.pagesperso-orange.fr/blindes/char_schneider/char_schneider_page01.htm
So i gathered tools and materials and started yesterday morning :

The part number one is cut...YYEEEAAAHHHH !

And so for the first part sheet others

The cyano path is open !


I was slowed down when i wanted to see the next instructions....

Finally i won against that white monster and could went ahead with the second instruction picture...

To do the rivets i chose to make them from the back side of the plastic sheet (the difficulty was to always think that it was the reverse of the pictures....)


And so on during the day, here is my result yesterday late in the evening :

Cheers
nico
noddy927
Joined: February 15, 2013
KitMaker: 1,273 posts
Armorama: 568 posts
Posted: Wednesday, October 23, 2013 - 11:12 PM UTC
Nice work Nico....I like the way you did the rivets neat trick.
Pete
Pete

Torchy

#047
Joined: September 13, 2005
KitMaker: 2,016 posts
Armorama: 1,187 posts

Posted: Thursday, October 24, 2013 - 12:30 AM UTC
Are wingie things ok?
Andy
Andy

AlanL
Joined: August 12, 2005
KitMaker: 14,499 posts
Armorama: 11,675 posts
Posted: Thursday, October 24, 2013 - 03:24 AM UTC
Hi Peter,
Still working on the Somme and the Draisine. Hope to do the 6inch Howitzer and maybe some other stuff for the Campaign too.
Dick and Nicholas, nice work.
Andy don't see any reason why not.
Al
Still working on the Somme and the Draisine. Hope to do the 6inch Howitzer and maybe some other stuff for the Campaign too.
Dick and Nicholas, nice work.
Andy don't see any reason why not.
Al
geogeezer
Joined: February 17, 2011
KitMaker: 263 posts
Armorama: 258 posts
Posted: Thursday, October 24, 2013 - 03:23 PM UTC
Hi Nico,
I'm fascinated by the process you're using to make your rivets. How thick is the plastic sheet?
Is that a pencil you're using as a tool? It looks like a nail chucked into a drafting pencil.
This is something I might use on my project, although most of the plastic is pretty thick.
Regards,
Dick
I'm fascinated by the process you're using to make your rivets. How thick is the plastic sheet?
Is that a pencil you're using as a tool? It looks like a nail chucked into a drafting pencil.
This is something I might use on my project, although most of the plastic is pretty thick.
Regards,
Dick
nico37
Joined: May 23, 2011
KitMaker: 651 posts
Armorama: 126 posts
Posted: Thursday, October 24, 2013 - 07:07 PM UTC
Hi,
thanks a lot men
But i misunderstood the notice, and some dimensions were wrongs too, i glued the armored sides to high, the red doted line has to be at the same level than the floor:

I noticed that after i past the evening on the front gun and pilot armored plates (when studying how to put them in place)........so i past the other part of the evening ungluing the armored sides
So the front armored plates i made yesterday are to high they won't fit when the sides go down (as the n°9 piece yet glued has to be cut).......
Dick: i use 0.5 mm styren sheets (it'll be 1 mm for some tracks parts). The tool i use is what in France we call a "Dry point", mostly used to engrave plastic models... If i could i used a less sharped point because if i press to hard i make a hole :

I have to find a more rounded point....
Cheers
nico

windysean
Joined: September 11, 2009
KitMaker: 1,917 posts
Armorama: 735 posts
Posted: Friday, October 25, 2013 - 12:13 AM UTC
Really well done, Nico. We're waiting to see how the re-glued armor looks, but based on what you've already shown, I think you've got a good system, and it should go well. I hope there aren't any more quirks waiting for you in the instructions and dimensions. 
-Sean H.
-Sean H.
geogeezer
Joined: February 17, 2011
KitMaker: 263 posts
Armorama: 258 posts
Posted: Friday, October 25, 2013 - 06:57 AM UTC
Many thanks for the information, Nico.
I'll try your rivet making method and see how it goes. I have plenty of plastic scraps to practice on.
Cheers,
Dick
I'll try your rivet making method and see how it goes. I have plenty of plastic scraps to practice on.
Cheers,
Dick

vonHengest
Joined: June 29, 2010
KitMaker: 5,854 posts
Armorama: 4,817 posts
Posted: Friday, October 25, 2013 - 05:12 PM UTC
I am loving what I'm seeing guys, there's never a lack of excellent modeling skills when it comes to the WWI arena here
nico37
Joined: May 23, 2011
KitMaker: 651 posts
Armorama: 126 posts
Posted: Saturday, October 26, 2013 - 06:21 AM UTC
Hi,
thanks men
I fixed the side plates and re-began the front plates :


Cheers
nico
thanks men
I fixed the side plates and re-began the front plates :


Cheers
nico
geogeezer
Joined: February 17, 2011
KitMaker: 263 posts
Armorama: 258 posts
Posted: Tuesday, October 29, 2013 - 05:23 PM UTC
Hi all
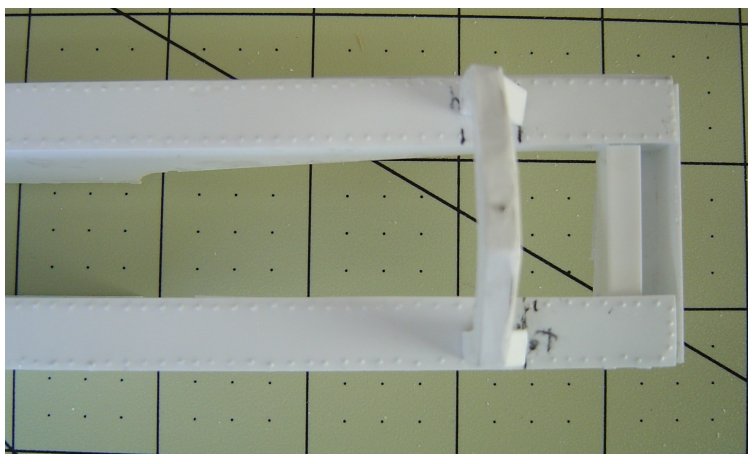
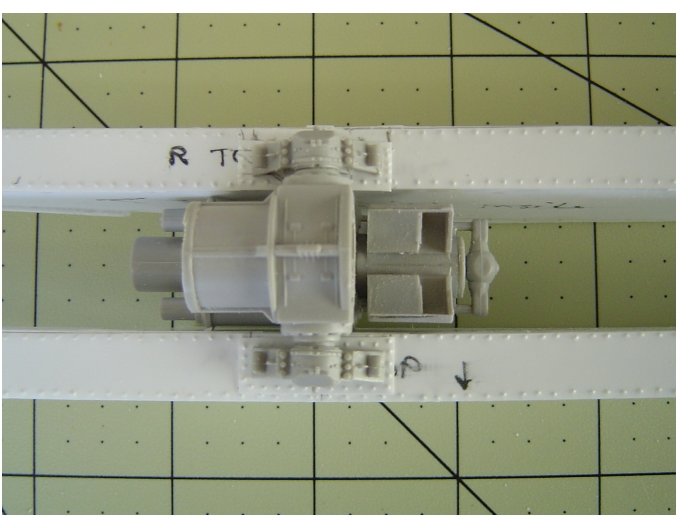
A little more progress on the Wilhelm Geschütze, or Paris gun. I've added the vertical side braces plus the end pieces, so now it's starting to look like a gun carriage. In the photos below, the cut down breech assembly and trunnions from the Leopold railway gun (gray) have been dry fitted, and the hoist bridge for the ammo hoist is in place. I've left off the catwalks on the outside for the time being as they are very exposed and fragile and there is still a lot to be done.
The photo below shows the rear end of the gun carriage looking forward toward the breech. The gun tube is on the left, and won't be installed until I work out the details of the suspension rigging.
The next photos are close-ups of the ammunition hoist bridge.
The last photo is looking down on the cut-down Leopold breech assembly and trunnions, dry fitted to the gun carriage.
Note the rivets. I used Nico's technique (many thanks, Nico,) to press the rivets into thin strips of polystyrene which were then turned upside down and cemented onto the frame. I made a tool by cutting the head off a small nail of the same diameter as the lead in one of my Staedtler drafting pencils. I smoothed off the point with a file and chucked it in the pencil. It works great. Tedious, but worth it.
More to come soon.
Cheers,
Dick

steph2102
Joined: April 23, 2011
KitMaker: 735 posts
Armorama: 606 posts
Posted: Saturday, November 02, 2013 - 06:11 AM UTC
hello, here is my entry.
Nicolas and Richard, great work, looking forward to see more.
steph

Nicolas and Richard, great work, looking forward to see more.
steph

AlanL
Joined: August 12, 2005
KitMaker: 14,499 posts
Armorama: 11,675 posts
Posted: Sunday, November 03, 2013 - 11:09 PM UTC
Hi folks,
Good news for WW1 fans ; two new diorama bases and a WW1 18 pdr just announced from Resicast.
If you are still undecided what to build for the campaign these might be of interest.
Reviews up on site.
This one was done by Christophe of the WW1 6 inch howitzer and the new dio base from GBS.

Al
Good news for WW1 fans ; two new diorama bases and a WW1 18 pdr just announced from Resicast.
If you are still undecided what to build for the campaign these might be of interest.
Reviews up on site.
This one was done by Christophe of the WW1 6 inch howitzer and the new dio base from GBS.

Al
geogeezer
Joined: February 17, 2011
KitMaker: 263 posts
Armorama: 258 posts
Posted: Monday, November 04, 2013 - 04:10 PM UTC
Hi all ,
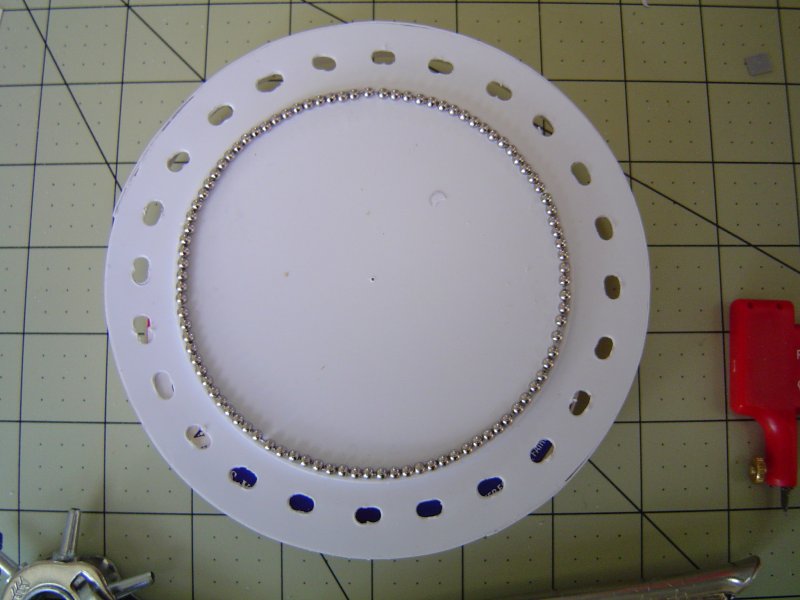
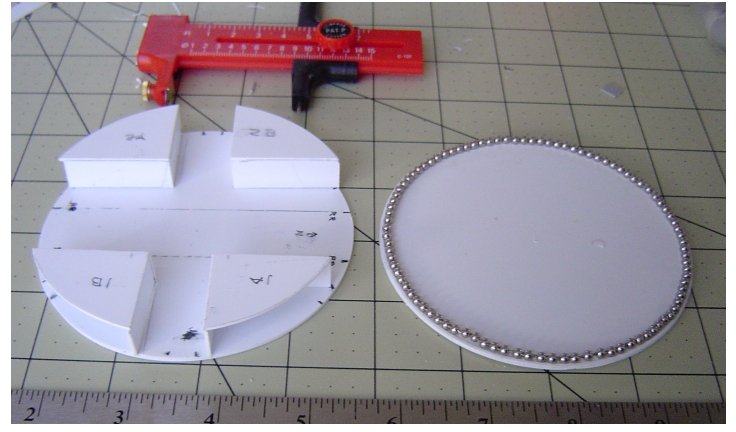
An update on the Wilhelm Geschütze, or Paris gun build. I've started on the rotating base, using photos and dimensions of the Beaumont emplacement from Col. Henry Miller's book on the Paris gun. The fixed base was cut from 1 mm Evergreen plastic sheet with a circle cutter, and the holes were punched (with considerable difficulty) using a leather punch. As can be seen in the following two photos, a couple of holes are slightly askew and need some work. The ball race atop the fixed base plate is dry fitted.
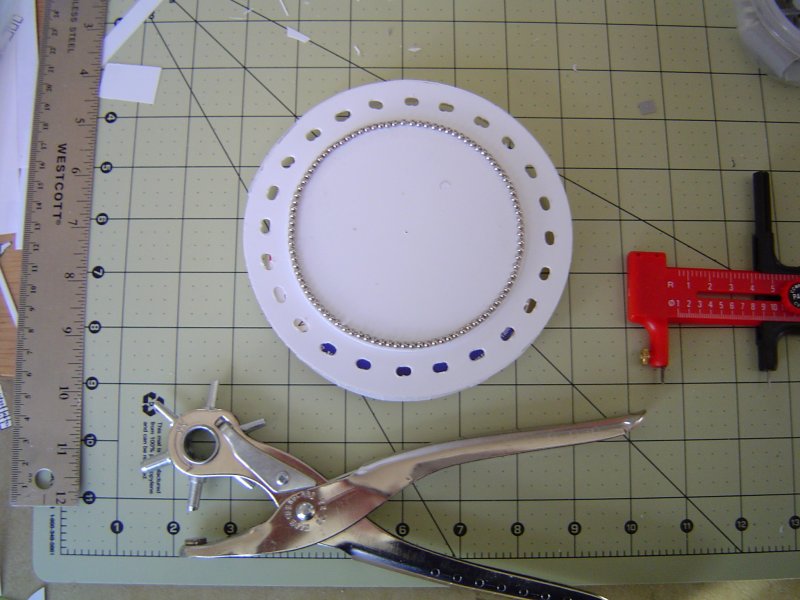
The next photo shows the ball race by itself, and the bead chain from which it was made.
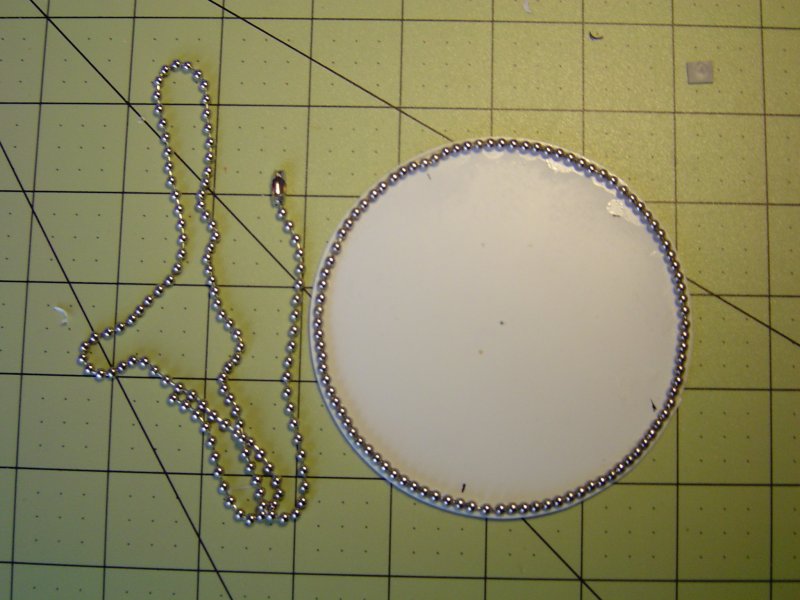
The bead chain is the sort used for ceiling fans, and the diameter of the individual beads scales out closely to the diameter of the 20 cm balls used on the Lange Max and Paris gun rotating bases. A strip of 0.5 x 1 mm plastic was cemented around the rim of the disc as a retainer, and the bead chain was cemented against it and to the base with CA glue, about two inches (5 cm) at a time, taking care to remove all the slack in the chain and force the balls closely together.
I was pleased to find that 96 beads were needed to complete the circle, exactly the number of 20 cm diameter steel balls specified for the actual gun mount, so the scale must be pretty close.
The next photo shows the ball race plate on the right and the cover plate on the left. Even with the beads on the ball race cemented in place, the cover plate rotates very smoothly when placed on top.
The gun carriage will eventually rest on the fittings mounted on the cover plate. The parts shown are dry fitted, as a lot remains to be done.
The last photo is of a captured Lange Max 38 cm mount, identical to the one at the Beaumont emplacement of the Paris gun I am modeling. It is by far the sharpest and most detailed photo I have found, and has proven very useful in figuring out where things go. If one looks closely at the base of the mount in the foreground of the photo, some of the 20 cm balls can be seen behind the retaining rings.

Still a long way to go, but things are beginning to take shape.
Cheers
Dick
,An update on the Wilhelm Geschütze, or Paris gun build. I've started on the rotating base, using photos and dimensions of the Beaumont emplacement from Col. Henry Miller's book on the Paris gun. The fixed base was cut from 1 mm Evergreen plastic sheet with a circle cutter, and the holes were punched (with considerable difficulty) using a leather punch. As can be seen in the following two photos, a couple of holes are slightly askew and need some work. The ball race atop the fixed base plate is dry fitted.
The next photo shows the ball race by itself, and the bead chain from which it was made.
The bead chain is the sort used for ceiling fans, and the diameter of the individual beads scales out closely to the diameter of the 20 cm balls used on the Lange Max and Paris gun rotating bases. A strip of 0.5 x 1 mm plastic was cemented around the rim of the disc as a retainer, and the bead chain was cemented against it and to the base with CA glue, about two inches (5 cm) at a time, taking care to remove all the slack in the chain and force the balls closely together.
I was pleased to find that 96 beads were needed to complete the circle, exactly the number of 20 cm diameter steel balls specified for the actual gun mount, so the scale must be pretty close.
The next photo shows the ball race plate on the right and the cover plate on the left. Even with the beads on the ball race cemented in place, the cover plate rotates very smoothly when placed on top.
The gun carriage will eventually rest on the fittings mounted on the cover plate. The parts shown are dry fitted, as a lot remains to be done.
The last photo is of a captured Lange Max 38 cm mount, identical to the one at the Beaumont emplacement of the Paris gun I am modeling. It is by far the sharpest and most detailed photo I have found, and has proven very useful in figuring out where things go. If one looks closely at the base of the mount in the foreground of the photo, some of the 20 cm balls can be seen behind the retaining rings.
Still a long way to go, but things are beginning to take shape.
Cheers
Dick
 |

WEB HOSTING BY


Copyright ©2021 Armorama and Kitmaker Network, a subsidiary of Silver Star Enterprises
All Rights Reserved. Please read our Conditions of Use and Privacy Policy.
All Rights Reserved. Please read our Conditions of Use and Privacy Policy.