

nice work Alan. wow you build quick!
Pete
Hosted by Richard S.
The Great War: Dawning of a New Age
noddy927

Joined: February 15, 2013
KitMaker: 1,273 posts
Armorama: 568 posts
Posted: Sunday, September 22, 2013 - 08:20 AM UTC

AlanL

Joined: August 12, 2005
KitMaker: 14,499 posts
Armorama: 11,675 posts
Posted: Sunday, September 22, 2013 - 08:24 AM UTC
Hi Peter,
Many thanks. Still a lot of stowage to do. I'll finish this one on the tracks but the kit is destined for a small dio.
Cheers
Al
Many thanks. Still a lot of stowage to do. I'll finish this one on the tracks but the kit is destined for a small dio.
Cheers
Al

hofpig

Joined: March 04, 2007
KitMaker: 1,330 posts
Armorama: 1,017 posts

Posted: Wednesday, October 02, 2013 - 12:55 AM UTC
Start Pics:
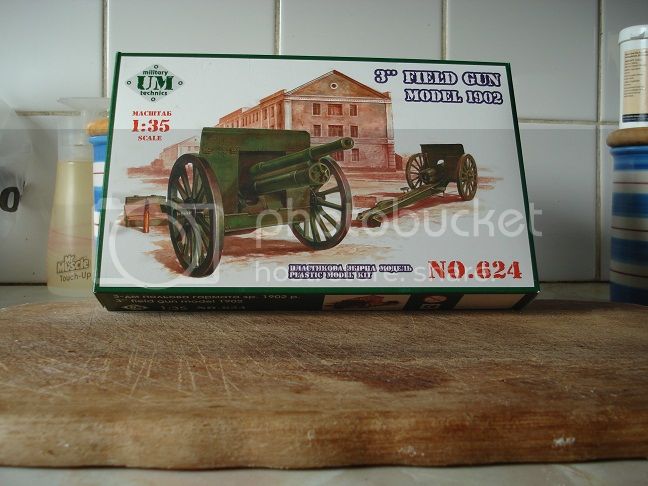


This is the Putilov Model 1902 3" or 76.2mm field gun. The kit from Unimodel is pretty good and I was suprised by the photo etch, brass wire that came with it. I had struggled to find any pics of use during WW1 but I found a book by accident in my local library, "The Russian Army and the First World War by Nik Cornuish". It had a few pics of ww1 Russian Artillery and much to my suprise two pics of this exact gun emplaced so thats what I intend to build a gun emplacement with gun. If I can afford it maybe a small crew.
Paul

AlanL
Joined: August 12, 2005
KitMaker: 14,499 posts
Armorama: 11,675 posts
Posted: Friday, October 04, 2013 - 04:37 AM UTC
Look forward to developments Paul.
I did the EMHAR 18pdr a while back but it was a very basic kit, that needed a lot of work to make it half decent.

I hope to complete this one for the campaign too.
Tractor is almost complete

Would anyone have any information regarding shell colours during WW1?
Lots of stowage with this kit. (But not the small ammo boxes shown at the bottom).

Cheers
Al
I did the EMHAR 18pdr a while back but it was a very basic kit, that needed a lot of work to make it half decent.

I hope to complete this one for the campaign too.

Tractor is almost complete

Would anyone have any information regarding shell colours during WW1?
Lots of stowage with this kit. (But not the small ammo boxes shown at the bottom).

Cheers
Al
hofpig
Joined: March 04, 2007
KitMaker: 1,330 posts
Armorama: 1,017 posts
Posted: Friday, October 04, 2013 - 04:44 AM UTC
Cheers Al,
That emhar one turned out ok I always wondered if the kit was any good. What were the figures like that came with it?
Paul
That emhar one turned out ok I always wondered if the kit was any good. What were the figures like that came with it?
Paul
AlanL
Joined: August 12, 2005
KitMaker: 14,499 posts
Armorama: 11,675 posts
Posted: Friday, October 04, 2013 - 05:04 AM UTC
Hi Paul,
They went into the bin so I can say lol. Very toy like if I remember.
Cheers
Al
They went into the bin so I can say lol. Very toy like if I remember.
Cheers
Al
hofpig
Joined: March 04, 2007
KitMaker: 1,330 posts
Armorama: 1,017 posts
Posted: Friday, October 04, 2013 - 05:15 AM UTC
Al,
I think I looked at their stand alone sets of figures about ten years ago and they were the same. 70's plastic solid cast poses etc. Not very good.
Paul
I think I looked at their stand alone sets of figures about ten years ago and they were the same. 70's plastic solid cast poses etc. Not very good.
Paul
noddy927
Joined: February 15, 2013
KitMaker: 1,273 posts
Armorama: 568 posts
Posted: Sunday, October 06, 2013 - 09:02 AM UTC
Some great work going on, so thought I had best start mine.
I bought these kits 2nd hand, and the were as they look, hope this is okay. I am building a dio for them as you can see.


As you can see I got some paint on the figures, and I have made a start on the trench.
Cheers Pete
I bought these kits 2nd hand, and the were as they look, hope this is okay. I am building a dio for them as you can see.


As you can see I got some paint on the figures, and I have made a start on the trench.
Cheers Pete
noddy927
Joined: February 15, 2013
KitMaker: 1,273 posts
Armorama: 568 posts
Posted: Tuesday, October 08, 2013 - 07:20 AM UTC
A little more work done on base/trench


trench is polystyrene and real wood with plaster for the soil, same will be for the base part of the trench, with the resin base from the figure incorperated in there too.
cheers Pete


trench is polystyrene and real wood with plaster for the soil, same will be for the base part of the trench, with the resin base from the figure incorperated in there too.
cheers Pete
AlanL
Joined: August 12, 2005
KitMaker: 14,499 posts
Armorama: 11,675 posts
Posted: Tuesday, October 08, 2013 - 08:15 AM UTC
Hi Pete,
Off to a good start, look forward to seeing this one develop.
Al
Off to a good start, look forward to seeing this one develop.
Al

geogeezer

Joined: February 17, 2011
KitMaker: 263 posts
Armorama: 258 posts
Posted: Saturday, October 12, 2013 - 05:57 PM UTC
Hi all 
Following a lot of research, I'm about to start work on my entry in the Great War campaign - the Paris gun, known to the Germans as the Paris Kanonen or Wilhelmgeschütze - named for the Kaiser.
A rather ambitious undertaking to say the least, as it involves a lot of scratch building and will be set in a fixed emplacement in a diorama. I usually work in 1/35 scale, but the original gun barrel was 34 meters long and scales out at nearly a meter, not counting the base. Since I don't have room for anything that large, it will be 1/72 scale and still be pretty big.
There are no kits for this monster, although I may borrow some track and a few other bits and pieces from a 1/72 scale Leopold kit.
There aren't any scale drawings either, although I have found some dimensioned drawings for the 38 cm Langer Max railroad gun which served as the base for the Paris guns. Another excellent source is Col. Henry Miller's book on the Paris gun, which has dimensions and plans for some of the emplacements.
Even so, considerable precision guesswork will be required. If anyone knows of a source of scale drawings, I'd appreciate hearing about it. Krupp probably has some in their vaults. The photos which follow give some idea of the size of the beast, whose projectiles were the first man-made objects to reach the outer fringes of Earth's atmosphere. Dawning of a new age indeed!
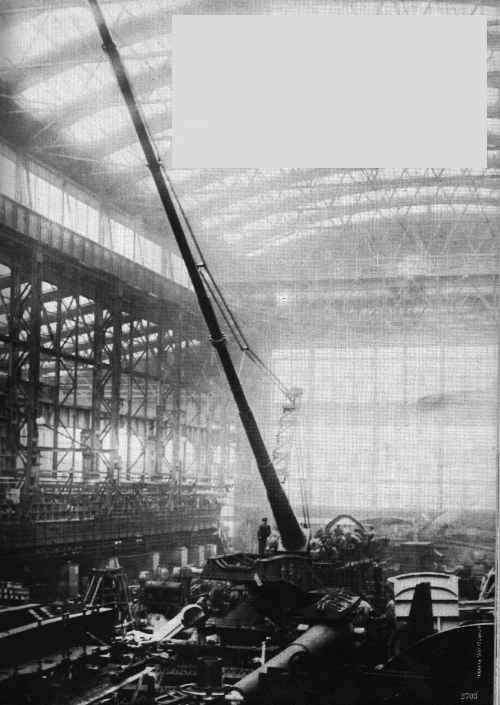
One of the Paris guns (there were three) in the Krupp works.
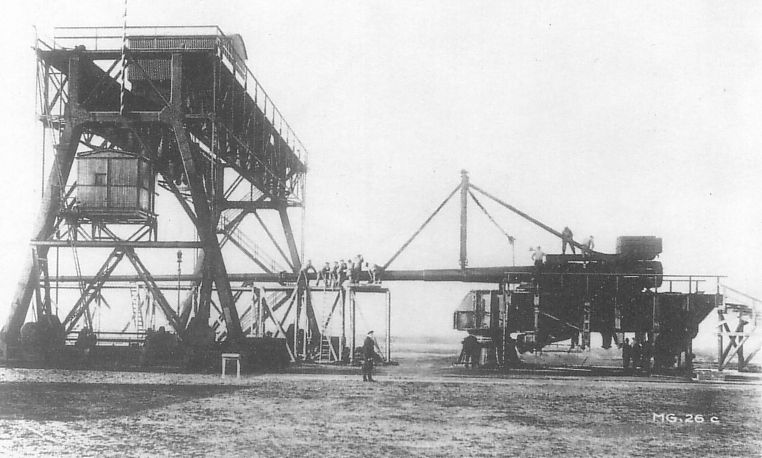
The photo above shows one of the Paris guns being assembled on a test range in northern Germany.
Note the size of the gantry crane. Each gun weighed over 200 tons.
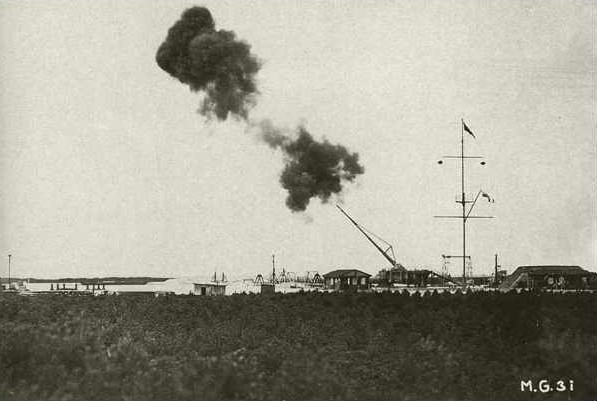
Paris gun being fired on the test range. Navy crews served the guns, and the officer in charge was an Admiral.
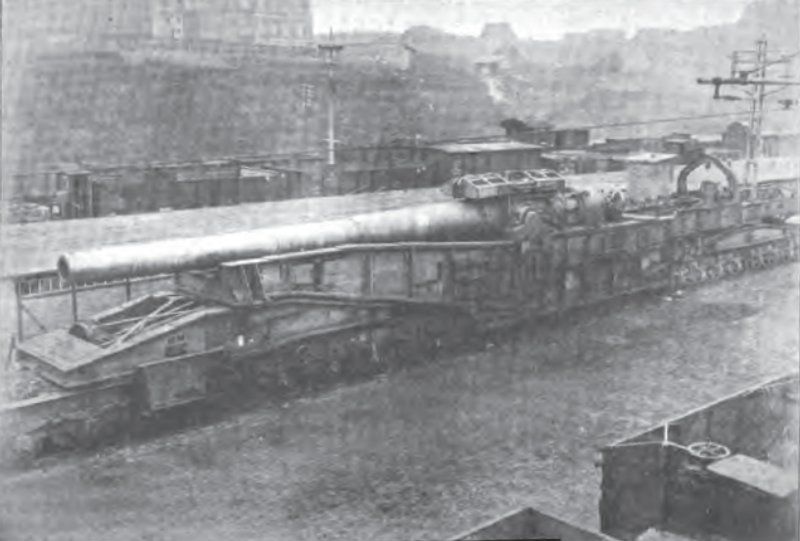
The rather blurry photo above is of the 38 cm railroad gun known as the "Langer Max," or Long Max, the platform on which the Paris guns were based. The Long Max guns were intended for Baden-class battleships which were cancelled after the battle of Jutland.
An 18 meter long sleeve with a 21 cm rifled bore was fitted inside the larger tube, and a smoothbore tube was bolted onto the end of the rifled section, giving an overall length of 34 meters. The device resembling a suspension bridge on top of the barrel was to prevent muzzle droop. During one of the early tests, the smoothbore section was blown completely off because it was slightly out of alignment. The barrels wore out after about 60 rounds and were rebored to 24 cm.
More to come shortly.
Cheers,
Dick
Following a lot of research, I'm about to start work on my entry in the Great War campaign - the Paris gun, known to the Germans as the Paris Kanonen or Wilhelmgeschütze - named for the Kaiser.
A rather ambitious undertaking to say the least, as it involves a lot of scratch building and will be set in a fixed emplacement in a diorama. I usually work in 1/35 scale, but the original gun barrel was 34 meters long and scales out at nearly a meter, not counting the base. Since I don't have room for anything that large, it will be 1/72 scale and still be pretty big.
There are no kits for this monster, although I may borrow some track and a few other bits and pieces from a 1/72 scale Leopold kit.
There aren't any scale drawings either, although I have found some dimensioned drawings for the 38 cm Langer Max railroad gun which served as the base for the Paris guns. Another excellent source is Col. Henry Miller's book on the Paris gun, which has dimensions and plans for some of the emplacements.
Even so, considerable precision guesswork will be required. If anyone knows of a source of scale drawings, I'd appreciate hearing about it. Krupp probably has some in their vaults. The photos which follow give some idea of the size of the beast, whose projectiles were the first man-made objects to reach the outer fringes of Earth's atmosphere. Dawning of a new age indeed!
One of the Paris guns (there were three) in the Krupp works.
The photo above shows one of the Paris guns being assembled on a test range in northern Germany.
Note the size of the gantry crane. Each gun weighed over 200 tons.
Paris gun being fired on the test range. Navy crews served the guns, and the officer in charge was an Admiral.
The rather blurry photo above is of the 38 cm railroad gun known as the "Langer Max," or Long Max, the platform on which the Paris guns were based. The Long Max guns were intended for Baden-class battleships which were cancelled after the battle of Jutland.
An 18 meter long sleeve with a 21 cm rifled bore was fitted inside the larger tube, and a smoothbore tube was bolted onto the end of the rifled section, giving an overall length of 34 meters. The device resembling a suspension bridge on top of the barrel was to prevent muzzle droop. During one of the early tests, the smoothbore section was blown completely off because it was slightly out of alignment. The barrels wore out after about 60 rounds and were rebored to 24 cm.
More to come shortly.
Cheers,
Dick
AlanL
Joined: August 12, 2005
KitMaker: 14,499 posts
Armorama: 11,675 posts
Posted: Saturday, October 12, 2013 - 09:39 PM UTC
Hi Richard,
Ambitious project - enter the heavy hitters. Artillery played such a key role in the conflict, look forward to developments.
You have a challenging and interesting project - good luck with the build.
Al
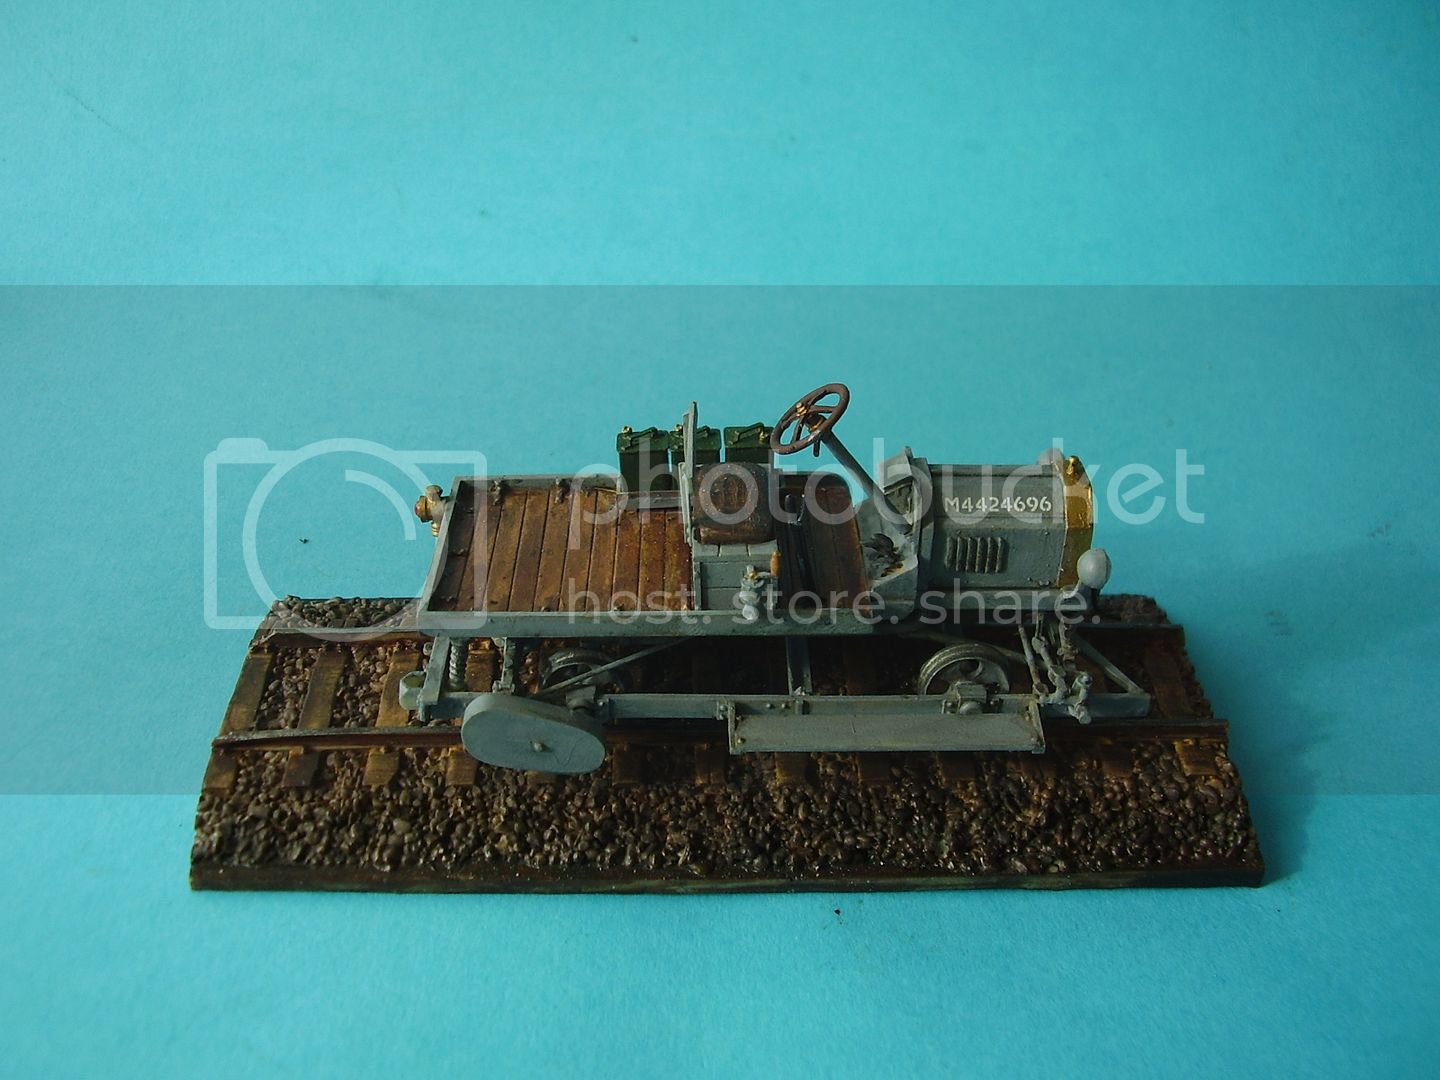
Some progress on the Crewe Tractor aka Draisine and stowage:


Cheers
Al
Ambitious project - enter the heavy hitters. Artillery played such a key role in the conflict, look forward to developments.
You have a challenging and interesting project - good luck with the build.
Al
Some progress on the Crewe Tractor aka Draisine and stowage:


Cheers
Al
noddy927
Joined: February 15, 2013
KitMaker: 1,273 posts
Armorama: 568 posts
Posted: Sunday, October 13, 2013 - 05:48 AM UTC
Alan looking good my friend, been looking at your trench somme thread, superb work.
Here is some progress on my Trench scene. I had to do a small alteration to one of the figs, the base is coming along, and I got some paint on the figures, oils.


Hope to have it done before next weekend.
Cheers Pete
Here is some progress on my Trench scene. I had to do a small alteration to one of the figs, the base is coming along, and I got some paint on the figures, oils.


Hope to have it done before next weekend.
Cheers Pete
AlanL
Joined: August 12, 2005
KitMaker: 14,499 posts
Armorama: 11,675 posts
Posted: Sunday, October 13, 2013 - 08:37 AM UTC
Hi Peter,
Coming along well, looking good so far.
My Somme dio is a bit of an epic, got a bit more done this evening.
Cheers
Al
Coming along well, looking good so far.
My Somme dio is a bit of an epic, got a bit more done this evening.
Cheers
Al
geogeezer
Joined: February 17, 2011
KitMaker: 263 posts
Armorama: 258 posts
Posted: Tuesday, October 15, 2013 - 04:38 PM UTC
Hi all
Progress on the Paris gun proceeds at a snail's pace. It's hard to get all those snails in harness and moving in the same direction.
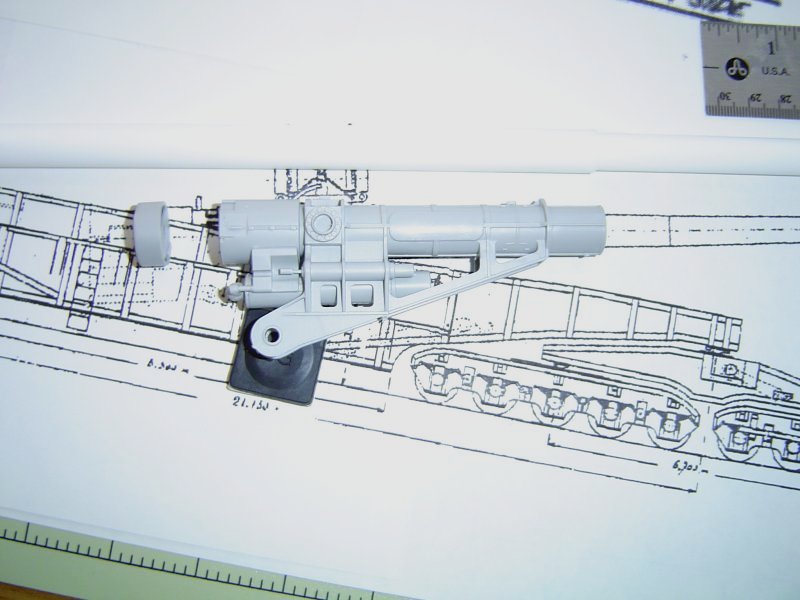
I've started with the breech assembly, and plan to adapt and modify parts from the 1/72 scale 28 cm Leopold railroad gun. The first photo shows the Leopold breech (dry fitted) resting atop a 1/72 scale drawing of the 38 cm/45 caliber Langer Max railroad gun. I placed the Leopold's trunnion where the Langer Max trunnion is, and the part which caps the breech is approximately where the Langer Max breech goes. As can be seen, there is a gap which will need to be filled, but otherwise, I think it will work. The recoil mechanism of the Paris gun never appears in photos, so any glaring errors resulting from use of the Leo's more modern machinery will be out of sight.
I placed plastic tubes above the drawing to show the length of the Paris gun's barrel, which will extend to the end of the steel ruler. The Paris gun always fired at an angle of 54 degrees, impossible to achieve from a railroad carriage, so gun and carriage were mounted on a fixed base with ample room below.
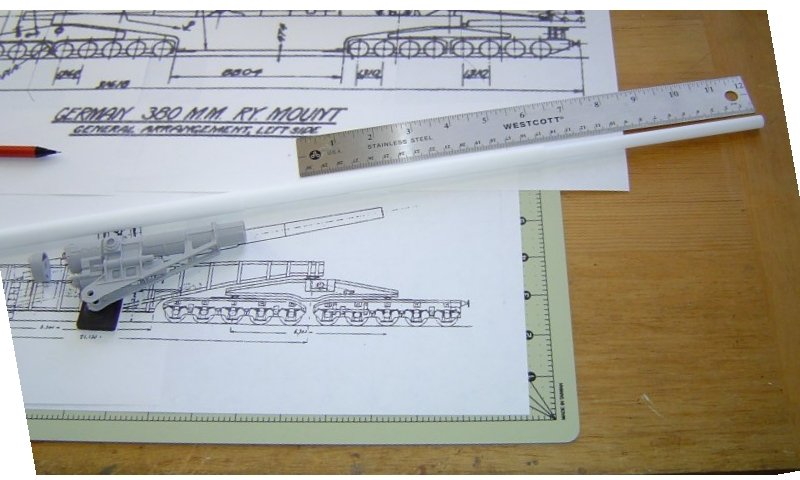
The second photo is a closeup of the Leo's breech assembly placed on the scale drawing of the 38 cm Langer Max RR gun with part of the recoil mechanism beneath. The trunnion of the Leo is on top of the Langer Max trunnion, and the breech cap is placed where the Langer Max breech ends. Some parts of the Leo will eventually be cut away.
The next step will be scratch-building the gun carriage and fitting the breech assembly and barrel inside. Unlike the Langer Max which was transported on its carriage, the Paris gun's barrel traveled on flatcars and was mounted on the carriage at the emplacement with the help of a gantry crane (which I also have to build.) At least I don't have to bother with wheels and running gear which were quite different from those of the Leopold.
This is turning out to be a challenging but very enjoyable build.
Cheers,
Dick
Progress on the Paris gun proceeds at a snail's pace. It's hard to get all those snails in harness and moving in the same direction.
I've started with the breech assembly, and plan to adapt and modify parts from the 1/72 scale 28 cm Leopold railroad gun. The first photo shows the Leopold breech (dry fitted) resting atop a 1/72 scale drawing of the 38 cm/45 caliber Langer Max railroad gun. I placed the Leopold's trunnion where the Langer Max trunnion is, and the part which caps the breech is approximately where the Langer Max breech goes. As can be seen, there is a gap which will need to be filled, but otherwise, I think it will work. The recoil mechanism of the Paris gun never appears in photos, so any glaring errors resulting from use of the Leo's more modern machinery will be out of sight.
I placed plastic tubes above the drawing to show the length of the Paris gun's barrel, which will extend to the end of the steel ruler. The Paris gun always fired at an angle of 54 degrees, impossible to achieve from a railroad carriage, so gun and carriage were mounted on a fixed base with ample room below.
The second photo is a closeup of the Leo's breech assembly placed on the scale drawing of the 38 cm Langer Max RR gun with part of the recoil mechanism beneath. The trunnion of the Leo is on top of the Langer Max trunnion, and the breech cap is placed where the Langer Max breech ends. Some parts of the Leo will eventually be cut away.
The next step will be scratch-building the gun carriage and fitting the breech assembly and barrel inside. Unlike the Langer Max which was transported on its carriage, the Paris gun's barrel traveled on flatcars and was mounted on the carriage at the emplacement with the help of a gantry crane (which I also have to build.) At least I don't have to bother with wheels and running gear which were quite different from those of the Leopold.
This is turning out to be a challenging but very enjoyable build.
Cheers,
Dick
AlanL
Joined: August 12, 2005
KitMaker: 14,499 posts
Armorama: 11,675 posts
Posted: Tuesday, October 15, 2013 - 09:01 PM UTC
Hi Dick,
Seems to fit the bill fairly well. You've set yourself a challenge that's for sure.
Al
Seems to fit the bill fairly well. You've set yourself a challenge that's for sure.
Al
Paulinsibculo

Joined: July 01, 2010
KitMaker: 1,322 posts
Armorama: 1,239 posts

Posted: Tuesday, October 15, 2013 - 11:11 PM UTC
Quoted Text
Start Pics:
This is the Putilov Model 1902 3" or 76.2mm field gun. The kit from Unimodel is pretty good and I was suprised by the photo etch, brass wire that came with it. I had struggled to find any pics of use during WW1 but I found a book by accident in my local library, "The Russian Army and the First World War by Nik Cornuish". It had a few pics of ww1 Russian Artillery and much to my suprise two pics of this exact gun emplaced so thats what I intend to build a gun emplacement with gun. If I can afford it maybe a small crew.
Paul
Hi, Paul,
Just wondering what the birch bark decals are for?
Is it painted on the gun shield?
Thanks for answering.
Paul
hofpig
Joined: March 04, 2007
KitMaker: 1,330 posts
Armorama: 1,017 posts
Posted: Wednesday, October 16, 2013 - 12:43 AM UTC
Quoted Text
Quoted Text
This is the Putilov Model 1902 3" or 76.2mm field gun. The kit from Unimodel is pretty good and I was suprised by the photo etch, brass wire that came with it. I had struggled to find any pics of use during WW1 but I found a book by accident in my local library, "The Russian Army and the First World War by Nik Cornuish". It had a few pics of ww1 Russian Artillery and much to my suprise two pics of this exact gun emplaced so thats what I intend to build a gun emplacement with gun. If I can afford it maybe a small crew.
Paul
Hi, Paul,
Just wondering what the birch bark decals are for?
Is it painted on the gun shield?
Thanks for answering.
Paul
Paul,
The simple answer is I don't know! The instructions shiow as "Russia, Western front(Summer 1916) But you are right they go either side of the gun on the sheild 1 to the right of the barrel and the other two to the left. I guess it must be some sort of camoflage but I am not doing that version. Hope that helps.
Paul

Bluestab
Joined: December 03, 2009
KitMaker: 2,160 posts
Armorama: 1,906 posts
Posted: Wednesday, October 16, 2013 - 01:00 PM UTC
Some nice work.
I haven't decided on a subject yet. I was thinking about a trench scene or a machine gun position, but my knowledge of the war is limited. Instead, I may look to the skies. I've got a 1/48 Eduard Albatros D.III in the stash that I might go with instead. It'll probably be after the new year before I start though. I've been tempted to pick the ICM infantry sets so I might change my mind.
I haven't decided on a subject yet. I was thinking about a trench scene or a machine gun position, but my knowledge of the war is limited. Instead, I may look to the skies. I've got a 1/48 Eduard Albatros D.III in the stash that I might go with instead. It'll probably be after the new year before I start though. I've been tempted to pick the ICM infantry sets so I might change my mind.
geogeezer
Joined: February 17, 2011
KitMaker: 263 posts
Armorama: 258 posts
Posted: Wednesday, October 16, 2013 - 03:14 PM UTC
Hi all
I need to correct a couple of errors in my previous posts on the Paris gun.
1) The 38 cm Langer Max guns and carriages which served as the base for the Paris guns came from discontinued Bayern class battleships, not Baden as I mistakenly said in my first post.
2) In operation, the Paris guns were fired at an elevation of 50 degrees, not 54. Geometry says the maximum range should occur when fired at an angle of 45 degrees, but the brilliant engineers who designed the Paris guns realized that by quickly getting the projectiles into the thin upper atmosphere, drag would be substantially reduced and the range would increase, hence the steeper angle.
Dick
noddy927
Joined: February 15, 2013
KitMaker: 1,273 posts
Armorama: 568 posts
Posted: Friday, October 18, 2013 - 11:40 PM UTC
Well after a couple of weeks solid graft, I am calling this completed. The painting was oils with much of the weathering done with pigments,the small puddle is paint mixed with humbrol gloss coat. I light coat of matt finished it off. The barbed wire cans and all of the base is scratch, one of the wooded foot ways is from the resin kit for one of the figures, that is where the german helmet is from. The grenades are from the spares box.


Really enjoyed this build, and the figures I got cheap so a cheap build.
Cheers Pete


Really enjoyed this build, and the figures I got cheap so a cheap build.
Cheers Pete
AlanL
Joined: August 12, 2005
KitMaker: 14,499 posts
Armorama: 11,675 posts
Posted: Saturday, October 19, 2013 - 12:30 AM UTC
Hi Peter,
Nice work and a fast build. There is a little white glue by the feet of the raider. The leather body armour looks good, taking us back to knights of old along with the mace.
Fine work.
This is progress on the Crewe Tractor and Model T Ford.

If anyone is still undecided what to build, keep an eye out for announcements just before Telford in early November.
Cheers
Al
Nice work and a fast build. There is a little white glue by the feet of the raider. The leather body armour looks good, taking us back to knights of old along with the mace.
Fine work.
This is progress on the Crewe Tractor and Model T Ford.


If anyone is still undecided what to build, keep an eye out for announcements just before Telford in early November.
Cheers
Al
noddy927
Joined: February 15, 2013
KitMaker: 1,273 posts
Armorama: 568 posts
Posted: Saturday, October 19, 2013 - 12:46 AM UTC
Thanks Al the glue was due to the fact I had just stuck him on the base, it's dried clear and I matt coated it. the Crewe tractor looks superb, and likewise the Model T and street scene.I don't know how you find the time considering the Somme mega build you are doing .
pete
pete
AlanL
Joined: August 12, 2005
KitMaker: 14,499 posts
Armorama: 11,675 posts
Posted: Saturday, October 19, 2013 - 01:22 AM UTC
Hi Peter,
Many thanks, I tend to hope from one to the other lol, just to add variety I have a jungle scene on the go too .
.
The Fords were fun, I'm tempted to be the Ambulance version and at least two of them will probably end up in the same home but the Model T as is, should mean I can complete the campaign and build at leisure.
Cheers
Al
Many thanks, I tend to hope from one to the other lol, just to add variety I have a jungle scene on the go too
.The Fords were fun, I'm tempted to be the Ambulance version and at least two of them will probably end up in the same home but the Model T as is, should mean I can complete the campaign and build at leisure.
Cheers
Al
Paulinsibculo
Joined: July 01, 2010
KitMaker: 1,322 posts
Armorama: 1,239 posts
Posted: Saturday, October 19, 2013 - 05:03 AM UTC
[quote
2) In operation, the Paris guns were fired at an elevation of 50 degrees, not 54. Geometry says the maximum range should occur when fired at an angle of 45 degrees, but the brilliant engineers who designed the Paris guns realized that by quickly getting the projectiles into the thin upper atmosphere, drag would be substantially reduced and the range would increase, hence the steeper angle.
Dick[/quote]
A 45 degrees elevation certainly not guarantees a symetric flight!
Artillely shells more often have an asymetric flight curve.
The flight of a artillery grenade is influenced by many factors, like temperature, humidity, weight of the grenade itself, gravity and, in case of the Paris guns, even earth's curvature became a factor.
Officially, the project was called Wilhelm Geschuetz, William's Gun.
However, sometimes it was called Long Max, the name Big Bertha was ' donated' by the Parisians.
Some data of Big Bertha:
The muzzle velocity was 5,260 feet per second. After 12 miles, the velocity was 3,000 per second. The highest point was reached after 90 seconds: 24 miles, having a speed of 2,250 feet per second.
The shell lands in Paris after a flight of 92 miles in 176 seconds. The impact speed was2,200 feet per second, after being slowed down by the increasing density of the atmosphere. The maximum speed of the grenade was 3,075 feet per second.
The straight line distance between gun and target was 67 miles.
Between March 23 and August 9, Paris was shelled 44 times. In total 367 rounds were used.
At March 23, 07,16 hrs, an enormous tube rose above the forests of Mont de Joie, followed by an enormous explosion: the first shell was on it way. It crushed in Quai de la Seine, no 6, a few minutes later.
At 0815 hrs, March 23, a man at Rue Charles V, in the 4th Arrondissement, became the first vitim of ' William's Gun' or ' Big Bertha'.
The gun was installed in the forest of Crepy-en-Laonnais, near Laon.
Since no German planes were seen in the skies above Paris and the front was quite some distance away, people became very upset. Even the War Ministry needed quite some time to analyze the cause of the sudden explosions all over Paris.
At 15,00 hrs, the Ministry declared:
The enemy has fired on Paris with a long range gun. Since 0800 hours this morning, every quarter of an hour, 9.5 inch ( 241 mm) shells struck the capital and its suburban area. There are about ten dead and 15 wounded. Measures to counter theenemy piece are now in course of execution.
Quite some data and history of this gun can be found in
Tanks and Weapons of World War 1, BPC Publishing Ltd., London, ISBN 0-7026-0002-4 (1973)
 |

WEB HOSTING BY


Copyright ©2021 Armorama and Kitmaker Network, a subsidiary of Silver Star Enterprises
All Rights Reserved. Please read our Conditions of Use and Privacy Policy.
All Rights Reserved. Please read our Conditions of Use and Privacy Policy.