

Superb work and your thought and imagination is amazing Dick. Keep it going.
Pete
Hosted by Richard S.
The Great War: Dawning of a New Age
noddy927

Joined: February 15, 2013
KitMaker: 1,273 posts
Armorama: 568 posts
Posted: Monday, November 04, 2013 - 04:20 PM UTC

nico37

Joined: May 23, 2011
KitMaker: 651 posts
Armorama: 126 posts

Posted: Monday, November 04, 2013 - 10:40 PM UTC
Hi,
Dick: you're doing a very amazing and inventive work !
I see you also improved the rivet method i use, you reduced the danger to make holes, good job
Cheers
nico
Dick: you're doing a very amazing and inventive work !
I see you also improved the rivet method i use, you reduced the danger to make holes, good job
Cheers
nico
nico37
Joined: May 23, 2011
KitMaker: 651 posts
Armorama: 126 posts
Posted: Monday, November 04, 2013 - 10:41 PM UTC
Quoted Text
hello, here is my entry.
Nicolas and Richard, great work, looking forward to see more.
steph

Thanks Steph and good choice with this Ford T !

A plus
nico
nico37
Joined: May 23, 2011
KitMaker: 651 posts
Armorama: 126 posts
Posted: Tuesday, November 05, 2013 - 12:57 AM UTC
Hi,
so i continued the front plates (pilot and gun places):


Then i worked on the rear plate with the only one access twin doors (a right side door was added later on MK II models):


And then i began a much more complicated part, the front bow which need accurate cut....i had to make several attempts before to have the good one !
!


So that's all for today,
cheers
nico
so i continued the front plates (pilot and gun places):


Then i worked on the rear plate with the only one access twin doors (a right side door was added later on MK II models):


And then i began a much more complicated part, the front bow which need accurate cut....i had to make several attempts before to have the good one
!


So that's all for today,
cheers
nico

geogeezer

Joined: February 17, 2011
KitMaker: 263 posts
Armorama: 258 posts
Posted: Tuesday, November 05, 2013 - 05:46 PM UTC
Pete and Nicolas Many thanks for the kind words.
Nico, your tank is getting really complex with all those odd angles. Excellent work. I can't wait to see it on tracks.
Cheers,
Dick
Nico, your tank is getting really complex with all those odd angles. Excellent work. I can't wait to see it on tracks.
Cheers,
Dick
nico37
Joined: May 23, 2011
KitMaker: 651 posts
Armorama: 126 posts
Posted: Thursday, November 07, 2013 - 07:05 PM UTC
Hi,
thanks a lot Dick
Well, i'm still far away from the tracks, which will be a real challenge itself.....
Waiting this major step, i still worked on the front bow:


Cheers
nico
thanks a lot Dick
Well, i'm still far away from the tracks, which will be a real challenge itself.....
Waiting this major step, i still worked on the front bow:


Cheers
nico
tankmodeler

#417

Joined: March 01, 2004
KitMaker: 3,123 posts
Armorama: 2,539 posts

Posted: Saturday, November 09, 2013 - 04:17 AM UTC
Nico,
This is gerat work, but I have to wonder, aren't you worried that you will lose the rivet detail when you putty up the seams between plates? Some of the seams are a tad ragged, which is fine at this stage because normally one fills and trims to get the right look, but with the rivets in place, don't you risk not only taking the heads off the rivets as you clean up the putty, but also leaving holes behind due to the punch method of making the rivets?
That's one of the reasons I always add rivets _after_ I get the major construction finished and get the seams cleaned up.
Paul


steph2102
Joined: April 23, 2011
KitMaker: 735 posts
Armorama: 606 posts
Posted: Saturday, November 09, 2013 - 09:32 PM UTC
hello, here is my progress.
steph


steph


nico37
Joined: May 23, 2011
KitMaker: 651 posts
Armorama: 126 posts
Posted: Saturday, November 09, 2013 - 10:16 PM UTC
Hi,
well i get the same questioning in mind about the rivets after the putty work, some edges will be hide by external reinforcement which i'll add at the end, so no putty will be need there. Where i'll have to use putty i think i'll use paint hiding strips as closes as possible of each edge ...... and then i'll see if it works ....
Steph: fast progress ! does the model fits well ? No major problem ? (i would like to do one of this kind in the future).
cheers
nico
Quoted Text
Nico,
This is gerat work, but I have to wonder, aren't you worried that you will lose the rivet detail when you putty up the seams between plates? Some of the seams are a tad ragged, which is fine at this stage because normally one fills and trims to get the right look, but with the rivets in place, don't you risk not only taking the heads off the rivets as you clean up the putty, but also leaving holes behind due to the punch method of making the rivets?
That's one of the reasons I always add rivets _after_ I get the major construction finished and get the seams cleaned up.
Paul
well i get the same questioning in mind about the rivets after the putty work, some edges will be hide by external reinforcement which i'll add at the end, so no putty will be need there. Where i'll have to use putty i think i'll use paint hiding strips as closes as possible of each edge ...... and then i'll see if it works ....
Steph: fast progress ! does the model fits well ? No major problem ? (i would like to do one of this kind in the future).
cheers
nico
nico37
Joined: May 23, 2011
KitMaker: 651 posts
Armorama: 126 posts
Posted: Saturday, November 09, 2013 - 10:25 PM UTC
Hi,
before to do the roof, i had to create the gun and machine gun shields which have a rounded shape.
I used thermoforming with one of my son' marble, for the gun i used old model cluster :


some black Tamiya bomb to see better:

The gun, i'll do the machine guns later:

It fits, i just had to do again the gun shield which was too big:

So, i'm going to do the roof now....
cheers
nico
steph2102
Joined: April 23, 2011
KitMaker: 735 posts
Armorama: 606 posts
Posted: Saturday, November 09, 2013 - 10:49 PM UTC
hi,
not for now no problem, except for the instalation of the radiator I had to remove the fan. of very nice progress on your schneider.
steph
not for now no problem, except for the instalation of the radiator I had to remove the fan. of very nice progress on your schneider.
steph
cdharwins
Joined: October 28, 2006
KitMaker: 491 posts
Armorama: 462 posts

Posted: Monday, November 11, 2013 - 03:35 AM UTC
I can't say enough good things about the models in this campaign. The WWI theme seems to bring out the best modelers.
I'm having a hard time here. In a good way. I originally planned to do a Schneider 75mm howitzer for the campaign. Then we get a bunch of new FT-17s. And now THIS!

My head is spinning. This kit is to be released in December 2013, so if I went with it, I'd have a year to build it. If not, I can fall back on my "75". Or build both. Either way, I'm getting the St. Chamond for this campaign. Or maybe something else will come out!
FINALLY! Some love for the WWI modelers.
Chris
I'm having a hard time here. In a good way. I originally planned to do a Schneider 75mm howitzer for the campaign. Then we get a bunch of new FT-17s. And now THIS!
My head is spinning. This kit is to be released in December 2013, so if I went with it, I'd have a year to build it. If not, I can fall back on my "75". Or build both. Either way, I'm getting the St. Chamond for this campaign. Or maybe something else will come out!
FINALLY! Some love for the WWI modelers.
Chris
geogeezer
Joined: February 17, 2011
KitMaker: 263 posts
Armorama: 258 posts
Posted: Monday, November 11, 2013 - 06:37 AM UTC
Steph - your Model T ambulance is coming along nicely.
Nico - that's an interesting technique for forming plastic bubbles. Is the candle the heat source, and if so, how is it used?
Cheers,
Dick
Nico - that's an interesting technique for forming plastic bubbles. Is the candle the heat source, and if so, how is it used?
Cheers,
Dick
nico37
Joined: May 23, 2011
KitMaker: 651 posts
Armorama: 126 posts
Posted: Monday, November 11, 2013 - 09:31 AM UTC
Hi,
Steph, thanks for the answer and the com;
Dick, thanks and yes, the candle is the heat source, the technic is just to keep the plastic sheet above at a height not too high (where the heat is not enough to make the plastic melt) and not too low (where the plastic would melt too fast ).....and make sure the sheet is large enough to prevent your hand to burn !
It takes very few seconds to melt just enough and then you have few seconds to firmly put the sheet on the matrix. few sconds later the plastic get colderand then you can remove the plastic ....which maybe has then the good shape.....
I used this technic sometimes to duplicate planes canopies and always ...failed ! It's the firt time i succeed ! (yes, i agree, the shape is more simple than for a canopy !)
I hope my explanations are clear enough...
cheers
nico
Steph, thanks for the answer and the com;
Dick, thanks and yes, the candle is the heat source, the technic is just to keep the plastic sheet above at a height not too high (where the heat is not enough to make the plastic melt) and not too low (where the plastic would melt too fast ).....and make sure the sheet is large enough to prevent your hand to burn !
It takes very few seconds to melt just enough and then you have few seconds to firmly put the sheet on the matrix. few sconds later the plastic get colderand then you can remove the plastic ....which maybe has then the good shape.....
I used this technic sometimes to duplicate planes canopies and always ...failed ! It's the firt time i succeed !
(yes, i agree, the shape is more simple than for a canopy !)I hope my explanations are clear enough...
cheers
nico
geogeezer
Joined: February 17, 2011
KitMaker: 263 posts
Armorama: 258 posts
Posted: Monday, November 11, 2013 - 04:57 PM UTC
Hi all 
Nico, thanks for the explanation. I'll give that a try when an opportunity appears.
A little more progress on the Paris Gun build. The first photo shows the rotating part of the base, which Col. Miller calls "the racer"in his book. A plastic cable tie like the one beside the base was used to make the traversing gear, which on the original was bronze.
Cable ties come in many lengths, and all one needs to make a many-toothed rack or gear is cut off the ends. I held the cable tie in place with a rubber band and cemented it with extra thin CA cement, since normal plastic cement doesn't work on the cable ties I have.
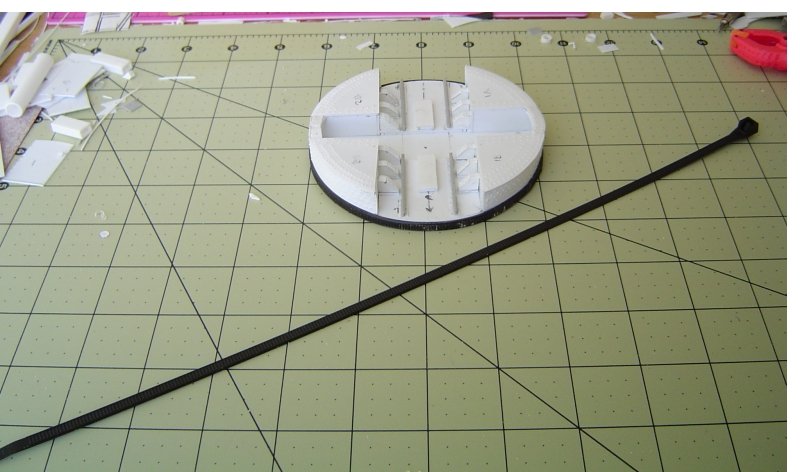
The next photo is a close up, showing the base gear and the railroad rails on which the gun carriage is moved into position. The rails are from the 28 cm Leopold gun kit.
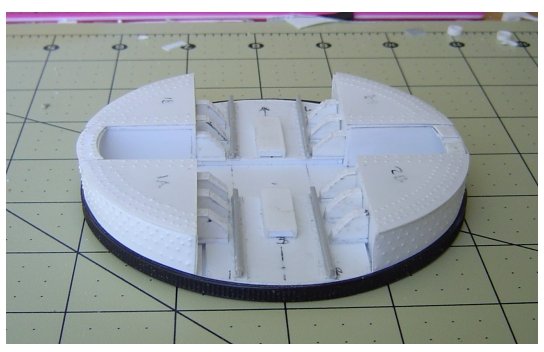
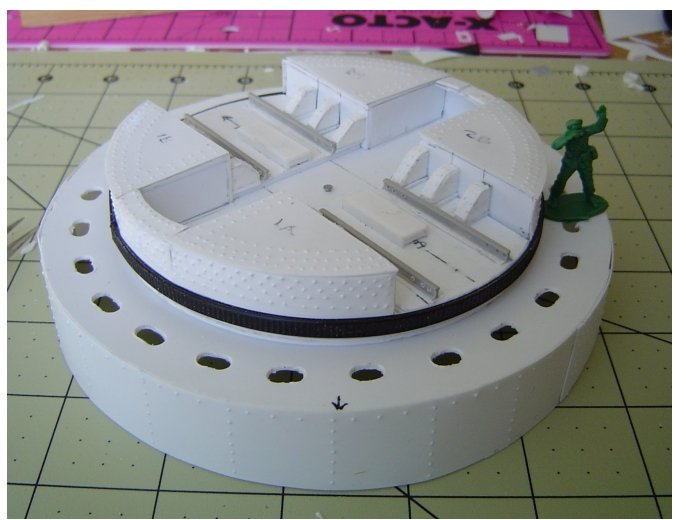
The next photo shows the rotating base (racer) mounted atop the fixed base. The objects in the foreground are parts for the jacks which lift the gun carriage clear of the trucks. The trucks are rolled away and the racer is then rotated 90 degrees and the carriage is lowered onto it.
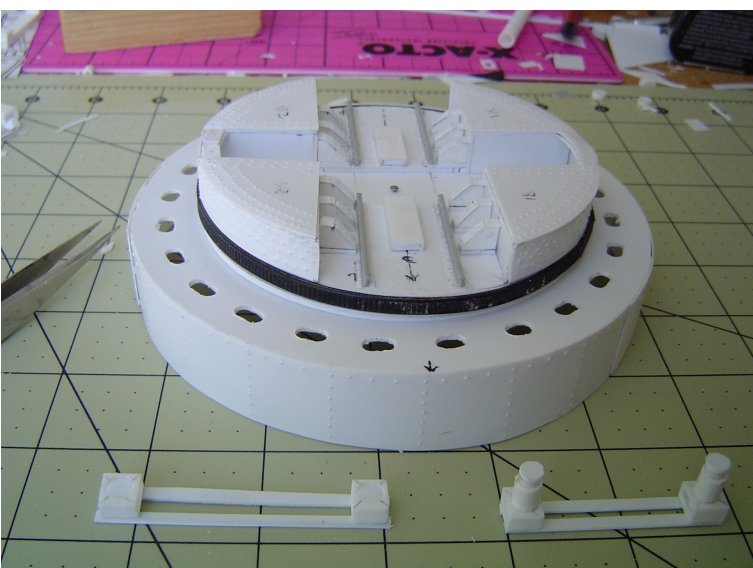
The final photo is a closeup of the base assembly showing some of the support structures. I threw in the 1/72 scale soldier for scale to show just how big this monster is.
I still have to finish the hydraulic jacks and figure out how the traversing gear works. Unfortunately, I only have a two dimensional plan view plus a few very grainy photographs.
More to come soon.
Cheers,
Dick
Nico, thanks for the explanation. I'll give that a try when an opportunity appears.
A little more progress on the Paris Gun build. The first photo shows the rotating part of the base, which Col. Miller calls "the racer"in his book. A plastic cable tie like the one beside the base was used to make the traversing gear, which on the original was bronze.
Cable ties come in many lengths, and all one needs to make a many-toothed rack or gear is cut off the ends. I held the cable tie in place with a rubber band and cemented it with extra thin CA cement, since normal plastic cement doesn't work on the cable ties I have.
The next photo is a close up, showing the base gear and the railroad rails on which the gun carriage is moved into position. The rails are from the 28 cm Leopold gun kit.
The next photo shows the rotating base (racer) mounted atop the fixed base. The objects in the foreground are parts for the jacks which lift the gun carriage clear of the trucks. The trucks are rolled away and the racer is then rotated 90 degrees and the carriage is lowered onto it.
The final photo is a closeup of the base assembly showing some of the support structures. I threw in the 1/72 scale soldier for scale to show just how big this monster is.
I still have to finish the hydraulic jacks and figure out how the traversing gear works. Unfortunately, I only have a two dimensional plan view plus a few very grainy photographs.
More to come soon.
Cheers,
Dick

RedDuster

Joined: March 01, 2010
KitMaker: 7,078 posts
Armorama: 248 posts

Posted: Tuesday, November 12, 2013 - 09:53 AM UTC
Right back from Telford and ready for the off.
main subject, HMS Tiger 1915, around the time of the Battle of Dogger Bank, 1/350th using the Combrig kit and whatever spare etch I can blag, mostly left over from the Dreadnought build over on Modelshipwrights.
Here's the box

and the contents

a bit more

Alos picked this, such a great looking kit I could not resist!
hope to get this built in the timescale of the campaign as well.

and the contents.

Will be starting on Tiger first.
Si
noddy927
Joined: February 15, 2013
KitMaker: 1,273 posts
Armorama: 568 posts
Posted: Tuesday, November 12, 2013 - 04:23 PM UTC
Great work Dick. Cable ties are so useful, but never seen one in a model before.
Simon: 2 nice kits there my friend.
Pete
Simon: 2 nice kits there my friend.
Pete
geogeezer
Joined: February 17, 2011
KitMaker: 263 posts
Armorama: 258 posts
Posted: Wednesday, November 13, 2013 - 05:33 AM UTC
Quoted Text
Great work Dick. Cable ties are so useful, but never seen one in a model before.
Simon: 2 nice kits there my friend.
Pete
Thanks Pete, but as always, when I am patting myself on the back for a job well done, Murphy's law is proven once again.
Something didn't look quite right, and after careful re-reading of the chapter in Col. Miller's book concerning the mounting of the gun at the Beaumont emplacement, I learned that the big ring gear was installed on the fixed base below the ball race, not on the moveable upper base.
Fortunately, I was able to pop the cable tie off without difficulty, and it is now installed in the proper location. Doing that resolved several other problems concerning the traversing mechanism, so it all worked out in the end.

Cheers,
Dick

AlanL

Joined: August 12, 2005
KitMaker: 14,499 posts
Armorama: 11,675 posts
Posted: Wednesday, November 13, 2013 - 06:19 AM UTC
Hi Dick,
Yes, Murphy's law lol. Fine progress none the less.
Hi Simon,
Look forward to developments.
For German fans have you seen the Kayara Ehrhardt M 1917. Looks to be an interesting kit.
Cheers
Al
Yes, Murphy's law lol. Fine progress none the less.
Hi Simon,
Look forward to developments.
For German fans have you seen the Kayara Ehrhardt M 1917. Looks to be an interesting kit.
Cheers
Al
RedDuster
Joined: March 01, 2010
KitMaker: 7,078 posts
Armorama: 248 posts
Posted: Wednesday, November 13, 2013 - 10:48 AM UTC
A small start on the Tiger, the first job is the removal of the overpoor on the hull, thankfully combrig cast the hull hollow, and with a deep groove to guid the saw.
before.

after and with the removed waste.

on test fitting the shelter deck the location of one of the doors is off, checking the drawing in Burt the locker looks to be in the right place.

removed and replaced with an etched door.

Hope to get some colour shot at the main components tomorrow.
Si
before.

after and with the removed waste.

on test fitting the shelter deck the location of one of the doors is off, checking the drawing in Burt the locker looks to be in the right place.

removed and replaced with an etched door.

Hope to get some colour shot at the main components tomorrow.
Si

vonHengest
Joined: June 29, 2010
KitMaker: 5,854 posts
Armorama: 4,817 posts
Posted: Thursday, November 14, 2013 - 10:30 AM UTC
Quoted Text
I can't say enough good things about the models in this campaign. The WWI theme seems to bring out the best modelers.
I'm having a hard time here. In a good way. I originally planned to do a Schneider 75mm howitzer for the campaign. Then we get a bunch of new FT-17s. And now THIS!
My head is spinning. This kit is to be released in December 2013, so if I went with it, I'd have a year to build it. If not, I can fall back on my "75". Or build both. Either way, I'm getting the St. Chamond for this campaign. Or maybe something else will come out!
FINALLY! Some love for the WWI modelers.
Chris
Indeed, your first quote sums it up nicely
Meng also has another kit in the works, which I would consider as fair game for WWI:
.jpg)
vonHengest
Joined: June 29, 2010
KitMaker: 5,854 posts
Armorama: 4,817 posts
Posted: Thursday, November 14, 2013 - 10:33 AM UTC
Si, you know a WWI campaign just isn't complete without one of your ships
noddy927
Joined: February 15, 2013
KitMaker: 1,273 posts
Armorama: 568 posts
Posted: Friday, November 15, 2013 - 01:59 AM UTC
I have SMS Markgraf in my stash, I may tackle my 1st ship, if I have time and enter that as well.
Pete
Pete
RedDuster
Joined: March 01, 2010
KitMaker: 7,078 posts
Armorama: 248 posts
Posted: Friday, November 15, 2013 - 07:36 AM UTC
Thanks Jeremy,
I do love ships from this period. Am getting on with putting paint on the main components, will post some pics over the weekend.
Great campaign some brilliant builds going on, glad to be a part of it.
Si.
I do love ships from this period. Am getting on with putting paint on the main components, will post some pics over the weekend.
Great campaign some brilliant builds going on, glad to be a part of it.
Si.
cdharwins
Joined: October 28, 2006
KitMaker: 491 posts
Armorama: 462 posts
Posted: Saturday, November 16, 2013 - 05:41 AM UTC
[quote]
Meng also has another kit in the works, which I would consider as fair game for WWI:[quote]
Yes sir! That beast will be entering my stash soon!!
Chris
Meng also has another kit in the works, which I would consider as fair game for WWI:[quote]
Yes sir! That beast will be entering my stash soon!!
Chris
 |

WEB HOSTING BY


Copyright ©2021 Armorama and Kitmaker Network, a subsidiary of Silver Star Enterprises
All Rights Reserved. Please read our Conditions of Use and Privacy Policy.
All Rights Reserved. Please read our Conditions of Use and Privacy Policy.