Campaigns: Completed Campaigns
Campaigns that are completed should be grouped here.
Hosted by Richard S.
The Great War: Dawning of a New Age
Bluestab
Visit this Community
South Carolina, United States
Joined: December 03, 2009
KitMaker: 2,160 posts
Armorama: 1,906 posts
Posted: Tuesday, March 25, 2014 - 06:45 AM UTC
Nice emplacement Paul.

Update time.

With the groundwork dried I decided to prime it. I plan on going with a grey-brown/tan color soil so I used gray primer. I overshot a coats of dark earth, tan, and gray, to give it the right shade I was looking for as well as give it a sense of depth.


With the FT-17 to show placement.


I went ahead and painted the sides of the diorama. The Styrofoam was covered in a layer of tissue and white glue. I used an old bottle of Polly S Centaur Brown I had. Then, I painted the shoring boards inside the trench. This is a base coat and will be painted over.


Letting the base dry...I added the black outlines to the FT-17. Not my best work but after the washes and dirt it should be fine.


Anyway, that's it for now.
RedDuster
Visit this Community
England - South East, United Kingdom
Joined: March 01, 2010
KitMaker: 7,078 posts
Armorama: 248 posts
Posted: Tuesday, March 25, 2014 - 07:50 AM UTC
Thanks Rick, you armour guys have my respect too, all that suspension & tracks, never can get them to sit quite right when I try.

Great builds Alex, Paul not so clever at groundwork either.

excellent thread, lots of variety.

Si
Bluestab
Visit this Community
South Carolina, United States
Joined: December 03, 2009
KitMaker: 2,160 posts
Armorama: 1,906 posts
Posted: Wednesday, March 26, 2014 - 06:24 AM UTC
A little more accomplished.

I added some details to the base. Because a WW1 scene without barbed wire is just wrong, I added a length of barbed wire. One of the aspects I am trying to push is the smashed landscape that you see in so many WW1 trench photos. So I added shattered tree stumps made from cut and broken sections of a china berry tree branch. The scrub brush will have some foliage added. Those were made from wire twisted and painted.


I played around with the placement of the tank. I realized that I had left off the trench crossing thing-a-ma-jig on the rear so I added it and then reworked how I was going to place the tank. I sort of settled on placement. The idea is that the tanks caught the edge of the trench and slid in and became stuck...or broke down. The trench was out in no-man's-land so the crew waited until night and used the cover of darkness to get back to their lines.


German infantry has moved up and found the abandoned tank in the trench. They are using the trench as cover as they work their way across no-man's-land. That plays in with the stagnant trench warfare thing.


Anyway, I'm playing around with the placement some. In hindsight, I probably would have had the bunker part more in the center with sections of trench on both sides. Also, it's a bit cliché but I would have rather used French infantry accompanying the FT. Can't use what you don't have.
hofpig
Visit this Community
England - South East, United Kingdom
Joined: March 04, 2007
KitMaker: 1,330 posts
Armorama: 1,017 posts
Posted: Wednesday, March 26, 2014 - 06:54 AM UTC
Hi Alex,

It's looking good, nice barbed wire where did you get it?

Paul
Bluestab
Visit this Community
South Carolina, United States
Joined: December 03, 2009
KitMaker: 2,160 posts
Armorama: 1,906 posts
Posted: Wednesday, March 26, 2014 - 08:39 AM UTC
Paul, I made it using a technique someone posted on these boards a while back. Let me see if I can find it and I'll link to it for you.

EDIT: whalla!

https://armorama.kitmaker.net//features/107
vonHengest
Visit this Community
Texas, United States
Joined: June 29, 2010
KitMaker: 5,854 posts
Armorama: 4,817 posts
Posted: Wednesday, March 26, 2014 - 04:08 PM UTC
Looking good Si, that's no small task you're taking on!

Nice groundwork Paul and Alex, looking forward to seeing your results!
Bluestab
Visit this Community
South Carolina, United States
Joined: December 03, 2009
KitMaker: 2,160 posts
Armorama: 1,906 posts
Posted: Friday, March 28, 2014 - 07:06 AM UTC
Thanks all.

A quick update. Last night I managed to get the pioneer tools and hatches on the FT. I'll try to get to work on the figures tonight.


2ndWorcesters
Visit this Community
England - West Midlands, United Kingdom
Joined: March 15, 2014
KitMaker: 80 posts
Armorama: 80 posts
Posted: Friday, March 28, 2014 - 08:50 AM UTC
Looking good Alex.
2ndWorcesters
Visit this Community
England - West Midlands, United Kingdom
Joined: March 15, 2014
KitMaker: 80 posts
Armorama: 80 posts
Posted: Saturday, March 29, 2014 - 10:29 AM UTC
Here is my entry for this campaign.


This will be an out of the box build, so nothing like the wonderful builds people are creating on here.

Cheers
Cam
#275
Visit this Community
Alberta, Canada
Joined: March 01, 2006
KitMaker: 174 posts
Armorama: 141 posts
Posted: Saturday, March 29, 2014 - 02:01 PM UTC
Here is my start photo, another St Chamond. Spent a few days building at my LHS so I now have must of the construction finished (but still the tracks to do
geogeezer
Visit this Community
Arizona, United States
Joined: February 17, 2011
KitMaker: 263 posts
Armorama: 258 posts
Posted: Sunday, March 30, 2014 - 03:46 PM UTC
Hi all

Some nice work going on in this campaign.

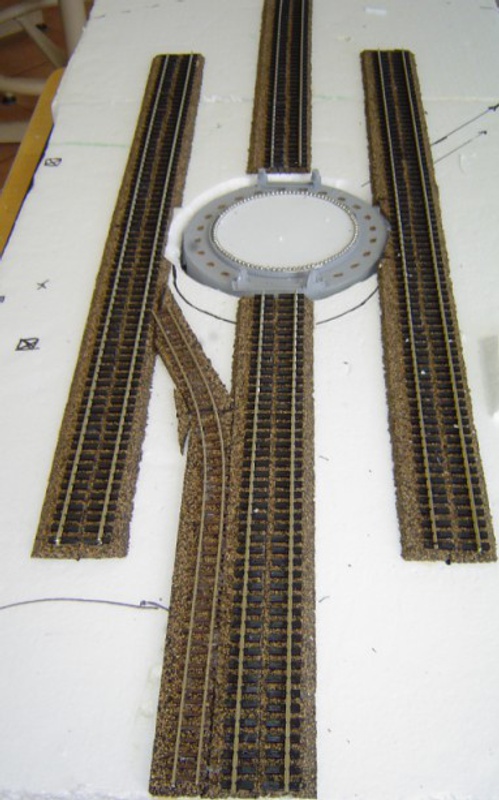
It's been a while since I've posted anything, but I've finally gotten a little more done on the Paris gun build. The basic track work for the emplacement is finished, after several false starts and some wasted track. The layout is according to the dimensions given for the Beaumont emplacement in Colonel Miller's book on the Paris gun.

The cork roadbed is HO scale, and the standard gauge track is HO (1/87) scale flex track which has been split and widened to
1/72 scale. The narrow gauge track is the ammunition supply track for the gun, and is N gauge (1/160 scale) flex track with every other tie cut out.
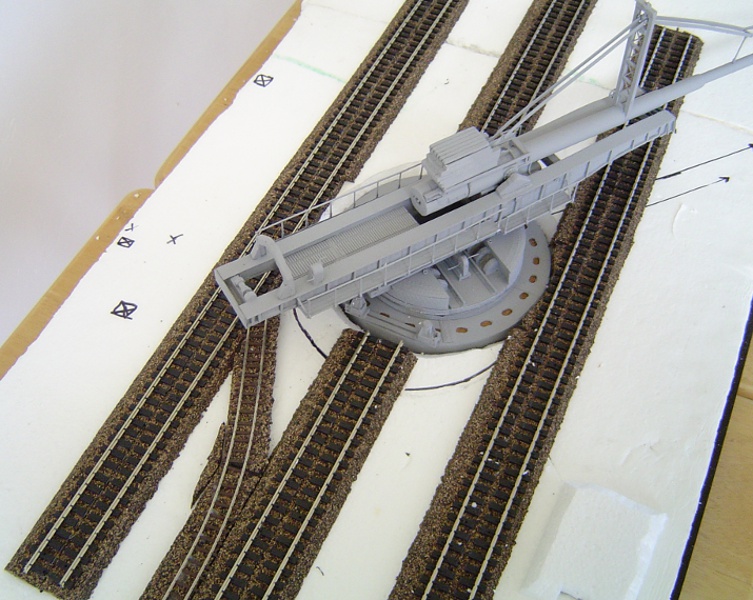
The photo below shows the gun mounted on its base and ready for loading, with the ammo hoist bridge positioned above the end of the ammo supply track.


Next up, the Gantry crane, a real challenge, because the only dimensions I have are the track gauge and the spacing between the outer tracks and the center of the emplacement. Everything else is precision (lol) guesswork based on photos and sketches, very few of which are in agreement.

Cheers

Dick
AlanL
Visit this Community
England - East Anglia, United Kingdom
Joined: August 12, 2005
KitMaker: 14,499 posts
Armorama: 11,675 posts
Posted: Sunday, March 30, 2014 - 10:19 PM UTC
Hi Alex and Dick,

You're making good progress, looking good.

Hi Rick,

As before great work on the St Chamond.

Hi Cam and Alan,

Welcome along.

Good to see progress on all fronts

Cheers

Al

edit:

Hi Daniel, Your SE5a look brilliant BTW.

Al
vonHengest
Visit this Community
Texas, United States
Joined: June 29, 2010
KitMaker: 5,854 posts
Armorama: 4,817 posts
Posted: Monday, March 31, 2014 - 11:34 AM UTC
Alex: The pictures are unfolding nicely...

Alan: I really like the decals on that sheet, nice choice

Cam: Looking forward to seeing your build pics!

Dick: That beast of a gun is looking right at home in those tracks.
geogeezer
Visit this Community
Arizona, United States
Joined: February 17, 2011
KitMaker: 263 posts
Armorama: 258 posts
Posted: Monday, March 31, 2014 - 05:26 PM UTC
Thanks Al and Jeremy.

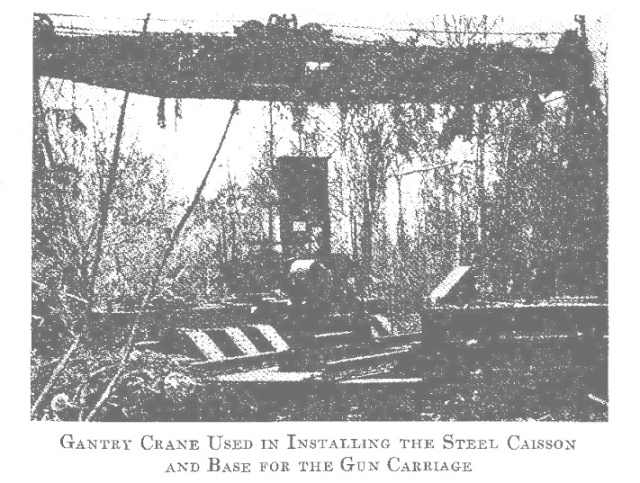
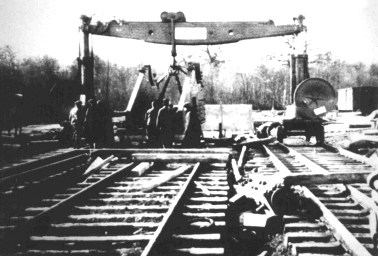
On the subject of the Gantry crane., the photo below shows the crane which was abandoned at the emplacement in the Bois de Corbie near Beaumont which is the one I am modeling. The bridge beam rests on two towers which to my eye are a trifle flimsy considering they had to support a load of well over a hundred metric tons.

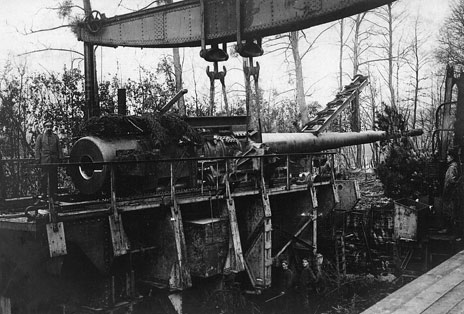
The next photo is of one of the early Paris gun emplacements with a concrete base. I included this because it shows how the barrel was slung beneath the crane on double hooks. It must have been a tricky balancing act. Note that the tower used to tension the suspension rig is folded to provide clearance for the crane. The bridge beam is supported on uprights rather than derrick type towers.

The following photo shows a similar crane with vertical supports which may be hydraulic. The bridge beam is generally similar to the others.

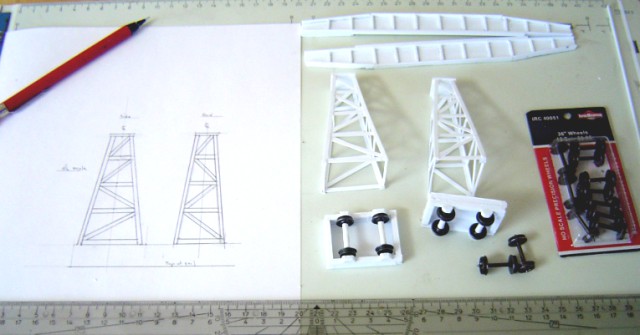
Now on to the model. The next picture shows the two towers, the two halves of the bridge beam, and the trucks on which the towers will be mounted. The wheels and axles were originally HO scale (1/87) and it was necessary to cut the axles and widen the gauge to 1/72 scale by splicing in a section of plastic tube.

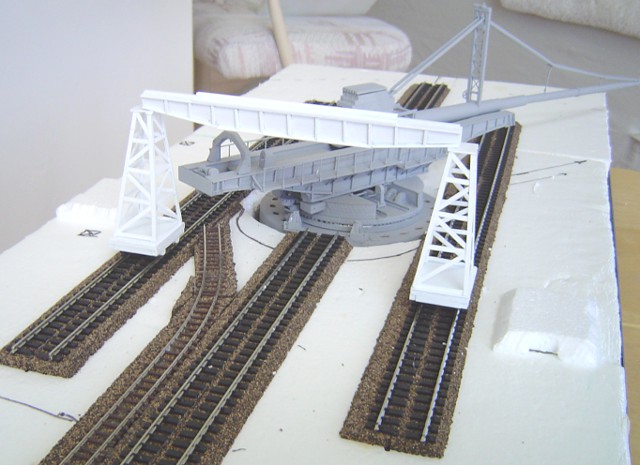
The final picture shows the Gantry crane partly assembled. The parts are dry fitted as there is a lot of detail to be added.


Still a lot to do, but we're getting there.

Cheers

Dick
Bluestab
Visit this Community
South Carolina, United States
Joined: December 03, 2009
KitMaker: 2,160 posts
Armorama: 1,906 posts
Posted: Tuesday, April 01, 2014 - 05:52 AM UTC
Quick update.

The figures are coming along. There's still a bit of work left on them; touch-ups, dirty them up, etc.

Running guy.


Officer/NCO


Trench tool guy. My least favorite posed figure.


Shooter. I posed the helmet cocked a bit off, like it's ill-fitting. I doubt it'll be noticeable when it's placed.


I gave the base a wash. I've got to start adding some vegetation and foliage. Touch up the trench details. I'm debating on discarded equipment and the wagon wheel.


That's it for now.
Cam
#275
Visit this Community
Alberta, Canada
Joined: March 01, 2006
KitMaker: 174 posts
Armorama: 141 posts
Posted: Tuesday, April 01, 2014 - 11:03 AM UTC
Richard - love your Paris gun and will be following your progress.

Alex - your trench section looks good, I might try to build a trench base for the St. Chamond but I usually get involved in building the next kit (Too impatient).

The build of the St. Chamond is finished and the kit is ready for paint. Some of the track links look like they were marinated in mold release agent so a good wash is going to be needed.

geogeezer
Visit this Community
Arizona, United States
Joined: February 17, 2011
KitMaker: 263 posts
Armorama: 258 posts
Posted: Thursday, April 03, 2014 - 12:04 PM UTC
Thanks to everyone for their comments.

Most of the detailing on the Gantry crane is done except for rigging the cables and the hoisting hook which I'm leaving for last. The photo below shows the two support towers and the bridge beam before assembly.

The next photo is of the assembled Gantry crane. The traveling block is mounted on a truck salvaged from an N-scale (1/160) railroad car and runs on a pair of 2 mm channels glued on top of the beam . The sheave on the traveling block came from a 1/35 scale air compressor, and the two sheaves on the ends of the beam are cut-down wheels from a toy Hot Wheels car. I'm not happy with them, but they're the best I can do at the moment. They are removable, and if I find something better, I'll replace them. The ladders are HO scale model railroad parts. The two jib cranes were made from curved pieces of sprue.

Next step is some paint.

Cheers

Dick
Bluestab
Visit this Community
South Carolina, United States
Joined: December 03, 2009
KitMaker: 2,160 posts
Armorama: 1,906 posts
Posted: Thursday, April 03, 2014 - 03:11 PM UTC
Richard, Amazing work.

Cam, Thanks. I think crossing a trench would be a great way to display the St. Chamond.
RedDuster
Visit this Community
England - South East, United Kingdom
Joined: March 01, 2010
KitMaker: 7,078 posts
Armorama: 248 posts
Posted: Sunday, April 06, 2014 - 07:39 AM UTC
Great builds going on here,

A bit more progress on the Tiger.

Funnel stays going on.


No,2 funnel, vertical rigging done and funnel glued down.


More stays on No.1 funnel and the cap & steam pipe on no.2 funnel.


More soon.

Si
Cam
#275
Visit this Community
Alberta, Canada
Joined: March 01, 2006
KitMaker: 174 posts
Armorama: 141 posts
Posted: Sunday, April 06, 2014 - 02:14 PM UTC
Nice work Simon. I always enjoy your updates.
AlanL
Visit this Community
England - East Anglia, United Kingdom
Joined: August 12, 2005
KitMaker: 14,499 posts
Armorama: 11,675 posts
Posted: Sunday, April 06, 2014 - 06:05 PM UTC
Hi Alex,

Good progress on the diorama.

Hi Dick,

Excellent work on the gantry. Project is a pleasure to watch.

Hi Cam,

Nice clean looking build.

Hi Si,

The Ship is coming along really well.

For my part, the Ambulance is finished less some personal kit. Dick I did fit the break cable - thanks.

geogeezer
Visit this Community
Arizona, United States
Joined: February 17, 2011
KitMaker: 263 posts
Armorama: 258 posts
Posted: Monday, April 07, 2014 - 04:02 PM UTC
Thanks for the comments, guys.

Cam - Nice work on the St. Chamond. Careful when crossing a trench with all that overhang. I understand the later models had rollers fore and aft to keep them from digging into the banks.

Simon - Your detailing on Tiger is amazing.

Alan, your Ford T ambulance is perfect.

Yes, Tin, Tin, Tin!
You exasperating puzzle, Hunka Tin!
I've abused you and I've flayed you
But by Henry Ford who made you,
You are better than a Packard, Hunka Tin

Cheers,

Dick
AlanL
Visit this Community
England - East Anglia, United Kingdom
Joined: August 12, 2005
KitMaker: 14,499 posts
Armorama: 11,675 posts
Posted: Tuesday, April 08, 2014 - 02:52 AM UTC
Hi Dick,

Many thanks for the feedback, glad you approve and I like the 'Hunka Tin' poem.

Cheers and thanks for the input.

Al
geogeezer
Visit this Community
Arizona, United States
Joined: February 17, 2011
KitMaker: 263 posts
Armorama: 258 posts
Posted: Tuesday, April 08, 2014 - 04:17 PM UTC
Hi Alan,

For the benefit of those who haven't seen this poem on the Internet, here is the complete version as originally published in the American Field Service Bulletin during WWI.

Hunka Tin

You may talk about your voitures
When you're sitting round the quarters,
But when it comes to getting blesses in-
Take a little tip from me,
Let those heavy motors be,
Pin your faith on Henry F's old Hunka Tin.
Give her essence and de l'eau,
Crank her up and let her go,
You back firin', spark-plug foulin' Hunka Tin.

The paint is not so good,
And no doubt you'll find the hood
Will rattle like a boiler shop en route;
The cooler's sure to boil
And perhaps she's leakin' oil;
Then often times the horn declines to toot.
But when the night is black,
And there's blesses to take back,
And they hardly give you time to take a smoke;
It's might good to feel,
When you're sitting at the wheel,
She'll be running when the bigger cars are broke.

After all the wars are past,
And we're taken home at last,
To our reward of which the preacher sings;
When those ukulele sharps
Will be strumming golden harps,
And the aviators all have reg'lar wings.
When the Kaiser is in hell,
With the furnace drawing well,
Paying for his million different kinds of sin,
If they're running short of coal,
Show me how to reach the hole,
And I'll cast a few loads down with Hunka Tin.

Yes, Tin, Tin, Tin!
You exasperating puzzle, Hunka Tin!
I've abused you and I've flahyed you
But by Henry Ford who made you,
You are better than a Packard, Hunka Tin!

(Blesses was the term used for wounded French soldiers.)

Cheers,

Dick

geogeezer
Visit this Community
Arizona, United States
Joined: February 17, 2011
KitMaker: 263 posts
Armorama: 258 posts
Posted: Tuesday, April 08, 2014 - 04:35 PM UTC
Hi all

I've given the Gantry crane some paint, and rigged the cables on the beam, but I'm not happy with the way they turned out. Too much spring in the wire I used. Thread would sag better, but what I had on hand is too thin to be anywhere close to scale. If I find something better, I'll replace the cables.
The photos below show both sides of the crane.


With the Gantry crane finished, I'll get started on landscaping the base, something I haven't done in a very long time.

Cheers

Dick