Thanks guys,
This is a great thread, keep looking to see progress on all builds.
Great work Dick, Al, Cam, Alex.
Si
Hosted by Richard S.
The Great War: Dawning of a New Age
RedDuster

Joined: March 01, 2010
KitMaker: 7,078 posts
Armorama: 248 posts

Posted: Wednesday, April 09, 2014 - 07:51 AM UTC
Posted: Wednesday, April 09, 2014 - 08:00 AM UTC
Hi Dick,
You could use lead wire, it is easy to get it to sag.
Hi Si,
Thanks.
Al
You could use lead wire, it is easy to get it to sag.
Hi Si,
Thanks.
Al

geogeezer

Joined: February 17, 2011
KitMaker: 263 posts
Armorama: 258 posts

Posted: Wednesday, April 09, 2014 - 04:35 PM UTC
Hi Al,
Thanks for the tip. I found a source on the Internet and ordered some. It's mainly used by fly fishermen who tie their own flies and want some extra weight.
Cheers,
Dick
Thanks for the tip. I found a source on the Internet and ordered some. It's mainly used by fly fishermen who tie their own flies and want some extra weight.
Cheers,
Dick
RedDuster

Joined: March 01, 2010
KitMaker: 7,078 posts
Armorama: 248 posts

Posted: Sunday, April 13, 2014 - 06:09 AM UTC
Posted: Monday, April 14, 2014 - 04:08 AM UTC
Moving along nicely Si, fine work.
Al

Al


Bluestab

Joined: December 03, 2009
KitMaker: 2,160 posts
Armorama: 1,906 posts

Posted: Tuesday, April 15, 2014 - 06:32 AM UTC
Some really nice work guys.
Update. I put down some vegetation. I'll wrap up the figures (straps, touch-up), place them, and probably will be done. And some touch-ups and I've still got to paint the mud on the tank.


Update. I put down some vegetation. I'll wrap up the figures (straps, touch-up), place them, and probably will be done. And some touch-ups and I've still got to paint the mud on the tank.


Posted: Tuesday, April 15, 2014 - 08:32 AM UTC
Coming along well Alex.
Cheers
Al
Cheers
Al

RedDuster

Joined: March 01, 2010
KitMaker: 7,078 posts
Armorama: 248 posts

Posted: Tuesday, April 15, 2014 - 08:47 AM UTC
Thanks Al,
Looking good Alex, like the angle of the tank, and the blasted tree stumps.
Si
Looking good Alex, like the angle of the tank, and the blasted tree stumps.
Si

Bluestab

Joined: December 03, 2009
KitMaker: 2,160 posts
Armorama: 1,906 posts

Posted: Thursday, April 17, 2014 - 06:41 AM UTC
Thanks Simon. I'm just trying to keep up with the rest of you guys. Some great work being done.
And with that, an update. I went and changed the figure holding the entrenching tool. I wanted a figure up on the platform. As is, he looked a bit silly manning the position with a shovel. I removed the shovel, cut up a rifle, and placed it in his hand. Not perfect but I think it looks better. I also added a few sandbags.


I think I'm done. I'll give it a few days to settle in and make any changes that are needed. Unless I change some things, I'll probably just upload a couple of pictures from this batch in to the gallery.
And with that, an update. I went and changed the figure holding the entrenching tool. I wanted a figure up on the platform. As is, he looked a bit silly manning the position with a shovel. I removed the shovel, cut up a rifle, and placed it in his hand. Not perfect but I think it looks better. I also added a few sandbags.


I think I'm done. I'll give it a few days to settle in and make any changes that are needed. Unless I change some things, I'll probably just upload a couple of pictures from this batch in to the gallery.
Posted: Friday, April 18, 2014 - 01:11 AM UTC
Hi Alex,
You've made goo0d progress on this on. Some battle field litter and trench type objects would be good.
Have you tried using Mig pigments? There are a good variety to give you a range of colours to the ground work. You'd need to blend the mud on the tracks into the mud on the ground.
The good thing about ground work like this is you can experiment safely with a variety of shades/tones.
Cheers
Al


Bluestab

Joined: December 03, 2009
KitMaker: 2,160 posts
Armorama: 1,906 posts

Posted: Friday, April 18, 2014 - 04:10 AM UTC
Thanks Alan for the input. It's not where I really want it to be. I'm probably going to take a break from it for a bit. I may jump back on it after a bit and see if I can work out some of the problems.
By the way, I'm really enjoying your diorama on the Unfinished Business Campaign.
By the way, I'm really enjoying your diorama on the Unfinished Business Campaign.
Posted: Friday, April 18, 2014 - 04:30 AM UTC
Hi Alex,
A break is good, I do that a lot in my builds leave them for a while and let the though process go to work.
The first of the Somme Dioramas got finished and the above ground scene is on the go.
The Somme 1916 got started in the last campaign lol.
http://www.armorama.co.uk/features/5238
The Somme 1916 Part 2 - got started in this one
http://www.armorama.co.uk/forums/217278
Don't know if it will get finished by September, we shall see how it goes.
Lots of interesting developments on the WW1 front.
Cheers
Al

RedDuster

Joined: March 01, 2010
KitMaker: 7,078 posts
Armorama: 248 posts

Posted: Friday, April 18, 2014 - 08:20 AM UTC
Hi Alex,
Great job, like the relationship of the tank and figures it tells the story to me.
Si
Great job, like the relationship of the tank and figures it tells the story to me.
Si
2ndWorcesters

Joined: March 15, 2014
KitMaker: 80 posts
Armorama: 80 posts

Posted: Sunday, April 20, 2014 - 07:10 AM UTC
Great work on the dio Alex.
Posted: Sunday, April 20, 2014 - 10:38 AM UTC

Bluestab

Joined: December 03, 2009
KitMaker: 2,160 posts
Armorama: 1,906 posts

Posted: Wednesday, April 23, 2014 - 07:54 AM UTC
I went ahead and tried to work on a few of the diorama's issues. I have put multiple washes to try to darken the groundwork, to try to blend the mud on the tank. I even painted the groundwork underneath the raised side of the tank and the tank's running gear and it didn't help blend them in the pictures. It looks great in person but it doesn't show in pictures. I did add some dry-brushing to the tank to muffle the paint some.
I don't want to overdo the washes for the sake of the pictures and mess it up so I'll call this one done. I'll give it a few days, make any added touch-ups, and snap a few pictures for the gallery.
It was a fun little build of an old kit and a war I really haven't messed with much. I learned some stuff that I'll be filing away for later use.


RedDuster

Joined: March 01, 2010
KitMaker: 7,078 posts
Armorama: 248 posts

Posted: Sunday, May 04, 2014 - 06:43 AM UTC
Posted: Sunday, May 04, 2014 - 07:51 AM UTC
Hi Alex,
Well done and congrats in getting finished. It had a good sense of the action going on. Worth the extra effort.
Cheers
Al
Well done and congrats in getting finished. It had a good sense of the action going on. Worth the extra effort.
Cheers
Al

RedDuster

Joined: March 01, 2010
KitMaker: 7,078 posts
Armorama: 248 posts

Posted: Monday, May 05, 2014 - 10:14 AM UTC
Cracking finish on the dio Alex, Al is right, the added depth really makes a difference, really well done.
Decided unless I tackled the funnel rigging, Tiger was going nowhere.


All the lower stays in place, and a couple of the upper ones, so over half way there! big push next time to get this bit done.
Si
Decided unless I tackled the funnel rigging, Tiger was going nowhere.


All the lower stays in place, and a couple of the upper ones, so over half way there! big push next time to get this bit done.
Si
geogeezer

Joined: February 17, 2011
KitMaker: 263 posts
Armorama: 258 posts

Posted: Monday, May 05, 2014 - 02:11 PM UTC
Alex - Nice work. A lot of action in a small space.
Simon - I don't see how you manage all that rigging. I have trouble getting one wire taut, and you have dozens, and they all look great.
Cheers,

Dick
Simon - I don't see how you manage all that rigging. I have trouble getting one wire taut, and you have dozens, and they all look great.
Cheers,


Dick
Posted: Tuesday, May 06, 2014 - 03:07 AM UTC
RedDuster

Joined: March 01, 2010
KitMaker: 7,078 posts
Armorama: 248 posts

Posted: Tuesday, May 06, 2014 - 07:38 AM UTC
Hi Dick,
The straight answer is I Cheat! The copper wire is rigid enough once rolled straight to stand up for itself. It would be a nightmare trying to tension those funnel stays.
Superb stuff Al,
So much going on, great Dio.
Si
The straight answer is I Cheat! The copper wire is rigid enough once rolled straight to stand up for itself. It would be a nightmare trying to tension those funnel stays.
Superb stuff Al,
So much going on, great Dio.
Si

Bluestab

Joined: December 03, 2009
KitMaker: 2,160 posts
Armorama: 1,906 posts

Posted: Wednesday, May 07, 2014 - 04:52 AM UTC
Thanks guys for the comments. I really enjoyed the build and learned a few things. I'm thoroughly enjoying the work being done here. I went ahead and uploaded a picture to the gallery so I'm officially calling it done....even though I was done with it with the last batch of progress photos. I actually uploaded one of those.
geogeezer

Joined: February 17, 2011
KitMaker: 263 posts
Armorama: 258 posts

Posted: Sunday, May 11, 2014 - 05:33 PM UTC
Hi all 
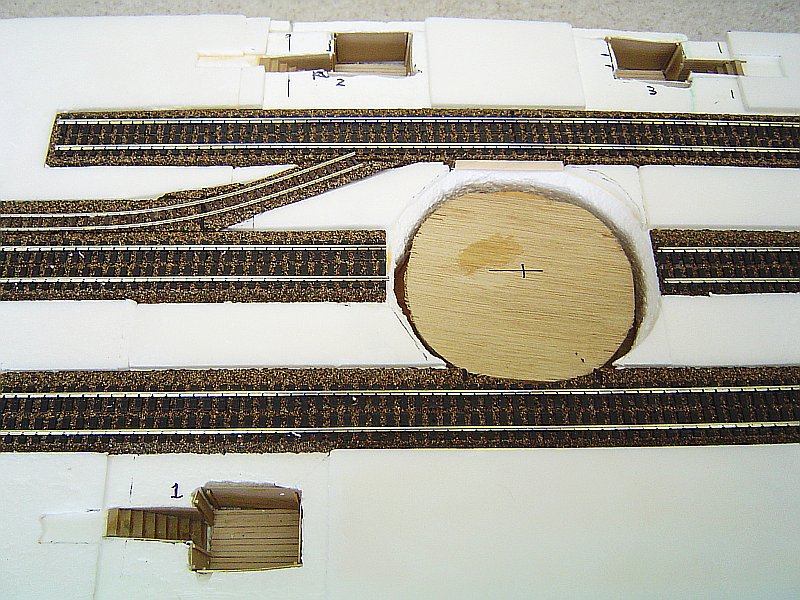
At long last, an update on the Paris gun build. A few details added to the gun mount - ladders & cranks, and cable on the ammo hoist drum. Still lacking the blocks and hook.
Excavated three dugouts. The original Beaumont emplacement had six in all, but my base is too small to fit them all in at this scale.
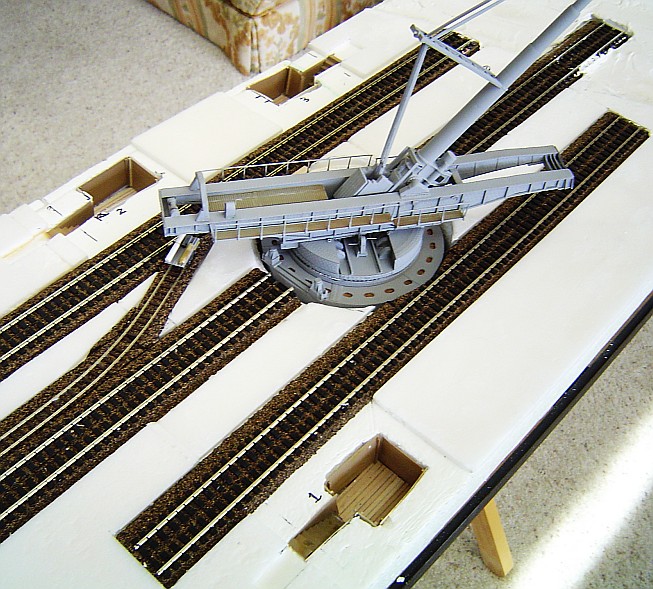
The next photo shows the base with the gun in place. The ammo cart laden with the projectile, powder bags, and brass base cartridge is on the narrow gauge track under the ammo hoist.
The following photos show the diorama base after the start of landscaping. The dugouts are covered and the entrances are sandbagged. The sandbags were made from Sculpey clay, and still need a little work.
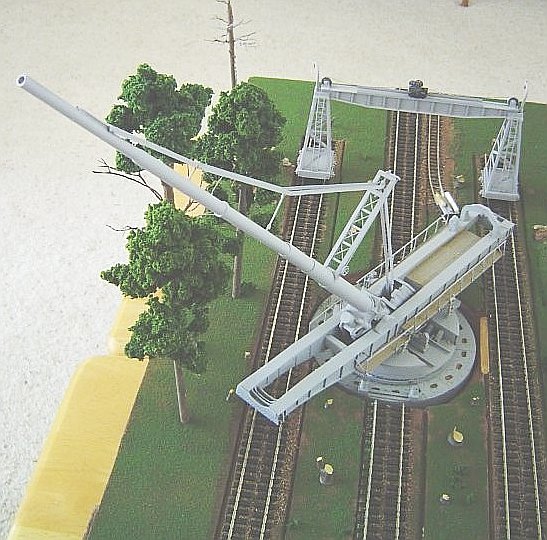
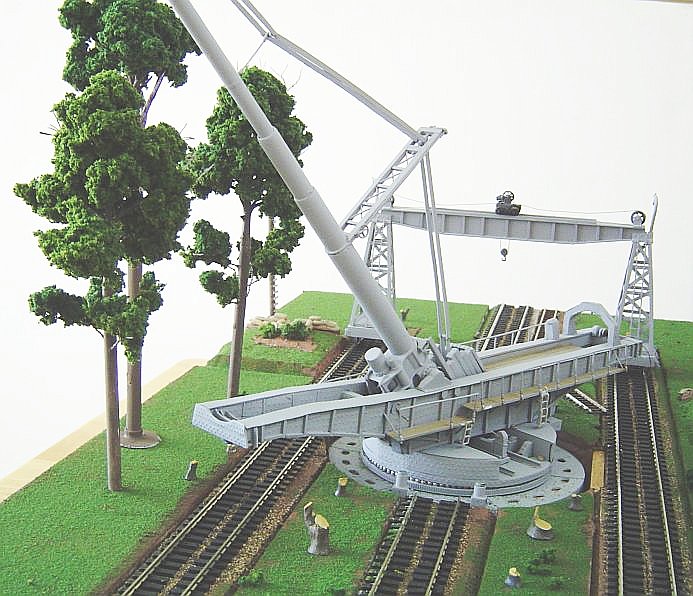
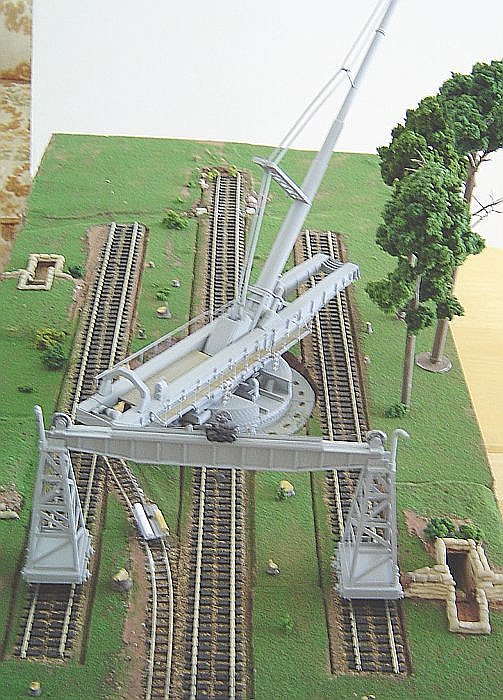
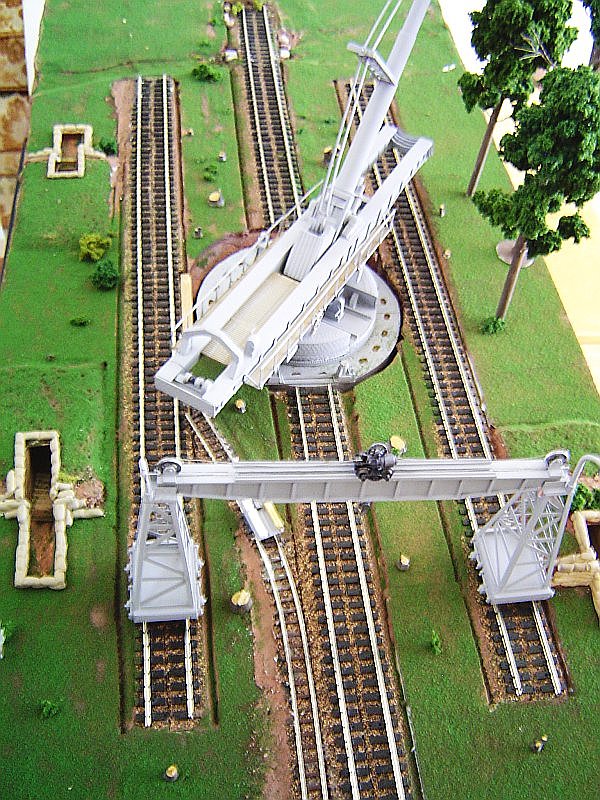
At the moment, the diorama looks rather flat and unfortunately resembles a well-manicured golf course with a huge cannon stuck in the middle. That should change when I add the remaining two dozen or so trees yet to be finished plus some underbrush.
On the subject of the site and the forest in which it is located, according to Col. Miller's book, the Beaumont site was chosen because with the reduced range of the re-bored gun it was still within range of Paris, the ground was firm and level, and it was covered with exceptionally tall trees.
I was surprised to learn that some beech trees in French forests attain heights of 40 meters and more. The frontispiece in Col. Miller's book on the Paris Gun is a photo of the Kaiser, the Crown Prince, and General Ludendorf visiting one of the guns in the forest of Crepy. With the barrel elevated to firing position, the muzzle is still well below the surrounding treetops.
I had some ready-made Realistic deciduous trees on hand, but none scaled out at over 10 meters, so I embarked on a rather tedious tree-stretching project. That involved cutting lengths of dowel and drilling the centers to fit the pins on the bottom of the trees on hand. I chucked the dowels in an electric drill and used it as an improvised lathe to taper them with a rasp and sandpaper. The next step was to drill holes for branches made from multistrand antenna wire. The trees in the above photos are the result. The tops are the original Realistic trees, the lower parts were scratched. My trees aren't as tall as they should be, but massed together they'll look okay.
Cheers
Dick

At long last, an update on the Paris gun build. A few details added to the gun mount - ladders & cranks, and cable on the ammo hoist drum. Still lacking the blocks and hook.
Excavated three dugouts. The original Beaumont emplacement had six in all, but my base is too small to fit them all in at this scale.
The next photo shows the base with the gun in place. The ammo cart laden with the projectile, powder bags, and brass base cartridge is on the narrow gauge track under the ammo hoist.
The following photos show the diorama base after the start of landscaping. The dugouts are covered and the entrances are sandbagged. The sandbags were made from Sculpey clay, and still need a little work.
At the moment, the diorama looks rather flat and unfortunately resembles a well-manicured golf course with a huge cannon stuck in the middle. That should change when I add the remaining two dozen or so trees yet to be finished plus some underbrush.
On the subject of the site and the forest in which it is located, according to Col. Miller's book, the Beaumont site was chosen because with the reduced range of the re-bored gun it was still within range of Paris, the ground was firm and level, and it was covered with exceptionally tall trees.
I was surprised to learn that some beech trees in French forests attain heights of 40 meters and more. The frontispiece in Col. Miller's book on the Paris Gun is a photo of the Kaiser, the Crown Prince, and General Ludendorf visiting one of the guns in the forest of Crepy. With the barrel elevated to firing position, the muzzle is still well below the surrounding treetops.
I had some ready-made Realistic deciduous trees on hand, but none scaled out at over 10 meters, so I embarked on a rather tedious tree-stretching project. That involved cutting lengths of dowel and drilling the centers to fit the pins on the bottom of the trees on hand. I chucked the dowels in an electric drill and used it as an improvised lathe to taper them with a rasp and sandpaper. The next step was to drill holes for branches made from multistrand antenna wire. The trees in the above photos are the result. The tops are the original Realistic trees, the lower parts were scratched. My trees aren't as tall as they should be, but massed together they'll look okay.
Cheers

Dick
Dodge54

Joined: August 09, 2013
KitMaker: 16 posts
Armorama: 14 posts

Posted: Sunday, May 11, 2014 - 08:05 PM UTC
Can i join the campaign or am i too late?
Thinking abaout the resicast ambulance as next Project ...
Cheers
Christian
Thinking abaout the resicast ambulance as next Project ...
Cheers
Christian
 |


