


Campaigns
Where Armorama group builds can be discussed, organized, and updates posted.
Where Armorama group builds can be discussed, organized, and updates posted.
Hosted by Darren Baker, Richard S.
48th Scale 2 campaign

GregCloseCombat

Joined: June 30, 2008
KitMaker: 2,408 posts
Armorama: 2,394 posts

Posted: Sunday, July 15, 2012 - 01:51 PM UTC
Took it to primer (waiting until grills come in to go further)


miniflea
Joined: October 17, 2011
KitMaker: 237 posts
Armorama: 235 posts
Posted: Sunday, July 15, 2012 - 05:16 PM UTC
Hello all! For the campaign I would like to build Tamiya's Hetzer:

I've never participated in a campaign before so maybe this will prevent the usual newfound interest in a new kit two thirds of the way though.
I've never participated in a campaign before so maybe this will prevent the usual newfound interest in a new kit two thirds of the way though.
GregCloseCombat
Joined: June 30, 2008
KitMaker: 2,408 posts
Armorama: 2,394 posts
Posted: Monday, July 16, 2012 - 02:39 AM UTC
Welcome to the campaign. I have found my build speed and percentage of finished models skyrocket through the participation in campaigns 
miniflea
Joined: October 17, 2011
KitMaker: 237 posts
Armorama: 235 posts
Posted: Monday, July 16, 2012 - 10:15 AM UTC
Well, got started. Superglued all the plastic bits to the metal hull, and since I'm waiting on an order of spray paint, went ahead and brush painted a dark yellow base.

Fully painted, minus the glacis plate (correct term?) which will be sprayed along with upper hull:

Road wheels. Sprayed the center color then brushed on black for the tires. The sprayed on layer is a bit thin but I don't think it will be noticeable once the wheels are weathered.

I don't have an airbrush and am unlikely to get one anytime soon, so all the painting I have to do is with brushes and spray cans.
Fully painted, minus the glacis plate (correct term?) which will be sprayed along with upper hull:
Road wheels. Sprayed the center color then brushed on black for the tires. The sprayed on layer is a bit thin but I don't think it will be noticeable once the wheels are weathered.
I don't have an airbrush and am unlikely to get one anytime soon, so all the painting I have to do is with brushes and spray cans.

SaxonTheShiba
Joined: February 01, 2009
KitMaker: 1,233 posts
Armorama: 557 posts

Posted: Tuesday, July 17, 2012 - 10:25 AM UTC
Miniflea----welcome to the fray. Will look forward to seeing the Hetzer.
Greg-----Sweet looking Ersatz M-10 Imposter/Infiltrator Vehicle.
Best wishes, Ian
Greg-----Sweet looking Ersatz M-10 Imposter/Infiltrator Vehicle.
Best wishes, Ian

pclark442
Joined: January 17, 2012
KitMaker: 42 posts
Armorama: 41 posts
Posted: Tuesday, July 17, 2012 - 01:53 PM UTC
Ok, Its finally green. Need to paint the tracks, add the stowage, and begin the weathering. The front LEFT fender is now missing (battle damage, FTW) due to a vigorous shaking episode with a Vallejo bottle that got out of control........


GregCloseCombat
Joined: June 30, 2008
KitMaker: 2,408 posts
Armorama: 2,394 posts
Posted: Tuesday, July 17, 2012 - 04:29 PM UTC
Minifleas - nice start on the Hetzer. Have you ever seen this youtube video of this guy that brush paints a Sherman in a huge dio?
http://www.youtube.com/watch?v=8oy1ZYoTVbk
Ian - thanks man The sneaky tank is coming 
Patrick - your paint and decals came out perfect. What gloss and clear brands or mixtures do you use??? I like that barrel cloth too
http://www.youtube.com/watch?v=8oy1ZYoTVbk
Ian - thanks man
The sneaky tank is coming Patrick - your paint and decals came out perfect. What gloss and clear brands or mixtures do you use???
I like that barrel cloth too
imatanker
Joined: February 11, 2011
KitMaker: 1,654 posts
Armorama: 1,565 posts
Posted: Tuesday, July 17, 2012 - 08:57 PM UTC
Greg... Nice work on the M10,it's coming along very well.
miniflea... I have wanted to build a Hertzer for a long time.I need to get one soon.Great brush work by the way,are you using the paint straight from the bottle,or thinned with something?
Patrick... I must second Gregs comment,that is truely a great paint job.Details are still crisp,coverage is good,no dust or dirt,and the gloss is even with no runs,drips or errors .I, also would like to know what you are using for products.
As for the utube vid,to bad it's not in english,because i would like to know how he keeps the paint from drying too quickly.I know He works fast,but that paint stays wet a long time.I can never get my Tamiya paint to stay wet that long Jeff T.
miniflea... I have wanted to build a Hertzer for a long time.I need to get one soon.Great brush work by the way,are you using the paint straight from the bottle,or thinned with something?
Patrick... I must second Gregs comment,that is truely a great paint job.Details are still crisp,coverage is good,no dust or dirt,and the gloss is even with no runs,drips or errors
.I, also would like to know what you are using for products.As for the utube vid,to bad it's not in english,because i would like to know how he keeps the paint from drying too quickly.I know He works fast,but that paint stays wet a long time.I can never get my Tamiya paint to stay wet that long
Jeff T.

PantherF
Joined: June 10, 2005
KitMaker: 6,188 posts
Armorama: 5,960 posts

Posted: Tuesday, July 17, 2012 - 09:06 PM UTC
I like the missing fender Patrick and overall it's a perfect effort that looks much larger than 1/48. 
~ Jeff
~ Jeff

pclark442
Joined: January 17, 2012
KitMaker: 42 posts
Armorama: 41 posts
Posted: Wednesday, July 18, 2012 - 05:42 AM UTC
Thanks guys for the compliments.
The base color is airbrushed Tamiya thinned with Tamiya Lacquer Thinner over Chaos black primer.
Color is about 60-40 OD and Dark Yellow. It came out "greener" than I wanted but looks ok.
Next time I am goig to try cutting the OD with Buff to see if I can tone down the green tinge.
I "spot shot" Future as a gloss coat for the decals then overcoated that with Testors Dullcoat. The Dullcoat really didnt "dull" it out that much. I need to find a better Flattning Spray.
I can't stress how "foolproof" airbrushing Tamiya is when you cut it with the yellow capped Tamiya lacquer thinner.
SaxonTheShiba
Joined: February 01, 2009
KitMaker: 1,233 posts
Armorama: 557 posts
Posted: Wednesday, July 18, 2012 - 10:50 AM UTC
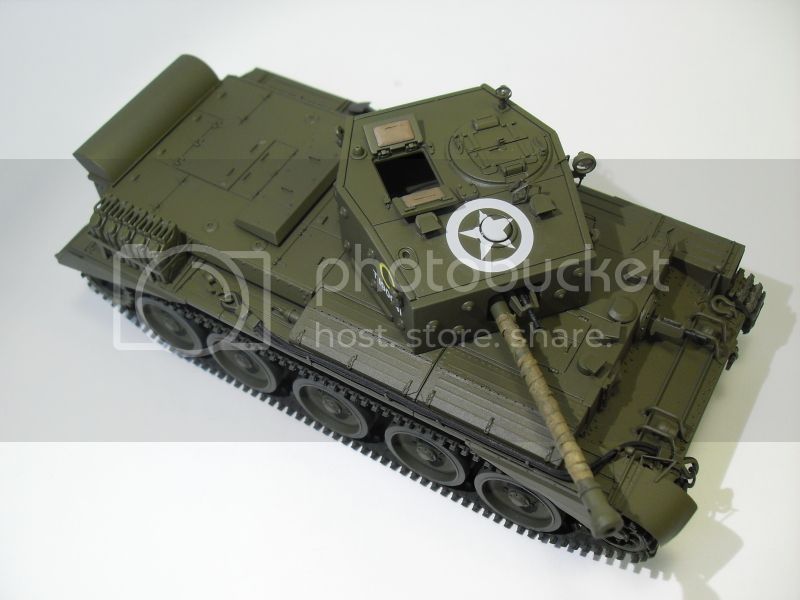
Patrick, great job on the Cromwell!! I was getting ready to ask you what you used for the green but you already answered my question. I think your paint mixture looks dead on. I am getting ready to tackle this color issue with my Churchill AVRE in the D-Day Campaign so I may try the mixture that you used. Once again, great job!
Best wishes,
Ian
Best wishes,
Ian
SaxonTheShiba
Joined: February 01, 2009
KitMaker: 1,233 posts
Armorama: 557 posts
Posted: Wednesday, July 18, 2012 - 10:55 AM UTC
Patrick, in regards to your issue with a flat coat....try thinning the Dullcote with Testors Metallizer thinner. The Metallizer thinner reacts better with Dull-Cote than regular laqcuer thinner and you will get a much flatter coat. It also airbrushes on much more smoothly. Don't know why it works better but an old modelling hand showed me that and it does make a difference.
Regards, Ian
Regards, Ian
Quoted Text
Thanks guys for the compliments.
The base color is airbrushed Tamiya thinned with Tamiya Lacquer Thinner over Chaos black primer.
Color is about 60-40 OD and Dark Yellow. It came out "greener" than I wanted but looks ok.
Next time I am goig to try cutting the OD with Buff to see if I can tone down the green tinge.
I "spot shot" Future as a gloss coat for the decals then overcoated that with Testors Dullcoat. The Dullcoat really didnt "dull" it out that much. I need to find a better Flattning Spray.
I can't stress how "foolproof" airbrushing Tamiya is when you cut it with the yellow capped Tamiya lacquer thinner.
PeteDoc

Joined: April 10, 2012
KitMaker: 164 posts
Armorama: 130 posts
Posted: Thursday, July 19, 2012 - 10:18 AM UTC
Patrick, that's lookin fantastic so far. Can't wait to see it weathered. BTW - here's my Vallejo shaker (works great!) -

pclark442
Joined: January 17, 2012
KitMaker: 42 posts
Armorama: 41 posts
Posted: Thursday, July 19, 2012 - 01:14 PM UTC
Quoted Text
Patrick, that's lookin fantastic so far. Can't wait to see it weathered. BTW - here's my Vallejo shaker (works great!) -
THAT IS @#$$^#%!!! AWESOME!!1 Gonna go build me one of those babys right now..........
miniflea
Joined: October 17, 2011
KitMaker: 237 posts
Armorama: 235 posts
Posted: Friday, July 20, 2012 - 06:38 AM UTC
GregCloseCombat- I have not seen that before, thanks!
imatanker, thank you. For a long time I did use the paint straight, and just rinsed my brush in water as needed (frequently since the Tamiya paint dries so fast) but lately I've started thinning a bit. I have a small plastic lid from a water bottle filled with thinner and I keep my brush wet with thinner while I paint- it makes the paint go on far smoother, and if I go back over an area that has started to dry, it doesn't flake, which was a big problem before. I'm using x-20A thinner, which seems to work better than plain water.
Moving along, I'm trying something new here, mixing up some mud for the hull using celluclay and Tamiya flat earth.


I mixed it a bit too wet, so I had to let it sit for a while then tried to texture it best I could with an old rough brush.

More will be applied, just wanted to do this before the road wheels went on. I'm thinking I'll leave it as dry mud, and perhaps do a darker "wet" mud. Not sure how to make it glossy though, perhaps mix a bit of future in? As always, constructive criticism is greatly appreciated! My progress so far:

Now to tackle the tracks.
imatanker, thank you. For a long time I did use the paint straight, and just rinsed my brush in water as needed (frequently since the Tamiya paint dries so fast) but lately I've started thinning a bit. I have a small plastic lid from a water bottle filled with thinner and I keep my brush wet with thinner while I paint- it makes the paint go on far smoother, and if I go back over an area that has started to dry, it doesn't flake, which was a big problem before. I'm using x-20A thinner, which seems to work better than plain water.
Moving along, I'm trying something new here, mixing up some mud for the hull using celluclay and Tamiya flat earth.
I mixed it a bit too wet, so I had to let it sit for a while then tried to texture it best I could with an old rough brush.
More will be applied, just wanted to do this before the road wheels went on. I'm thinking I'll leave it as dry mud, and perhaps do a darker "wet" mud. Not sure how to make it glossy though, perhaps mix a bit of future in? As always, constructive criticism is greatly appreciated! My progress so far:
Now to tackle the tracks.
PantherF
Joined: June 10, 2005
KitMaker: 6,188 posts
Armorama: 5,960 posts
Posted: Saturday, July 21, 2012 - 10:32 AM UTC
Well, got back to the Cobra and wanted to update the machine guns with these 1/48 brass units.

Had to snipp off the kit's plastic version.

They look "alright":

And closer:

Still need to paint them. Had one casualty ...
... I cannot use the Lindberg decals

I had picked out. Even though they are both "1/48" scale, they are just a bit too big and no amount of adjusting will they fit in that area, SO plan B. Put the crappy kit decals on and hope for no silvering!
I did find some Tamiya stars to slap on the side but we'll see.
~ Jeff
Had to snipp off the kit's plastic version.
They look "alright":
And closer:
Still need to paint them.
Had one casualty ...... I cannot use the Lindberg decals
I had picked out. Even though they are both "1/48" scale, they are just a bit too big and no amount of adjusting will they fit in that area, SO plan B. Put the crappy kit decals on and hope for no silvering!
I did find some Tamiya stars to slap on the side but we'll see.
~ Jeff
PantherF
Joined: June 10, 2005
KitMaker: 6,188 posts
Armorama: 5,960 posts
Posted: Saturday, July 21, 2012 - 09:49 PM UTC
Sealed the decals... so far so, okay.


Now for some detailing paint, main rotor and flat coat... then the clear parts.
~ Jeff
Now for some detailing paint, main rotor and flat coat... then the clear parts.
~ Jeff
imatanker
Joined: February 11, 2011
KitMaker: 1,654 posts
Armorama: 1,565 posts
Posted: Saturday, July 21, 2012 - 10:11 PM UTC
Jeff S... Nice work on the MGs and decals,they look great.Did you use any type of setting solution on the markings?Jeff T.
PantherF
Joined: June 10, 2005
KitMaker: 6,188 posts
Armorama: 5,960 posts
Posted: Saturday, July 21, 2012 - 10:17 PM UTC
Quoted Text
Jeff S... Nice work on the MGs and decals,they look great.Did you use any type of setting solution on the markings?Jeff T.
Ooooh yes. My good friend Micro Set by Microscale. The AURORA decals are a bit thick but look okay and have not silvered... yet.
It's going too smooth. Something is going to go wrong soon, I can feel it.
Thanks for commenting!
~ Jeff
PantherF
Joined: June 10, 2005
KitMaker: 6,188 posts
Armorama: 5,960 posts
Posted: Sunday, July 22, 2012 - 01:27 AM UTC
Took the tape off and put down a coat of DULL COTE.

Prepped and painted the main rotor blade. Need to do some touch-up painting and put on the clear parts.
~ Jeff
Prepped and painted the main rotor blade. Need to do some touch-up painting and put on the clear parts.
~ Jeff
Dangeroo

#023

Joined: March 13, 2009
KitMaker: 2,058 posts
Armorama: 1,656 posts

Posted: Sunday, July 22, 2012 - 06:48 AM UTC
Evenin' gents!
So, I finally made it...
Here's my start pic (sorry, it's blurry but I couldn't tell on the camera and it's too late now...):

And I made a quick start. After the DML 1/350 scale Independence I almost forgot how quick these Tamiya thingies build...

Glad to finally join! This will be a quick OOB build with minimal weathering and sometime I will do a dio with it and some other vehicle (M4, M8 or M10). Maybe 1/48 scale campaign III?
Cheers!
Stefan
So, I finally made it...
Here's my start pic (sorry, it's blurry but I couldn't tell on the camera and it's too late now...):
And I made a quick start. After the DML 1/350 scale Independence I almost forgot how quick these Tamiya thingies build...
Glad to finally join! This will be a quick OOB build with minimal weathering and sometime I will do a dio with it and some other vehicle (M4, M8 or M10). Maybe 1/48 scale campaign III?
Cheers!
Stefan
Scouteyes
Joined: November 07, 2010
KitMaker: 247 posts
Armorama: 208 posts

Posted: Sunday, July 22, 2012 - 10:27 AM UTC
Welcome Stefan! I came in a bit late too, and the heat-wave in my attic man-cave has caused me to pause a bit, but there's plenty of time left.
GregCloseCombat
Joined: June 30, 2008
KitMaker: 2,408 posts
Armorama: 2,394 posts
Posted: Sunday, July 22, 2012 - 04:55 PM UTC
minifleas - I used testors clear gloss to get 'wet' mud, street, walls, tires, etc in this M8 diorama I did last (first) 48th campaign.

Pete - is that a jigsaw? that would do it
Jeff - great progress, almost there
Stefan - plenty of time to finish that jeep to where you want it. I'm sure we can find a 'volunteer' to host the 48th campaign pt 3
Pete - is that a jigsaw? that would do it
Jeff - great progress, almost there
Stefan - plenty of time to finish that jeep to where you want it. I'm sure we can find a 'volunteer' to host the 48th campaign pt 3
SaxonTheShiba
Joined: February 01, 2009
KitMaker: 1,233 posts
Armorama: 557 posts
Posted: Monday, July 23, 2012 - 11:48 AM UTC
Jeff S.----Cobra looks good and hat's off with being able to get the Aurora decals to work!!!
Regards, Ian
Regards, Ian

tinbanger

Joined: February 04, 2008
KitMaker: 2,507 posts
Armorama: 88 posts

Posted: Monday, July 23, 2012 - 12:42 PM UTC
Hi All.
Here is my entry:-


Here is my entry:-

 |

WEB HOSTING BY


Copyright ©2021 Armorama and Kitmaker Network, a subsidiary of Silver Star Enterprises
All Rights Reserved. Please read our Conditions of Use and Privacy Policy.
All Rights Reserved. Please read our Conditions of Use and Privacy Policy.