

Hosted by Richard S.
Panzer IV Campaign

Sleepwalker71

Joined: August 30, 2012
KitMaker: 265 posts
Armorama: 186 posts

Posted: Sunday, November 30, 2014 - 01:44 PM UTC
Please ignore my previous "tip". I have a mistake there. Now correcting it.

Namabiiru

#399

Joined: March 05, 2014
KitMaker: 2,888 posts
Armorama: 1,920 posts

Posted: Sunday, November 30, 2014 - 02:48 PM UTC
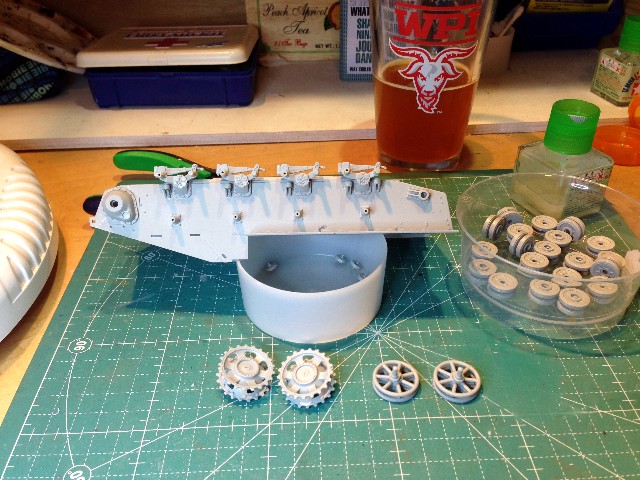
Bob and David are absolutely right about the Dragon Hummel kit being a very nice kit. Got started on the suspension, and so far it is so much better than the last DML kit I put together. The detail on this one is superb and the parts fit is fantastic. The only "issue" I have found so far is that the taper on the axles is just a little too much to ensure a nice snug fit on the road wheels. A wind of masking tape seems to tighten up the resulting wobble nicely.
If anyone is still trying to decide on a kit for this build I can heartily endorse this one!

If anyone is still trying to decide on a kit for this build I can heartily endorse this one!
ZAPanzer

Joined: September 12, 2012
KitMaker: 88 posts
Armorama: 49 posts
Posted: Sunday, November 30, 2014 - 04:32 PM UTC
Hi
My start picture, my first Hummel, so looking forward to it.

My start picture, my first Hummel, so looking forward to it.

Namabiiru
#399
Joined: March 05, 2014
KitMaker: 2,888 posts
Armorama: 1,920 posts
Posted: Sunday, November 30, 2014 - 05:09 PM UTC
First WIP update photo: Suspension is all a-tanto and ready for laying some smart track.

WARDUKWNZ

Joined: June 01, 2011
KitMaker: 1,716 posts
Armorama: 1,638 posts

Posted: Sunday, November 30, 2014 - 06:33 PM UTC
Up date time ... first off cutting the chassis and extending it and then cutting the angle ,, that went without a problem .


You can see in this pic how much longer the chassis is now over the stock one ,the eagle eyed amongst you will notice the pieces glued to the hull to reshape the chassis ..i made the first cut lower deliberately to make it easier for me to figure out how high i needed to go to get the right angle ..yip its strange but it works for me


I also paid some attention to the gun as well .. thats now mounted and looking pretty damn mean .

But there has been even more work done ..right now having a wee problem sleeping so i did some more to this this morning ..its 2.20am here right now and starting to get tired so sleep might not be far away

Next i got to mount the return roller mounts and wheels .. but i have to wait for the putty to dry first and i am not going to make it super smooth or clean as there is going to be a light covering of mud and dirt .
More to follow soon guys .
Phill

Removed by original poster on 12/02/14 - 02:39:24 (GMT).

TheMedic
Joined: March 05, 2005
KitMaker: 37 posts
Armorama: 31 posts
Posted: Monday, December 01, 2014 - 07:47 AM UTC
Here's my start up photo for the campaign. Looking forward to this build.
it's a 1/35 Dragon Sturmpanzer IV 'Brummbar' Late.

it's a 1/35 Dragon Sturmpanzer IV 'Brummbar' Late.

spongya


Joined: February 01, 2005
KitMaker: 2,365 posts
Armorama: 1,709 posts

Posted: Monday, December 01, 2014 - 06:45 PM UTC
The Schmallturm conversion:
CMK set

contents

Assembled model: the texture on the turret is really nice

First paint layer. The two parts of the hull are not yet glued together

CMK set
contents
Assembled model: the texture on the turret is really nice
First paint layer. The two parts of the hull are not yet glued together

Tojo72
Joined: June 06, 2006
KitMaker: 4,691 posts
Armorama: 3,509 posts
Posted: Wednesday, December 03, 2014 - 12:07 AM UTC
All finished !!! Painted with mostly Tamiya paint,weathered with AK and Mig Products.A great kit to build,very detailed,no issues for me except a ton of fiddly PE some of which I left off.I would highly recommend this kit.


ltb073
Joined: March 08, 2010
KitMaker: 3,662 posts
Armorama: 3,078 posts
Posted: Wednesday, December 03, 2014 - 03:26 AM UTC
Looks great Anthony nice job on the camo

nng-nng

Joined: October 22, 2013
KitMaker: 380 posts
Armorama: 376 posts
Posted: Wednesday, December 03, 2014 - 03:44 AM UTC
Oh common Anthony. You´re already done and I haven´t really decided which kit to use... 
Glad to hear the kit is a good one, was one of my possible options. But I think I´m leaning more twoards a E with Vorpanzer. Just for the badass look:

Glad to hear the kit is a good one, was one of my possible options. But I think I´m leaning more twoards a E with Vorpanzer. Just for the badass look:
Namabiiru
#399
Joined: March 05, 2014
KitMaker: 2,888 posts
Armorama: 1,920 posts
Posted: Wednesday, December 03, 2014 - 04:08 AM UTC
I think they could have done more with the weathering, Fabian. The markings look too bright to me 

Tojo72
Joined: June 06, 2006
KitMaker: 4,691 posts
Armorama: 3,509 posts
Posted: Wednesday, December 03, 2014 - 04:26 AM UTC
Quoted Text
Oh common Anthony. You´re already done and I haven´t really decided which kit to use...
Glad to hear the kit is a good one, was one of my possible options. But I think I´m leaning more twoards a E with Vorpanzer. Just for the badass look:
Thank you Fabian, I did the Vorpanzer a few years ago, another highly detailed but enjoyable kit.Have fun with it.
Namabiiru
#399
Joined: March 05, 2014
KitMaker: 2,888 posts
Armorama: 1,920 posts
Posted: Wednesday, December 03, 2014 - 02:39 PM UTC
Hoping some of you Pz IV experts out there can give me some guidance. As I was working on the undercarriage for my Hummel, I noticed that every image of the return rollers, whether in the instructions or the box art, look like the steel type return rollers; whereas the return rollers actually included in the kit are the style with rubber tires on them. It looks to me like maybe the Nashorn had the rubberized return rollers, while Hummel had steel rollers.  Is that actually the case? Would a Hummel with rubber return rollers be wrong?
Is that actually the case? Would a Hummel with rubber return rollers be wrong? WARDUKWNZ
Joined: June 01, 2011
KitMaker: 1,716 posts
Armorama: 1,638 posts
Posted: Wednesday, December 03, 2014 - 03:12 PM UTC
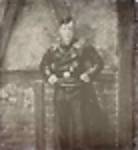
Mark ,,The answer to your is yes ...the Hummel with rubber return rollers is totally fine ..the Hummel was built with both and here is a pic of one in Russia in 1944 to prove it .

So feel safe mate ..your all good to go
Phill

So feel safe mate ..your all good to go
Phill
Namabiiru
#399
Joined: March 05, 2014
KitMaker: 2,888 posts
Armorama: 1,920 posts
Posted: Wednesday, December 03, 2014 - 05:47 PM UTC
Awesome, Phill! Thanks!

BravoTwoZero
Joined: June 11, 2009
KitMaker: 461 posts
Armorama: 370 posts
Posted: Thursday, December 04, 2014 - 05:13 AM UTC
I have completed building this kit. Here are progress photos of my 1/72 Mobelwagen.


And here are pictures of the gun.


This is a very nice kit. A little challenging to build but the fine details look great. This is now ready for priming and base coating.
And here are pictures of the gun.
This is a very nice kit. A little challenging to build but the fine details look great. This is now ready for priming and base coating.

shorty53
#330

Joined: July 15, 2011
KitMaker: 175 posts
Armorama: 72 posts

Posted: Saturday, December 06, 2014 - 04:29 PM UTC
Pz.Kpfw.IV Ausf.F2(G), some more steps.
Step3

Step4

Step5

Step6

Step3
Step4
Step5
Step6
Avarice
Joined: February 20, 2014
KitMaker: 26 posts
Armorama: 26 posts
Posted: Saturday, December 06, 2014 - 05:13 PM UTC
Playing catch up here... these photos were take last week.
upper deck

suspension arms

turret

Box of wheels and bits

upper deck
suspension arms
turret
Box of wheels and bits

cacciacarri

Joined: March 18, 2007
KitMaker: 91 posts
Armorama: 88 posts
Posted: Saturday, December 06, 2014 - 05:42 PM UTC
Hi Guys,
Finally the first steps.
Here are some photos of my Pz.Kpfw.IV Ausf.G:


cheers
Antonio
Finally the first steps.
Here are some photos of my Pz.Kpfw.IV Ausf.G:


cheers
Antonio
WARDUKWNZ
Joined: June 01, 2011
KitMaker: 1,716 posts
Armorama: 1,638 posts
Posted: Sunday, December 07, 2014 - 03:32 PM UTC
Been doing more work on my Waffenträger auf pz. iv and this is what is looks like so far .


I did some work on the engine cover ..replaced it with a resin one i found in the parts box .

Because of the shield i had to modify the ram mounts on the gun .

And just for a little bling .. some PE guards and other things to still be added which it will be soon enough .

More to follow soon .
Phill

ColinEdm

Joined: October 15, 2013
KitMaker: 1,355 posts
Armorama: 1,229 posts
Posted: Sunday, December 07, 2014 - 05:46 PM UTC
Great work so far Phil!

Nito74

Joined: March 04, 2008
KitMaker: 5,386 posts
Armorama: 4,727 posts
Posted: Sunday, December 07, 2014 - 06:23 PM UTC
Phill, that's huge..
Are you sure you won't need another set of wheels ?
Are you sure you won't need another set of wheels ?
Nito74
Joined: March 04, 2008
KitMaker: 5,386 posts
Armorama: 4,727 posts
Posted: Monday, December 08, 2014 - 02:25 AM UTC
Update:


wrenchy
Joined: April 23, 2006
KitMaker: 140 posts
Armorama: 46 posts
Posted: Monday, December 08, 2014 - 07:14 AM UTC
A little progress. The TMD turret roof and front/ rear hull pieces fit great. It will be getting turret schurtzen and Fruil Winterketten. There's a pic in the Squadron Panzer IV in action of a similarly equipped tank that I've wanted to build for years.

 |

WEB HOSTING BY


Copyright ©2021 Armorama and Kitmaker Network, a subsidiary of Silver Star Enterprises
All Rights Reserved. Please read our Conditions of Use and Privacy Policy.
All Rights Reserved. Please read our Conditions of Use and Privacy Policy.