Louisiana, United States
Joined: March 06, 2010
KitMaker: 3,128 posts
Armorama: 2,959 posts
Posted: Monday, December 08, 2014 - 08:05 AM UTC
Looks like lots of great starts here!
I better go find the kit that I'll build for this one!


@Antonio; your G rear plate looks like a good clean start indeed - seeing that big exhaust can reminds me...
So, @ALL who find themselves building a IV with one of those large exhaust cans... the stack or pipe was really pretty thin-wall - not that massive-looking pipe we get in these Dragon kits. It will look much better were the hole reamed out and walls thinned a bit. That, and the opening seems to often have been bent, etc.
The IV's are really clanking along!

Bob

Michigan, United States
Joined: May 12, 2014
KitMaker: 105 posts
Armorama: 68 posts
Posted: Tuesday, December 09, 2014 - 07:12 AM UTC
Heaven help me, but here's my entry. Dragon Jagdpanzer IV L/70(V) This will be a serious challenge for me. I've done some PE work and I've tackled Friuls before, but I've never done PE this advanced. I'll be practicing my soldering skills on some scrap before I get too deep into this one.
Any general tips on super-detailing with PE?
Overall:

Griffon Model detail set with barrel:
 Stacks
 of PE:

Griffon barrel:

Friuls:

Date stamp:

Wish me luck!
North-West, South Africa
Joined: September 12, 2012
KitMaker: 88 posts
Armorama: 49 posts
Posted: Tuesday, December 09, 2014 - 11:00 AM UTC
@Chuck - Good Luck, I'm doing the Dragon Hummel (my first Dragon kit) and PE aside Dragon kits just have so much more detail than other brands. I have always been Tamiya fan - because the fit together perfectly and minimal putty.
Cheers
Rob
Namabiiru
 Associate Editor
#399
Rhode Island, United States
Joined: March 05, 2014
KitMaker: 2,888 posts
Armorama: 1,920 posts
Posted: Wednesday, December 10, 2014 - 04:05 AM UTC
Quoted Text
@Chuck - Good Luck, I'm doing the Dragon Hummel (my first Dragon kit) and PE aside Dragon kits just have so much more detail than other brands. I have always been Tamiya fan - because the fit together perfectly and minimal putty.
Cheers
Rob
Couldn't agree more, Rob. Tamiya has consistently good offerings, if somewhat lacking in detail. Dragon has great detail, but unfortunately seems to manage to work a variety of blunders into many of their kits, particularly where the instructions are concerned--at least, that has been my experience.
I've already found some issues with the Hummel--which I am also doing for this campaign--but so far nothing heart-breaking, as I have found in some other DML kits.

Auckland, New Zealand
Joined: June 01, 2011
KitMaker: 1,716 posts
Armorama: 1,638 posts
Posted: Wednesday, December 10, 2014 - 09:55 AM UTC
Mark i am also in agreement here... Dragon is a strange one ..they do awesome detail but miss the simple things or they make something simple to simple and totally lacking the right detail .
I have a 3n1 Panzer IV Ausf E (6264) and oh momma has it got detail ..even the final drives are detailed inside and out ..perfect for a broken down tank ..yet i have built others and its like its made by someone else and then Dragon put their name on it ..yet its a total Dragon kit ..not like their early SU76 .
But at the end of the day ...its never something that nasty so i will keep buying them and building them .
Phill
I know the voices ain't real but they do come up with some great ideas
Never trust a man who left alone with a tea cozy and doesn't try it on ( Billy Connolly )
Overkill is often very understated
Auckland, New Zealand
Joined: June 01, 2011
KitMaker: 1,716 posts
Armorama: 1,638 posts
Posted: Saturday, December 13, 2014 - 08:46 AM UTC
Update time ...been kinda busy with work being this close to xmas .. but still managed to get some things done
First off the tracks ..

And the two hundred million little sprues i had to remove the tracks from ...

Before you ask ...yes it did take ages to removed all those 220 links ,6 cuts per track link .. do the math
Now for the end result .


Did a little work on the track guard as well ..give it a more used look and there is more to go on that yet too.

Finally got around to the gun mount and the exhaust too ..


More to follow soon guys
I know the voices ain't real but they do come up with some great ideas
Never trust a man who left alone with a tea cozy and doesn't try it on ( Billy Connolly )
Overkill is often very understated
Uusimaa, Finland
Joined: October 22, 2012
KitMaker: 1,194 posts
Armorama: 1,077 posts
Posted: Saturday, December 13, 2014 - 03:00 PM UTC
That's coming along well and those tracks look quite nice, I may need to pick up a set.
Kimmo
There is a time to laugh and a time not to laugh, and this is not one of them.
Auckland, New Zealand
Joined: June 01, 2011
KitMaker: 1,716 posts
Armorama: 1,638 posts
Posted: Saturday, December 13, 2014 - 04:07 PM UTC
Kimmo untill a couple of days ago i had never heard of these tracks and when they where handed to me my first thought was " oh crap"
But surprise surprise these went together without a single problem at all ..i didnt need to redrill a single hole and the pins are .3mm brass tubing and they give you plenty of it ..i still have a nice little pile of it left over as it comes in lengths so my .3 mm brass tubing has been resupplied nicely
If you wanna try a set as winter and ost ketten plastic tracks are not that common ..get em mate ..you wont regret it .
They fit the Tamiya drive sprocket perfectly but you will need to file a very small amount of plastic from between the road wheels ,,that took all of 10 mins to fix
..i am most happy with these .
Phill
I know the voices ain't real but they do come up with some great ideas
Never trust a man who left alone with a tea cozy and doesn't try it on ( Billy Connolly )
Overkill is often very understated
ColinEdm
Associate Editor Alberta, Canada
Joined: October 15, 2013
KitMaker: 1,355 posts
Armorama: 1,229 posts
Posted: Saturday, December 13, 2014 - 08:09 PM UTC
Phil, you beat me to the tracks! I was finishing off my Panther and have just started on those. I agree, cleaning them up off the sprues is very tedious but the end result is worth it, and they fit both the Tamiya and Dragon late sprockets. Kimmo, well worth it.
The voices are back.....excellent....
Uusimaa, Finland
Joined: October 22, 2012
KitMaker: 1,194 posts
Armorama: 1,077 posts
Posted: Saturday, December 13, 2014 - 08:15 PM UTC
Thanks guys, I've been waiting for someone to use these as I keep seeing them on ebay pretty cheap.
Kimmo
There is a time to laugh and a time not to laugh, and this is not one of them.
Lisboa, Portugal
Joined: March 04, 2008
KitMaker: 5,386 posts
Armorama: 4,727 posts
Posted: Saturday, December 13, 2014 - 09:06 PM UTC
update, turret ready...


Turret ready on a Centurion's hull

and on it own hull

Active Builds: 0
Active Campaigns: 0
Minnesota, United States
Joined: October 01, 2008
KitMaker: 597 posts
Armorama: 439 posts
Posted: Sunday, December 14, 2014 - 08:15 PM UTC
Sorry for the "incommunicado" status lately as end of the year projects at work have taken up the bulk of my time. I was able to get some time at the bench this weekend, and get the ambush scheme on my Wirbelwind.
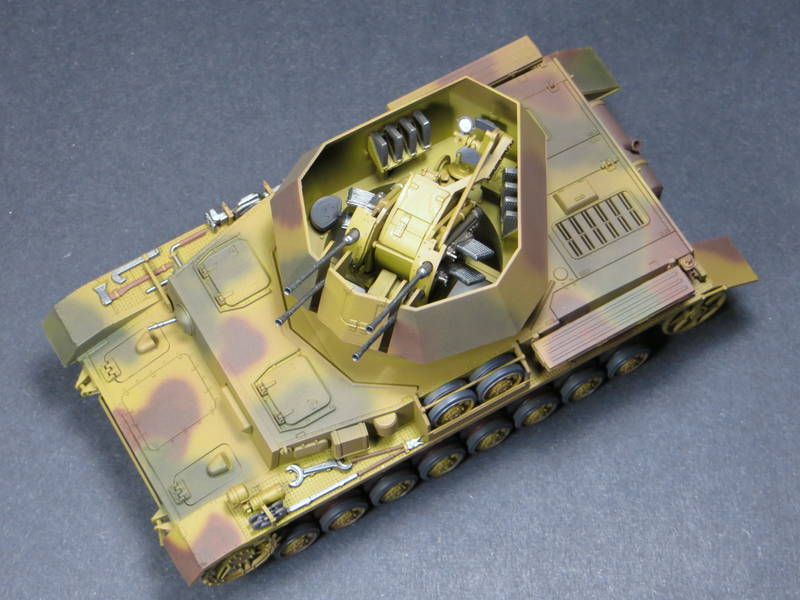
I tried to use German Camo Brown as an overall mist coat to tie in the three colors, soften up the camo lines and knock the yellow down a bit in brightness. I also decided to use the kit supplied tracks, and they have been primed and given the first coat of Metallic Gray.
EWC(SW/AW) USN 1990-2005
IPMS #46275
Michigan, United States
Joined: May 12, 2014
KitMaker: 105 posts
Armorama: 68 posts
Posted: Monday, December 15, 2014 - 09:26 PM UTC
Looking good, Matt. I like the interior detail.
Here's a progress shot on mine. Slowly pushing through the detail build. Rear plate is done.

Wheels are done.

Had to remove the molded-on sponson gusset plate as it'll be replaced by PE in a later step.


Bending the radio mount brackets, of which there are 8.

Tiny little buggers.
South Australia, Australia
Joined: February 20, 2014
KitMaker: 26 posts
Armorama: 26 posts
Posted: Tuesday, December 16, 2014 - 05:26 PM UTC
Minnesota, United States
Joined: October 01, 2008
KitMaker: 597 posts
Armorama: 439 posts
Posted: Tuesday, December 16, 2014 - 07:32 PM UTC
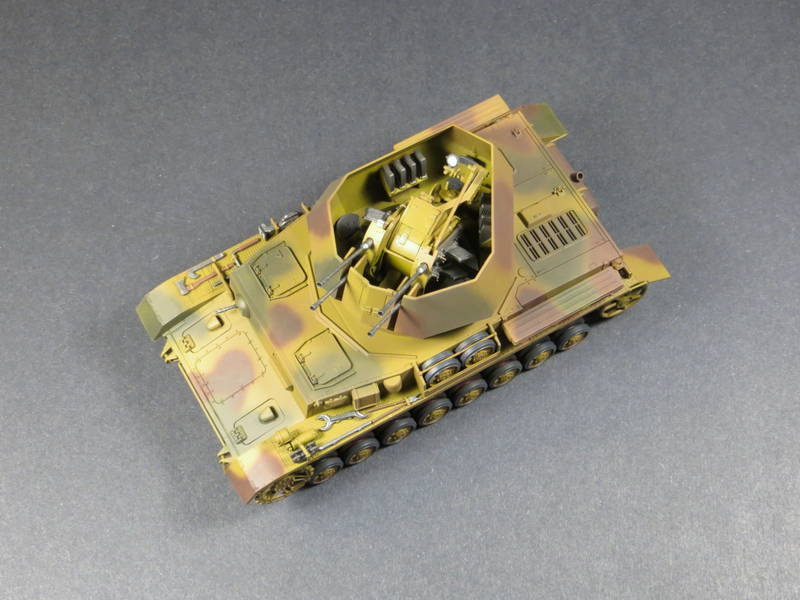
Finished up last night. Nothing really major, decided to keep the kit tracks on this one and use my Pz IV Magic Tracks on a possible second build for the campaign.
Weathering was kept to a very minimum, and decal application was pretty straight forward, with only 4 being used.
This is the finished product, which will be the first project I've worked on since January of this year... I'll post one of the last two in the campaign gallery once it's back online.


EWC(SW/AW) USN 1990-2005
IPMS #46275
ColinEdm
Associate Editor Alberta, Canada
Joined: October 15, 2013
KitMaker: 1,355 posts
Armorama: 1,229 posts
Posted: Thursday, December 18, 2014 - 09:22 AM UTC
Finally an update on mine, feeling like an underachiever seeing all the others! Got the lower hull for my Mobelwagen done, and finally finished off my Kaizen tracks and test fitted them. On to the upper hull and gun!


The voices are back.....excellent....
#041
Kobenhavn, Denmark
Joined: July 20, 2006
KitMaker: 10,069 posts
Armorama: 4,677 posts
Posted: Thursday, December 18, 2014 - 04:33 PM UTC
Nice build, Matt. A very clean looking machine, but that is also nice once in a while.

Nice job on the tracks, Colin.
Campaign'oholic - 252+ campaigns completed
Louisiana, United States
Joined: March 06, 2010
KitMaker: 3,128 posts
Armorama: 2,959 posts
Posted: Thursday, December 18, 2014 - 10:44 PM UTC
Looking Good, Colin!
Those Kaizen tracks do appear to come out quite nice... think I'll get me a set or 2!
IF you can, at this point, may I suggest that you please take one or 2 links out? That sag looks very dangerous, and Pz IV pics generally show tracks were rather tighter than that! The Pz IV had easy-to-use track-tensioners and crew were doubtless trained to keep stuff fairly snug to avoid the embarrassment of shedding a track in a turn!
Cheers!
Bob
ColinEdm
Associate Editor Alberta, Canada
Joined: October 15, 2013
KitMaker: 1,355 posts
Armorama: 1,229 posts
Posted: Friday, December 19, 2014 - 03:16 AM UTC
Thanks Bob, I was thinking much the same thing about taking one or two of the links out. Since I finished them I have been looking at reference pics and it would appear that I indeed have too much sag, an easy fix!
The voices are back.....excellent....
Canelones, Uruguay
Joined: December 27, 2006
KitMaker: 773 posts
Armorama: 765 posts
Posted: Friday, December 19, 2014 - 05:39 PM UTC
Wow, nice subjects and works.
I apply with the Cyberhobby Jagdpanzer IV L/70 V
Regars from the south
Alvaro

Namabiiru
Associate Editor #399
Rhode Island, United States
Joined: March 05, 2014
KitMaker: 2,888 posts
Armorama: 1,920 posts
Posted: Thursday, December 25, 2014 - 12:02 PM UTC
Looks like several of us are working on Nashorns or Hummels so I'll through this question out, hopefully to the benefit of all.
I'm struggling with the best way to do the interior of the fighting compartment. If I assemble everything first it looks like it will be a bear to paint, but it doesn't seem like I can easily build the superstructure, paint it, then attach it to the hull like I would do with an Sdkfz 250. the best approach I can think of so far is to paint as many of the pieces as I can, assemble them, and then do a whole bunch of touching up. Anyone got any ideas/experience that might help?
Auckland, New Zealand
Joined: June 01, 2011
KitMaker: 1,716 posts
Armorama: 1,638 posts
Posted: Thursday, December 25, 2014 - 12:48 PM UTC
First of all Mark leave out the gun .. the ammo rack mounted on the right hand rear side can be painted with it in place .the bases of the shells can be painted with it in place with ease..the boxes mounted near the gun on the left up front would be better painted outside of the tank then glued in place ..other than that its pretty easy to paint the inside on the fighting compartment on a Hummel ..there aint much in it
Phill
I know the voices ain't real but they do come up with some great ideas
Never trust a man who left alone with a tea cozy and doesn't try it on ( Billy Connolly )
Overkill is often very understated
Namabiiru
Associate Editor #399
Rhode Island, United States
Joined: March 05, 2014
KitMaker: 2,888 posts
Armorama: 1,920 posts
Posted: Thursday, December 25, 2014 - 02:54 PM UTC
Quoted Text
First of all Mark leave out the gun .. the ammo rack mounted on the right hand rear side can be painted with it in place .the bases of the shells can be painted with it in place with ease..the boxes mounted near the gun on the left up front would be better painted outside of the tank then glued in place ..other than that its pretty easy to paint the inside on the fighting compartment on a Hummel ..there aint much in it
Phill
Thanks, Phil.
Yeah, the ammo boxes don't seem to be a big issue. I think I'm mainly concerned with the triangular braces toward the front of the fighting compartment, and especially the MP40 racks attached to them--if I paint those separately I'm not sure I can get them in there once the sides are in place.
Auckland, New Zealand
Joined: June 01, 2011
KitMaker: 1,716 posts
Armorama: 1,638 posts
Posted: Thursday, December 25, 2014 - 03:19 PM UTC
From what i can see the best way to get around that problem would be to leave the front of the shields off .. paint the Mp40 and the side frames then glue the front of the shields in ,,one idea is paint the inside of the front pieces then glue them back in place with Tamiya extra thin ..wont knacker the paint and will glue pretty fast if you clean the edges of paint .
Oh same with the rear panel too..there is a Mp 40 there to i think if i remember it right .
Phill
I know the voices ain't real but they do come up with some great ideas
Never trust a man who left alone with a tea cozy and doesn't try it on ( Billy Connolly )
Overkill is often very understated
Michigan, United States
Joined: May 12, 2014
KitMaker: 105 posts
Armorama: 68 posts
Posted: Saturday, December 27, 2014 - 05:31 AM UTC